前言:微服务架构,不可避免的存在单个微服务有多个实例,那么客户端如何将请求分摊到多个微服务的实例上呢?这里我们就需要使用负载均衡了
一、Ribbon简介
Ribbon是Netflix发布的负载均衡器,它有助于控制HTTP和TCP客户端的行为。为Ribbon配置服务提供者地址列表后,Ribbon就可基于某种负载均衡算法,自动地帮助服务消费者去请求。Ribbon默认为我们提供了很多的负载均衡算法,例如:轮询,随机等,也可自定义;
Ribbon的GitHub:https://github.com/Netflix/ribbon
而在SpringCloud中使用Ribbon和Eureka时,Ribbon会自动从EurekaServer中获取服务提供者地址列表,并基于负载均衡算法。
二、Ribbon实战
1、创建EurekaServer,EurekaClient1,EurekaClient2,之前已经说过了Eureka的使用,这里直接上代码:
EurekaServer:
 ServerApplication.java
pom.xml
application.properties
EurekaClient1:
pom.xml
application.properties
而在启动类中加入RestTemplate远程调用实例到容器中,并且添加LoadBalanced注解,使RestTemplate具备负载均衡的能力:

@SpringBootApplication
@EnableDiscoveryClient
public class ClientApplication {

    public static void main(String[] args) {
        SpringApplication.run(ClientApplication.class, args);
    }

    /**
     * @Description: 加入@LoadBalanced注解,就可以为RestTemplate加入负载均衡的能力
     * @Param:
     * @return:
     * @Author:
     * @Date: 2018/6/15
     */
    @Bean
    @LoadBalanced
    public RestTemplate getRestTemplate() {
        return new RestTemplate();
    }

}
创建Controller,注入RestTemplate、LoadBalancerClient实例:
package com.cn.controller;

import org.springframework.beans.factory.annotation.Autowired;
import org.springframework.cloud.client.ServiceInstance;
import org.springframework.cloud.client.loadbalancer.LoadBalancerClient;
import org.springframework.stereotype.Controller;
import org.springframework.web.bind.annotation.GetMapping;
import org.springframework.web.bind.annotation.ResponseBody;
import org.springframework.web.client.RestTemplate;

/**
 * @program: springcloud-example
 * @description:
 * @author:
 * @create: 2018-06-15 15:55
 **/
@Controller
public class RibbonController {

    @Autowired
    private LoadBalancerClient loadBalancerClient;

    @Autowired
    private RestTemplate restTemplate;

    @GetMapping("/loadInstance")
    @ResponseBody
    public String loadInstance() {
        ServiceInstance choose = this.loadBalancerClient.choose("client-87");
        System.out.println(choose.getServiceId()+":"+choose.getHost()+":"+choose.getPort());
        return choose.getServiceId() + ":" + choose.getHost() + ":" + choose.getPort();
    }

}
EurekaClient2:
pom.xml与EurekaClient1中一致
application.xml:
server.port=8763
spring.application.name=client-87
eureka.client.service-url.defaultZone=http://localhost:8761/eureka
ClientApplication
ClientController.java:
package com.cn.contorller;

import org.springframework.stereotype.Controller;
import org.springframework.web.bind.annotation.GetMapping;
import org.springframework.web.bind.annotation.ResponseBody;

/**
 * @program: springcloud-example
 * @description:
 * @author:
 * @create: 2018-06-15 16:12
 **/
@Controller
public class ClientController {

    @GetMapping("/getUser")
    @ResponseBody
    public String getUser() {
        System.out.println("获取用户成功");
        return "获取用户成功";
    }

}
2、启动顺序:
①、依次启动EurekaServer =》 EurekaClient1 =》 EurekaClient2 ;
②、然后将EurekaClient2中的application.properties的server.port=8763改为server.port=8764,再次启动该项目;
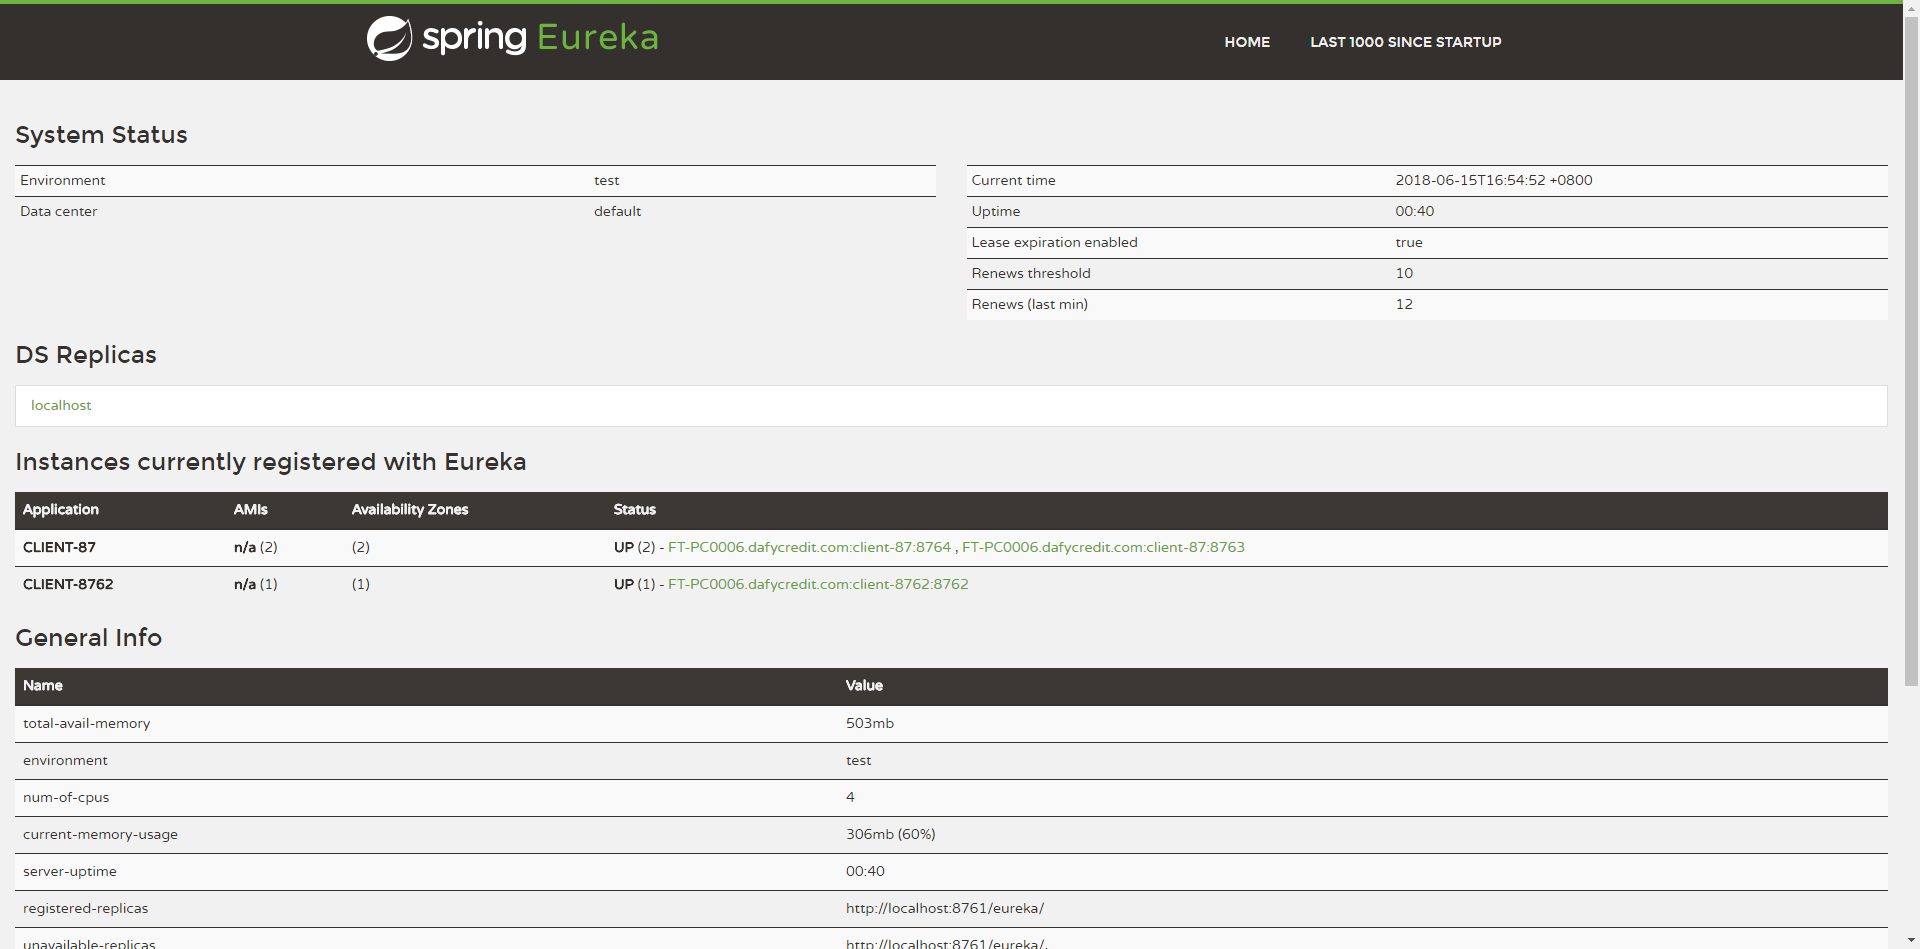
③、打开EurekaServer的配置页面(http://localhost:8761/),如下:
<P><A href="http://www.xasgnanke.com/"><FONT color=#ffffff>郑州男科医院</FONT>
<P><A href="http://www.zztjfk.com/"><FONT color=#ffffff>郑州治疗妇科哪家医院好</FONT>
<P><A href="http://www.zztongjiyiyuan.com/"><FONT color=#ffffff>郑州好的男科医院</FONT>
<P><A href="http://byby.zztjyy.com/"><FONT color=#ffffff>郑州不孕不育医院哪家好</FONT>
<P><A href="http://xzmobile.zztj120.com/"><FONT color=#ffffff>郑州妇科医院</FONT>
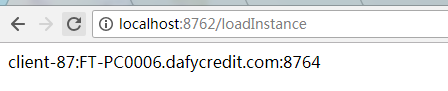
④、我们在地址栏输入http://localhost:8762/loadInstance,多刷新几次,会发现每次调用的端口实例都不同,如下图:

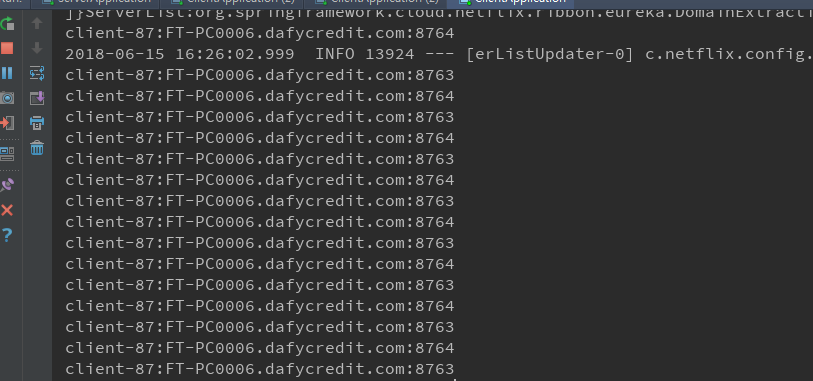
⑤、我们在看控制台,如图:
至此,Ribbon已经入门,是不是很简单,但是这只是最简单的应用,九牛一毛尔...学无止境乎!