前言:
从17年9月份开始断断续续的接触java开发,对java的知识体系了解甚少,都是浮在各种语法的使用上,浅尝则止,使用最多的关键字莫过于String List Map Thread,对java语法体系的内部逻辑没有深入学习过,希望通过笔记分享来加深对java的学习,知其然,知其所以然
今天要分享的知识:java并发编程-volatile、CAS、synchronize
volatile
1、保证可见性:可见性是指当多个线程访问同一个变量时,一个线程修改了这个变量的值,其他线程能够立即看得到修改的值
产生不可见的原因:cpu结构,各个cpu的cache之间数据不可见
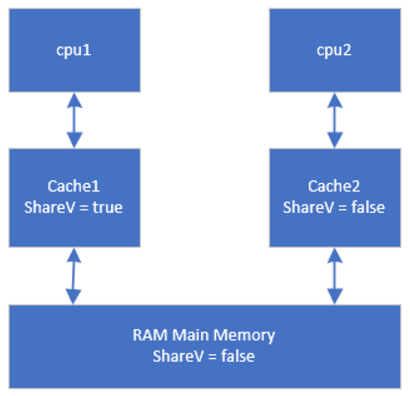
场景:共享变量ShareV = false,线程T1在cpu1上运行,将ShareV修改为true,线程T2在cpu2上运行,通过判断ShareV的值进行逻辑处理,若Cache1中ShareV没有更新到主存,Cache2中ShareV的值仍然为false,导致共享变量的值在多线程下不一致
作用:被定义为volatile的变量在Cache中发生变化时会被立即更新到主存,同时使该值在其他Cache的副本失效,Cache会从主存拉取该变量的最新值
应用实例:
public class VolatileTest {
    private volatile static boolean flag = false;
    public static void main(String[] args) {
        Thread write = new Thread(new Runnable() {
            public void run() {
                // TODO Auto-generated method stub
                flag = true;
            }
        });
        Thread read = new Thread(new Runnable() {
            public void run() {
                while(true) {
                    if(flag) {      //flag保证为最新值
                        System.out.println("do something you want");
                        break;
                    }
                }
            }
        });
        write.start();
        read.start();
    }
}
2、保证有序性:有序性是指在单线程中保证不影响执行结果的前提下,为了提高运行速度,编译器和CPU会将程序编译出的指令重排序,这里的有序保证的是不影响执行结果,而不一定是按照代码的编写顺序执行
重排序导致多线程不安全场景
public class SingleTon {
    public Integer testInt;
    protected SingleTon() {
        testInt = new Integer(1);
    }
    private static SingleTon instance;
    public static SingleTon getInstance() {
        if(instance == null) {                 //第一次判断
            synchronized(SingleTon.class) {
                if(instance == null) {         //第二次判断
                     instance = new SingleTon();
                }
            }
        }
        return instance;
    }
}
问题的根源:
instance = new SingleTon();创建对象时可分解为3行伪代码
memory = allocate() //1:分配对象的内存空间
ctorInstance(memory) //2:初始化对象
instance = memory //3:设置instance指向刚分配的地址
上述3行代码编译器可能会对2、3重排序,先执行3,再执行2,导致多线程不安全
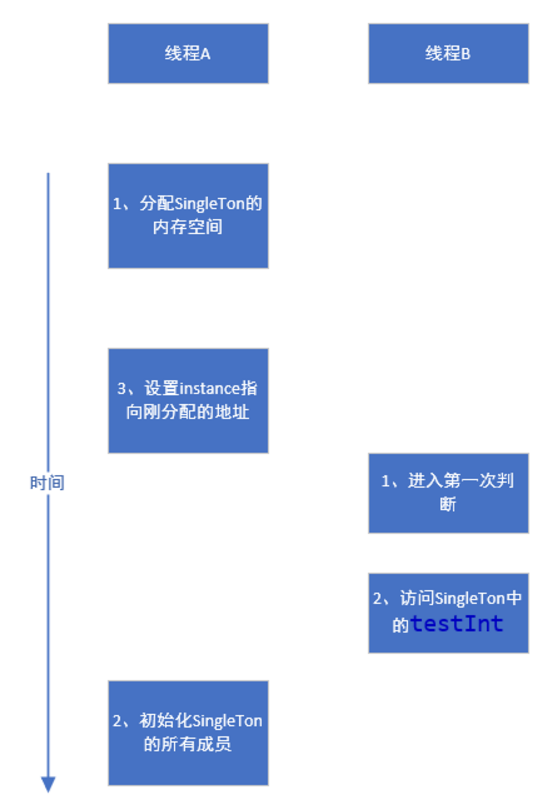
当线程B访问testInt时可能为空
将对象instance加上关键字volatile,可以保证2、3步骤不会被重排序,volatile会使编译器在生成指令时在2、3之间插入内存屏障,屏障前后的指令顺序无法交换
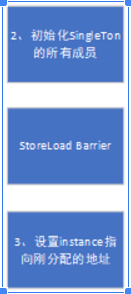
图中的插入屏障后的执行语义:SingleTon中所有的成员都保存(刷新到内存)后,才能给instance赋值
内存屏障类型表:
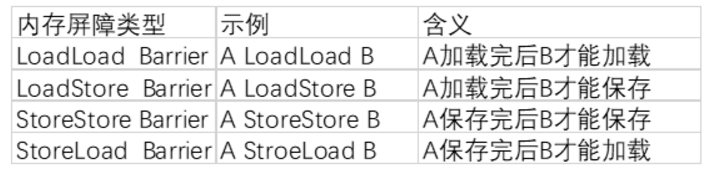
volatile变量插入屏障的场景:
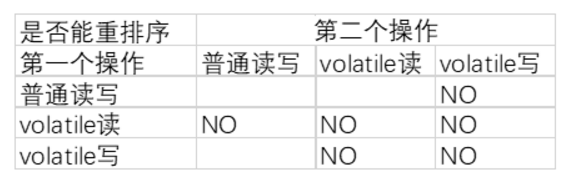
从表中可以看出,第二个操作是对volatile变量写时,第一个操作不管是任何操作都不能重排序,第一个操作是对volatile变量读时,第二个操作不管是任何操作都不能重排序
CAS(compare and swap)
在了解cas前先了解原子操作的方式:
1、锁总线
处理器提供一个总线LOCK信号,当一个处理器在总线上输出此信号时,其他处理器的请求将被阻塞,发出信号的处理器将独占内存
2、锁缓存
处理器提供一个缓存LOCK信号,该缓存的主存所对应的其他cpu下的缓存将被锁定,只有发出信号的处理器能操作此缓存,CMPXCHG就是其中一个信号指令
CAS操作就是利用CMPXCHG指令实现的
CAS语法含义:CAS(expect,update),与期望值expect比较,如果相等,更新为update值,不等,更新失败
应用实例:
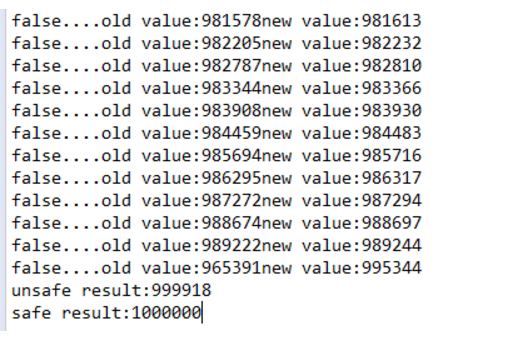
public class Counter {
    private AtomicInteger atomicI = new AtomicInteger(0);
    private volatile int i=0;
    private void unsafecount() {
        i++;
    }
    private void safeCount() {
        for(;;) {
            int i = atomicI.get();
            boolean suc = atomicI.compareAndSet(i, ++i);
            if(suc) {
                break;
            }else {
                System.out.println("false....old value:"+i+"new value:"+atomicI.get());
            }
        }
    }
    public static void main(String[] args) {
        final Counter cas = new Counter();
        List<Thread> ts = new ArrayList<Thread>(600);
        for(int i=0;i<100;i++) {
            Thread t = new Thread(new Runnable() {
                public void run() {
                    for(int i=0;i<10000;i++) {
                        cas.unsafecount();
                        cas.safeCount();
                    }
                }
            });
            ts.add(t);
        }
        for(Thread t : ts) {
            t.start();
        }
        for(Thread t : ts) {
            try {
                t.join();
            } catch (InterruptedException e) {
                // TODO Auto-generated catch block
                e.printStackTrace();
            }
        }
        System.out.println("unsafe result:"+cas.i);
        System.out.println("safe result:"+cas.atomicI.get());
    }
}
AtomicInteger部分源码:
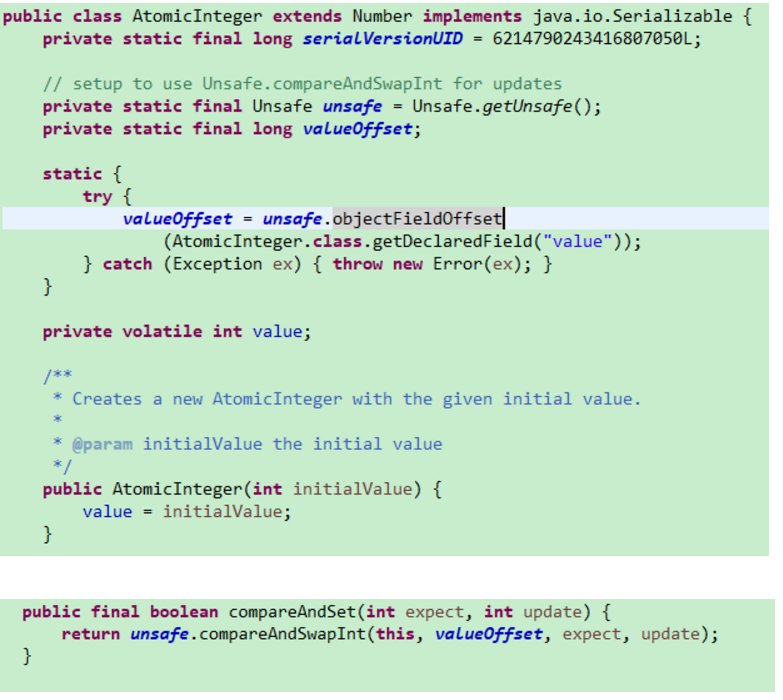
valueOffset为value的地址值
下图为使用cas对volatile int i进行多线程安全操作流程图
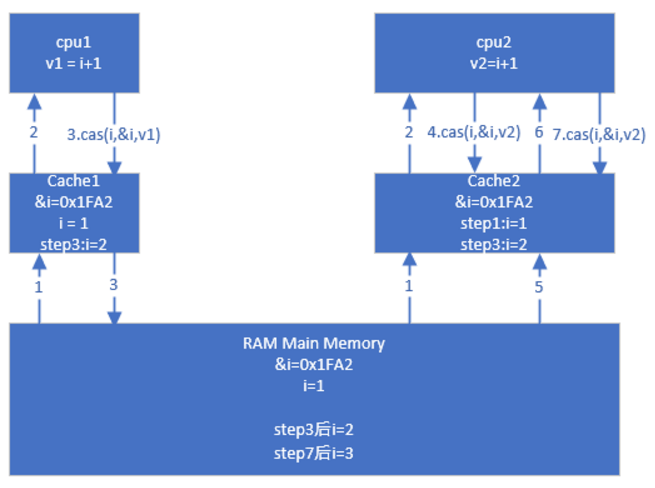
1、获取i的值
2、将i值加1赋值给v1
3、cpu2的cas操作同一个地址,被锁住;cpu1的cas 刷新到缓存,比较i(此处的i为传值操作)的值,和&i地址所指向的值,都为1,将&i地址所指向的值更新为v1,由于v1为volatile,立即刷新到主存,i值更新为2
4、cpu2的cas刷新到缓存,比较i(此处的i为传值操作)的值,和&i地址所指向的值,&i地址指向的值变为2,而传入的i值为1,不相等
5、获取i的值
6、将i值加1赋值给v2
7、cpu2的cas操作,step7后i值为3
从运行结果截图中可以看出,当cas失败时,期望的值和最新的值差值很大了,这是因为step3被执行 了多次之后,step4才被执行
结合volatile和cas是java实现原子操作的基石,整个java并发开发包concurrent都是以volatile和cas为基础开发的
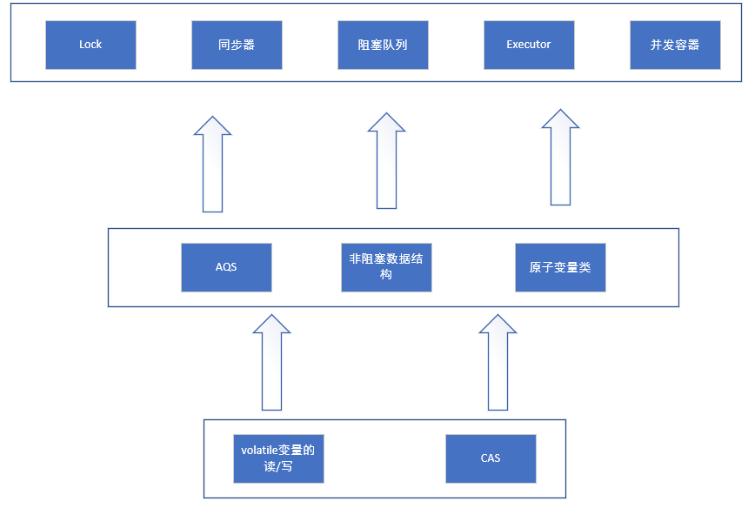
上图中还有很多并发包的知识点,希望后期能够整理成笔记
synchronize
可以保证方法或者代码块在运行时,同一时刻只有一个方法可以进入到临界区,同时它还可以保证共享变量的内存可见性
应用实例
1、锁普通方法
2、锁静态方法
3、锁方法块
public class SynchronizeTest {
    public synchronized void normaltest1() {
        System.out.println("start normaltest1....."+currentTime());
        sleepSeconds(5);
        System.out.println("end normaltest1....."+currentTime());
    }
    public synchronized void normaltest2() {
        System.out.println("start normaltest2....."+currentTime());
        sleepSeconds(5);
        System.out.println("end normaltest2....."+currentTime());
    }

    public synchronized static void staticTest1() {
        System.out.println("start staticTest1....."+currentTime());
        sleepSeconds(5);
        System.out.println("end staticTest1....."+currentTime());
    }
    public synchronized static void staticTest2() {
        System.out.println("start staticTest2....."+currentTime());
        sleepSeconds(5);
        System.out.println("end staticTest2....."+currentTime());
    }

    public void blockTest1() {
        System.out.println("start blockTest1....."+currentTime());
        synchronized(this) {
            sleepSeconds(5);
        }
        System.out.println("end blockTest1....."+currentTime());
    }
    public void blockTest2() {
        System.out.println("start blockTest2....."+currentTime());
        synchronized(this) {
            sleepSeconds(5);
        }
        System.out.println("end blockTest2....."+currentTime());
    }

    public  static void sleepSeconds(int time) {
        try {
            Thread.sleep(time*1000);
        } catch (InterruptedException e) {
            e.printStackTrace();
        }
    }
    public static String currentTime() {
        Date date = new Date();
        SimpleDateFormat format = new SimpleDateFormat("yyyy-MM-dd HH:mm:ss");
        String time = format.format(date.getTime());
        return time;

    }
    public static void main(String[] args) {
        //1.普通方法块,锁normalst对象
        final SynchronizeTest normalst = new SynchronizeTest();
        Thread t1 = new Thread(new Runnable() {
            public void run() {
                normalst.normaltest1();
            }
        });

        Thread t2 = new Thread(new Runnable() {
            public void run() {
                normalst.normaltest2();
            }
        });
        t1.start();
        t2.start();

        //2.静态方法块,锁SynchronizeTest类对象
        final SynchronizeTest staticst1 = new SynchronizeTest();
        final SynchronizeTest staticst2 = new SynchronizeTest();
        Thread t3 = new Thread(new Runnable() {
            public void run() {
                staticst1.staticTest1();
            }
        });

        Thread t4 = new Thread(new Runnable() {
            public void run() {
                staticst2.staticTest2();
            }
        });
        t3.start();
        t4.start();

        //3.代码块,锁代码块上的对象
        final SynchronizeTest blockst = new SynchronizeTest();
        Thread t5 = new Thread(new Runnable() {
            public void run() {
                blockst.blockTest1();
            }
        });
        Thread t6 = new Thread(new Runnable() {
            public void run() {
                blockst.blockTest2();
            }
        });
        t5.start();
        t6.start();
    }
}
运行结果截图:
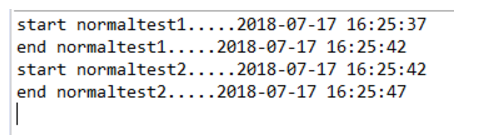
从截图可以看出,两个线程调用同一个对象的两个普通方法,其中一个线程会被阻塞,证明synchronize锁的不是方法,而是对象
synchronize锁对象的原理
java对象内存结构
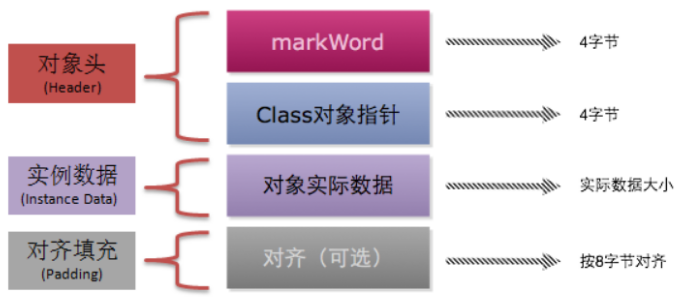
markWord结构:
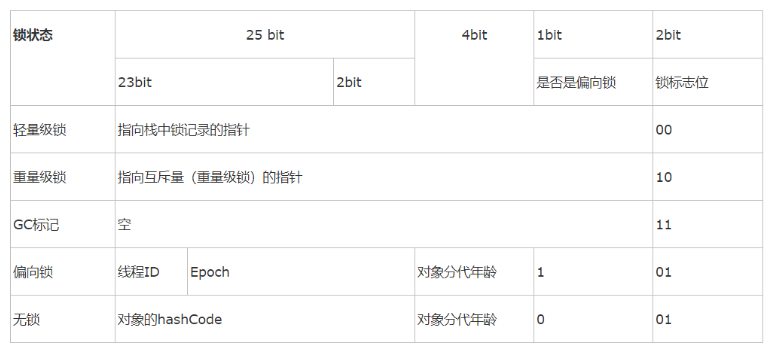
markWord中的数据结构会随着对象被锁的状态发生变化,java SE 1.6之前markWord的四种锁中只有无锁和重量级锁来实现锁多线程机制,但重量级锁使得程序的并发效率很低,由于synchronize性能很低,增加了偏向锁和轻量级锁进行了优化,所以我们重点讲解重量级锁
(这里面还有每种锁在什么状态下触发、锁撤销、锁升级的知识点,感兴趣的同学可以自己查下资料)
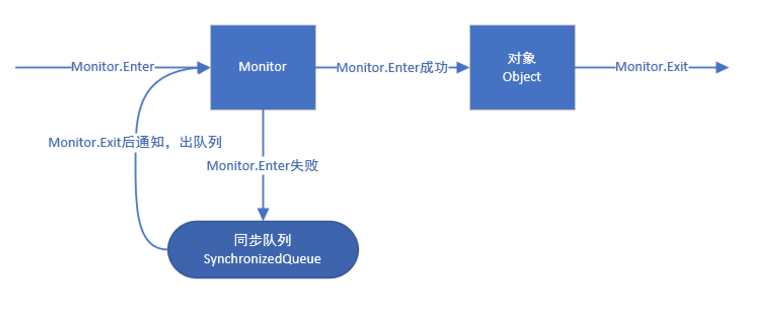
在markword中对象为重量级锁状态时,有一个指向重量级锁的指针,这个指针的值为一个Monitor对象的地址值,每个对象都有一个对应的Monitor对象
通过下面这段代码大致讲述一下获取Monitor对象的流程
public class Monitor {
    public void synTest() {
        synchronized(this) {
            System.out.println("hello...");
        }
    }
    public static void main(String[] args) {
        Monitor m = new Monitor();
        m.synTest();
    }
}
反编译字节码 javap - v Monitor.class
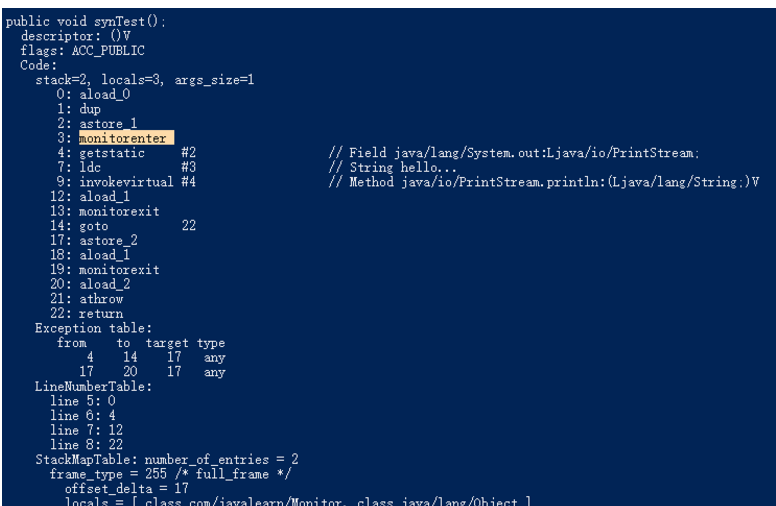
当执行到monitorenter指令时,执行方法的线程必须先获取到改对象的监视器(Monitor对象)才能进入同步块或者同步方法,而没有获取到监视器的线程会被阻塞在入口处,进入BLOCKED状态
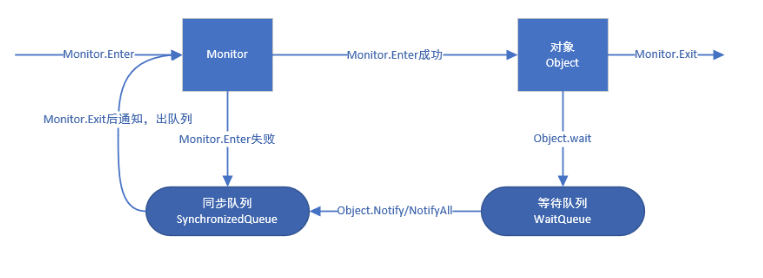
synchronize与wait/notify配合实现等待/通知
代码示例:
public class WaitNotify {
    static volatile boolean flag = true;
    static Object lock = new Object();
    public static class Wait implements Runnable{

        public void run() {
            synchronized(lock) {
                while(flag) {
                    System.out.println("time1:"+currentTime());
                    try {
                        lock.wait();//wait线程进入等待队列
                    } catch (InterruptedException e) {
                        // TODO Auto-generated catch block
                        e.printStackTrace();
                    }
                    System.out.println("time2:"+currentTime());
                }
                System.out.println("time3:"+currentTime());
            }
        }
    }
    public static class Notify implements Runnable{

        public void run() {
            synchronized(lock) {
                System.out.println("time4:"+currentTime());
                lock.notify();//通知后,wait线程从等待队列进入同步队列,所以即使调用notify后,wait线程也是无法获取锁的
                flag = false;
                sleepSeconds(5);
            }
            synchronized(lock) {
                System.out.println("time5:"+currentTime());
            }
        }
    }
    public  static void sleepSeconds(int time) {
        try {
            Thread.sleep(time*1000);
        } catch (InterruptedException e) {
            e.printStackTrace();
        }
    }
    public static String currentTime() {
        Date date = new Date();
        SimpleDateFormat format = new SimpleDateFormat("yyyy-MM-dd HH:mm:ss");
        String time = format.format(date.getTime());
        return time;

    }
    public static void main(String[] args) {
        Thread waitThread = new Thread(new Wait(),"WaitThread");
        waitThread.start();
        Thread notifyThread = new Thread(new Notify(),"NotifyThread");
        notifyThread.start();
    }
}
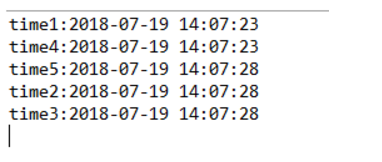
time5、time2时间有可能交换
结尾彩蛋:
i从1累加到1亿,synchronize和AtomicInteger用时对比
public class SynAtomicCompare {
    private  int c1=0;
    private  AtomicInteger c2 = new AtomicInteger(0);
    public void synAdd() {
        synchronized(SynAtomicCompare.class){
            c1++;
        }
    }
    public void aicAdd() {
        c2.getAndAdd(1);
    }
    public void print() {
        System.out.println("c1:"+c1+"c2:"+c2);
    }
    public  class MyThread extends Thread{
        public void run() {
            for(int i=0;i<10000;i++)
                synAdd();//测试synchronized
                //aicAdd();//测试AtomicInteger
        }
    }
    public static void main(String args[]) {
        SynAtomicCompare t = new SynAtomicCompare();
        List<MyThread> list = new ArrayList<MyThread>();
        int threadNum = 10000;
        for(int i=0;i<threadNum;i++) {
            MyThread myThread = t.new MyThread();
            list.add(myThread);
        }

        long start = System.currentTimeMillis();
        for(int i=0;i<threadNum;i++) {
            list.get(i).start();
        }

        for(int i=0;i<threadNum;i++) {
            try {
                list.get(i).join();
            }catch(InterruptedException e) {
                e.printStackTrace();
            }
        }
        long end = System.currentTimeMillis();
        t.print();
        long delta = end - start;
        System.out.println("spend time :"+delta);

    }
}
synchronize用时3705毫秒

AtomicInteger用时2171毫秒

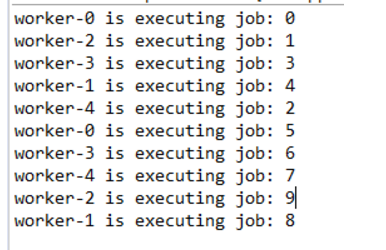
基于synchronize、wait、notify实现简单线程池
public class SimpleThreadPool {
    private static final int DEFAULT_WORKER_NUMS = 5;

    private List<Job> jobList = new LinkedList<Job>();
    private List<Worker> workerList = new LinkedList<Worker>();

    public SimpleThreadPool() {
        initWorkers(DEFAULT_WORKER_NUMS);
    }
    public void shutdown() {
        for(Worker worker : workerList) {
            worker.shutdown();
        }
    }
    public static class Job implements Runnable{
        private String jobName;
        private String getName() {
            return jobName;
        }
        public Job(String jobName) {
            this.jobName = jobName;
        }
        public void run() {
            try {
                Thread.sleep(1000);
            } catch (InterruptedException e) {
                e.printStackTrace();
            }
        }
    }
    public class Worker implements Runnable{
        private volatile boolean running = true;
        public void run() {
            while(running) {
                Job job = null;
                synchronized(jobList) {
                    while(jobList.isEmpty()) {
                        try {
                            jobList.wait();
                        } catch (InterruptedException e) {
                            // TODO Auto-generated catch block
                            e.printStackTrace();
                        }
                    }
                    job = jobList.remove(0);
                }
                if(job!=null) {
                    String threadName = Thread.currentThread().getName();
                    System.out.println(threadName+" is executing job: "+job.getName());
                    job.run();
                }
            }
        }
        public void shutdown() {
            running = false;
        }
    }
    public void execute(Job job) {
        synchronized(jobList) {
            jobList.add(job);
            jobList.notify();
        }
    }
    private void initWorkers(int num) {
        for(int i=0;i<num;i++) {
            Worker worker = new Worker();
            workerList.add(worker);
            Thread thread = new Thread(worker,"worker-"+i);
            thread.start();
        }
    }

    public static void main(String[] args) {
        SimpleThreadPool stp = new SimpleThreadPool();
        for(int i=0;i<10;i++) {
            Job job = new Job(String.valueOf(i));
            stp.execute(job);
        }
    }
}