ISCSI远程块存储
1 系统和存储分离
1.1>ISCSI概念
ISCSI(Internet SCSI)支持从客户端(发起端)通过IP向远程服务器上的iscsi存储设备(目标)发送SCSI命令。ISCSI限定名称用于确定发起端和目标,并采用iqn.yyyy-mm.{reverse domain}:label的格式默认情况下,网络通信是至ISCSI目标上的端口3260/tcp的明文端口
1.2>ISCSI名称设定
ISCSI 发起端:需要访问原始SAN存储的客户端

ISCSI 目标:从iscsi服务器提供的远程硬盘磁盘,或“目标门户”

ISCSCI目标门户:通过网络向发起端提供目标的服务器

IQN:“ISCSI限定名称”。每个发起端和目标需要唯一名称进行标示最好的做法是时用一个在Internet上可能独一无二的名称。1 yum install targetcli
2 fdisk /dev/vdb
3 partprobe
4 fdisk -l
5 targetcli
/> /backstores/block create westos:storage1 /dev/vdb1 #建立一个块设备
Created block storage object westos:storage1 using /dev/vdb1.
/> /iscsi create iqn.2018-06.com.example:storage1 #配置iscsi target命名,命名在同一子网确保是唯一的,命名格式为:iqn.yyyy-mm.<主机名反写>:自定义名称(自定义名称不能用下划线)
Created target iqn.2018-06.com.example:storage1.
Created TPG 1.
/> /iscsi/iqn.2018-06.com.example:storage1/tpg1/acls create iqn.2018-06.com.example:westoskey #创建ACL允许ISCSI客户机连接密钥westoskey; iqn.2018-06.com.example为客户端ISCSI名称
Created Node ACL for iqn.2018-06.com.example:westoskey
/> /iscsi/iqn.2018-06.com.example:storage1/tpg1/luns create /backstores/block/westos:storage1
Created LUN 0.#创建lun(target块设备的逻辑单元)
Created LUN 0->0 mapping in node ACL iqn.2018-06.com.example:westoskey
/> /iscsi/iqn.2018-06.com.example:storage1/tpg1/portals create 172.25.254.232 #创建ip与端口
Using default IP port 3260
Created network portal 172.25.254.232:3260.
/> exit
Global pref auto_save_on_exit=true
Last 10 configs saved in /etc/target/backup.
Configuration saved to /etc/target/saveconfig.json1>建立一个块设备;配置iscsi target命名

2>创建ACL允许ISCSI客户机连接密钥westoskey;创建lun(target块设备的逻辑单元);创建ip与端口
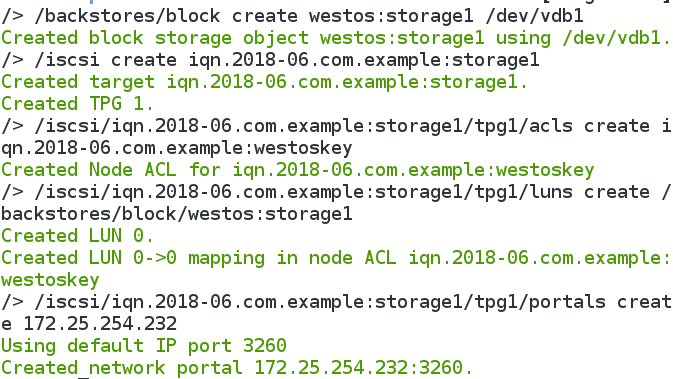
3>创建硬盘磁盘结果

客户端
1 yum install iscsi
2 yum install iscsi-initiator-utils.x86_64 -y
3 systemctl start iscsi
4 systemctl enable iscsi
5 vim /etc/iscsi/initiatorname.iscsi #配置ISCSIinitatorname名称
InitiatorName=iqn.2018-06.com.example:westoskey
6 systemctl restart iscsid.service
7 iscsiadm -m discovery -t st -p 172.25.254.232 #-m 执行的动作,-t 类型stand target -p 端口
 172.25.254.232:3260,1 iqn.2018-06.com.example:storage1
8 iscsiadm -m node -T iqn.2018-06.com.example:storage1 -p 172.25.254.232 -l #-m 执行的动作,node节点,-T 名称 -l 登入
Logging in to [iface: default, target: iqn.2018-06.com.example:storage1, portal: 172.25.254.232,3260] (multiple)
Login to [iface: default, target: iqn.2018-06.com.example:storage1, portal: 172.25.254.232,3260] successful.
9 fdisk -l #查看分区是否添加成功
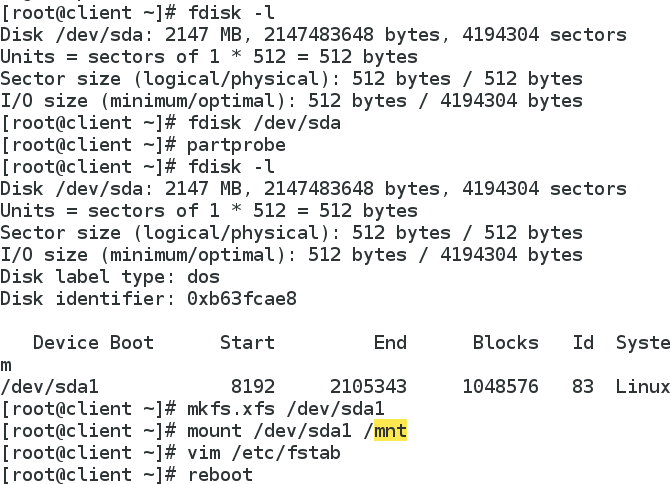
2 客户端挂载服务端提供的硬盘设备
1 fdisk /dev/sda
2 partprobe
3 mkfs.xfs /dev/sda1
4 mount /dev/sda1 /mnt
5 vim /etc/fstab
/dev/sda1       /mnt    xfs     defaults,_netdev #开机时先启动网络配置再启动设备配置  0  0
6 reboot
第一次重启可能起不来,需要强制关机,再开机
df #开机自动挂载