1.简介
iSCSI:Internet Small Computer System Interface,Internet小型计算机系统接口,又称为IP-SAN,是一种基于因特网及SCSI-3协议下的存储技术。
2.iSCSI的作用
基于客户端和服务端架构的虚拟磁盘技术,服务端提供磁盘空间,客户端连接并且可以当成本地磁盘来用。
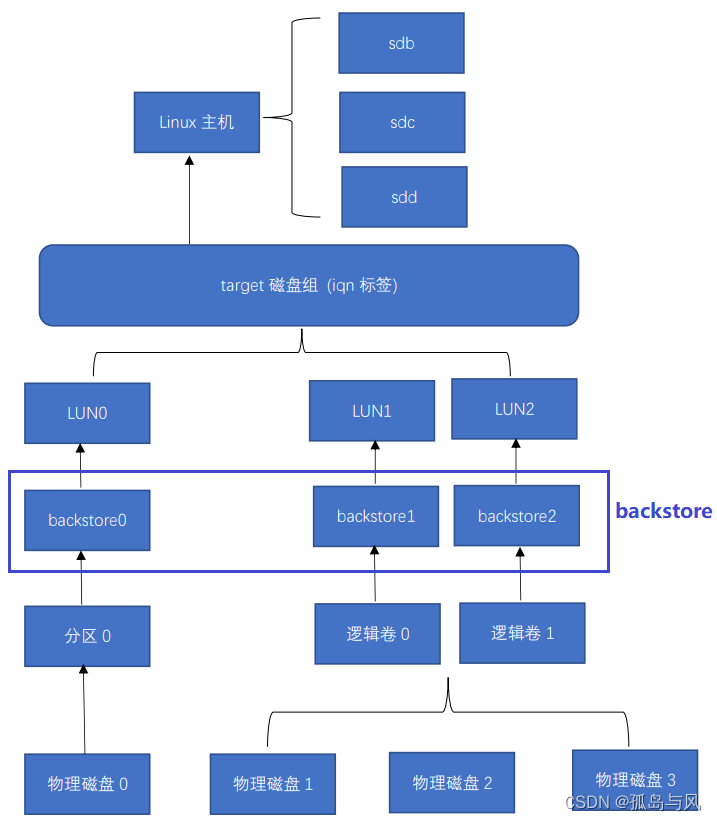
3.iSCSI磁盘的构成
-
backstore 后端存储:对应到服务端提供实际存储空间的设备,需要起一个管理名称。
-
target 磁盘组:是客户端的访问目标,作为一个框架,由多个lun组成。
-
lun 逻辑单元:每一个lun需要关联到某一个后端存储设备,在客户端会视为一块虚拟硬盘。
4.iSCSI共享存储的逻辑
在服务器端物理磁盘会被分散成多个分区或逻辑卷,然后再绑定到单个的逻辑单元(LUN),一个LUN的绑定了一个分区或逻辑卷,LUN大小与绑定的分区或逻辑卷大小相同,所有的LUN再绑定到iqn标签,这个标签是创建target磁盘组是设定的,一个iqn标签可以绑定一个或多个LUN。在客户端每一个LUN最后相当于被挂载到客户端对应一个块设备(sdb.sdc.…)。最后设置访问控制,也就是设置客户端声称的名字,客户端需要iSCSI对应文件中的initiatorname设置成服务器中设置声明的名字才能进行访问。
5.服务端部署
1.确认服务端IP
[root@server ~]# ip addr
1: lo: <LOOPBACK,UP,LOWER_UP> mtu 65536 qdisc noqueue state UNKNOWN group default qlen 1000
    link/loopback 00:00:00:00:00:00 brd 00:00:00:00:00:00
    inet 127.0.0.1/8 scope host lo
       valid_lft forever preferred_lft forever
    inet6 ::1/128 scope host
       valid_lft forever preferred_lft forever
2: ens192: <BROADCAST,MULTICAST,UP,LOWER_UP> mtu 1500 qdisc mq state UP group default qlen 1000
    link/ether 00:50:56:92:10:46 brd ff:ff:ff:ff:ff:ff
    inet 10.0.128.170/24 brd 10.0.128.255 scope global noprefixroute ens192
       valid_lft forever preferred_lft forever
    inet6 fe80::4edf:b81d:8852:fef5/64 scope link noprefixroute
       valid_lft forever preferred_lft forever
2.添加一块新的硬盘,重启使得系统识别到磁盘:sdb
[root@server ~]# fdisk -l

Disk /dev/sda: 37.6 GB, 37580963840 bytes, 73400320 sectors
Units = sectors of 1 * 512 = 512 bytes
Sector size (logical/physical): 512 bytes / 512 bytes
I/O size (minimum/optimal): 512 bytes / 512 bytes
Disk label type: dos
Disk identifier: 0x00041dad

   Device Boot      Start         End      Blocks   Id  System
/dev/sda1   *        2048     2099199     1048576   83  Linux
/dev/sda2         2099200    73400319    35650560   8e  Linux LVM

Disk /dev/sdb: 10.7 GB, 10737418240 bytes, 20971520 sectors
Units = sectors of 1 * 512 = 512 bytes
Sector size (logical/physical): 512 bytes / 512 bytes
I/O size (minimum/optimal): 512 bytes / 512 bytes


Disk /dev/mapper/centos-root: 34.4 GB, 34351349760 bytes, 67092480 sectors
Units = sectors of 1 * 512 = 512 bytes
Sector size (logical/physical): 512 bytes / 512 bytes
I/O size (minimum/optimal): 512 bytes / 512 bytes


Disk /dev/mapper/centos-swap: 2147 MB, 2147483648 bytes, 4194304 sectors
Units = sectors of 1 * 512 = 512 bytes
Sector size (logical/physical): 512 bytes / 512 bytes
I/O size (minimum/optimal): 512 bytes / 512 bytes
3.使用fdisk进行分区,将sdb磁盘分成两个分区
Disk /dev/sdb: 10.7 GB, 10737418240 bytes, 20971520 sectors
Units = sectors of 1 * 512 = 512 bytes
Sector size (logical/physical): 512 bytes / 512 bytes
I/O size (minimum/optimal): 512 bytes / 512 bytes
Disk label type: dos
Disk identifier: 0x3266af65

   Device Boot      Start         End      Blocks   Id  System
/dev/sdb1            2048     2099199     1048576   83  Linux
/dev/sdb2         2099200    20971519     9436160   83  Linux
4.安装 targetcli 软件包
[root@server ~]# yum -y install targetcli
5.设置target服务开机启动,并启动服务
[root@server ~]# systemctl enable target
Created symlink from /etc/systemd/system/multi-user.target.wants/target.service to /usr/lib/systemd/system/target.service.
[root@server ~]# systemctl start target
6.使用targetcli命令进行配置
[root@server ~]# targetcli
Warning: Could not load preferences file /root/.targetcli/prefs.bin.
targetcli shell version 2.1.53
Copyright 2011-2013 by Datera, Inc and others.
For help on commands, type 'help'.

/> ls
o- / ..................................................................... [...]
  o- backstores .......................................................... [...]
  | o- block .............................................. [Storage Objects: 0]
  | o- fileio ............................................. [Storage Objects: 0]
  | o- pscsi .............................................. [Storage Objects: 0]
  | o- ramdisk ............................................ [Storage Objects: 0]
  o- iscsi ........................................................ [Targets: 0]
  o- loopback ..................................................... [Targets: 0]

#1.创建后端存储test0、test1
/> /backstores/block create dev=/dev/sdb1 name=test0
Created block storage object test0 using /dev/sdb1.
/> /backstores/block create dev=/dev/sdb2 name=test1
Created block storage object test1 using /dev/sdb2.

#2.创建target
/> iscsi/ create iqn.2023-06.com.test:server
Created target iqn.2023-06.com.test:server.
Created TPG 1.
Global pref auto_add_default_portal=true
Created default portal listening on all IPs (0.0.0.0), port 3260.

#3.进行lun0、lun1关联
/> iscsi/iqn.2023-06.com.test:server/tpg1/luns create /backstores/block/test0
Created LUN 0.
/> iscsi/iqn.2023-06.com.test:server/tpg1/luns create /backstores/block/test1
Created LUN 1.

#4.在 TPG 项下,新建 ACL 设置 IQN 为iqn.2018-05.com.test:desktop的客户端使用
/> iscsi/iqn.2023-06.com.test:server/tpg1/acls create iqn.2023-06.com.test:clientCreated Node ACL for iqn.2023-06.com.test:client
Created mapped LUN 1.
Created mapped LUN 0.

#5.查看配置信息
/> ls
o- / .............................................................................. [...]
  o- backstores ................................................................... [...]
  | o- block ....................................................... [Storage Objects: 2]
  | | o- test0 ................................ [/dev/sdb1 (1.0GiB) write-thru activated]
  | | | o- alua ........................................................ [ALUA Groups: 1]
  | | |   o- default_tg_pt_gp ............................ [ALUA state: Active/optimized]
  | | o- test1 ................................ [/dev/sdb2 (9.0GiB) write-thru activated]
  | |   o- alua ........................................................ [ALUA Groups: 1]
  | |     o- default_tg_pt_gp ............................ [ALUA state: Active/optimized]
  | o- fileio ...................................................... [Storage Objects: 0]
  | o- pscsi ....................................................... [Storage Objects: 0]
  | o- ramdisk ..................................................... [Storage Objects: 0]
  o- iscsi ................................................................. [Targets: 1]
  | o- iqn.2023-06.com.test:server ............................................ [TPGs: 1]
  |   o- tpg1 .................................................... [no-gen-acls, no-auth]
  |     o- acls ............................................................... [ACLs: 1]
  |     | o- iqn.2023-06.com.test:client ............................... [Mapped LUNs: 2]
  |     |   o- mapped_lun0 ...................................... [lun0 block/test0 (rw)]
  |     |   o- mapped_lun1 ...................................... [lun1 block/test1 (rw)]
  |     o- luns ............................................................... [LUNs: 2]
  |     | o- lun0 .......................... [block/test0 (/dev/sdb1) (default_tg_pt_gp)]
  |     | o- lun1 .......................... [block/test1 (/dev/sdb2) (default_tg_pt_gp)]
  |     o- portals ......................................................... [Portals: 1]
  |       o- 0.0.0.0:3260 .......................................................... [OK]
  o- loopback .............................................................. [Targets: 0]

#6.退出
/> exit
Global pref auto_save_on_exit=true
Configuration saved to /etc/target/saveconfig.json
7.重启target服务
[root@server ~]# systemctl restart target
8.设置target服务开机启动
[root@server ~]# systemctl enable target
9.关闭防火墙
[root@server ~]# systemctl stop firewalld.service
6.客户端配置
1.安装iscsi-initiator-utils
[root@client ~]# yum install -y iscsi-initiator-utils
2.编辑配置文件 /etc/iscsi/initiatorname.iscsi,修改名称为服务端中客户端声称的名字
[root@client ~]# cat /etc/iscsi/initiatorname.iscsi
InitiatorName=iqn.2023-06.com.test:client
3.发现服务端共享存储
[root@client ~]# iscsiadm --mode discoverydb --type sendtargets --portal 10.0.128.170 --discover
10.0.128.170:3260,1 iqn.2023-06.com.test:server
4.设置 iscsid 开机启动,重启此服务
[root@client ~]# systemctl enable iscsid
Created symlink from /etc/systemd/system/multi-user.target.wants/iscsid.service to /usr/lib/systemd/system/iscsid.service.
[root@client ~]# systemctl restart iscsid
5.使用共享存储,被识别为sdb、sdc
[root@client ~]# lsblk
NAME            MAJ:MIN RM  SIZE RO TYPE MOUNTPOINT
sda               8:0    0   35G  0 disk
├─sda1            8:1    0    1G  0 part /boot
└─sda2            8:2    0   34G  0 part
  ├─centos-root 253:0    0   32G  0 lvm  /
  └─centos-swap 253:1    0    2G  0 lvm  [SWAP]
sdb               8:16   0    1G  0 disk
sdc               8:32   0    9G  0 disk
6.验证会话状态及相关的磁盘信息
[root@client ~]# iscsiadm -m session -P 3 |grep Attached
                Attached SCSI devices:
                        Attached scsi disk sdb          State: running
                        Attached scsi disk sdc          State: running
7.在新磁盘上创建分区
#1.创建sdb1分区
[root@client ~]# fdisk /dev/sdb
Welcome to fdisk (util-linux 2.23.2).

Changes will remain in memory only, until you decide to write them.
Be careful before using the write command.

Device does not contain a recognized partition table
Building a new DOS disklabel with disk identifier 0x2a2fa4e3.

Command (m for help): n
Partition type:
   p   primary (0 primary, 0 extended, 4 free)
   e   extended
Select (default p): p
Partition number (1-4, default 1):
First sector (65528-2097151, default 65528):
Using default value 65528
Last sector, +sectors or +size{K,M,G} (65528-2097151, default 2097151):
Using default value 2097151
Partition 1 of type Linux and of size 992 MiB is set

Command (m for help): w
The partition table has been altered!

Calling ioctl() to re-read partition table.
Syncing disks.

#2.创建sdc1分区
[root@client ~]# fdisk /dev/sdb
Welcome to fdisk (util-linux 2.23.2).

Changes will remain in memory only, until you decide to write them.
Be careful before using the write command.

Device does not contain a recognized partition table
Building a new DOS disklabel with disk identifier 0x2a2fa4e3.

Command (m for help): n
Partition type:
   p   primary (0 primary, 0 extended, 4 free)
   e   extended
Select (default p): p
Partition number (1-4, default 1):
First sector (65528-2097151, default 65528):
Using default value 65528
Last sector, +sectors or +size{K,M,G} (65528-2097151, default 2097151):
Using default value 2097151
Partition 1 of type Linux and of size 992 MiB is set

Command (m for help): w
The partition table has been altered!

Calling ioctl() to re-read partition table.
Syncing disks.

#3.查看
[root@client ~]# lsblk
NAME            MAJ:MIN RM  SIZE RO TYPE MOUNTPOINT
sda               8:0    0   35G  0 disk
├─sda1            8:1    0    1G  0 part /boot
└─sda2            8:2    0   34G  0 part
  ├─centos-root 253:0    0   32G  0 lvm  /
  └─centos-swap 253:1    0    2G  0 lvm  [SWAP]
sdb               8:16   0    1G  0 disk
└─sdb1            8:17   0  992M  0 part
sdc               8:32   0    9G  0 disk
└─sdc1            8:33   0    9G  0 part
sr0              11:0    1  4.4G  0 rom
8.格式化磁盘分区
[root@client ~]# mkfs.xfs /dev/sdb1
[root@client ~]# mkfs.xfs /dev/sdc1
9.创建挂载目录
[root@client ~]# mkdir /iscsi1
[root@client ~]# mkdir /iscsi2
10.挂载分区
[root@client ~]# mount /dev/sdb1 /iscsi1
[root@client ~]# mount /dev/sdc1 /iscsi2
[root@client ~]# df -h|grep /iscsi
/dev/sdb1                961M  2.5M  893M   1% /iscsi1
/dev/sdc1                9.0G   33M  9.0G   1% /iscsi2
11.永久挂载
[root@client ~]# blkid
/dev/sda1: UUID="94690918-1083-4616-9920-d6c0a4315911" TYPE="xfs"
/dev/sda2: UUID="a76gEe-pO26-I0hG-SgV9-Wr97-UP08-8jVg37" TYPE="LVM2_member"
/dev/sr0: UUID="2020-11-04-11-36-43-00" LABEL="CentOS 7 x86_64" TYPE="iso9660" PTTYPE="dos"
/dev/mapper/centos-root: UUID="3f7fa0b5-79c5-488c-b23e-5bbcde77235f" TYPE="xfs"
/dev/mapper/centos-swap: UUID="7ec9af7e-eb4f-4732-aa97-1e03f085727c" TYPE="swap"
/dev/sdb1: UUID="dcc14954-15c7-4564-aa6e-fa3a36412b48" TYPE="ext4"
/dev/sdc1: UUID="cebe8fcf-729f-4b04-a354-2a772be98ea0" TYPE="xfs"
在/etc/fstab 文件中添加两行
UUID=dcc14954-15c7-4564-aa6e-fa3a36412b48 /iscsi1 xfs    defaults        0 0
UUID=cebe8fcf-729f-4b04-a354-2a772be98ea0 /iscsi2 xfs    defaults        0 0