如果知道hbase数据表的key的分布情况,就可以在建表的时候对hbase进行region的预分区。这样做的好处是防止大数据量插入的热点问题,提高数据插入的效率。
背景:HBase默认建表时有一个region,这个region的rowkey是没有边界的,即没有startkey和endkey,在数据写入时,所有数据都会写入这个默认的region,随着数据量的不断 增加,此region已经不能承受不断增长的数据量,会进行split,分成2个region。在此过程中,会产生两个问题:1.数据往一个region上写,会有写热点问题。2.region split会消耗宝贵的集群I/O资源。基于此我们可以控制在建表的时候,创建多个空region,并确定每个region的起始和终止rowky,这样只要我们的rowkey设计能均匀的命中各个region,就不会存在写热点问题。自然split的几率也会大大降低。当然随着数据量的不断增长,该split的还是要进行split。像这样预先创建hbase表分区的方式,称之为预分区,下面给出一种预分区的实现方式:
首先看没有进行预分区的表,startkey和endkey为空。
要进行预分区,首先要明确rowkey的取值范围或构成逻辑,以我的rowkey组成为例:两位随机数+时间戳+客户号,两位随机数的范围从00-99,于是我划分了10个region来存储数据,每个region对应的rowkey范围如下:
-10|,10|-20|,20|-30|,30|-40|,40|-50|,50|-60|,60|-70|,70|-80|,80|-90|,90|-
一、HBase API创建分区表
在使用HBase API建表的时候,需要产生splitkeys二维数组,这个数组存储的rowkey的边界值。下面是java 代码实现:-
private byte[][] getSplitKeys() {
-
String[] keys = new String[] { "10|", "20|", "30|", "40|", "50|",
-
"60|", "70|", "80|", "90|" };
-
byte[][] splitKeys = new byte[keys.length][];
-
TreeSet< byte[]> rows = new TreeSet< byte[]>(Bytes.BYTES_COMPARATOR); //升序排序
-
for ( int i = 0; i < keys.length; i++) {
-
rows.add(Bytes.toBytes(keys[i]));
-
}
-
Iterator< byte[]> rowKeyIter = rows.iterator();
-
int i= 0;
-
while (rowKeyIter.hasNext()) {
-
byte[] tempRow = rowKeyIter.next();
-
rowKeyIter.remove();
-
splitKeys[i] = tempRow;
-
i++;
-
}
-
return splitKeys;
-
}
为什么后面会跟着一个"|",是因为在ASCII码中,"|"的值是124,大于所有的数字和字母等符号,当然也可以用“~”(ASCII-126)。分隔文件的第一行为第一个region的stopkey,每行依次类推,最后一行不仅是倒数第二个region的stopkey,同时也是最后一个region的startkey。也就是说分区文件中填的都是key取值范围的分隔点。
需要注意的是,在上面的代码中用treeset对rowkey进行排序,必须要对rowkey排序,否则在调用admin.createTable(tableDescriptor,splitKeys)的时候会出错。创建表的代码如下:
-
/**
-
* 创建预分区hbase表
-
* @param tableName 表名
-
* @param columnFamily 列簇
-
* @return
-
*/
-
( "resource")
-
public boolean createTableBySplitKeys(String tableName, List<String> columnFamily) {
-
try {
-
if (StringUtils.isBlank(tableName) || columnFamily == null
-
|| columnFamily.size() < 0) {
-
log.error( "===Parameters tableName|columnFamily should not be null,Please check!===");
-
}
-
HBaseAdmin admin = new HBaseAdmin(conf);
-
if (admin.tableExists(tableName)) {
-
return true;
-
} else {
-
HTableDescriptor tableDescriptor = new HTableDescriptor(
-
TableName.valueOf(tableName));
-
for (String cf : columnFamily) {
-
tableDescriptor.addFamily( new HColumnDescriptor(cf));
-
}
-
byte[][] splitKeys = getSplitKeys();
-
admin.createTable(tableDescriptor,splitKeys); //指定splitkeys
-
log.info( "===Create Table " + tableName
-
+ " Success!columnFamily:" + columnFamily.toString()
-
+ "===");
-
}
-
} catch (MasterNotRunningException e) {
-
// TODO Auto-generated catch block
-
log.error(e);
-
return false;
-
} catch (ZooKeeperConnectionException e) {
-
// TODO Auto-generated catch block
-
log.error(e);
-
return false;
-
} catch (IOException e) {
-
// TODO Auto-generated catch block
-
log.error(e);
-
return false;
-
}
-
return true;
-
}
在hbase shell中输入命令san 'hbase:meta'查看建表结果:

从上图可看出10个region均匀的分布在了3台regionserver上(集群就3台机器regionserver),达到预期效果。还可以在hbase的web UI界面中更加直观的查看建表的预分区信息。

再看看写数据是否均匀的命中各个region,是否能够做到对写请求的负载均衡:
-
public class TestHBasePartition {
-
public static void main(String[] args) throws Exception{
-
HBaseAdmin admin = new HBaseAdmin(conf);
-
HTable table = new HTable(conf, "testhbase");
-
table.put(batchPut());
-
}
-
-
private static String getRandomNumber(){
-
String ranStr = Math.random()+ "";
-
int pointIndex = ranStr.indexOf( ".");
-
return ranStr.substring(pointIndex+ 1, pointIndex+ 3);
-
}
-
-
private static List<Put> batchPut(){
-
List<Put> list = new ArrayList<Put>();
-
for( int i= 1;i<= 10000;i++){
-
byte[] rowkey = Bytes.toBytes(getRandomNumber()+ "-"+System.currentTimeMillis()+ "-"+i);
-
Put put = new Put(rowkey);
-
put.add(Bytes.toBytes( "info"), Bytes.toBytes( "name"), Bytes.toBytes( "zs"+i));
-
list.add(put);
-
}
-
return list;
-
}
-
}

写了1万条数据,从Write Request Count一栏可以查看写请求是否均匀的分布到3台机器上,实测我的达到目标,完成。
二、在HBase shell中创建分区表,指定分区文件
在hbase shell中直接输入create,会看到如下的提示:
-
Examples:
-
-
Create a table with namespace=ns1 and table qualifier=t1
-
hbase> create 'ns1:t1', { NAME => 'f1', VERSIONS => 5}
-
-
Create a table with namespace= default and table qualifier=t1
-
hbase> create 't1', { NAME => 'f1'}, { NAME => 'f2'}, { NAME => 'f3'}
-
hbase> # The above in shorthand would be the following:
-
hbase> create 't1', 'f1', 'f2', 'f3'
-
hbase> create 't1', { NAME => 'f1', VERSIONS => 1, TTL => 2592000, BLOCKCACHE => true}
-
hbase> create 't1', { NAME => 'f1', CONFIGURATION => { 'hbase.hstore.blockingStoreFiles' => '10'}}
-
-
Table configuration options can be put at the end.
-
Examples:
-
-
hbase> create 'ns1:t1', 'f1', SPLITS => [ '10', '20', '30', '40']
-
hbase> create 't1', 'f1', SPLITS => [ '10', '20', '30', '40']
-
hbase> create 't1', 'f1', SPLITS_FILE => 'splits.txt', OWNER => 'johndoe'
-
hbase> create 't1', { NAME => 'f1', VERSIONS => 5}, METADATA => { 'mykey' => 'myvalue' }
-
hbase> # Optionally pre- split the table into NUMREGIONS, using
-
hbase> # SPLITALGO ( "HexStringSplit", "UniformSplit" or classname)
-
hbase> create 't1', 'f1', {NUMREGIONS => 15, SPLITALGO => 'HexStringSplit'}
-
hbase> create 't1', 'f1', {NUMREGIONS => 15, SPLITALGO => 'HexStringSplit', CONFIGURATION => { 'hbase.hregion.scan.loadColumnFamiliesOnDemand' => 'true'}}
-
hbase> create 't1', { NAME => 'f1'}, { NAME => 'if1', LOCAL_INDEX=> 'COMBINE_INDEX|INDEXED=f1:q1:8|rowKey:rowKey:10,UPDATE=true'}
create 'split_table_test', 'cf', {SPLITS_FILE => 'region_split_info.txt'}create 'split_table_test',{NAME =>'cf', COMPRESSION => 'SNAPPY'}, {SPLITS_FILE => 'region_split_info.txt'}下面,我们登陆一下master的web页面<Hmaster:60010>,查看一下hbase的表信息,找到刚刚新建的预分区表,进入查看region信息:
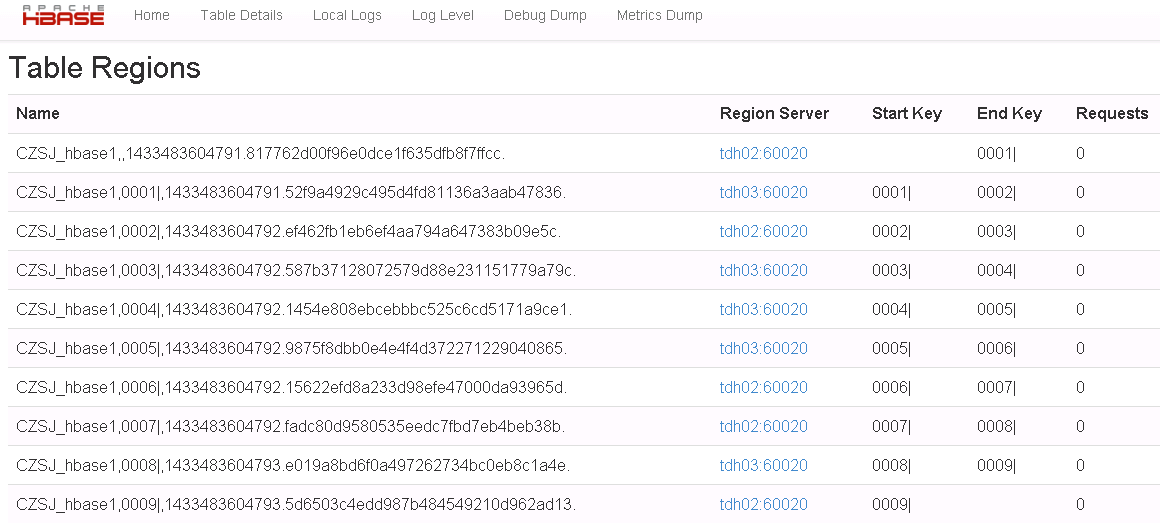
我们看到第一个region是没有startkey的,最后一个region是没有stopkey的。