1. 环境准备
springmvc上传文件的功能需要两个jar包的支持(点我下载),如下

2. 单个文件的上传
2.1 前台页面
简单的写一下前台页面,注意一点的是form表单中别忘了写enctype="multipart/form-data"属性:
<tr>
    <td>商品图片</td>
    <td><c:if test="${itemsCustom.pic !=null}">
            <img src="/file/${itemsCustom.pic}" width=100 height=100 /><br />
        </c:if>
        <input type="file" name="items_pic"/>
    </td>
</tr>- 1
- 2
- 3
- 4
- 5
- 6
- 7
- 8
2.2 对多部件类型multipart解析
意思就是说针对上面的enctype="multipart/form-data"类型,springmvc需要对multipart类型的数据进行解析,在springmvc.xml中配置multipart类型解析器即可。
<!-- 文件上传,需要配置MultipartResolver处理器 -->
<bean id="multipartResolver" class="org.springframework.web.multipart.commons.CommonsMultipartResolver">
    <!-- 设置船上文件的最大尺寸为5MB -->
    <property name="maxUploadSize" value="5242880"/>
    <property name="defaultEncoding" value="utf-8"/>
</bean>- 1
- 2
- 3
- 4
- 5
- 6
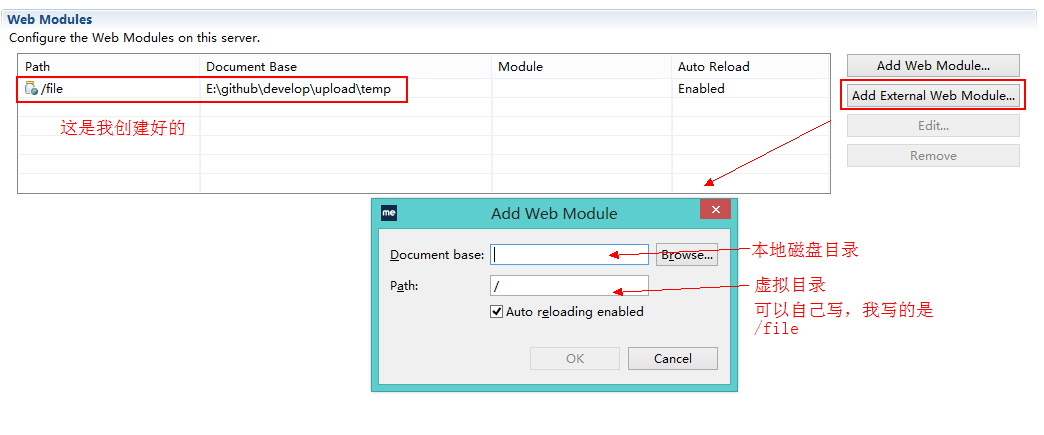
2.3 创建文件保存的虚拟目录
在上传文件之前,首先要创建一个虚拟目录来保存文件,这个虚拟目录会对应磁盘上的一个实际的目录,在实际中肯定会有一个服务器专门存储资源的,在这里我们就用本地来保存文件,然后映射一个虚拟目录,用来在程序中指定获取文件的路径(其实上面前台页面中,那个src=”/file/${itemsCustom.pic}”中的/file就是虚拟目录)。
创建的方法有两种:一是在Myeclipse中双击tomcat服务器,然后弹出下面的框框:
设置好后,保存即可,这样上传的文件都会保存到Document base指定的目录中,相当于虚拟映射到path指定的目录中,程序中获取这个文件,要从path指定的虚拟目录中获取,即我上面的/file。
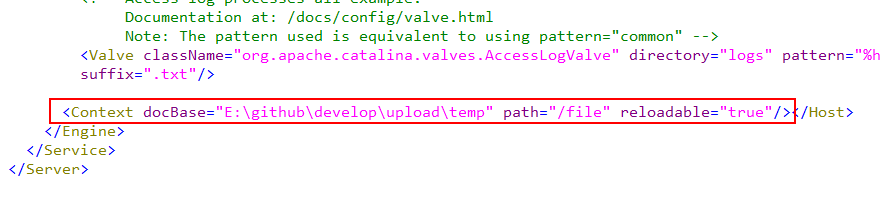
第二种方法就是在tomcat的配置文件中配置一下,其实刚刚在Myeclipse中的操作已经自动写到这个配置文件中了,配置文件位置在tomcat目录/conf/server.xml中,看一下里面会多了一行:
这就是刚刚我配置的,它自动写到这个文件中了,所以我们也可以直接自己在文件中写,就不需要在Myeclipse中配置了。
2.4 编写后台Controller方法
接下来就是重点了,前台传过来的文件,我们在controller中需要进行处理,然后保存到磁盘中,同时也就映射到了我们配置的虚拟路径中了,那么如何接收呢?看下面的代码:
@RequestMapping("/editItemsSubmit")
public String editItemsSubmit(Model model, HttpServletRequest request,
        Integer id,
        @Validated(value = { ValidGroup1.class }) ItemsCustom itemsCustom,
        BindingResult bindingResult,
        MultipartFile items_pic)
        throws Exception {

    // 处理上传的单个图片
    String originalFileName = items_pic.getOriginalFilename();// 原始名称
    // 上传图片
    if (items_pic != null && originalFileName != null && originalFileName.length() > 0) {
        // 存储图片的物理路径,实际中是要写到配置文件中的,不能在这写死
        String pic_path = "E:\\github\\develop\\upload\\temp\\";
        // 新的图片名称
        String newFileName = UUID.randomUUID()
                + originalFileName.substring(originalFileName
                        .lastIndexOf("."));
        File newFile = new File(pic_path + newFileName);//新图片
        items_pic.transferTo(newFile);// 将内存中的数据写入磁盘
        itemsCustom.setPic(newFileName);// 将新图片名称写到itemsCustom中
    } else {
        //如果用户没有选择图片就上传了,还用原来的图片
        ItemsCustom temp = itemsService.findItemsById(itemsCustom.getId());
        itemsCustom.setPic(temp.getPic());
    }

    // 调用service更新商品信息,页面需要将商品信息传到此方法
    itemsService.updateItems(id, itemsCustom);
    return "/WEB-INF/jsp/success.jsp";
}- 1
- 2
- 3
- 4
- 5
- 6
- 7
- 8
- 9
- 10
- 11
- 12
- 13
- 14
- 15
- 16
- 17
- 18
- 19
- 20
- 21
- 22
- 23
- 24
- 25
- 26
- 27
- 28
- 29
- 30
- 31
首先来看一下形参,主要有ItemsCustom和MultipartFile类型的items_pic,我这里上传一张图片是ItemsCustom类的一个属性,所以有了这个形参,是为了写到该类中,另外前面的@Validated注解是我写springmvc校验的时候用的,跟这里文件上传无关。springmvc文件上传的类是MultipartFile,名items_pic必须和前台的name属性一致才行。
上传文件的逻辑是,首先判断有没有上传文件,如果上传了,那么对文件重新命名然后写到磁盘中。如果没有上传文件,那么我应该还是用原来的文件(图片),因为我写的这个例子是更新商品信息,对文件上传那里没有做非空验证,所以在这里写了else。
这样文件就上传完了,这是单个文件的上传。
3. 多个文件的上传
多个文件上传和单个文件上传原理一样的,不过在细节上会有点不同,待我一个个总结。首先在前台页面上要注意的一点是name属性必须一样,即:
<input type="file" name="items_pic"/>
<input type="file" name="items_pic"/>- 1
- 2
然后就是后台接收的形参也要变,如下:
@RequestMapping("/editItemsSubmit")
public String editItemsSubmit(Model model, HttpServletRequest request,
        Integer id,
        @Validated(value = { ValidGroup1.class }) ItemsCustom itemsCustom,
        BindingResult bindingResult,
        @RequestParam MultipartFile[] items_pic)
        throws Exception {

    //多个图片,不存数据库了,在此打印一下即可
    for(MultipartFile myfile : items_pic) {
        if(myfile.isEmpty()){
            System.out.println("文件未上传");
        }else{
            System.out.println("文件长度: " + myfile.getSize());
            System.out.println("文件类型: " + myfile.getContentType());
            System.out.println("文件名称: " + myfile.getName());
            System.out.println("文件原名: " + myfile.getOriginalFilename());
            System.out.println("========================================");

            //写入磁盘,和上面的单个文件上传一模一样
            String originalFileName = myfile.getOriginalFilename();
            String pic_path = "E:\\github\\develop\\upload\\temp\\";
            String newFileName = UUID.randomUUID()
                    + originalFileName.substring(originalFileName
                            .lastIndexOf("."));
            File newFile = new File(pic_path + newFileName);
            myfile.transferTo(newFile);
        }
    }

    return "/WEB-INF/jsp/success.jsp";
}- 1
- 2
- 3
- 4
- 5
- 6
- 7
- 8
- 9
- 10
- 11
- 12
- 13
- 14
- 15
- 16
- 17
- 18
- 19
- 20
- 21
- 22
- 23
- 24
- 25
- 26
- 27
- 28
- 29
- 30
- 31
- 32
如上,形参变成数组类型了,且前面要加上@RequestParam注解才行。然后获取的话,就是遍历这个数组,循环内部与上面的单个文件上传就一模一样了。看一下打印结果: 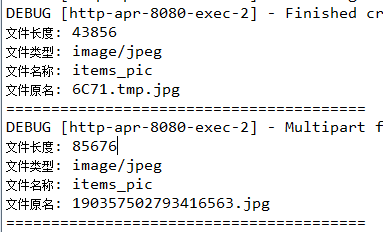
可以看到,两个文件都顺利接收到,至此,多文件上传成功。关于springmvc的文件上传功能就总结到这吧。