Spring使用AspectJ进行AOP的开发:注解方式
大致步骤,
1,导包;
2,引入Spring的约束;
3,创建类和增强类;
4,开启Aspect代理;
5,配置文件创建对象;
6,测试;
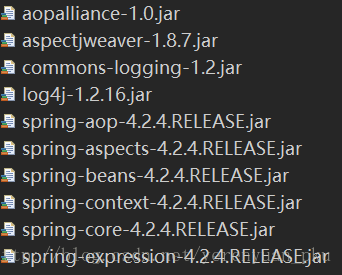
- 创建一个Web项目, 引入相关的jar包。所要导入的jar包如下:
引入Spring的配置文件。主要引入AOP的约束:
<?xml version="1.0" encoding="UTF-8"?>
<beans xmlns="http://www.springframework.org/schema/beans"
    xmlns:xsi="http://www.w3.org/2001/XMLSchema-instance"
    xmlns:aop="http://www.springframework.org/schema/aop" xsi:schemaLocation="
        http://www.springframework.org/schema/beans
        http://www.springframework.org/schema/beans/spring-beans.xsd
        http://www.springframework.org/schema/aop
        http://www.springframework.org/schema/aop/spring-aop.xsd">

</beans>
编写目标类。
在Web项目的src目录下创建一个cn.itcast.aop包,并在该包下编写一个Book类:public class Book { public void add() { System.out.println("book add................."); } }编写切面类。
再在cn.itcast.aop包下编写一个MyBook增强类:public class MyBook { public void before1() { System.out.println("before........"); } }在增强的类上面使用
@Aspect注解@Aspect public class MyBook { public void before1() { System.out.println("before........"); } }在增强类的方法里面,使用注解配置通知类型:
@Aspect
public class MyBook {

    // 前置通知
    // *:方法的访问修饰符,也可写为execution(public void cn.itcast.aop.Book.*(..)),但一般都不会用
    @Before("execution(* cn.itcast.aop.Book.*(..))")
    public void before1() {
        System.out.println("before........");
    }

}
AspectJ的AOP的注解:
@Aspect:定义切面类的注解@Before:前置通知,相当于BeforeAdvice@AfterReturning:后置通知,相当于AfterReturningAdvice@Around:环绕通知,相当于MethodInterceptor@AfterThrowing:抛出通知,相当于ThrowAdvice@After:最终final通知,不管是否异常,该通知都会执行@Pointcut:定义切入点的注解
开启AspectJ的注解
<aop:aspectj-autoproxy></aop:aspectj-autoproxy>创建Book类和MyBook类的两个对象(使用配置文件)
<bean id="book" class="cn.itcast.aop.Book"></bean>
<bean id="myBook" class="cn.itcast.aop.MyBook"></bean>
最后在cn.itcast.aop包下编写一个TestDemo单元测试类
public class TestDemo {

    @Test
    public void testBook() {
        ApplicationContext context = new ClassPathXmlApplicationContext("bean1.xml");
        Book book = (Book) context.getBean("book");
        book.add();
    }
}
测试即可。