一、TensorFlow常规模型加载方法
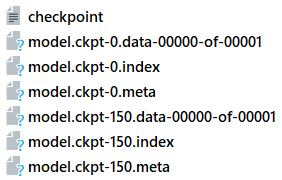
checkpoint文件会记录保存信息,通过它可以定位最新保存的模型:
|
1
2
|
ckpt
=
tf.train.get_checkpoint_state(
'./model/'
)
print
(ckpt.model_checkpoint_path)
|

.meta文件保存了当前图结构
.index文件保存了当前参数名
.data文件保存了当前参数值
tf.train.import_meta_graph函数给出model.ckpt-n.meta的路径后会加载图结构,并返回saver对象
|
1
|
ckpt
=
tf.train.get_checkpoint_state(
'./model/'
)
|
tf.train.Saver函数会返回加载默认图的saver对象,saver对象初始化时可以指定变量映射方式,根据名字映射变量(『TensorFlow』滑动平均)
|
1
|
saver
=
tf.train.Saver({
"v/ExponentialMovingAverage"
:v})
|
saver.restore函数给出model.ckpt-n的路径后会自动寻找参数名-值文件进行加载
|
1
2
|
saver.restore(sess,
'./model/model.ckpt-0'
)
saver.restore(sess,ckpt.model_checkpoint_path)
|
1.不加载图结构,只加载参数
由于实际上我们参数保存的都是Variable变量的值,所以其他的参数值(例如batch_size)等,我们在restore时可能希望修改,但是图结构在train时一般就已经确定了,所以我们可以使用tf.Graph().as_default()新建一个默认图(建议使用上下文环境),利用这个新图修改和变量无关的参值大小,从而达到目的。
|
1
2
3
4
5
6
7
8
9
10
11
12
13
14
15
16
17
18
19
20
21
22
23
24
25
26
27
28
29
30
31
32
|
'''
使用原网络保存的模型加载到自己重新定义的图上
可以使用python变量名加载模型,也可以使用节点名
'''
import
AlexNet as Net
import
AlexNet_train as train
import
random
import
tensorflow as tf
IMAGE_PATH
=
'./flower_photos/daisy/5673728_71b8cb57eb.jpg'
with tf.Graph().as_default() as g:
x
=
tf.placeholder(tf.float32, [
1
, train.INPUT_SIZE[
0
], train.INPUT_SIZE[
1
],
3
])
y
=
Net.inference_1(x, N_CLASS
=
5
, train
=
False
)
with tf.Session() as sess:
# 程序前面得有 Variable 供 save or restore 才不报错
# 否则会提示没有可保存的变量
saver
=
tf.train.Saver()
ckpt
=
tf.train.get_checkpoint_state(
'./model/'
)
img_raw
=
tf.gfile.FastGFile(IMAGE_PATH,
'rb'
).read()
img
=
sess.run(tf.expand_dims(tf.image.resize_images(
tf.image.decode_jpeg(img_raw),[
224
,
224
],method
=
random.randint(
0
,
3
)),
0
))
if
ckpt
and
ckpt.model_checkpoint_path:
print
(ckpt.model_checkpoint_path)
saver.restore(sess,
'./model/model.ckpt-0'
)
global_step
=
ckpt.model_checkpoint_path.split(
'/'
)[
-
1
].split(
'-'
)[
-
1
]
res
=
sess.run(y, feed_dict
=
{x: img})
print
(global_step,sess.run(tf.argmax(res,
1
)))
|
2.加载图结构和参数
|
1
2
3
4
5
6
7
8
9
10
11
12
13
14
15
16
17
18
19
20
21
22
23
24
25
26
27
28
29
30
31
32
33
34
35
36
|
'''
直接使用使用保存好的图
无需加载python定义的结构,直接使用节点名称加载模型
由于节点形状已经定下来了,所以有不便之处,placeholder定义batch后单张传会报错
现阶段不推荐使用,以后如果理解深入了可能会找到使用方法
'''
import
AlexNet_train as train
import
random
import
tensorflow as tf
IMAGE_PATH
=
'./flower_photos/daisy/5673728_71b8cb57eb.jpg'
ckpt
=
tf.train.get_checkpoint_state(
'./model/'
)
# 通过检查点文件锁定最新的模型
saver
=
tf.train.import_meta_graph(ckpt.model_checkpoint_path
+
'.meta'
)
# 载入图结构,保存在.meta文件中
with tf.Session() as sess:
saver.restore(sess,ckpt.model_checkpoint_path)
# 载入参数,参数保存在两个文件中,不过restore会自己寻找
img_raw
=
tf.gfile.FastGFile(IMAGE_PATH,
'rb'
).read()
img
=
sess.run(tf.image.resize_images(
tf.image.decode_jpeg(img_raw), train.INPUT_SIZE, method
=
random.randint(
0
,
3
)))
imgs
=
[]
for
i
in
range
(
128
):
imgs.append(img)
print
(sess.run(tf.get_default_graph().get_tensor_by_name(
'fc3:0'
),feed_dict
=
{
'Placeholder:0'
: imgs}))
'''
img
=
sess.run(tf.expand_dims(tf.image.resize_images(
tf.image.decode_jpeg(img_raw), train.INPUT_SIZE, method
=
random.randint(
0
,
3
)),
0
))
print
(img)
imgs
=
[]
for
i
in
range
(
128
):
imgs.append(img)
print
(sess.run(tf.get_default_graph().get_tensor_by_name(
'conv1:0'
),
feed_dict
=
{
'Placeholder:0'
:img}))
|
注意,在所有两种方式中都可以通过调用节点名称使用节点输出张量,节点.name属性返回节点名称。
简化版本说明:
|
1
2
3
4
5
6
7
8
9
10
11
12
|
# 连同图结构一同加载
ckpt
=
tf.train.get_checkpoint_state(
'./model/'
)
saver
=
tf.train.import_meta_graph(ckpt.model_checkpoint_path
+
'.meta'
)
with tf.Session() as sess:
saver.restore(sess,ckpt.model_checkpoint_path)
# 只加载数据,不加载图结构,可以在新图中改变batch_size等的值
# 不过需要注意,Saver对象实例化之前需要定义好新的图结构,否则会报错
saver
=
tf.train.Saver()
with tf.Session() as sess:
ckpt
=
tf.train.get_checkpoint_state(
'./model/'
)
saver.restore(sess,ckpt.model_checkpoint_path)
|
二、TensorFlow二进制模型加载方法
这种加载方法一般是对应网上各大公司已经训练好的网络模型进行修改的工作
|
1
2
3
4
5
6
7
8
9
10
11
12
13
14
15
16
17
|
# 新建空白图
self
.graph
=
tf.Graph()
# 空白图列为默认图
with
self
.graph.as_default():
# 二进制读取模型文件
with tf.gfile.FastGFile(os.path.join(model_dir,model_name),
'rb'
) as f:
# 新建GraphDef文件,用于临时载入模型中的图
graph_def
=
tf.GraphDef()
# GraphDef加载模型中的图
graph_def.ParseFromString(f.read())
# 在空白图中加载GraphDef中的图
tf.import_graph_def(graph_def,name
=
'')
# 在图中获取张量需要使用graph.get_tensor_by_name加张量名
# 这里的张量可以直接用于session的run方法求值了
# 补充一个基础知识,形如'conv1'是节点名称,而'conv1:0'是张量名称,表示节点的第一个输出张量
self
.input_tensor
=
self
.graph.get_tensor_by_name(
self
.input_tensor_name)
self
.layer_tensors
=
[
self
.graph.get_tensor_by_name(name
+
':0'
)
for
name
in
self
.layer_operation_names]
|