一、TX2端
1.在TX2上安装git和cmake
sudo apt-get install git cmake2. 下载并运行jetson-inference
jetson-inference不是很好下载,我试了两天,最后在Windows下科学上网下载到了,给个我下载好的百度云链接吧:
链接:https://pan.baidu.com/s/1hSrWSk3Wy9qzEGFZke8yLQ 密码:dlms
git clone https://github.com/dusty-nv/jetson-inference.git
cd jetson-inference
mkdir build
cd build
cmake ..
到这儿会卡住,也是多试几次就好了,这个要看nvidia的网络状况
会将orange_0.jpg识别的结果保存在output_0.jpg中,其中要用到的googlenet.prototxt和bvlc_googlenet.caffemodel并不是networks文件夹中自带的,需要自己下载以后放入其中,否则会报错:
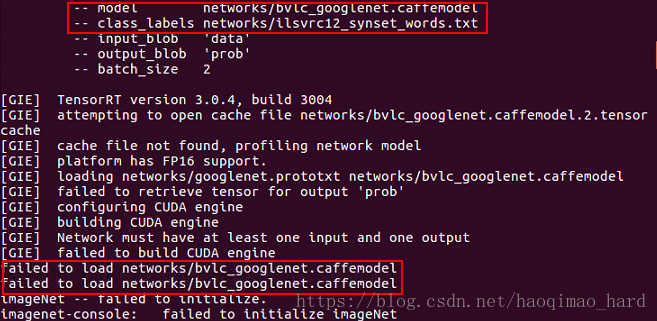
为了方便,再给个下好的网盘链接:
链接:https://pan.baidu.com/s/16Nc7SjYJc5FN5xKitWAn7Q 密码:qjhl
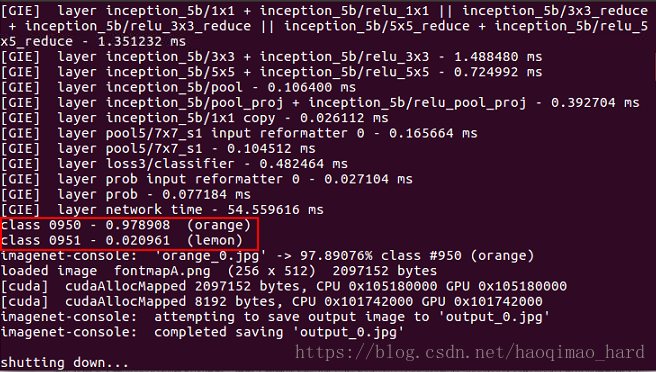
运行结果:
(2)检测
./imagenet-camera googlenet结果:

可以达到10帧/秒,把我的马里奥识别成了头盔2333
二、主机端
1.安装依赖项
我的主机是ubuntu16.04,所以仅以此为例,其他系统的相关选项都能在参考4中找到:
(1)预先设置
CUDA_REPO_PKG=http://developer.download.nvidia.com/compute/cuda/repos/ubuntu1604/x86_64/cuda-repo-ubuntu1604_8.0.61-1_amd64.deb
ML_REPO_PKG=http://developer.download.nvidia.com/compute/machine-learning/repos/ubuntu1604/x86_64/nvidia-machine-learning-repo-ubuntu1604_1.0.0-1_amd64.deb
(2)下载安装包
wget "$CUDA_REPO_PKG" -O /tmp/cuda-repo.deb && sudo dpkg -i /tmp/cuda-repo.deb && rm -f /tmp/cuda-repo.deb
wget "$ML_REPO_PKG" -O /tmp/ml-repo.deb && sudo dpkg -i /tmp/ml-repo.deb && rm -f /tmp/ml-repo.deb
(3)更新
sudo apt-get update(4)依赖项
sudo apt-get install --no-install-recommends git graphviz python-dev python-flask python-flaskext.wtf python-gevent python-h5py python-numpy python-pil python-pip python-scipy python-tk2.Caffe配置
要求必须构建caffe(DIGITS requires a build of Caffe),按照参考5中的步骤进行:
(1)Building Protobuf3
参考:
1.吉浦迅-【入门篇】Jetson TX2深度学习Inference初体验
3.NVIDIA/DIGITS: Deep Learning GPU Training System