- 下载
先在网上下载cas-server-3.5.2,将里面的cas-server-webapp-3.5.2.war放到tomcat的webapps目录下。 - https设置
cas单点登默认使用的是https,所以需要证书,由于是个人测试和学习用的,可以用JDK自带的keytool工具生成证书。
2.1 用JDK生成证书: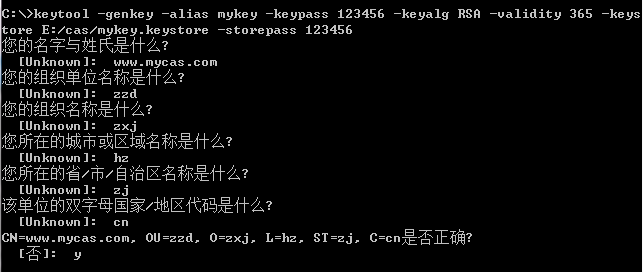
方便复制:keytool -genkey -alias mykey -keypass 123456 -keyalg RSA -validity 365 -keystore E:/cas/mykey.keystore -storepass 123456
其中-keystore 的参数是存放生成证书的路径,需要提前创建好。您的名字与姓氏那一栏输入的是域名,而不能是ip。这里可以修改hosts文件:
# localhost name resolution is handled within DNS itself.
#    127.0.0.1       localhost
#    ::1             localhost
     127.0.0.1       www.mycas.com
2.2 导出证书:
方便复制:keytool -keystore E:/cas/mykey.keystore -export -alias mykey -file E:/cas/mykey.cer
2.3 使用证书
这里可以直接双击mykey.cer文件安装证书,将证书存储到受信任的根证书颁发机构。或者为客户端的JVM导入证书: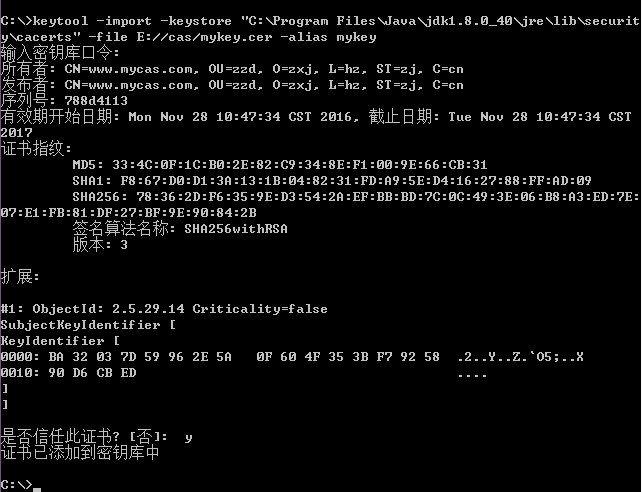
方便复制:keytool -import -keystore "C:\Program Files\Java\jdk1.8.0_40\jre\lib\securit
y\cacerts" -file E://cas/mykey.cer -alias mykey
这里输入的密码:changeit
2.4 修改tomcat配置
打开tomcat的conf目录下server.xml,找到1 <!-- 2 <Connector port="8443" protocol="org.apache.coyote.http11.Http11Protocol" 3 maxThreads="150" SSLEnabled="true" scheme="https" secure="true" 4 clientAuth="false" sslProtocol="TLS" /> 5 -->
将注释打开,并改为
1 <Connector port="8443" protocol="org.apache.coyote.http11.Http11Protocol"
2            maxThreads="150" SSLEnabled="true" scheme="https" secure="true"
3            clientAuth="false" sslProtocol="TLS"
4            keystoreFile="E:/cas/mykey.keystore" keystorePass="123456" />
其中keystoreFile是生成证书的路径,keystorePass是证书的密码
- 启动tomcat进行测试

方便复制:https://www.mycas.com:8443/cas-server-webapp-3.5.2/login
只要用户名密码一致就能登录。 - 取消https
如果不想用https的方式,需要修改一些配置。
4.1 找到WEB-INFO/deployerConfigContext.xml下
1 <bean class="org.jasig.cas.authentication.handler.support.HttpBasedServiceCredentialsAuthenticationHandler"
2     p:httpClient-ref="httpClient" />
添加参数requireSecure为false,如下:
1 <bean class="org.jasig.cas.authentication.handler.support.HttpBasedServiceCredentialsAuthenticationHandler"
2     p:httpClient-ref="httpClient"
3     p:requireSecure="false" />
4.2 找到WEB-INF/spring-configuration/ticketGrantingTicketCookieGenerator.xml下
1 <bean id="ticketGrantingTicketCookieGenerator" class="org.jasig.cas.web.support.CookieRetrievingCookieGenerator"
2     p:cookieSecure="true"
3     p:cookieMaxAge="-1"
4     p:cookieName="CASTGC"
5     p:cookiePath="/cas" />
将cookieSecure改为false,如下:
1 <bean id="ticketGrantingTicketCookieGenerator" class="org.jasig.cas.web.support.CookieRetrievingCookieGenerator"
2     p:cookieSecure="false"
3     p:cookieMaxAge="-1"
4     p:cookieName="CASTGC"
5     p:cookiePath="/cas" />
4.3 找到WEB-INF\spring-configuration\warnCookieGenerator.xml下
1 <bean id="warnCookieGenerator" class="org.jasig.cas.web.support.CookieRetrievingCookieGenerator"
2     p:cookieSecure="true"
3     p:cookieMaxAge="-1"
4     p:cookieName="CASPRIVACY"
5     p:cookiePath="/cas" />
将cookieSecure改为false,如下
1 <bean id="warnCookieGenerator" class="org.jasig.cas.web.support.CookieRetrievingCookieGenerator"
2     p:cookieSecure="false"
3     p:cookieMaxAge="-1"
4     p:cookieName="CASPRIVACY"
5     p:cookiePath="/cas" />
4.4 找到tomcat的conf目录下server.xml
把之前打开的注释关闭。测试如下:
方便复制:http://www.mycas.com:8088/cas-server-webapp-3.5.2/login
这里我把tomcat的端口改成了8088。 - 结尾
至此,一个简单的cas单点登录服务端就算搭建完成了
CAS单点登录:服务端搭建
猜你喜欢
转载自blog.csdn.net/wang1988081309/article/details/80828969
今日推荐
周排行