想要整合mybatis和spring,那么我们首先要知道这两个框架是干嘛的,对于mybatis我们前面几篇博客已经有了很详细的介绍,我们通过加载mybatis-configuration.xml 文件来产生SqlSessionFactory,然后通过SqlSessionFactory去产生sqlSession,最后用 sqlSession对数据库表所映射的实体类进行增删改查操作。而spring是干嘛的呢,简单来说,通过spring的DI和IOC,能帮助我们产生对象并管理对象的声明周期,而sprig的AOP也能帮助我们管理对象的事务。那么整合思路就很清晰了。
1、需要spring通过单例的方式管理 SqlSessionFactory,并用 SqlSessionFactory 去创建 sqlSession
2、持久层的 mapper 需要spring 管理
本篇所有源码链接:https://pan.baidu.com/s/1dG00Ksp 密码:d1ev
1、创建mybatis-spring 工程,并导入相应的 jar 包(详情见上面源码)
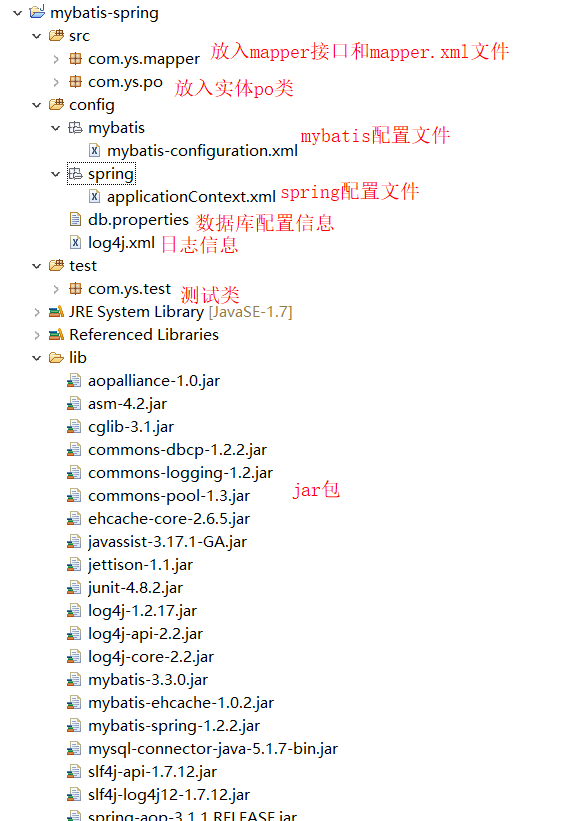
2、在 spring 全局配置文件中 applicationContext.xml 中配置 SqlSessionFactory,以及数据源
①、我们将数据库配置信息写入classpath 目录的 db.properties 文件中
|
1
2
3
4
5
6
|
#db.properties
dataSource=org.apache.commons.dbcp.BasicDataSource
jdbc.driver=com.mysql.jdbc.Driver
jdbc.url=jdbc:mysql:
//localhost:3306/mybatisrelation
jdbc.username=root
jdbc.password=root
|
②、在mybatis全局配置文件mybatis-configuration.xml 开启二级缓存,以及别名定义
|
1
2
3
4
5
6
7
8
9
10
11
12
13
14
15
16
17
18
19
|
<?xml version=
"1.0"
encoding=
"UTF-8"
?>
<!DOCTYPE configuration PUBLIC
"-//mybatis.org//DTD Config 3.0//EN"
"http://mybatis.org/dtd/mybatis-3-config.dtd"
>
<configuration>
<!--开启二级缓存 -->
<settings>
<setting name=
"cacheEnabled"
value=
"true"
/>
</settings>
<!-- 包的别名定义 -->
<typeAliases>
<
package
name=
"com.ys.po"
/>
</typeAliases>
<!-- 注意:下面的以前有mybatis全局配置文件管理mapper,现在转移到spring容器管理 -->
<!-- <mappers>
<mapper
class
=
"com.ys.po.UserMapper"
/>
</mappers> -->
</configuration>
|
③、在 spring 全局配置文件中 applicationContext.xml 中配置 SqlSessionFactory,以及数据源
|
1
2
3
4
5
6
7
8
9
10
11
12
13
14
15
16
17
18
19
20
21
22
23
24
25
26
27
28
29
30
31
32
33
34
35
36
37
|
<?xml version=
"1.0"
encoding=
"UTF-8"
?>
<beans xmlns=
"http://www.springframework.org/schema/beans"
xmlns:xsi=
"http://www.w3.org/2001/XMLSchema-instance"
xmlns:context=
"http://www.springframework.org/schema/context"
xmlns:aop=
"http://www.springframework.org/schema/aop"
xmlns:tx=
"http://www.springframework.org/schema/tx"
xsi:schemaLocation="http:
//www.springframework.org/schema/beans
http:
//www.springframework.org/schema/beans/spring-beans-4.2.xsd
http:
//www.springframework.org/schema/context
http:
//www.springframework.org/schema/context/spring-context.xsd
http:
//www.springframework.org/schema/aop
http:
//www.springframework.org/schema/aop/spring-aop-4.2.xsd
http:
//www.springframework.org/schema/tx
http:
//www.springframework.org/schema/tx/spring-tx.xsd">
<!-- 加载classpath下的db.properties文件,里面配了数据库连接的一些信息 -->
<context:property-placeholder location=
"classpath:db.properties"
/>
<!-- 配置数据源 -->
<bean id=
"dataSource"
class
=
"${dataSource}"
destroy-method=
"close"
>
<property name=
"driverClassName"
value=
"${jdbc.driver}"
/>
<property name=
"url"
value=
"${jdbc.url}"
/>
<property name=
"username"
value=
"${jdbc.username}"
/>
<property name=
"password"
value=
"${jdbc.password}"
/>
<property name=
"maxActive"
value=
"10"
/>
<property name=
"maxIdle"
value=
"5"
/>
</bean>
<!-- 配置sqlSessionFactory,SqlSessionFactoryBean是用来产生sqlSessionFactory的 -->
<bean id=
"sqlSessionFactory"
class
=
"org.mybatis.spring.SqlSessionFactoryBean"
>
<!-- 加载mybatis的全局配置文件,放在classpath下的mybatis文件夹中 -->
<property name=
"configLocation"
value=
"mybatis/mybatis-configuration.xml"
/>
<!-- 加载数据源,使用上面配置好的数据源 -->
<property name=
"dataSource"
ref=
"dataSource"
/>
</bean>
</beans>
|
3、mapper 接口开发配置
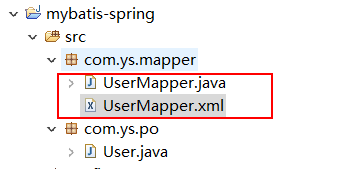
①、创建 po 类
在com.ys.po包下创建 User.java
|
1
2
3
4
5
6
7
8
9
10
11
12
13
14
15
16
17
18
19
20
21
22
23
24
25
26
27
28
29
30
|
package
com.ys.po;
public
class
User {
private
int
id;
private
String username;
private
String sex;
public
int
getId() {
return
id;
}
public
void
setId(
int
id) {
this
.id = id;
}
public
String getUsername() {
return
username;
}
public
void
setUsername(String username) {
this
.username = username;
}
public
String getSex() {
return
sex;
}
public
void
setSex(String sex) {
this
.sex = sex;
}
@Override
public
String toString() {
return
"User [id="
+ id +
", username="
+ username +
", sex="
+ sex
+
"]"
;
}
}
|
②、创建接口 UserMapper.java,以及UserMapper.xml 文件
必须满足以下四点:
|
1
2
3
4
|
1
、UserMapper 接口必须要和 UserMapper.xml 文件同名且在同一个包下,也就是说 UserMapper.xml 文件中的namespace是UserMapper接口的全类名
2
、UserMapper接口中的方法名和 UserMapper.xml 文件中定义的 id 一致
3
、UserMapper接口输入参数类型要和 UserMapper.xml 中定义的 parameterType 一致
4
、UserMapper接口返回数据类型要和 UserMapper.xml 中定义的 resultType 一致
|
UserMapper.java
|
1
2
3
4
5
6
7
8
|
package
com.ys.mapper;
import
com.ys.po.User;
public
interface
UserMapper {
//根据 id 查询 user 表数据
public
User selectUserById(
int
id)
throws
Exception;
}
|
UserMapper.xml
|
1
2
3
4
5
6
7
8
9
10
11
12
13
14
15
16
17
|
<?xml version=
"1.0"
encoding=
"UTF-8"
?>
<!DOCTYPE mapper
PUBLIC
"-//mybatis.org//DTD Mapper 3.0//EN"
"http://mybatis.org/dtd/mybatis-3-mapper.dtd"
>
<mapper namespace=
"com.ys.mapper.UserMapper"
>
<!-- 根据 id 查询 user 表中的数据
id:唯一标识符,此文件中的id值不能重复
resultType:返回值类型,一条数据库记录也就对应实体类的一个对象
parameterType:参数类型,也就是查询条件的类型
-->
<select id=
"selectUserById"
resultType=
"com.ys.po.User"
parameterType=
"int"
>
select * from user where id = #{id}
</select>
</mapper>
|
4、在 spring全局配置文件applicationContext.xml 中配置 mapper
|
1
2
3
4
5
|
<!-- MapperFactoryBean:根据mapper接口生成的代理对象 -->
<bean id=
"userMapper"
class
=
"org.mybatis.spring.mapper.MapperFactoryBean"
>
<property name=
"mapperInterface"
value=
"com.ys.mapper.UserMapper"
/>
<property name=
"sqlSessionFactory"
ref=
"sqlSessionFactory"
/>
</bean>
|
测试:
|
1
2
3
4
5
6
7
8
9
10
11
12
13
14
15
16
17
18
19
20
21
22
23
24
25
26
27
28
|
package
com.ys.test;
import
org.junit.Before;
import
org.junit.Test;
import
org.springframework.context.ApplicationContext;
import
org.springframework.context.support.ClassPathXmlApplicationContext;
import
com.ys.mapper.UserMapper;
import
com.ys.po.User;
public
class
UserMapperTest {
private
ApplicationContext applicationContext;
@Before
public
void
setUp()
throws
Exception {
applicationContext =
new
ClassPathXmlApplicationContext(
"classpath:spring/applicationContext.xml"
);
//得到spring容器
}
@Test
public
void
testSelectUserById()
throws
Exception {
UserMapper userMapper = (UserMapper) applicationContext.getBean(
"userMapper"
);
User user = userMapper.selectUserById(
1
);
System.out.println(user);
}
}
|
从配置中可以看出,使用MapperFactoryBean来产生mapper的代理对象,首先要配置一个mapperInterface,即你要spring产生哪个mapper接口对应的代理对象,将mapper接口的全类名给传进去,spring就知道要创建对应的代理对象了,然后配置sqlSessionFactory,用来产生sqlSession。
但是我们发现,id="userMapper" 写死了,如果我们有很多 mapper 接口,那么我们每一个都需要配置吗?答案是不用的,我们可以不用配置 id 属性,然后加上包扫描配置,如下:
|
1
2
3
4
5
6
7
8
9
10
|
<!--第二种方式:mapper批量扫描
规范:mapper.java和mapper.xml必须在同一个包下,并没名称一致
bean的id为mapper类名(首字母小写)
-->
<bean
class
=
"org.mybatis.spring.mapper.MapperScannerConfigurer"
>
<!-- 指定扫描的包名
如果扫描多个包,那么每个包中间使用半角逗号分隔 -->
<property name=
"basePackage"
value=
"com.ys.mapper"
></property>
<property name=
"sqlSessionFactoryBeanName"
value=
"sqlSessionFactory"
/>
</bean>
|
测试程序还是和上面一样,那么spring和mybatis整合就完美了。
想要整合mybatis和spring,那么我们首先要知道这两个框架是干嘛的,对于mybatis我们前面几篇博客已经有了很详细的介绍,我们通过加载mybatis-configuration.xml 文件来产生SqlSessionFactory,然后通过SqlSessionFactory去产生sqlSession,最后用 sqlSession对数据库表所映射的实体类进行增删改查操作。而spring是干嘛的呢,简单来说,通过spring的DI和IOC,能帮助我们产生对象并管理对象的声明周期,而sprig的AOP也能帮助我们管理对象的事务。那么整合思路就很清晰了。
1、需要spring通过单例的方式管理 SqlSessionFactory,并用 SqlSessionFactory 去创建 sqlSession
2、持久层的 mapper 需要spring 管理
本篇所有源码链接:https://pan.baidu.com/s/1dG00Ksp 密码:d1ev
1、创建mybatis-spring 工程,并导入相应的 jar 包(详情见上面源码)
2、在 spring 全局配置文件中 applicationContext.xml 中配置 SqlSessionFactory,以及数据源
①、我们将数据库配置信息写入classpath 目录的 db.properties 文件中
|
1
2
3
4
5
6
|
#db.properties
dataSource=org.apache.commons.dbcp.BasicDataSource
jdbc.driver=com.mysql.jdbc.Driver
jdbc.url=jdbc:mysql:
//localhost:3306/mybatisrelation
jdbc.username=root
jdbc.password=root
|
②、在mybatis全局配置文件mybatis-configuration.xml 开启二级缓存,以及别名定义
|
1
2
3
4
5
6
7
8
9
10
11
12
13
14
15
16
17
18
19
|
<?xml version=
"1.0"
encoding=
"UTF-8"
?>
<!DOCTYPE configuration PUBLIC
"-//mybatis.org//DTD Config 3.0//EN"
"http://mybatis.org/dtd/mybatis-3-config.dtd"
>
<configuration>
<!--开启二级缓存 -->
<settings>
<setting name=
"cacheEnabled"
value=
"true"
/>
</settings>
<!-- 包的别名定义 -->
<typeAliases>
<
package
name=
"com.ys.po"
/>
</typeAliases>
<!-- 注意:下面的以前有mybatis全局配置文件管理mapper,现在转移到spring容器管理 -->
<!-- <mappers>
<mapper
class
=
"com.ys.po.UserMapper"
/>
</mappers> -->
</configuration>
|
③、在 spring 全局配置文件中 applicationContext.xml 中配置 SqlSessionFactory,以及数据源
|
1
2
3
4
5
6
7
8
9
10
11
12
13
14
15
16
17
18
19
20
21
22
23
24
25
26
27
28
29
30
31
32
33
34
35
36
37
|
<?xml version=
"1.0"
encoding=
"UTF-8"
?>
<beans xmlns=
"http://www.springframework.org/schema/beans"
xmlns:xsi=
"http://www.w3.org/2001/XMLSchema-instance"
xmlns:context=
"http://www.springframework.org/schema/context"
xmlns:aop=
"http://www.springframework.org/schema/aop"
xmlns:tx=
"http://www.springframework.org/schema/tx"
xsi:schemaLocation="http:
//www.springframework.org/schema/beans
http:
//www.springframework.org/schema/beans/spring-beans-4.2.xsd
http:
//www.springframework.org/schema/context
http:
//www.springframework.org/schema/context/spring-context.xsd
http:
//www.springframework.org/schema/aop
http:
//www.springframework.org/schema/aop/spring-aop-4.2.xsd
http:
//www.springframework.org/schema/tx
http:
//www.springframework.org/schema/tx/spring-tx.xsd">
<!-- 加载classpath下的db.properties文件,里面配了数据库连接的一些信息 -->
<context:property-placeholder location=
"classpath:db.properties"
/>
<!-- 配置数据源 -->
<bean id=
"dataSource"
class
=
"${dataSource}"
destroy-method=
"close"
>
<property name=
"driverClassName"
value=
"${jdbc.driver}"
/>
<property name=
"url"
value=
"${jdbc.url}"
/>
<property name=
"username"
value=
"${jdbc.username}"
/>
<property name=
"password"
value=
"${jdbc.password}"
/>
<property name=
"maxActive"
value=
"10"
/>
<property name=
"maxIdle"
value=
"5"
/>
</bean>
<!-- 配置sqlSessionFactory,SqlSessionFactoryBean是用来产生sqlSessionFactory的 -->
<bean id=
"sqlSessionFactory"
class
=
"org.mybatis.spring.SqlSessionFactoryBean"
>
<!-- 加载mybatis的全局配置文件,放在classpath下的mybatis文件夹中 -->
<property name=
"configLocation"
value=
"mybatis/mybatis-configuration.xml"
/>
<!-- 加载数据源,使用上面配置好的数据源 -->
<property name=
"dataSource"
ref=
"dataSource"
/>
</bean>
</beans>
|
3、mapper 接口开发配置
①、创建 po 类
在com.ys.po包下创建 User.java
|
1
2
3
4
5
6
7
8
9
10
11
12
13
14
15
16
17
18
19
20
21
22
23
24
25
26
27
28
29
30
|
package
com.ys.po;
public
class
User {
private
int
id;
private
String username;
private
String sex;
public
int
getId() {
return
id;
}
public
void
setId(
int
id) {
this
.id = id;
}
public
String getUsername() {
return
username;
}
public
void
setUsername(String username) {
this
.username = username;
}
public
String getSex() {
return
sex;
}
public
void
setSex(String sex) {
this
.sex = sex;
}
@Override
public
String toString() {
return
"User [id="
+ id +
", username="
+ username +
", sex="
+ sex
+
"]"
;
}
}
|
②、创建接口 UserMapper.java,以及UserMapper.xml 文件
必须满足以下四点:
|
1
2
3
4
|
1
、UserMapper 接口必须要和 UserMapper.xml 文件同名且在同一个包下,也就是说 UserMapper.xml 文件中的namespace是UserMapper接口的全类名
2
、UserMapper接口中的方法名和 UserMapper.xml 文件中定义的 id 一致
3
、UserMapper接口输入参数类型要和 UserMapper.xml 中定义的 parameterType 一致
4
、UserMapper接口返回数据类型要和 UserMapper.xml 中定义的 resultType 一致
|
UserMapper.java
|
1
2
3
4
5
6
7
8
|
package
com.ys.mapper;
import
com.ys.po.User;
public
interface
UserMapper {
//根据 id 查询 user 表数据
public
User selectUserById(
int
id)
throws
Exception;
}
|
UserMapper.xml
|
1
2
3
4
5
6
7
8
9
10
11
12
13
14
15
16
17
|
<?xml version=
"1.0"
encoding=
"UTF-8"
?>
<!DOCTYPE mapper
PUBLIC
"-//mybatis.org//DTD Mapper 3.0//EN"
"http://mybatis.org/dtd/mybatis-3-mapper.dtd"
>
<mapper namespace=
"com.ys.mapper.UserMapper"
>
<!-- 根据 id 查询 user 表中的数据
id:唯一标识符,此文件中的id值不能重复
resultType:返回值类型,一条数据库记录也就对应实体类的一个对象
parameterType:参数类型,也就是查询条件的类型
-->
<select id=
"selectUserById"
resultType=
"com.ys.po.User"
parameterType=
"int"
>
select * from user where id = #{id}
</select>
</mapper>
|
4、在 spring全局配置文件applicationContext.xml 中配置 mapper
|
1
2
3
4
5
|
<!-- MapperFactoryBean:根据mapper接口生成的代理对象 -->
<bean id=
"userMapper"
class
=
"org.mybatis.spring.mapper.MapperFactoryBean"
>
<property name=
"mapperInterface"
value=
"com.ys.mapper.UserMapper"
/>
<property name=
"sqlSessionFactory"
ref=
"sqlSessionFactory"
/>
</bean>
|
测试:
|
1
2
3
4
5
6
7
8
9
10
11
12
13
14
15
16
17
18
19
20
21
22
23
24
25
26
27
28
|
package
com.ys.test;
import
org.junit.Before;
import
org.junit.Test;
import
org.springframework.context.ApplicationContext;
import
org.springframework.context.support.ClassPathXmlApplicationContext;
import
com.ys.mapper.UserMapper;
import
com.ys.po.User;
public
class
UserMapperTest {
private
ApplicationContext applicationContext;
@Before
public
void
setUp()
throws
Exception {
applicationContext =
new
ClassPathXmlApplicationContext(
"classpath:spring/applicationContext.xml"
);
//得到spring容器
}
@Test
public
void
testSelectUserById()
throws
Exception {
UserMapper userMapper = (UserMapper) applicationContext.getBean(
"userMapper"
);
User user = userMapper.selectUserById(
1
);
System.out.println(user);
}
}
|
从配置中可以看出,使用MapperFactoryBean来产生mapper的代理对象,首先要配置一个mapperInterface,即你要spring产生哪个mapper接口对应的代理对象,将mapper接口的全类名给传进去,spring就知道要创建对应的代理对象了,然后配置sqlSessionFactory,用来产生sqlSession。
但是我们发现,id="userMapper" 写死了,如果我们有很多 mapper 接口,那么我们每一个都需要配置吗?答案是不用的,我们可以不用配置 id 属性,然后加上包扫描配置,如下:
|
1
2
3
4
5
6
7
8
9
10
|
<!--第二种方式:mapper批量扫描
规范:mapper.java和mapper.xml必须在同一个包下,并没名称一致
bean的id为mapper类名(首字母小写)
-->
<bean
class
=
"org.mybatis.spring.mapper.MapperScannerConfigurer"
>
<!-- 指定扫描的包名
如果扫描多个包,那么每个包中间使用半角逗号分隔 -->
<property name=
"basePackage"
value=
"com.ys.mapper"
></property>
<property name=
"sqlSessionFactoryBeanName"
value=
"sqlSessionFactory"
/>
</bean>
|
测试程序还是和上面一样,那么spring和mybatis整合就完美了。