1、前言
之前有写过 SSM(spring+springMVC+mybatis) 的整合文章,而如今随着微服务架构的盛行,并且 spring boot 这种约定大于配置的框架开发比 springMVC 更加简洁和高效,所以趁着手头有点空闲时间进行了 Spring Boot 和 MyBatis 的整合,期间也踩了不少坑,在此将过程记录下来以可以帮助后来的同学。
2、环境
· 开发工具:Intellij IDEA 2017
· Spring Boot:1.5.7.RELEASE
· JDK:1.8.0_161
· Maven:3.3.9
· MySQL:5.7系列
3、数据准备
CREATE TABLE `userinfo` (
  `id` int(10) unsigned NOT NULL AUTO_INCREMENT,
  `user_id` varchar(32) NOT NULL,
  `user_name` varchar(130) NOT NULL,
  `age` int(11) NOT NULL,
  `gender` varchar(11) NOT NULL,
  `address` varchar(100) NOT NULL,
  `user_pass` varchar(132) NOT NULL COMMENT '用户秘银,进行md5加盐处理',
  PRIMARY KEY (`id`),
  KEY `uid` (`user_id`) USING BTREE
) ENGINE=InnoDB AUTO_INCREMENT=7 DEFAULT CHARSET=utf8;

-- ----------------------------
-- Records of userinfo
-- ----------------------------
INSERT INTO `userinfo` VALUES ('1', 'b6866b572db34900a75a57697f16fc01', '张三', '10', '男', 'string1', 'string1');
INSERT INTO `userinfo` VALUES ('2', '231a454d01f24cd292ed4b0a401233f2', '李四', '20', '男', 'string2', 'string2');
INSERT INTO `userinfo` VALUES ('3', '2831089e21634fb9b744475999a28bbe', '王五', '30', '女', 'string3', 'string3');
INSERT INTO `userinfo` VALUES ('4', '55677286ba754605ac585cdedc6bd943', '马六', '40', '女', 'string4', 'string4');
INSERT INTO `userinfo` VALUES ('5', '8ea709e95d64472da917cc5916240ae8', '赵七', '50', '男', 'string5', 'string5');
INSERT INTO `userinfo` VALUES ('6', 'e793646a8b1745709f036e0ee2ed869e', '三八', '60', '男', 'string6', 'string6');
4、创建项目
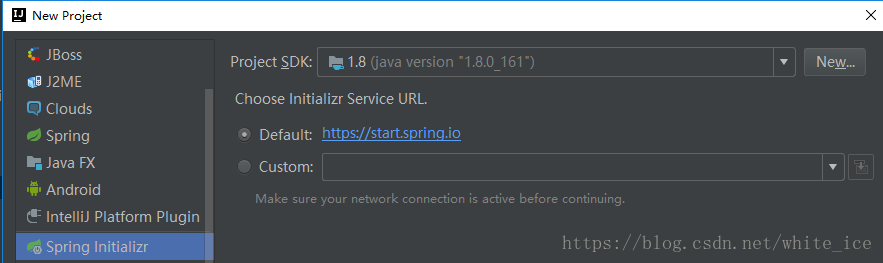
依次点击 File > New > Project....
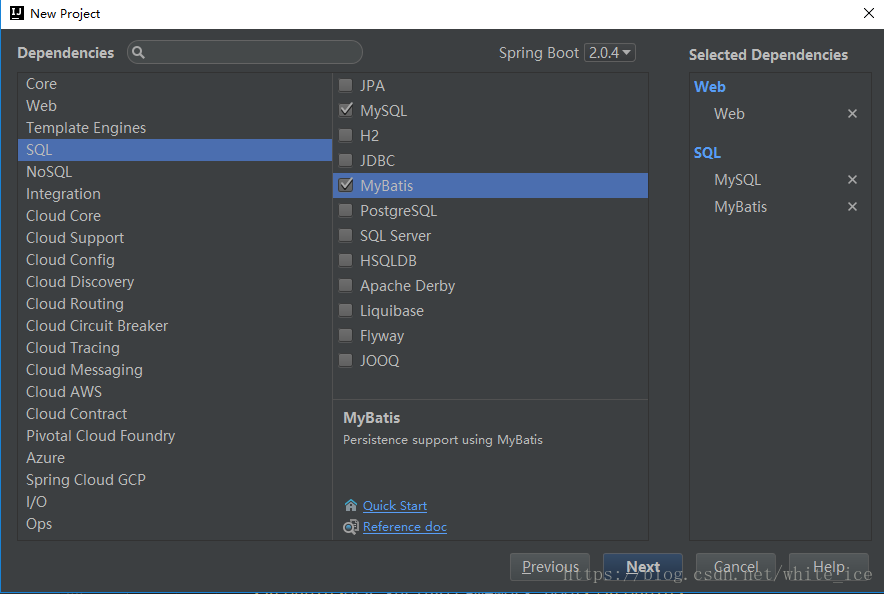
点击 next 输入 groupId 和 artifactId,然后选择初始依赖配置,这里选择 web,mysql,Mybatis 三个:
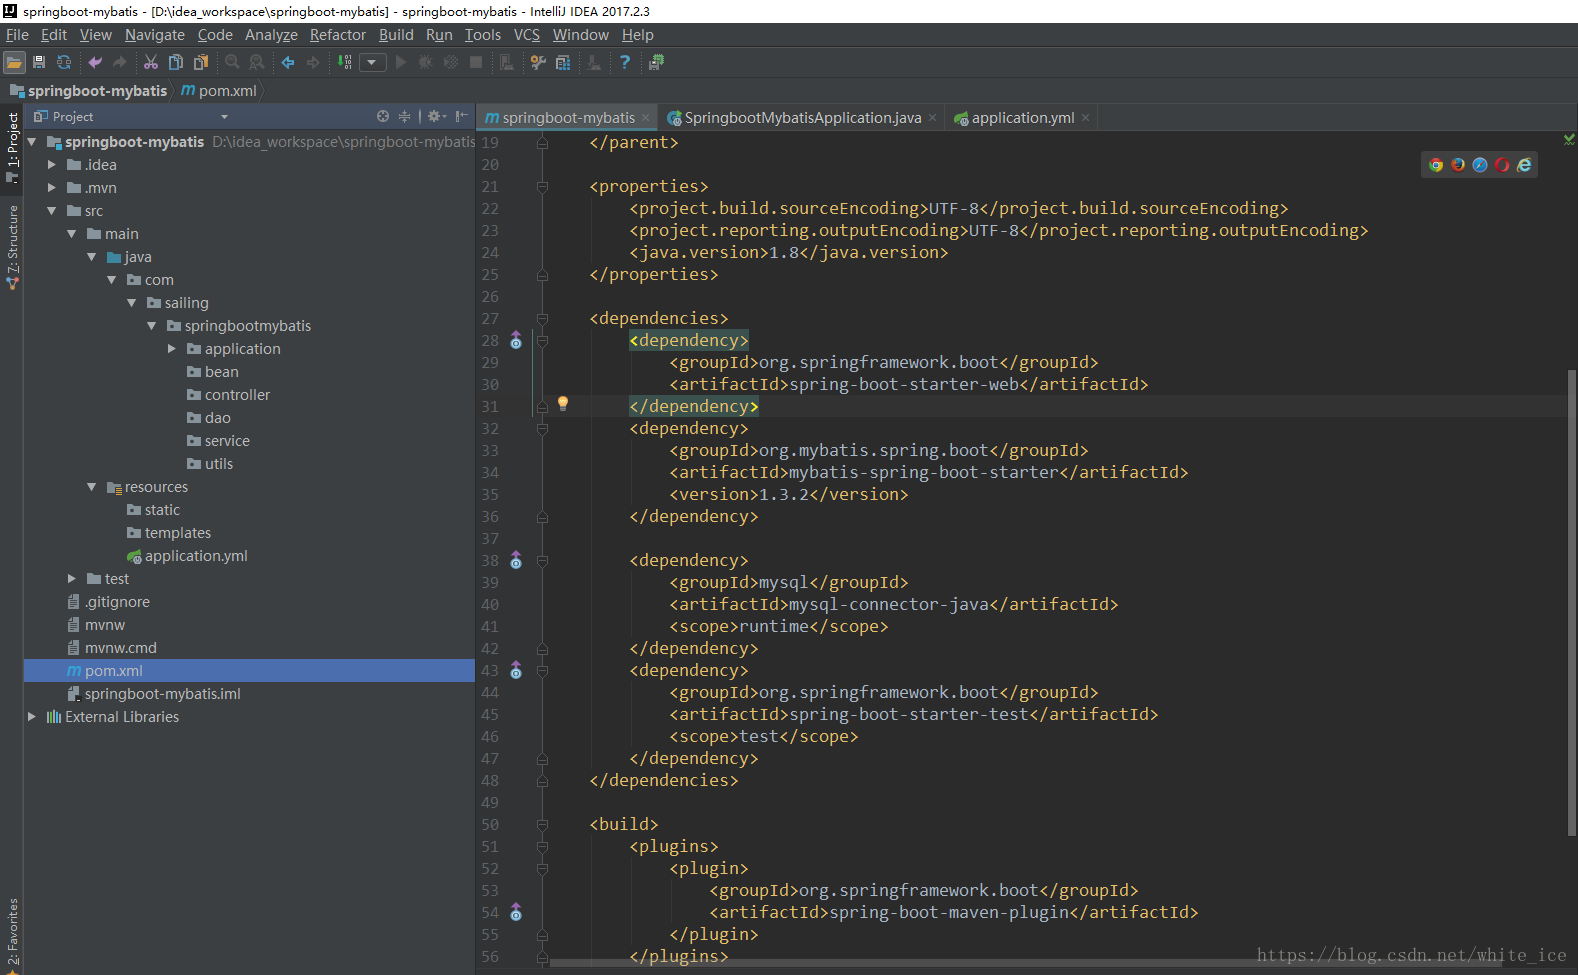
创建完成的项目,我们在基础上创建如下 package(bean,mapper,service,service.impl,controller,utils),配置文件可以使用 properties 和 yml 两种文件,我们这里删除自带的 application.properties 文件,创建 application.yml 文件,这样整个项目目录结构以及初始 pom.xml 内容如下图所示:
5、使用Generator插件自动生成代码
mybatis 提供了自动生成与数据库表对应实体、mapper、以及 xml文件 的插件,这很大程度上节省了我们的开发时间,首先我们需要在 resources 文件夹下创建 generatorConfig.xml,这是插件的核心配置,包含数据库连接以及生成的实体、mapper存放地址等信息,然后在 resources 文件夹下创建 mapperXML 文件夹(用来存放自动生成xml),这里贴出我的配置内容:
<?xml version="1.0" encoding="UTF-8"?>
<!DOCTYPE generatorConfiguration
        PUBLIC "-//mybatis.org//DTD MyBatis Generator Configuration 1.0//EN"
        "http://mybatis.org/dtd/mybatis-generator-config_1_0.dtd">
<generatorConfiguration>

    <!-- 数据库驱动:选择你的本地硬盘上面的数据库驱动包-->
    <classPathEntry  location="D:\maven_repository\mysql\mysql-connector-java\5.1.44\mysql-connector-java-5.1.44.jar"/>
    <context id="DB2Tables"  targetRuntime="MyBatis3">

        <commentGenerator>
            <property name="suppressDate" value="true"/>
            <!-- 是否去除自动生成的注释 true:是 : false:否 -->
            <property name="suppressAllComments" value="true"/>
        </commentGenerator>

        <!--数据库链接URL,用户名、密码 -->
        <jdbcConnection driverClass="com.mysql.jdbc.Driver" connectionURL="jdbc:mysql://127.0.0.1/test"
                        userId="root" password="123456">
        </jdbcConnection>
        <javaTypeResolver>
            <property name="forceBigDecimals" value="false"/>
        </javaTypeResolver>

        <!-- 生成模型的包名和位置-->
        <javaModelGenerator targetPackage="com.sailing.springbootmybatis.bean"
                            targetProject="D:\idea_workspace\springboot-mybatis\src\main\java">
            <property name="enableSubPackages" value="true"/>
            <property name="trimStrings" value="true"/>
        </javaModelGenerator>

        <!-- 生成映射文件的包名和位置-->
        <sqlMapGenerator targetPackage="mapperXML" targetProject="D:\idea_workspace\springboot-mybatis\src\main\resources">
            <property name="enableSubPackages" value="true"/>
        </sqlMapGenerator>

        <!-- 生成DAO的包名和位置-->
        <javaClientGenerator type="XMLMAPPER" targetPackage="com.sailing.springbootmybatis.mapper"
                             targetProject="D:\idea_workspace\springboot-mybatis\src\main\java">
            <property name="enableSubPackages" value="true"/>
        </javaClientGenerator>

        <!-- 要生成的表 tableName是数据库中的表名或视图名 domainObjectName是实体类名-->
        <!-- 这里用的通配符匹配全部的表,另外所有表都有自动增长的id字段。如果不是所有表的配置都一样,可以做针对性的配置。 -->
        <table tableName="%" enableCountByExample="false" enableUpdateByExample="false" enableDeleteByExample="false"
               enableSelectByExample="false" selectByExampleQueryId="false">
            <generatedKey column="id" sqlStatement="Mysql"/>
        </table>
    </context>
</generatorConfiguration>
然后在 pom.xml 文件中找到 plugins节点,增加 mybatis generator 插件依赖,注意其中的 configurationFile 内容和上面创建的 generatorConfig.xml 路径是对应的 。
<build>
   <plugins>
      <plugin>
         <groupId>org.springframework.boot</groupId>
         <artifactId>spring-boot-maven-plugin</artifactId>
      </plugin>

      <!-- mybatis generator 自动生成代码插件 -->
      <plugin>
         <groupId>org.mybatis.generator</groupId>
         <artifactId>mybatis-generator-maven-plugin</artifactId>
         <version>1.3.2</version>
         <configuration>
            <!-- 对应generator配置文件的路径 -->
            <configurationFile>${basedir}/src/main/resources/generatorConfig.xml</configurationFile>
            <overwrite>true</overwrite>
            <verbose>true</verbose>
         </configuration>
      </plugin>
   </plugins>
</build>
最后点击 Edit Configurations... 按钮到添加命令窗口,点击左上角 + 按钮找到 maven (如果没有找到,点击最底下 xx items more...按钮),输入如下命令 Name:generator,Commond line:mybatis-generator.generate -e,点击 ok ,退出来以后点击运行就会自动生成代码如下:
Userinfo.java
package com.sailing.springbootmybatis.bean;

public class Userinfo {
    private Integer id;

    private String userId;

    private String userName;

    private Integer age;

    private String gender;

    private String address;

    private String userPass;

    public Integer getId() {
        return id;
    }

    //setter getter ....
}
UserinfoMapper
package com.sailing.springbootmybatis.mapper;

import com.sailing.springbootmybatis.bean.Userinfo;

public interface UserinfoMapper {
    int deleteByPrimaryKey(Integer id);

    int insert(Userinfo record);

    int insertSelective(Userinfo record);

    Userinfo selectByPrimaryKey(Integer id);

    int updateByPrimaryKeySelective(Userinfo record);

    int updateByPrimaryKey(Userinfo record);
}
UserinfoMapper.xml
<?xml version="1.0" encoding="UTF-8" ?>
<!DOCTYPE mapper PUBLIC "-//mybatis.org//DTD Mapper 3.0//EN" "http://mybatis.org/dtd/mybatis-3-mapper.dtd" >
<mapper namespace="com.sailing.springbootmybatis.mapper.UserinfoMapper" >
  <resultMap id="BaseResultMap" type="com.sailing.springbootmybatis.bean.Userinfo" >
    <id column="id" property="id" jdbcType="INTEGER" />
    <result column="user_id" property="userId" jdbcType="VARCHAR" />
    <result column="user_name" property="userName" jdbcType="VARCHAR" />
    <result column="age" property="age" jdbcType="INTEGER" />
    <result column="gender" property="gender" jdbcType="VARCHAR" />
    <result column="address" property="address" jdbcType="VARCHAR" />
    <result column="user_pass" property="userPass" jdbcType="VARCHAR" />
  </resultMap>
  <sql id="Base_Column_List" >
    id, user_id, user_name, age, gender, address, user_pass
  </sql>
  <select id="selectByPrimaryKey" resultMap="BaseResultMap" parameterType="java.lang.Integer" >
    select
    <include refid="Base_Column_List" />
    from userinfo
    where id = #{id,jdbcType=INTEGER}
  </select>
  <delete id="deleteByPrimaryKey" parameterType="java.lang.Integer" >
    delete from userinfo
    where id = #{id,jdbcType=INTEGER}
  </delete>
  <insert id="insert" parameterType="com.sailing.springbootmybatis.bean.Userinfo" >
    <selectKey resultType="java.lang.Integer" keyProperty="id" order="BEFORE" >
      SELECT LAST_INSERT_ID()
    </selectKey>
    insert into userinfo (id, user_id, user_name,
      age, gender, address,
      user_pass)
    values (#{id,jdbcType=INTEGER}, #{userId,jdbcType=VARCHAR}, #{userName,jdbcType=VARCHAR},
      #{age,jdbcType=INTEGER}, #{gender,jdbcType=VARCHAR}, #{address,jdbcType=VARCHAR},
      #{userPass,jdbcType=VARCHAR})
  </insert>
  <insert id="insertSelective" parameterType="com.sailing.springbootmybatis.bean.Userinfo" >
    <selectKey resultType="java.lang.Integer" keyProperty="id" order="BEFORE" >
      SELECT LAST_INSERT_ID()
    </selectKey>
    insert into userinfo
    <trim prefix="(" suffix=")" suffixOverrides="," >
      id,
      <if test="userId != null" >
        user_id,
      </if>
      <if test="userName != null" >
        user_name,
      </if>
      <if test="age != null" >
        age,
      </if>
      <if test="gender != null" >
        gender,
      </if>
      <if test="address != null" >
        address,
      </if>
      <if test="userPass != null" >
        user_pass,
      </if>
    </trim>
    <trim prefix="values (" suffix=")" suffixOverrides="," >
      #{id,jdbcType=INTEGER},
      <if test="userId != null" >
        #{userId,jdbcType=VARCHAR},
      </if>
      <if test="userName != null" >
        #{userName,jdbcType=VARCHAR},
      </if>
      <if test="age != null" >
        #{age,jdbcType=INTEGER},
      </if>
      <if test="gender != null" >
        #{gender,jdbcType=VARCHAR},
      </if>
      <if test="address != null" >
        #{address,jdbcType=VARCHAR},
      </if>
      <if test="userPass != null" >
        #{userPass,jdbcType=VARCHAR},
      </if>
    </trim>
  </insert>
  <update id="updateByPrimaryKeySelective" parameterType="com.sailing.springbootmybatis.bean.Userinfo" >
    update userinfo
    <set >
      <if test="userId != null" >
        user_id = #{userId,jdbcType=VARCHAR},
      </if>
      <if test="userName != null" >
        user_name = #{userName,jdbcType=VARCHAR},
      </if>
      <if test="age != null" >
        age = #{age,jdbcType=INTEGER},
      </if>
      <if test="gender != null" >
        gender = #{gender,jdbcType=VARCHAR},
      </if>
      <if test="address != null" >
        address = #{address,jdbcType=VARCHAR},
      </if>
      <if test="userPass != null" >
        user_pass = #{userPass,jdbcType=VARCHAR},
      </if>
    </set>
    where id = #{id,jdbcType=INTEGER}
  </update>
  <update id="updateByPrimaryKey" parameterType="com.sailing.springbootmybatis.bean.Userinfo" >
    update userinfo
    set user_id = #{userId,jdbcType=VARCHAR},
      user_name = #{userName,jdbcType=VARCHAR},
      age = #{age,jdbcType=INTEGER},
      gender = #{gender,jdbcType=VARCHAR},
      address = #{address,jdbcType=VARCHAR},
      user_pass = #{userPass,jdbcType=VARCHAR}
    where id = #{id,jdbcType=INTEGER}
  </update>
</mapper>
6、配置文件
这里我们没有采用 spring boot 1.x 版本默认使用的 org.apache.tomcat.jdbc.pool.DataSource 数据源(spring boot 2.0 以后默认采用性能更好的 HikariCP 数据源 ),而是采用阿里巴巴的 Druid 数据源-----官方文档,所以需要在 pom.xml 中添加如下依赖 :
<!-- alibaba的druid数据库连接池 -->
<dependency>
   <groupId>com.alibaba</groupId>
   <artifactId>druid-spring-boot-starter</artifactId>
   <version>1.1.5</version>
</dependency>
然后打开创建的 application.yml 文件,配置如下内容:
server:
  port: 8088
  context-path: /sm
## 配置数据源相关信息
spring:
  datasource:
    name: DBconfig
    type: com.alibaba.druid.pool.DruidDataSource
    url: jdbc:mysql//127.0.0.1:3306/test?useUnicode=true&characterEncoding=utf8&useSSL=false
    username: root
    password: 123456
    driver-class-name: com.mysql.jdbc.Driver
    druid:
      filters: stat
      maxActive: 20
      initialSize: 1
      maxWait: 60000
      minIdle: 1
      timeBetweenEvictionRunsMillis: 60000
      minEvictableIdleTimeMillis: 300000
      validationQuery: select 'x'
      testWhileIdle: true
      testOnBorrow: false
      testOnReturn: false
      poolPreparedStatements: true
      maxOpenPreparedStatements: 20

## 该配置节点为独立的节点,有很多同学容易将这个配置放在spring的节点下,导致配置无法被识别
mybatis:
  mapper-locations: classpath:mapperXML/*.xml  #注意:一定要对应mapper映射xml文件的所在路径
  config-location: classpath:MybatisConfig.xml # 注意: mybatis的配置文件
  type-aliases-package: com.sailing.springbootmybatis.bean  # 注意:对应实体类的路径
贴出 pom.xml 最终内容:
<?xml version="1.0" encoding="UTF-8"?>
<project xmlns="http://maven.apache.org/POM/4.0.0" xmlns:xsi="http://www.w3.org/2001/XMLSchema-instance"
   xsi:schemaLocation="http://maven.apache.org/POM/4.0.0 http://maven.apache.org/xsd/maven-4.0.0.xsd">
   <modelVersion>4.0.0</modelVersion>

   <groupId>com.sailing</groupId>
   <artifactId>springboot-mybatis</artifactId>
   <version>0.0.1-SNAPSHOT</version>
   <packaging>jar</packaging>

   <name>springboot-mybatis</name>
   <description>Demo project for springboot-mybatis</description>

   <parent>
      <groupId>org.springframework.boot</groupId>
      <artifactId>spring-boot-starter-parent</artifactId>
      <version>1.5.7.RELEASE</version>
      <relativePath/> <!-- lookup parent from repository -->
   </parent>

   <properties>
      <project.build.sourceEncoding>UTF-8</project.build.sourceEncoding>
      <project.reporting.outputEncoding>UTF-8</project.reporting.outputEncoding>
      <java.version>1.8</java.version>
   </properties>

   <dependencies>
      <dependency>
         <groupId>org.springframework.boot</groupId>
         <artifactId>spring-boot-starter-web</artifactId>
      </dependency>
      <dependency>
         <groupId>org.mybatis.spring.boot</groupId>
         <artifactId>mybatis-spring-boot-starter</artifactId>
         <version>1.3.2</version>
      </dependency>

      <dependency>
         <groupId>mysql</groupId>
         <artifactId>mysql-connector-java</artifactId>
         <scope>runtime</scope>
      </dependency>
      <dependency>
         <groupId>org.springframework.boot</groupId>
         <artifactId>spring-boot-starter-test</artifactId>
         <scope>test</scope>
      </dependency>

      <!-- ps: 以下依赖是手动添加的 -->

      <!-- alibaba的druid数据库连接池 -->
      <dependency>
         <groupId>com.alibaba</groupId>
         <artifactId>druid-spring-boot-starter</artifactId>
         <version>1.1.5</version>
      </dependency>

   </dependencies>

   <build>
      <plugins>
         <plugin>
            <groupId>org.springframework.boot</groupId>
            <artifactId>spring-boot-maven-plugin</artifactId>
         </plugin>

         <!-- mybatis generator 自动生成代码插件 -->
         <plugin>
            <groupId>org.mybatis.generator</groupId>
            <artifactId>mybatis-generator-maven-plugin</artifactId>
            <version>1.3.2</version>
            <configuration>
               <!-- 对应generator配置文件的路径 -->
               <configurationFile>${basedir}/src/main/resources/generatorConfig.xml</configurationFile>
               <overwrite>true</overwrite>
               <verbose>true</verbose>
            </configuration>
         </plugin>
      </plugins>
   </build>


</project>
7、编写代码
接着来完善代码,编写如下 UserinfoService UserinfoServiceImpl 和 UserinfoController 文件,就写了两个业务层接口,一个根据id查找用户,一个查询所有用户,内容如下:
package com.sailing.springbootmybatis.service;

import com.sailing.springbootmybatis.bean.Userinfo;

import java.util.List;

/**
 * @author baibing
 * @project: springboot-mybatis
 * @package: com.sailing.springbootmybatis.service
 * @Description: service 业务接口
 * @date 2018/9/12 09:52
 */
public interface UserinfoService {

    Userinfo findById(Integer id);

    List<Userinfo> findAllUsers();
}
package com.sailing.springbootmybatis.service.impl;

import com.sailing.springbootmybatis.bean.Userinfo;
import com.sailing.springbootmybatis.mapper.UserinfoMapper;
import com.sailing.springbootmybatis.service.UserinfoService;
import org.springframework.beans.factory.annotation.Autowired;
import org.springframework.stereotype.Service;
import org.springframework.transaction.annotation.Transactional;

import java.util.List;

/**
 * @author baibing
 * @project: springboot-mybatis
 * @package: com.sailing.springbootmybatis.service.impl
 * @Description: service实现类
 * @date 2018/9/12 10:03
 */
@Service
@Transactional
public class UserinfoServiceImpl implements UserinfoService {

    @Autowired
    private UserinfoMapper userinfoMapper;

    @Override
    public Userinfo findById(Integer id) {
        return userinfoMapper.selectByPrimaryKey(id);
    }

    @Override
    public List<Userinfo> findAllUsers() {
        return userinfoMapper.selectAllUsers();
    }
}
package com.sailing.springbootmybatis.controller;

import com.sailing.springbootmybatis.bean.Userinfo;
import com.sailing.springbootmybatis.service.UserinfoService;
import org.springframework.beans.factory.annotation.Autowired;
import org.springframework.web.bind.annotation.PathVariable;
import org.springframework.web.bind.annotation.RequestMapping;
import org.springframework.web.bind.annotation.RequestMethod;
import org.springframework.web.bind.annotation.RestController;

import java.util.List;

/**
 * @author baibing
 * @project: springboot-mybatis
 * @package: com.sailing.springbootmybatis.controller
 * @Description: Userinfo controller 控制层
 * @date 2018/9/12 10:07
 */
@RestController
public class UserinfoController {

    @Autowired
    private UserinfoService userinfoService;

    @RequestMapping(value = "/user/{id}", method = RequestMethod.GET)
    public Userinfo getUser(@PathVariable(value = "id") Integer id){
        return userinfoService.findById(id);
    }

    @RequestMapping(value = "/users", method = RequestMethod.GET)
    public List<Userinfo> getAllUsers(){
        return userinfoService.findAllUsers();
    }
}
此处需要注意的是,需要在 serviceImpl 中注入 mapper 接口,在 controller 层中注入 service 接口。
8、启动类
启动类需要注意的是,官方建议放到根目录,以便于可以自动扫描所有的 mapper、service、controller(这样我们可以不用写 @ComponentScan 和 @MapperScan 注解)。如果和我一样建立一个application包存放启动类的话,需要添加注解 @ComponentScan 和 @MapperScan 来手动指定要扫描的包,前一个是扫描 service 和 controller 的,后一个扫描 mapper 文件的:
package com.sailing.springbootmybatis.application;
import org.mybatis.spring.annotation.MapperScan;
import org.springframework.boot.SpringApplication;
import org.springframework.boot.autoconfigure.SpringBootApplication;
import org.springframework.context.annotation.ComponentScan;
/**
* @author baibing
* @project: springboot-mybatis
* @package: com.sailing.springbootmybatis
* @Description: 主项目的启动类 注意:1.官方建议将此类放到主目录下,以便能扫描到 mapper、service 和 controller
* 2.如果没有按照上面配置,启动项目会报注解找不到相关class错误,解决方法:是在
* 启动类上面增加 @ComponentScan(扫描所有controller和 service 以及 Component)
* 和 @MapperScan(扫描所有mapper) 两个注解也可以解决,但还是建议按照第一种方式。
* @date 2018/9/12 10:07
*/
@ComponentScan(value = {"com.sailing.springbootmybatis.*"})
@MapperScan(value = {"com.sailing.springbootmybatis.mapper"})
@SpringBootApplication
public class SpringbootMybatisApplication {
public static void main(String[] args) {
SpringApplication.run(SpringbootMybatisApplication.class, args);
}
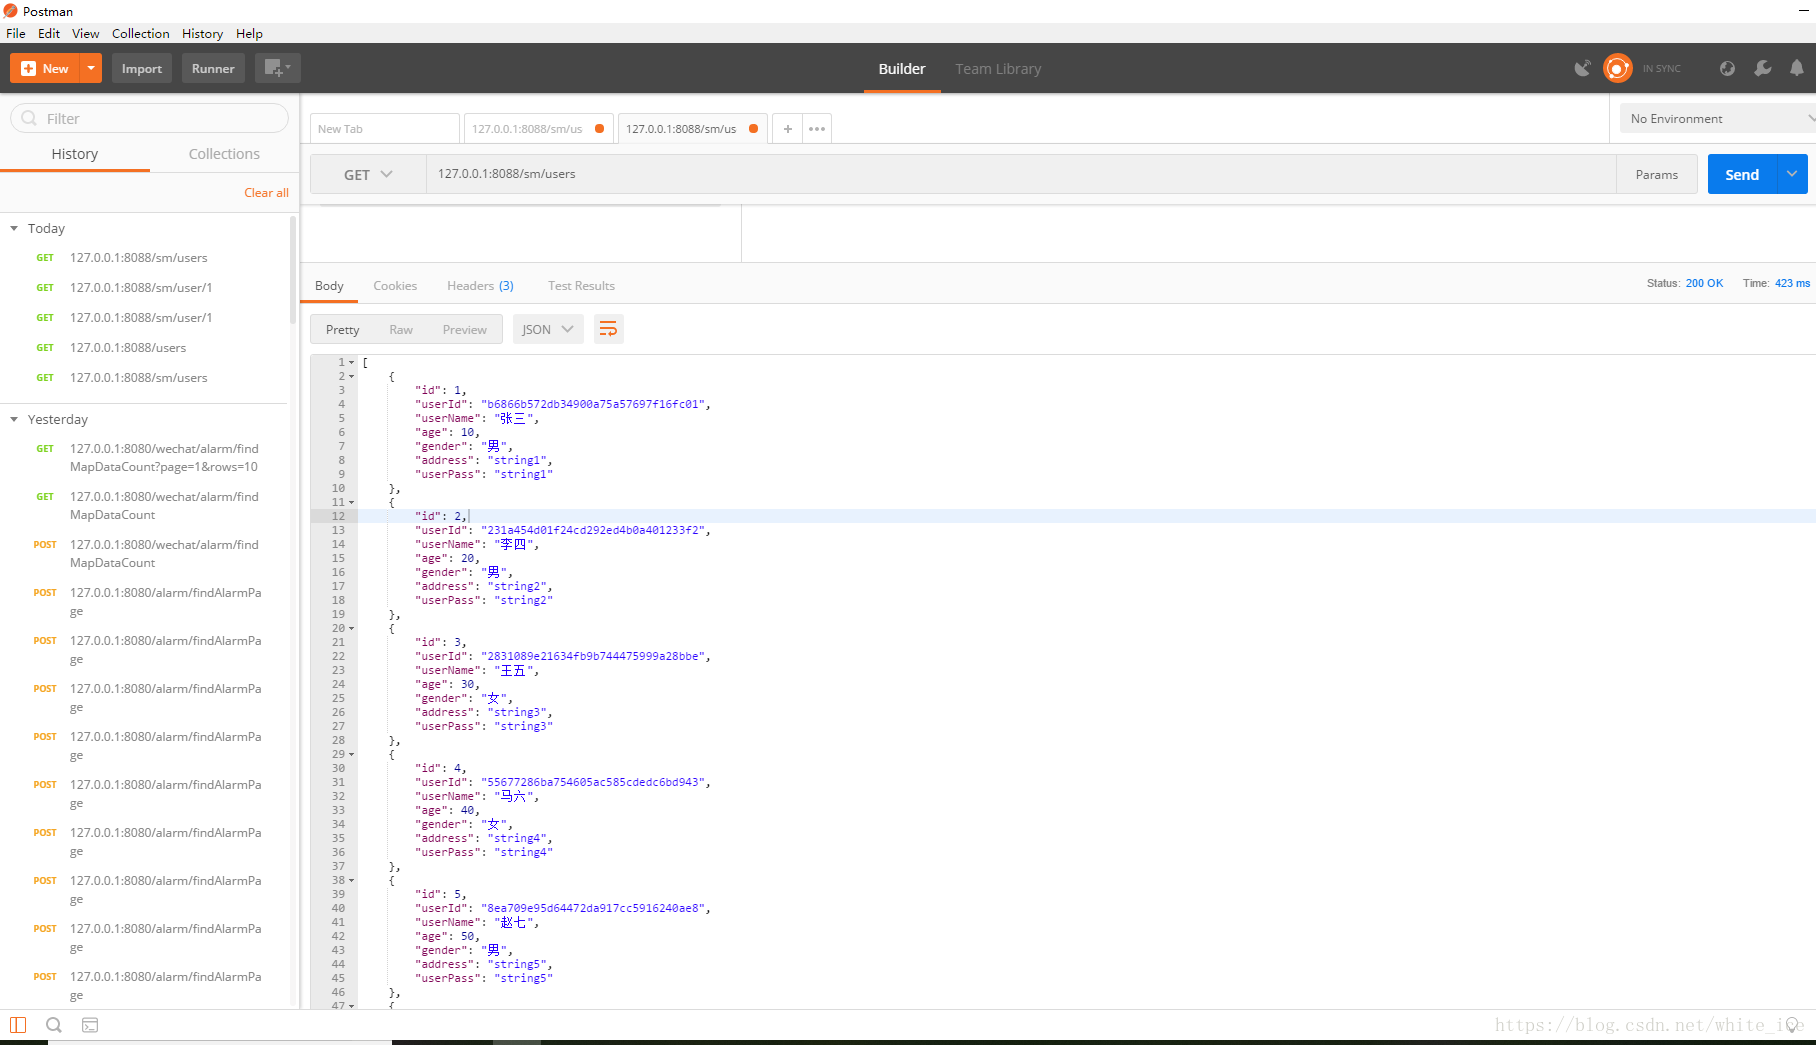
}完成后我们运行项目,这里使用 Postman 进行测试,输入 localhost:8088/sm/users 访问查找所有用户接口,可以看到接口正常运行并返回结果集:
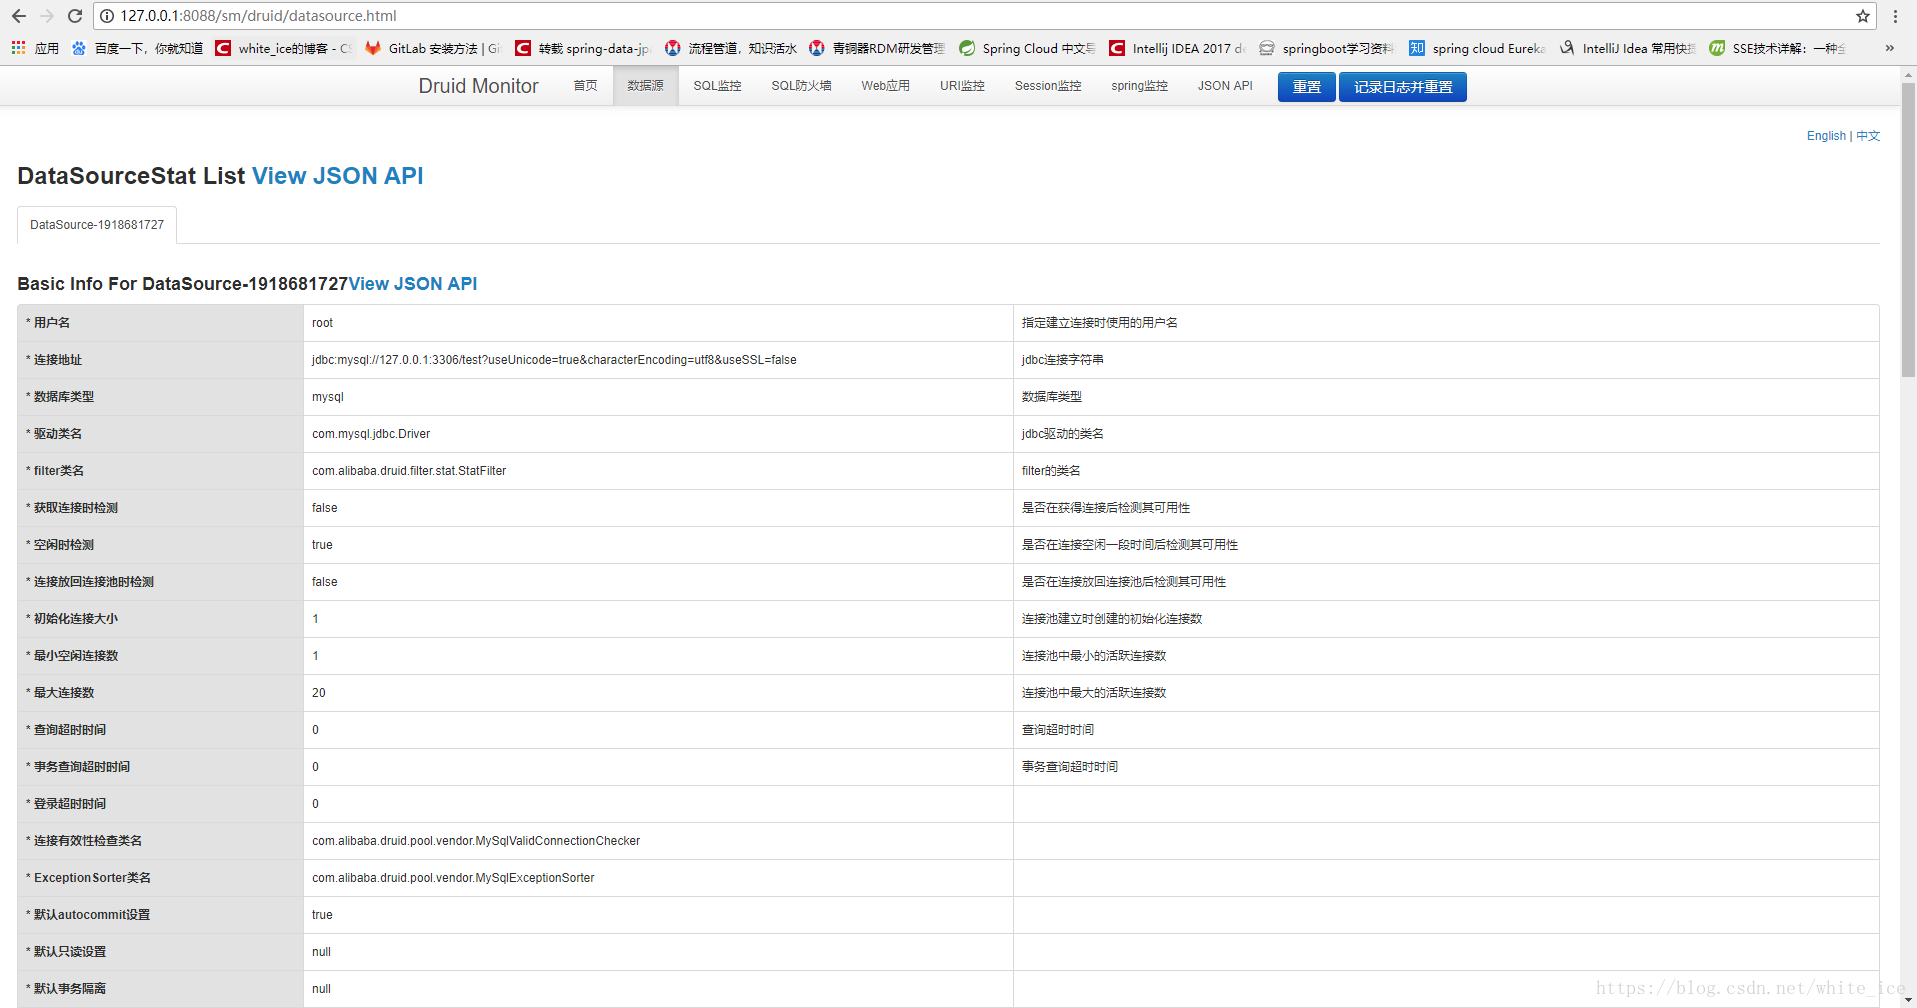
也可以访问:http://127.0.0.1:8088/sm/druid/webapp.html 可以查看Druid 监控信息,包含数据源以及sql监控等信息。
9、结束
到这里,Spring boot 整合 Mybatis 完成!不足之处,欢迎大家留言指正~~~,
项目下载地址:https://download.csdn.net/download/white_ice/10662376