Nginx+keepalived双机热备(双主模式)
此前已经写过一篇使用keepalived实现nginx的高可用,这种方式有一台机器一直作backup使用,有50%的资源被浪费。
Nginx+keepalived双机热备(主从模式)
keepalived安装请查看
Nginx+keepalived双机热备(主从模式)
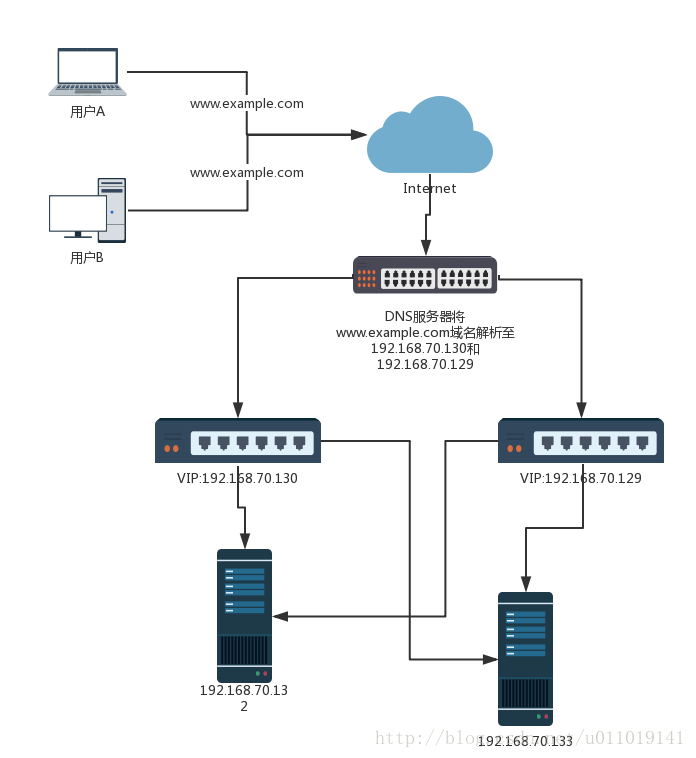
下面来配置nginx+keepalived的双主机双机热备,这种配置下有两个Virtual IP,两个机器互为主备,最后我们把域名DNS服务器解析至两个Virtual IP即可。
环境介绍
两台服务器
Server1:192.168.70.132
Server2:192.168.70.133
要设置的两个虚拟IP
Virtual IP1:192.168.70.130
Virtual IP2:192.168.70.129
将DNS域名解析至两个虚拟IP: 192.168.30.51、192.168.30.52
网络扑拓图
配置第一台服务器
第一台服务器ip为192.168.70.132
vim /etc/keepalived/keepalived.conf! Configuration File for keepalived
global_defs {
notification_email {
acassen@firewall.loc
failover@firewall.loc
sysadmin@firewall.loc
}
notification_email_from Alexandre.Cassen@firewall.loc
smtp_server 192.168.200.1
smtp_connect_timeout 30
router_id NodeA
vrrp_skip_check_adv_addr
vrrp_strict
vrrp_garp_interval 0
vrrp_gna_interval 0
}
vrrp_script chk_nginx { #检查nginx进程脚本此处暂未启动
script "/etc/keepalived/nginx_check.sh"
interval 2
weight -20
}
#虚拟IP1, 本机作为Master
vrrp_instance VI_1 {
state MASTER
interface ens33
virtual_router_id 51
priority 100
advert_int 1
authentication {
auth_type PASS
auth_pass 1111
}
track_script { # 执行上面检测nginx进程脚本
chk_nginx
}
virtual_ipaddress {
192.168.70.130
}
}
#虚拟IP2, 本机作为Backup
vrrp_instance VI_2 {
state BACKUP
interface ens33
virtual_router_id 52
priority 90
advert_int 1
authentication {
auth_type PASS
auth_pass 1111
}
track_script { # 执行上面检测nginx进程脚本
chk_nginx
}
virtual_ipaddress {
192.168.70.129
}
}
配置第二台服务器
vim /etc/keepalived/keepalived.conf! Configuration File for keepalived
global_defs {
notification_email {
acassen@firewall.loc
failover@firewall.loc
sysadmin@firewall.loc
}
notification_email_from Alexandre.Cassen@firewall.loc
smtp_server 192.168.200.1
smtp_connect_timeout 30
router_id NodeB #自定义主机名
vrrp_skip_check_adv_addr
vrrp_strict
vrrp_garp_interval 0
vrrp_gna_interval 0
}
vrrp_script chk_nginx { #检查nginx进程脚本此处暂未启动
script "/etc/keepalived/nginx_check.sh"
interval 2
weight -20
}
#虚拟IP1, 本机作为BACKUP
vrrp_instance VI_1 {
state BACKUP
interface ens33
virtual_router_id 51
priority 90
advert_int 1
authentication {
auth_type PASS
auth_pass 1111
}
track_script { # 执行上面检测nginx进程脚本
chk_nginx
}
virtual_ipaddress { #虚拟ip
192.168.70.130
}
}
#虚拟IP2, 本机作为Master
vrrp_instance VI_2 {
state MASTER
interface ens33
virtual_router_id 52
priority 100
advert_int 1
authentication {
auth_type PASS
auth_pass 1111
}
track_script { # 执行上面检测nginx进程脚本
chk_nginx
}
virtual_ipaddress { #虚拟ip
192.168.70.129
}
}
监控脚本
#!/bin/sh
A=`ps -C nginx --no-header |wc -l`
if [ $A -eq 0 ];then
    nginx
    sleep 2
    if [ `ps -C nginx --no-header |wc -l` -eq 0 ];then
        killall keepalived
    fi
fi
测试
修改nginx默认访问页nginx的默认页面
注意:测试过程中请重启iptables.
# nginx 默认访问页面
# $NGINX_HOME/html/index.html
vim /usr/share/nginx/html/index.html
修改server1的页,加入IP: 192.168.70.132
<!DOCTYPE html>
<html>
<head>
<title>Welcome to nginx!</title>
<style>
    body {
        width: 35em;
        margin: 0 auto;
        font-family: Tahoma, Verdana, Arial, sans-serif;
    }
</style>
</head>
<body>
<h1>Welcome to nginx!</h1>
<p>If you see this page, the nginx web server is successfully installed and
working. Further configuration is required.</p>

<p>For online documentation and support please refer to
<a href="http://nginx.org/">nginx.org</a>.<br/>
Commercial support is available at
<a href="http://nginx.com/">nginx.com</a>.</p>

<p><em>Thank you for using nginx.</em></p>
<p>IP:192.168.70.132</p>
</body>
</html>
修改server2的页,加入IP: 192.168.70.133
<!DOCTYPE html>
<html>
<head>
<title>Welcome to nginx!</title>
<style>
    body {
        width: 35em;
        margin: 0 auto;
        font-family: Tahoma, Verdana, Arial, sans-serif;
    }
</style>
</head>
<body>
<h1>Welcome to nginx!</h1>
<p>If you see this page, the nginx web server is successfully installed and
working. Further configuration is required.</p>

<p>For online documentation and support please refer to
<a href="http://nginx.org/">nginx.org</a>.<br/>
Commercial support is available at
<a href="http://nginx.com/">nginx.com</a>.</p>

<p><em>Thank you for using nginx.</em></p>
<p>IP:192.168.70.133</p>
</body>
</html>
两个机器都启动keepalived和nginx
访问虚拟ip1
在浏览器输入192.168.30.130进入访问页面
访问虚拟ip2
在浏览器输入192.168.30.129进入访问页面
证明两个VIP都起效果了
Kill掉server2的keepalived
killall keepalived访问ip2

证明了server1为server2的备机,server2 down掉后server1接管server2的nginx访问
Kill掉server1机器的keepalived,启动server2机器的keepalived
Kill掉server1
killall keepalived启动server2
service keepalived start访问ip1

证明了server2为server1的备机,server1 down掉后server2接管server1的nginx访问