今天用到了ui-bootstrap中的modal 觉得用起来还不错,也比较简单,博主以前用个ngDialog做的模态框,虽然不知道对不对,但这个插件也还可以。
这貌似是我目前为止用过最简单的功能了,所以博客内容也很简单,大家一看就能懂~~
进入正题,老规矩放下官网的API,蓝灯翻墙,就可以看了,当然还是纯英文的,最近博主看多了,都习惯了。~~~
因为博主用的是1.4*版本的angular 所以官网上的最新的是angular1.5 *的 请注意看ui-bootstrapp-tpl的版本,我写的不是最新版本,版本不同代码还是有差距的,毕竟1.5已经准备向2慢慢走了,很多不太一样了,我没仔细研究啊~好像没$scope了,跟ng2靠拢了,但功能几乎没有太多差距。基本的模态框都是OK的
http://angular-ui.github.io/bootstrap/首先看看都需要那些外部文件,如果你看最新版本的话,他会引入一个sanitize
    <script src="//ajax.googleapis.com/ajax/libs/angularjs/1.4.7/angular.js"></script>
    <script src="//ajax.googleapis.com/ajax/libs/angularjs/1.4.7/angular-animate.js"></script>
    <script src="//angular-ui.github.io/bootstrap/ui-bootstrap-tpls-1.0.0.js"></script>
    <script src="example.js"></script>
    <link href="//netdna.bootstrapcdn.com/bootstrap/3.3.5/css/bootstrap.min.css" rel="stylesheet">
模态框比较简单,我们直接上一个例子就行
在线代码演示网站
Html
<div ng-controller="ModalDemoCtrl">
    <script type="text/ng-template" id="myModalContent.html">
        <div class="modal-header">
            <h3 class="modal-title">I'm a modal!</h3>
        </div>
        <div class="modal-body">
            <ul>
                <li ng-repeat="item in items">
                    <a href="#" ng-click="$event.preventDefault(); selected.item = item">{{ item }}</a>
                </li>
            </ul>
            Selected: <b>{{ selected.item }}</b>
        </div>
        <div class="modal-footer">
            <button class="btn btn-primary" type="button" ng-click="ok()">OK</button>
            <button class="btn btn-warning" type="button" ng-click="cancel()">Cancel</button>
        </div>
    </script>

    <button type="button" class="btn btn-default" ng-click="open()">Open me!</button>
    <button type="button" class="btn btn-default" ng-click="open('lg')">Large modal</button>
    <button type="button" class="btn btn-default" ng-click="open('sm')">Small modal</button>
    <button type="button" class="btn btn-default" ng-click="toggleAnimation()">Toggle Animation ({{ animationsEnabled }})</button>
    <div ng-show="selected">Selection from a modal: {{ selected }}</div>
</div>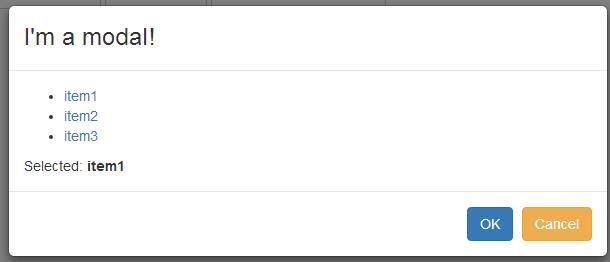
先不看controller,先看我们的HTML页面,我们分解来看
这个script里就是我们的模态框的模板,相信用过bootstrap模态框的对标签应该都不是很陌生
id="myModalContent.html"//用来识别如果我的页面中有多个模态框,我们可以在js里通过id来识别ng-click="open('sm')" //我们有sm md lg 三种可选大小,这里是模态框的大小Js
angular.module('ui.bootstrap.demo', ['ngAnimate', 'ui.bootstrap']);
angular.module('ui.bootstrap.demo').controller('ModalDemoCtrl', function ($scope, $uibModal, $log) {

  $scope.items = ['item1', 'item2', 'item3'];

  $scope.animationsEnabled = true;

  $scope.open = function (size) {

    var modalInstance = $uibModal.open({
      animation: $scope.animationsEnabled,
      templateUrl: 'myModalContent.html',
      controller: 'ModalInstanceCtrl',
      size: size,
      resolve: {
        items: function () {
          return $scope.items;
        }
      }
    });

    modalInstance.result.then(function (selectedItem) {
      $scope.selected = selectedItem;
    }, function () {
      $log.info('Modal dismissed at: ' + new Date());
    });
  };

  $scope.toggleAnimation = function () {
    $scope.animationsEnabled = !$scope.animationsEnabled;
  };

});

// Please note that $modalInstance represents a modal window (instance) dependency.
// It is not the same as the $uibModal service used above.

angular.module('ui.bootstrap.demo').controller('ModalInstanceCtrl', function ($scope, $uibModalInstance, items) {

  $scope.items = items;
  $scope.selected = {
    item: $scope.items[0]
  };

  $scope.ok = function () {
    $uibModalInstance.close($scope.selected.item);
  };

  $scope.cancel = function () {
    $uibModalInstance.dismiss('cancel');
  };
});这里面的ModalDemoCtrl 多数就是用来放open方法,还可能放的就是模态框成功后的方法modalInstance.result.then,这里面写的是模态框调用成功的方法。
$scope.items = ['item1', 'item2', 'item3'];//放进resolve将值传进模态框的控制器中resolve: {
items: function () {
return $scope.items;
}
}父亲控制器的值就是通过resolve传进到子控制器也就是模态框的控制器
$uibModalInstance.close($scope.selected.item); //关闭模态框的方法,可以不传参数是不是感觉很简单,但做的时候我倒是不推荐上面的用法,我们最好还是把共有的地方分离出来,下面是我的代码,仅供借鉴
我用的是更老一点的版本只需要把$modal换成$uibModal就可以了
<span ng-controller="ModalAdd" class="pull-left">
<script type="text/ng-template" id="myModalAdd.html">
<div ng-include="'tpl/modal.addstu.html'"></div>
</script>
<button class="btn btn-info" ng-click="open('md')">增加学生</button>
</span>//博主有的版本更老一点需要把$modal换成$uibModal
app.controller('ModalAdd', ['$scope', '$modal', '$log', '$location', function($scope, $modal, $log, $location) {
$scope.items = ['item1', 'item2', 'item3'];
$scope.open = function (size) {
var modalInstance = $modal.open({
templateUrl: 'myModalAdd.html',
controller: 'ModalAddCtrl',
size: size,
resolve: {
        items: function () {
          return $scope.items;
        }
      }
});
modalInstance.result.then(function (selectedItem) {
$scope.selected = selectedItem;
console.log(selectedItem)
}, function () {
$log.info('Modal dismissed at: ' + new Date());
});
};
}])这里面唯一的变化就是我把原来的写在界面里的html单独写在了一个页面里这样一来,我们减少了复制粘贴的重复工作,二来,如果模态框内容过多,不便于我们代码的维护,我们会分不清主次代码,所以还是分出来的好一些。。~~
这篇内容比较简单,就介绍到这里了~~