实验环境
flume 版本:apache-flume-1.6.0-bin.tar.gz
安装flume
上传flume源文件到ha1的/hasoft目录下
解压
tar -zxvfapache-flume-1.6.0-bin.tar.gz
删除源文件
rm -rfapache-flume-1.6.0-bin.tar.gz
配置环境变量
vi /etc/profile
export FLUME_HOME=/usr/local/flume
export FLUME_CONF_DIR=$FLUME_HOME/conf
export PATH=$FLUME_HOME/bin
source/etc/profile
配置文件
cd /hasoft/apache-flume-1.6.0-bin/conf
cp flume-conf.properties.template flume-conf.properties
vi flume-conf.properties
⦁
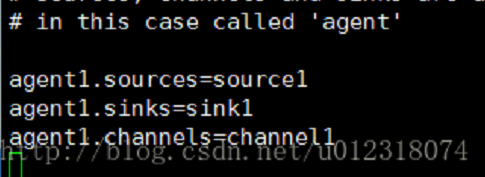
agent1表示代理名称
agent1.sources=source1
agent1.sinks=sink1
agent1.channels=channel1
⦁
修改为:
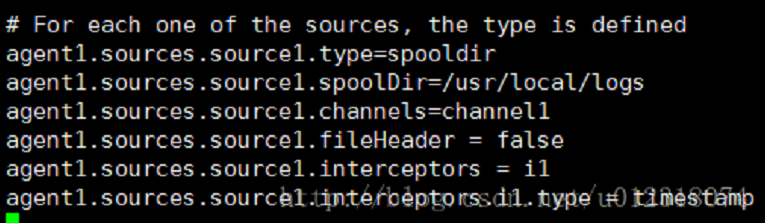
配置source1
agent1.sources.source1.type=spooldir
agent1.sources.source1.spoolDir=/usr/local/logs
agent1.sources.source1.channels=channel1
agent1.sources.source1.fileHeader = false
agent1.sources.source1.interceptors = i1
agent1.sources.source1.interceptors.i1.type = timestamp
修改为:
配置channel1
agent1.channels.channel1.type=file
agent1.channels.channel1.checkpointDir=/usr/local/logs_tmp_cp
agent1.channels.channel1.dataDirs=/usr/local/logs_tmp
⦁
替换channel的上下两条配置信息。
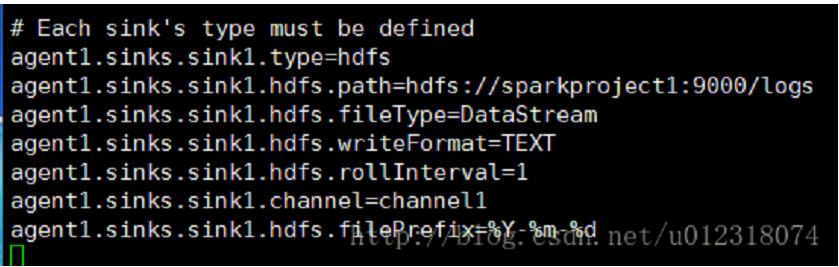
配置sink1
agent1.sinks.sink1.type=hdfs
agent1.sinks.sink1.hdfs.path=hdfs://ha1.ry600.com:9000/logs
agent1.sinks.sink1.hdfs.fileType=DataStream
agent1.sinks.sink1.hdfs.writeFormat=TEXT
agent1.sinks.sink1.hdfs.rollInterval=1
agent1.sinks.sink1.channel=channel1
agent1.sinks.sink1.hdfs.filePrefix=%Y-%m-%d
⦁
修改为:
创建需要的文件夹
在/usr/local目录下创建logs文件夹
mkdir /usr/local/logs
创建HDFS文件夹
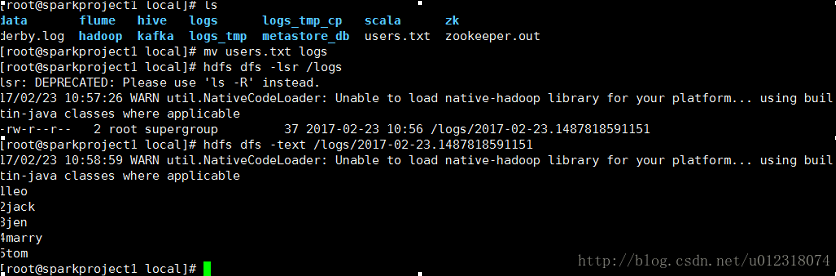
hdfs dfs -mkdir /logs
查看文件夹
hdfs dfs -ls /

启动flume-agent
flume-ng agent -n agent1 -c conf -f /hasoft/apache-flume-1.7.0-bin/conf/flume-conf.properties -Dflume.root.logger=DEBUG,console
测试