详细介绍Vector中用XML绘制圆
开始前我们先了解下画圆的基本命令:
- rx ry 椭圆半径
- x-axis-rotation x轴旋转角度
- large-arc-flag 为0时表示取小弧度,1时取大弧度 (舍取的时候,是要长的还是短的)
- sweep-flag 0取逆时针方向,1取顺时针方向
- x y终点位置
看上面太绕了
简单点:
A(圆的x轴半径,y轴半径,x轴旋转角度,0/1-小/大弧度,0/1-逆/顺时针,圆的终点位置x点,圆的终点位置y点)
大体如上↑,光看其解释,大致部分应该都能理解,但是小部分并不是很明白。
下面我们来一一实践知晓:
先看效果:
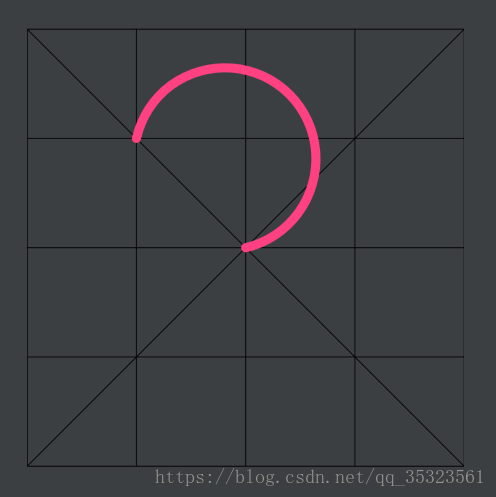
先移动到画布中心点的位置(24,24),画一个半径为10的圆形,终点为12,12 效果图如下:

这样看点的位置不清晰,为了便于大家知道每个点的位置,我换了种方式。
如图,毕竟这vector画图主要还是跟每个点的位置打交道,我以这种形式,相比大家应该能很清楚的明白每个坐标的位置吧。这样我也不用一直标某个点x1,y1 某个点x2,y2 巴拉巴拉巴拉的 看的头的大了,我个人还是比较喜欢看图说话的~~毕竟这样也方便我,哈哈。
<vector xmlns:android="http://schemas.android.com/apk/res/android"
        android:width="48dp"
        android:height="48dp"
        android:viewportHeight="48"
        android:viewportWidth="48">


    <path
        android:fillColor="#ff000000"
        android:pathData="M0 0 0 48 48 48 48 0z"
        android:strokeAlpha="1"/>
    <path
        android:pathData="M24 24 A 10,10 0 1 0 12,12"
        android:strokeAlpha="1"
        android:strokeColor="@color/colorAccent"
        android:strokeLineCap="round"
        android:strokeWidth="1"/>
</vector>
这里我基本属性先介绍下,怕很新的小伙伴不理解:
- strokeWidth : 划线宽度
- strokeColor:划线颜色
- strokeAlpha:划线透明度 1 = FF 也可以通过改变color来实现(0xffff0000=红色)
好,屁话说了一堆,我们进入正题:
猜想:在2点之间的直线,画一个半圆弧(圆的大小由x,y半径决
定),再根据顺逆时针改变旋转方向。
回顾我们的基本命令:
A(圆的x轴半径,y轴半径,x轴旋转角度,0/1-小/大弧度,0/1-逆/顺时针,圆的终点位置x点,圆的终点位置y点)
上面标红的属性就是我们接下来要验证。
为了证实猜想,我做了2个效果图,并附上代码。
效果图1:
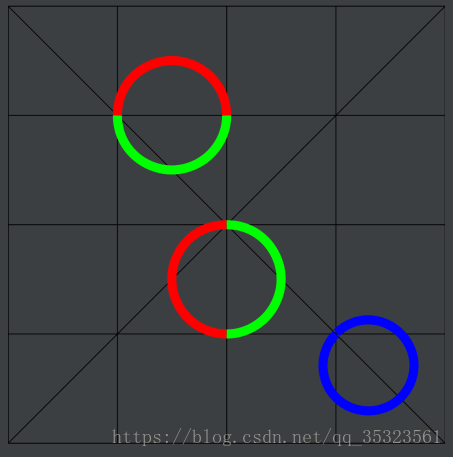
关键代码1:
<path
    android:pathData="M12 12 A 5,5 0 1 1 24,12"
    android:strokeWidth="1"
    android:strokeColor="#ffff0000"
    android:strokeAlpha="1"
    />
<path
    android:pathData="M12 12 A 5,5 0 1 0 24,12"
    android:strokeWidth="1"
    android:strokeColor="#ff00ff00"
    android:strokeAlpha="1"
    />
<path
    android:pathData="M24 24 A 5,5 0 1 0 24,36"
    android:strokeWidth="1"
    android:strokeColor="#ffff0000"
    android:strokeAlpha="1"
    />
<path
    android:pathData="M24 24 A 5,5 0 1 1 24,36"
    android:strokeWidth="1"
    android:strokeColor="#ff00ff00"
    android:strokeAlpha="1"
    />
<path
    android:pathData="M36 36 A 5,5 0 1 0 36.1,35.9"
    android:strokeWidth="1"
    android:strokeColor="#ff0000ff"
    android:strokeAlpha="1"
    />
效果图2:

关键代码2:
<!--半圆-->
<path
    android:pathData="M12 12 A 5,5 0 1 1 36,12 M12 12 L 36 12"
    android:strokeWidth="0.1"
    android:strokeColor="#ff00ff00"
    />
<path
    android:pathData="M12 12 A 5,5 0 1 1 32,13 M12 12 L 32 13"
    android:strokeWidth="0.1"
    android:strokeColor="#ffff0000"
    />
<path
    android:pathData="M12 12 A 5,5 0 1 1 28,15 M12 12 L 28 15"
    android:strokeWidth="0.1"
    android:strokeColor="#ff0000ff"
    />
<path
    android:pathData="M12 12 A 5,5 0 1 1 24,18 M12 12 L 24 18"
    android:strokeWidth="0.1"
    android:strokeColor="#ffffff00"
    />


<!--圆-->
<path
    android:pathData="M12 36 A 5,5 0 1 1 11,36 M12 36 L 11 36"
    android:strokeWidth="0.1"
    android:strokeColor="#ff00ff00"
    />
<path
    android:pathData="M12 36 A 5,5 0 1 1 10,34 M12 36 L 10 34"
    android:strokeWidth="0.1"
    android:strokeColor="#ffff0000"
    />
<path
    android:pathData="M12 36 A 5,5 0 1 1 12,32 M12 36 L 12 32"
    android:strokeWidth="0.1"
    android:strokeColor="#ff0000ff"
    />
<path
    android:pathData="M12 36 A 5,5 0 1 1 16,37 M12 36 L 16 37"
    android:strokeWidth="0.1"
    android:strokeColor="#ffffff00"
    />
如效果图,其实不用我说多,看图说话大家应该差不多明白了吧。
重点:

起点和终点决定一条直线,通过直线画一个半圆弧,也就是说,直线的长度决定圆弧的开口大小,直线无线接近0圆弧就越接近圆。
搞定了最重要的,其他就是些副属性。大家可以直接去一一尝试,效果最直观。
感谢18-4-20 17:25