使用React Native 开发App,确实需要踩很多坑。移动开发中基本上每个App都会有启动页,使用原生的iOS/Android来实现该功能很简单,但我本职是iOS开发,对于Android原生不是很了解(这一点我相信很多人跟我一样),所以要同时适用于两个平台,可能就得使用第三方库了。这里给大家推荐的闪屏库是 rn-splash-screen ,虽然该库在github上的star并不是最多的,但确实比star更多react-native-splash-screen要好用,后者我也尝试过,一个字“坑”(可能跟我的react-native 版本有关吧,我的版本是0.50.1)。
第一步
命令行cd 到项目,然后执行:
1. npm install --save rn-splash-screen (注:将rn-splash-screen库安装到项目的node_modules中)
2. react-native link rn-splash-screen (注:自动将使用rn-splash-screen库的一些设置配置到iOS/Android的工程配置文件中)
第二步
Android的配置:
(1)在项目android/app/src/main/res/ 路径下创建一个名称为drawable的文件夹,并在该文件夹下放置一个名称为splash的png格式的图片(这个就是用于闪屏的图片,名称也可自己起,只要后面的配置也跟着变就行)。图片建议使用.9.png格式的,并配置针对多种屏幕像素的尺寸。参考http://stackoverflow.com/a/34726279
(2)在android/app/src/main/res/values/路径下的styles.xml文件中加入配置:
<style name="AppTheme" parent="Theme.AppCompat.Light.NoActionBar">
    <item name="android:windowBackground">@drawable/splash</item>
</style>
(3)在/android/app/src/main/路径下的AndroidManifest.xml文件中做如下修改:
<application
      android:name="xxx.MainApplication" //这个xxx跟具体的app的包名有关
      android:allowBackup="true"
      android:label="@string/app_name"
      android:icon="@mipmap/ic_launcher"
  -   android:theme="@style/AppTheme"      //前面的减号表示要删除(如果原来有的话)
  +   android:icon="@mipmap/ic_launcher"   //前面的加号表示要添加(如果原来没有的话)
      >
      <activity
        android:name="com.skyocean.youjoylife.MainActivity"
        android:label="@string/app_name"
  +     android:theme="@style/AppTheme"   //前面的加号表示要添加(如果原来没有的话)
        android:configChanges="keyboard|keyboardHidden|orientation|screenSize">
        <intent-filter>
            <action android:name="android.intent.action.MAIN" />
            <category android:name="android.intent.category.LAUNCHER" />
        </intent-filter>
      </activity>
注意:只需要改上面代码中前面带“+”“-”号的这几行,别改错了,不然后面在调用 SplashScreen.hide() 会报错。
(4)在android/app/src/main/java/com/__APPNAMES__/路径下的MainActivity.java中做如下修改:
// [...]
import android.graphics.Color;
import android.os.Bundle;

import com.facebook.react.ReactInstanceManager;          //**********需要添加的************
import com.facebook.react.bridge.ReactContext;           //**********需要添加的************
import com.mehcode.reactnative.splashscreen.SplashScreen;//**********需要添加的************

public class MainActivity extends ReactActivity {
  // [...]

  @Override
  protected void onCreate(Bundle savedInstanceState) {
      // Show the js-controlled splash screen
      SplashScreen.show(this, getReactInstanceManager());  //**********需要添加的************

      super.onCreate(savedInstanceState);

      // [...]
  }

  // [...]
}
iOS的配置:
(1)删除iOS工程文件夹下的 LaunchScreen.xib 文件
(2)在iOS工程的Images.xcassets中添加LaunchImage(在Xcode中打开 Images.xcassets ),按如下步骤操作
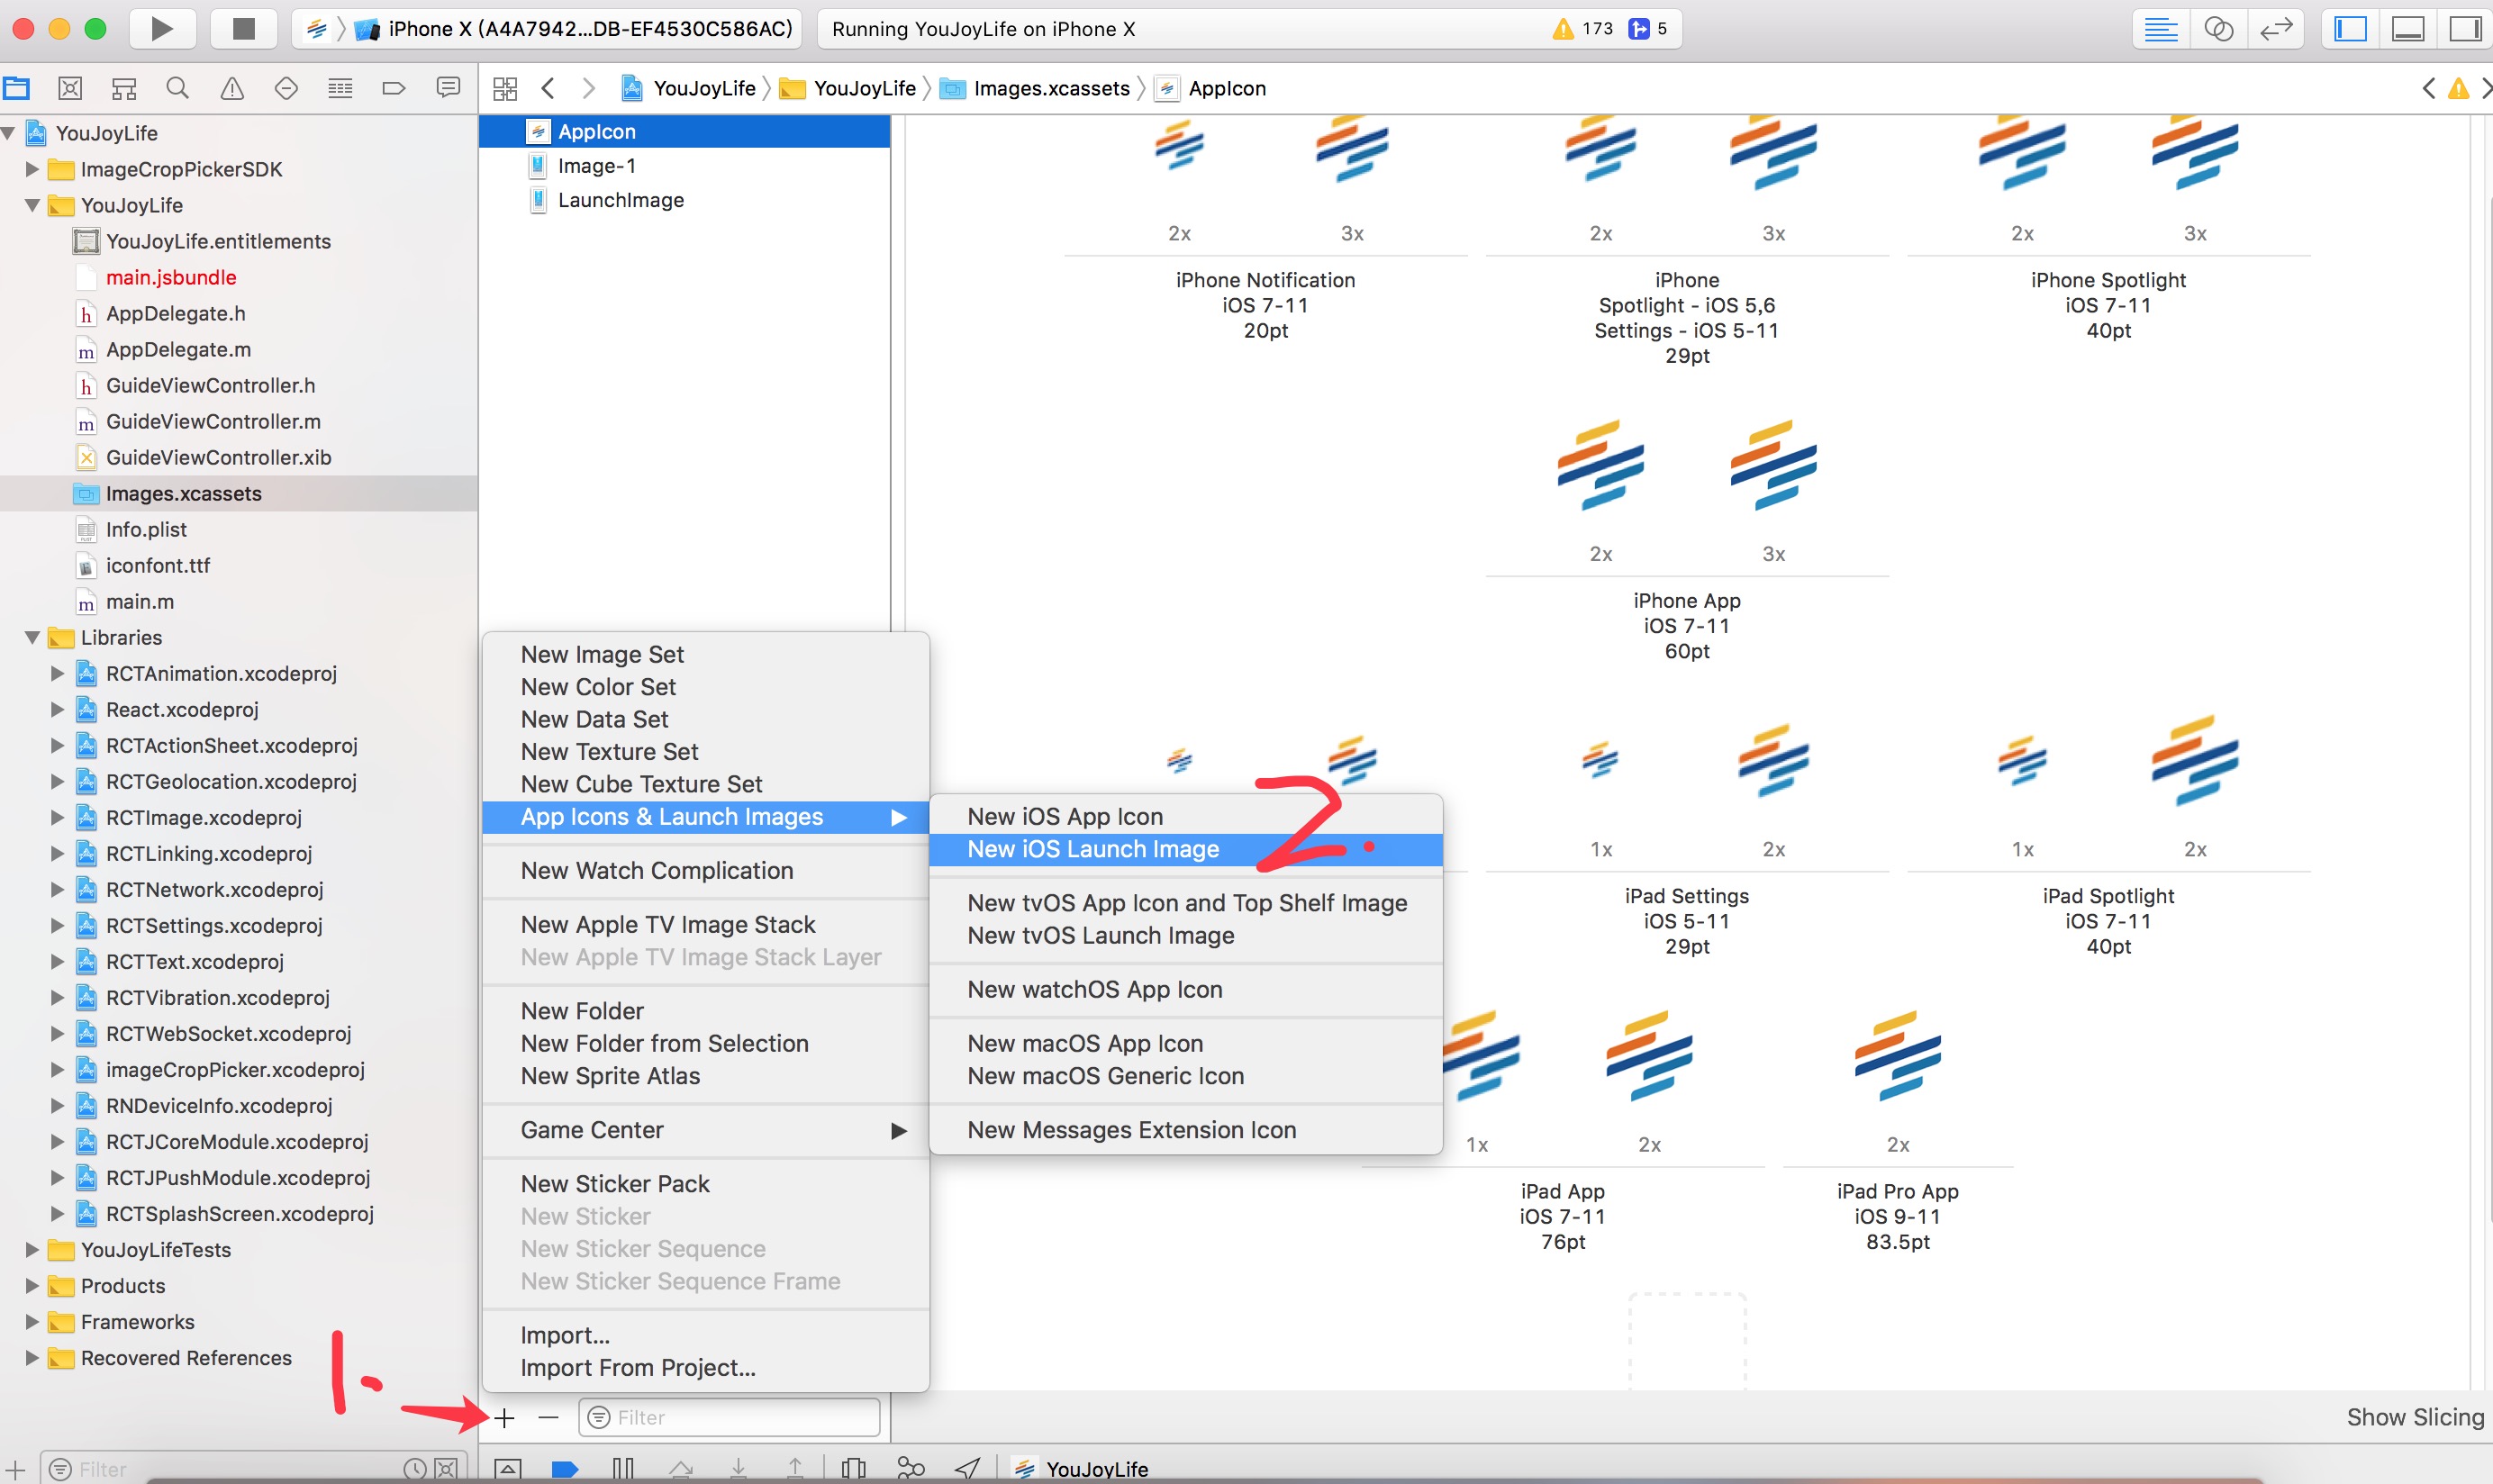
(3)最终的LaunchImage是这样的:

(4)然后iOS工程中配置一下,步骤如下:
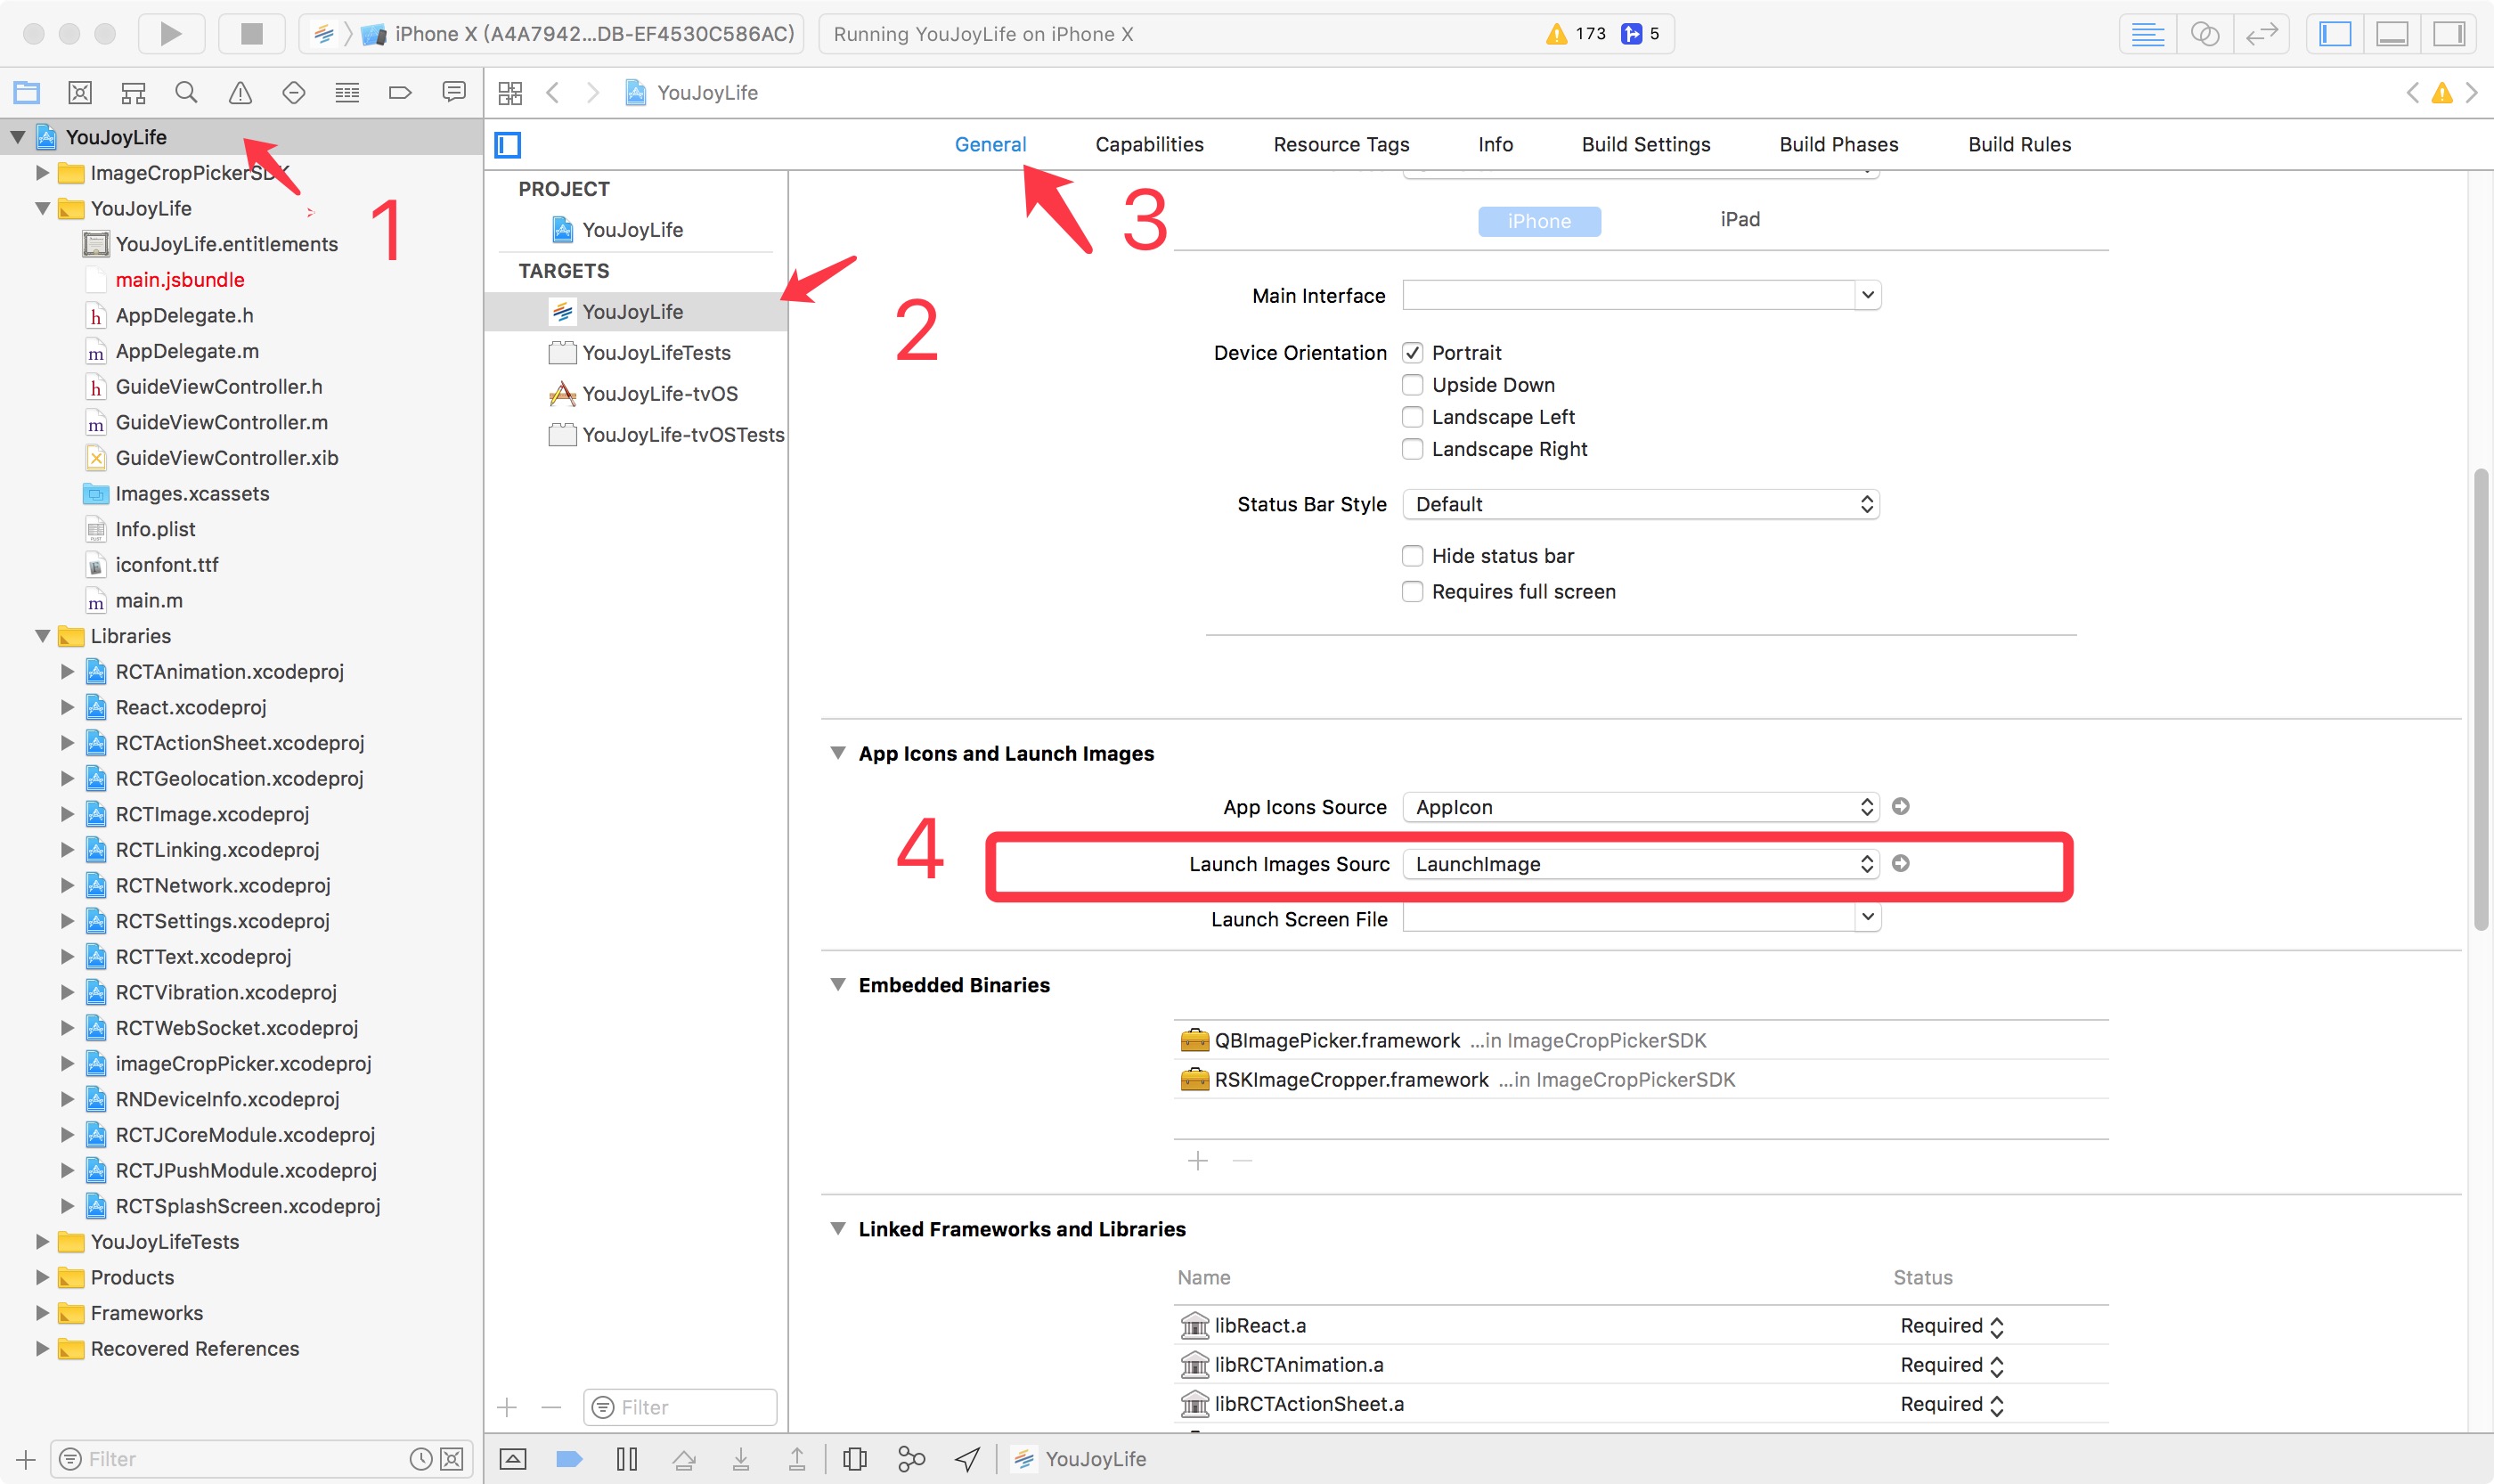
(5)进入iOS工程的AppDelegate.m中做如下修改:
// [...]
#import <RCTSplashScreen/RCTSplashScreen.h>   //**********先导入头文件************

- (BOOL)application:(UIApplication *)application didFinishLaunchingWithOptions:(NSDictionary *)launchOptions
{
  // [...]

  RCTRootView *rootView = // [...]

  // Show splash screen (rn-splash-screen)
  [RCTSplashScreen show:rootView]; //**********添加这行代码,注意:这行代码必须在 RCTRootView *rootView = // [...] 的下面************

  // [...]
}
至此,我们运行React Native 工程在iOS/Android设备或模拟器上就能看到闪屏页了。
最后,我们还要在React Native 中手动关闭闪屏页(一般在App的界面的入口代码中添加关闭闪屏页的代码):
import SplashScreen from "rn-splash-screen";

// Hide the active splash screen
SplashScreen.hide();
你也可以给闪屏页加个延时:
componentDidMount(){
        //隐藏闪屏页,闪屏页用的是第三方库,rn-splash-screen
        setTimeout(() => {
            SplashScreen.hide();
        }, 2000);//延时2秒消失
放在componentDidMount方法中可以让app的界面先加载出来,避免出现白屏闪一下的问题。