java线程之间的通信方式也比较多,这里总结一下自己理解的pipe管道通信。
一、建立管道输入端和输出端的连接
首先为了创建一个管道流,我们必须首先创建一个PipedOutputStream对象,然后创建一个PipedInputStream对象。如下:
PipedOutputStream out = null;
PipedInputStream in = null;
对象建立好以后使用connect()方法将二者建立连接
out.connect(in);
该方法在PipedOutputStream 、PipedInputStream当中都有,随便调用那个来建立连接都可以,但注意智能建立一次连接,重复建立会抛异常。
不使用connect()方法也是可以建立连接的,方法如下:
out = new PipedOutputStream(in );
一旦建立了管道,就可以像操作文件一样对管道进行数据读写。
二、开始通信
首先有一点特别注意,不能在同一个线程当中既写入又读取,这样会造成死锁,因为管道会有阻塞的时候(当管道当中没有数据,进行读操作时,读操作的线程会阻塞,直到有线程来写数据;当管道当中满数据,进行写操作时,写操作的线程阻塞,直到有线程来读数据),有时需要写和读的两端同时都在工作,只有一个线程去完成读和写,显然无法保证能够同时读写,所以读写最好放在单独的线程去完成。
建立的管道是一个包含1024字节大小的循环缓冲数组,从管道当中读取的数据,会被清除出管道,即是读取以后就相当于把该数据从管道当中拿走了,所以是循环缓冲数组。
下面演示代码:
package cn.zhoucy.pipe;
import java.io.IOException;
import java.io.PipedInputStream;
import java.io.PipedOutputStream;
public class TestPiped {
public static void main(String[] args) {
Sender sender = new Sender();
Recive recive = new Recive();
PipedInputStream pi = recive.getPipedInputputStream();
PipedOutputStream po = sender.getPipedOutputStream();
try {
pi.connect(po);
} catch (IOException e) {
System.out.println(e.getMessage());
}
new Thread(sender).start();
new Thread(recive).start();
}
}
class Sender implements Runnable {
PipedOutputStream out = null;
public PipedOutputStream getPipedOutputStream() {
out = new PipedOutputStream();
return out;
}
@Override
public void run() {
try {
out.write("Hello , Reciver!".getBytes());
} catch (IOException e) {
System.out.println(e.getMessage());
}
try {
out.close();
} catch (IOException e) {
System.out.println(e.getMessage());
}
}
}
class Recive implements Runnable {
PipedInputStream in = null;
public PipedInputStream getPipedInputputStream() {
in = new PipedInputStream();
return in;
}
@Override
public void run() {
byte[] bys = new byte[1024];
try {
in.read(bys);
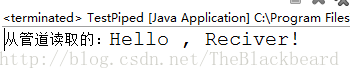
System.out.println("读取到的信息:" + new String(bys).trim());
in.close();
} catch (IOException e) {
System.out.println(e.getMessage());
}
}
}
- 1
- 2
- 3
- 4
- 5
- 6
- 7
- 8
- 9
- 10
- 11
- 12
- 13
- 14
- 15
- 16
- 17
- 18
- 19
- 20
- 21
- 22
- 23
- 24
- 25
- 26
- 27
- 28
- 29
- 30
- 31
- 32
- 33
- 34
- 35
- 36
- 37
- 38
- 39
- 40
- 41
- 42
- 43
- 44
- 45
- 46
- 47
- 48
- 49
- 50
- 51
- 52
- 53
- 54
- 55
- 56
- 57
- 58
- 59
- 60
- 61
- 62
- 63
- 64
- 65
- 66
- 67
- 68
- 69
- 70
- 71
- 72
- 73
运行结果如下: