BlockCanary检查APP卡顿,相关使用方法以及源码学习
一、使用方法
1.添加依赖
dependencies {
    // most often used way, enable notification to notify block event
    compile 'com.github.markzhai:blockcanary-android:1.5.0'

    // this way you only enable BlockCanary in debug package
    // debugCompile 'com.github.markzhai:blockcanary-android:1.5.0'
    // releaseCompile 'com.github.markzhai:blockcanary-no-op:1.5.0'
}
2.在Application初始化并且启动
public class DemoApplication extends Application {
    @Override
    public void onCreate() {
        // ...
        // Do it on main process
        BlockCanary.install(this, new AppBlockCanaryContext()).start();
    }
}
二、原理
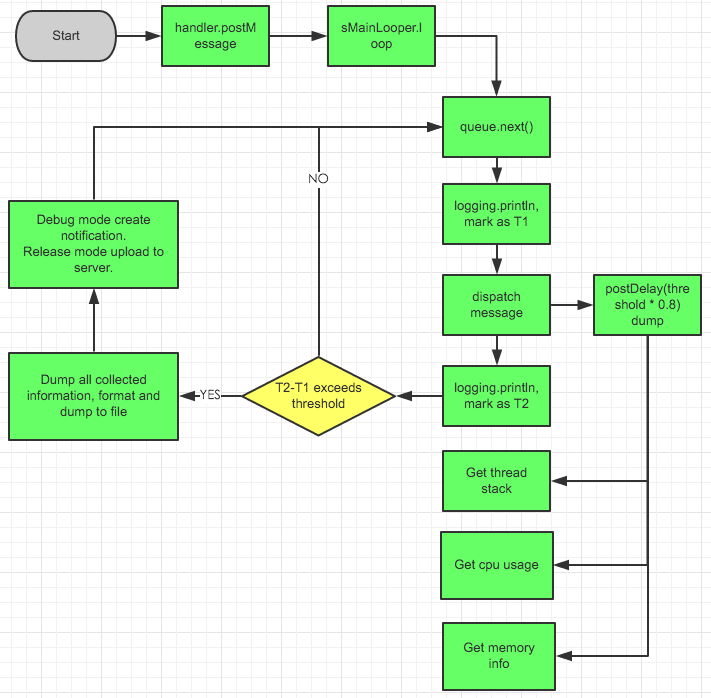
1.原理概述:给主线程Looper设置一个Printer,记录dispatchMessage方法执行的耗时时间。如果耗时超过给定的阙值,则认为主线程卡顿了。如果发生卡顿,收集所有信息(CPU、设备、堆栈)并且格式化,debug时通知烂提示,release时上传服务器。
2.Looper源码片断
for (;;) {
    Message msg = queue.next(); // might block
    if (msg == null) {
        // No message indicates that the message queue is quitting.
        return;
    }

    // This must be in a local variable, in case a UI event sets the logger
    final Printer logging = me.mLogging;
    if (logging != null) {
        logging.println(">>>>> Dispatching to " + msg.target + " " +
            msg.callback + ": " + msg.what);
    }
    final long traceTag = me.mTraceTag;
    if (traceTag != 0 && Trace.isTagEnabled(traceTag)) {
        Trace.traceBegin(traceTag, msg.target.getTraceName(msg));
    }
    try {
        msg.target.dispatchMessage(msg);
    } finally {
        if (traceTag != 0) {
            Trace.traceEnd(traceTag);
        }
    }

    if (logging != null) {
        logging.println("<<<<< Finished to " + msg.target + " " + msg.callback);
    }

    // Make sure that during the course of dispatching the
    // identity of the thread wasn't corrupted.
    final long newIdent = Binder.clearCallingIdentity();
    if (ident != newIdent) {
        Log.wtf(TAG, "Thread identity changed from 0x"
            + Long.toHexString(ident) + " to 0x"
            + Long.toHexString(newIdent) + " while dispatching to "
            + msg.target.getClass().getName() + " "
            + msg.callback + " what=" + msg.what);
    }

    msg.recycleUnchecked();
}
3.BlockCanary原理图
三、源码分析
1.Application初始化以及启动
BlockCanary.install(this, new AppBlockCanaryContext()).start();2.start过程
/**
 * Start monitoring.
 */
public void start() {
    //防止多次启动
    if (!mMonitorStarted) {
        mMonitorStarted = true;
        //给主线程设置Printer
        Looper.getMainLooper().setMessageLogging(mBlockCanaryCore.monitor);
    }
}
3.intsall过程
/**
 * Install {@link BlockCanary}
 *
 * @param context            Application context
 * @param blockCanaryContext BlockCanary context
 * @return {@link BlockCanary}
 */
public static BlockCanary install(Context context, BlockCanaryContext blockCanaryContext) {
    //初始化用户配置也即是用户传入的AppBlockCanaryContext
    BlockCanaryContext.init(context, blockCanaryContext);
    //显示/隐藏桌面Block图标,也就是是否禁用组建①
    setEnabled(context, DisplayActivity.class, BlockCanaryContext.get().displayNotification());
    //返回单例对象②
    return get();
}
①是否启动Activity组件
private static void setEnabled(Context context,
                                   final Class<?> componentClass,
                                   final boolean enabled) {
    final Context appContext = context.getApplicationContext();
    //单独提交到一个IO线程去执行,作者参考LeakCanary
    executeOnFileIoThread(new Runnable() {
        @Override
        public void run() {
            setEnabledBlocking(appContext, componentClass, enabled);
        }
    });
}
// these lines are originally copied from LeakCanary: Copyright (C) 2015 Square, Inc.
private static final Executor fileIoExecutor = newSingleThreadExecutor("File-IO");
private static void setEnabledBlocking(Context appContext,
Class<?> componentClass,
boolean enabled) {
ComponentName component = new ComponentName(appContext, componentClass);
PackageManager packageManager = appContext.getPackageManager();
//根据用户配置禁止或者启动组件
int newState = enabled ? COMPONENT_ENABLED_STATE_ENABLED : COMPONENT_ENABLED_STATE_DISABLED;
// Blocks on IPC.
packageManager.setComponentEnabledSetting(component, newState, DONT_KILL_APP);
}
// end of lines copied from LeakCanary②install返回外观类BlockCanary单例对象
/**
 * Get {@link BlockCanary} singleton.
 * 单例模式DCL
 * @return {@link BlockCanary} instance
 */
public static BlockCanary get() {
    if (sInstance == null) {
        synchronized (BlockCanary.class) {
            if (sInstance == null) {
                sInstance = new BlockCanary();
            }
        }
    }
    return sInstance;
}
3.外观类BlockCanary类初始化时,会初始化核心内部类以及添加拦截器
public final class BlockCanary {

    private static final String TAG = "BlockCanary";
    //单例对象
    private static BlockCanary sInstance;
    //核心内部类对象
    private BlockCanaryInternals mBlockCanaryCore;
    //是否已经开启卡顿监测,防止多次开启
    private boolean mMonitorStarted = false;

    private BlockCanary() {
        //将配置赋值给内部核心类
        BlockCanaryInternals.setContext(BlockCanaryContext.get());
        //单例模式获取核心内部类②
        mBlockCanaryCore = BlockCanaryInternals.getInstance();
        //添加拦截器,用户实现的BlockInterceptor接口
        mBlockCanaryCore.addBlockInterceptor(BlockCanaryContext.get());
        //如果用户禁用通知则不添加通知拦截器①
        if (!BlockCanaryContext.get().displayNotification()) {
            return;
        }
        mBlockCanaryCore.addBlockInterceptor(new DisplayService());

    }
......
}
①分析内部核心类之前先看下DisplayService类,这是一个拦截器,在发生卡顿时通知栏发送通知,代码作了版本适配
final class DisplayService implements BlockInterceptor {

    private static final String TAG = "DisplayService";

    @Override
    public void onBlock(Context context, BlockInfo blockInfo) {
        //发生卡顿时就显示通知,点击通知栏进入DisplayActivity界面
        Intent intent = new Intent(context, DisplayActivity.class);
        intent.putExtra("show_latest", blockInfo.timeStart);
        intent.setFlags(Intent.FLAG_ACTIVITY_NEW_TASK | Intent.FLAG_ACTIVITY_CLEAR_TOP);
        PendingIntent pendingIntent = PendingIntent.getActivity(context, 1, intent, FLAG_UPDATE_CURRENT);
        String contentTitle = context.getString(R.string.block_canary_class_has_blocked, blockInfo.timeStart);
        String contentText = context.getString(R.string.block_canary_notification_message);
        show(context, contentTitle, contentText, pendingIntent);
    }
    //根据版本进行适配通知栏
    @TargetApi(HONEYCOMB)
    private void show(Context context, String contentTitle, String contentText, PendingIntent pendingIntent) {
        NotificationManager notificationManager = (NotificationManager)
                context.getSystemService(Context.NOTIFICATION_SERVICE);

        Notification notification;
        if (SDK_INT < HONEYCOMB) {
            notification = new Notification();
            notification.icon = R.drawable.block_canary_notification;
            notification.when = System.currentTimeMillis();
            notification.flags |= Notification.FLAG_AUTO_CANCEL;
            notification.defaults = Notification.DEFAULT_SOUND;
            try {
                Method deprecatedMethod = notification.getClass().getMethod("setLatestEventInfo", Context.class, CharSequence.class, CharSequence.class, PendingIntent.class);
                deprecatedMethod.invoke(notification, context, contentTitle, contentText, pendingIntent);
            } catch (NoSuchMethodException | IllegalAccessException | IllegalArgumentException
                    | InvocationTargetException e) {
                Log.w(TAG, "Method not found", e);
            }
        } else {
            Notification.Builder builder = new Notification.Builder(context)
                    .setSmallIcon(R.drawable.block_canary_notification)
                    .setWhen(System.currentTimeMillis())
                    .setContentTitle(contentTitle)
                    .setContentText(contentText)
                    .setAutoCancel(true)
                    .setContentIntent(pendingIntent)
                    .setDefaults(Notification.DEFAULT_SOUND);
            if (SDK_INT < JELLY_BEAN) {
                notification = builder.getNotification();
            } else {
                notification = builder.build();
            }
        }
        notificationManager.notify(0xDEAFBEEF, notification);
    }
}
②初始化了一个核心内部类对象,下面继续内部核心类分析跟踪过程
/**
 * Get BlockCanaryInternals singleton
 * 单例模式DCL
 * @return BlockCanaryInternals instance
 */
static BlockCanaryInternals getInstance() {
    if (sInstance == null) {
        synchronized (BlockCanaryInternals.class) {
            if (sInstance == null) {
                sInstance = new BlockCanaryInternals();
            }
        }
    }
    return sInstance;
}
4.内部核心类初始化过程:初始化堆栈采样器、初始化CPU采样器、初始化Printer、删除过期日志
public BlockCanaryInternals() {
        //初始化堆栈采样器①
        stackSampler = new StackSampler(
                Looper.getMainLooper().getThread(),
                sContext.provideDumpInterval());
        //初始化CPU采样器②
        cpuSampler = new CpuSampler(sContext.provideDumpInterval());
        //设置Printer③
        setMonitor(new LooperMonitor(new LooperMonitor.BlockListener() {

            @Override
            public void onBlockEvent(long realTimeStart, long realTimeEnd,
                                     long threadTimeStart, long threadTimeEnd) {
                // Get recent thread-stack entries and cpu usage
                ArrayList<String> threadStackEntries = stackSampler
                        .getThreadStackEntries(realTimeStart, realTimeEnd);
                if (!threadStackEntries.isEmpty()) {
                    BlockInfo blockInfo = BlockInfo.newInstance()
                            .setMainThreadTimeCost(realTimeStart, realTimeEnd, threadTimeStart, threadTimeEnd)
                            .setCpuBusyFlag(cpuSampler.isCpuBusy(realTimeStart, realTimeEnd))
                            .setRecentCpuRate(cpuSampler.getCpuRateInfo())
                            .setThreadStackEntries(threadStackEntries)
                            .flushString();
                    LogWriter.save(blockInfo.toString());

                    if (mInterceptorChain.size() != 0) {
                        for (BlockInterceptor interceptor : mInterceptorChain) {
                            interceptor.onBlock(getContext().provideContext(), blockInfo);
                        }
                    }
                }
            }
        }, getContext().provideBlockThreshold(), getContext().stopWhenDebugging()));
        //删除过期日志④
        LogWriter.cleanObsolete();
    }
④先从软柿子捏起,先看删除日志
/**
     * Delete obsolete log files, which is by default 2 days.
     */
    public static void cleanObsolete() {
        //写线程执行删除日志操作
        HandlerThreadFactory.getWriteLogThreadHandler().post(new Runnable() {
            @Override
            public void run() {
                long now = System.currentTimeMillis();
                //获取所有日志文件
                File[] f = BlockCanaryInternals.getLogFiles();
                if (f != null && f.length > 0) {
                    synchronized (SAVE_DELETE_LOCK) {
                        for (File aF : f) {
                            //如果日志大于2天则删除
                            if (now - aF.lastModified() > OBSOLETE_DURATION) {
                                aF.delete();
                            }
                        }
                    }
                }
            }
        });
    }
如何获取所有日志文件
/**
 * 获取日志存储路径
 * 根据用户设置的文件名称,如果SD卡未挂在或者不可写则使用/data目录,否则使用根目录+用户设置路径
 */
static String getPath() {
    String state = Environment.getExternalStorageState();
    String logPath = BlockCanaryInternals.getContext()
            == null ? "" : BlockCanaryInternals.getContext().providePath();

    if (Environment.MEDIA_MOUNTED.equals(state)
            && Environment.getExternalStorageDirectory().canWrite()) {
        return Environment.getExternalStorageDirectory().getPath() + logPath;
    }
    return getContext().provideContext().getFilesDir() + BlockCanaryInternals.getContext().providePath();
}
/**
 * 获取日志路径文件夹,如果不存在则创建
 */
static File detectedBlockDirectory() {
    File directory = new File(getPath());
    if (!directory.exists()) {
        directory.mkdirs();
    }
    return directory;
}
/**
 * 获取所有日志文件,过滤后缀.log的文件
 */
public static File[] getLogFiles() {
    File f = detectedBlockDirectory();
    if (f.exists() && f.isDirectory()) {
        return f.listFiles(new BlockLogFileFilter());
    }
    return null;
}

/**
 * 文件过滤器
 */
private static class BlockLogFileFilter implements FilenameFilter {

    private String TYPE = ".log";

    BlockLogFileFilter() {

    }

    @Override
    public boolean accept(File dir, String filename) {
        return filename.endsWith(TYPE);
    }
}
③采样器是对信息的收集,稍后分析,直接看设置Printer时新建出来的LooperMonitor对象
/**
 * 实现Printer接口必须实现println()方法
 */
class LooperMonitor implements Printer {
    //默认卡顿阙值
    private static final int DEFAULT_BLOCK_THRESHOLD_MILLIS = 3000;

    private long mBlockThresholdMillis = DEFAULT_BLOCK_THRESHOLD_MILLIS;
    private long mStartTimestamp = 0;
    private long mStartThreadTimestamp = 0;
    private BlockListener mBlockListener = null;
    private boolean mPrintingStarted = false;
    //Debug时是否进行卡顿检测
    private final boolean mStopWhenDebugging;

    public interface BlockListener {
        void onBlockEvent(long realStartTime,
                          long realTimeEnd,
                          long threadTimeStart,
                          long threadTimeEnd);
    }

    public LooperMonitor(BlockListener blockListener, long blockThresholdMillis, boolean stopWhenDebugging) {
        if (blockListener == null) {
            throw new IllegalArgumentException("blockListener should not be null.");
        }
        mBlockListener = blockListener;
        mBlockThresholdMillis = blockThresholdMillis;
        mStopWhenDebugging = stopWhenDebugging;
    }

    @Override
    public void println(String x) {
        //Debug时用户设置是否停止检测并且是否Debug
        if (mStopWhenDebugging && Debug.isDebuggerConnected()) {
            return;
        }
        //记录开始时间,也就是dispatchMessage之前的log打印时
        if (!mPrintingStarted) {
            mStartTimestamp = System.currentTimeMillis();
            mStartThreadTimestamp = SystemClock.currentThreadTimeMillis();
            mPrintingStarted = true;
            //启动采样器
            startDump();
        } else {
            //记录结束时间,也就是dispatchMessage之后的log打印时
            final long endTime = System.currentTimeMillis();
            mPrintingStarted = false;
            //判断是否卡顿
            if (isBlock(endTime)) {
                //发生卡顿,回调
                notifyBlockEvent(endTime);
            }
            stopDump();
        }
    }

    private boolean isBlock(long endTime) {
        return endTime - mStartTimestamp > mBlockThresholdMillis;
    }

    private void notifyBlockEvent(final long endTime) {
        final long startTime = mStartTimestamp;
        final long startThreadTime = mStartThreadTimestamp;
        final long endThreadTime = SystemClock.currentThreadTimeMillis();
        HandlerThreadFactory.getWriteLogThreadHandler().post(new Runnable() {
            @Override
            public void run() {
                mBlockListener.onBlockEvent(startTime, endTime, startThreadTime, endThreadTime);
            }
        });
    }

    private void startDump() {
        if (null != BlockCanaryInternals.getInstance().stackSampler) {
            BlockCanaryInternals.getInstance().stackSampler.start();
        }

        if (null != BlockCanaryInternals.getInstance().cpuSampler) {
            BlockCanaryInternals.getInstance().cpuSampler.start();
        }
    }

    private void stopDump() {
        if (null != BlockCanaryInternals.getInstance().stackSampler) {
            BlockCanaryInternals.getInstance().stackSampler.stop();
        }

        if (null != BlockCanaryInternals.getInstance().cpuSampler) {
            BlockCanaryInternals.getInstance().cpuSampler.stop();
        }
    }
}
回到③,在回调方法中,格式化了信息并写入文件中,启动拦截器
//设置Printer③
        setMonitor(new LooperMonitor(new LooperMonitor.BlockListener() {

            @Override
            public void onBlockEvent(long realTimeStart, long realTimeEnd,
                                     long threadTimeStart, long threadTimeEnd) {
                // Get recent thread-stack entries and cpu usage
                //获取堆栈信息
                ArrayList<String> threadStackEntries = stackSampler
                        .getThreadStackEntries(realTimeStart, realTimeEnd);
                if (!threadStackEntries.isEmpty()) {
                    BlockInfo blockInfo = BlockInfo.newInstance()
                            .setMainThreadTimeCost(realTimeStart, realTimeEnd, threadTimeStart, threadTimeEnd)
                            .setCpuBusyFlag(cpuSampler.isCpuBusy(realTimeStart, realTimeEnd))
                            .setRecentCpuRate(cpuSampler.getCpuRateInfo())
                            .setThreadStackEntries(threadStackEntries)
                            .flushString();
                    //写入日志
                    LogWriter.save(blockInfo.toString());
                    //启动拦截器
                    if (mInterceptorChain.size() != 0) {
                        for (BlockInterceptor interceptor : mInterceptorChain) {
                            interceptor.onBlock(getContext().provideContext(), blockInfo);
                        }
                    }
                }
            }
        }, getContext().provideBlockThreshold(), getContext().stopWhenDebugging()));
①②是采样器,主要对信息的收集,其中startDump方法会启动采样器,延迟执行,延迟时间就是卡顿的阙值乘以0.8。
/**
 * {@link AbstractSampler} sampler defines sampler work flow.
 */
abstract class AbstractSampler {

    private static final int DEFAULT_SAMPLE_INTERVAL = 300;

    protected AtomicBoolean mShouldSample = new AtomicBoolean(false);
    protected long mSampleInterval;

    private Runnable mRunnable = new Runnable() {
        @Override
        public void run() {
            doSample();

            if (mShouldSample.get()) {
                HandlerThreadFactory.getTimerThreadHandler()
                        .postDelayed(mRunnable, mSampleInterval);
            }
        }
    };

    public AbstractSampler(long sampleInterval) {
        if (0 == sampleInterval) {
            sampleInterval = DEFAULT_SAMPLE_INTERVAL;
        }
        mSampleInterval = sampleInterval;
    }

    public void start() {
        if (mShouldSample.get()) {
            return;
        }
        mShouldSample.set(true);
        //延迟执行,延迟时间是阙值的0.8倍
        HandlerThreadFactory.getTimerThreadHandler().removeCallbacks(mRunnable);
        HandlerThreadFactory.getTimerThreadHandler().postDelayed(mRunnable,
                BlockCanaryInternals.getInstance().getSampleDelay());
    }

    public void stop() {
        if (!mShouldSample.get()) {
            return;
        }
        mShouldSample.set(false);
        HandlerThreadFactory.getTimerThreadHandler().removeCallbacks(mRunnable);
    }

    abstract void doSample();
}
四、BlockCanary使用的设计模式有单例模式、外观模式、责任链模式。