应用卡顿自动检测工具blockcanary算是在github上推荐的比较多的工具,很实用的能检测主线程卡顿的,还有另一个对它稍微改造的工程blockcanaryex,信息相对更加全面,放上两个工程的地址:
Blockcanary:https://github.com/markzhai/AndroidPerformanceMonitor
Blockcanaryex:https://github.com/seiginonakama/BlockCanaryEx
使用方式
使用方式也比较简单,在工程app的build.gradle中添加:
Compile ‘com.github.markzhai:blockcanary-android:1.5.0’
新建类继承application,在其中设置:
Blockcanary.install(this,new AppBlockCanaryContext()).start();
AppBlockCanaryContext继承自BlockCanaryContext,其中会有一部分比较有用的参数可以配置和获取:
1.String provideUid() 用户id
2.String provideNetworkType() 当前网络状态(2\3\4G或wifi)
3.Int provideMonitorDuration() 设置监控卡顿的时间为多长,单位小时,如果为负数则表示在应用生命周期内持续监控。
4.Int provideBlockThreshold() 设置卡顿出现的阀值,如果UI线程的操作超过此值则记录卡顿,单位毫秒
5.String providePath() 保存卡顿log到本地哪个路径下
6.Boolean diplayNotification() 是否需要在通知栏显示卡顿信息
7.Boolean zip(File[] src,File dest) 将卡顿信息压缩为zip包
8.Upload(File zippedFile) 应该是上传log文件
9.List<String> provideWhiteList() 设置白名单,可以过滤某些不想进行卡顿监控的方法。
卡顿简介
Android系统在4.4以后为优化性能体验,引入了VSYNC(垂直同步信号),会按照60FPS/s的频率,差不多16.67ms的间隔发送一次信号,Android系统的绘制机制会根据这个信号来进行相应的处理。如果一次页面渲染未能在16.67ms内完成,那么界面就不会发生改变,只能等待下一次VSYNC信号,这样就会造成卡顿。通过统计两帧之间间隔大于16.67ms的次数,来进行定量的衡量。
Blockcanary原理浅析
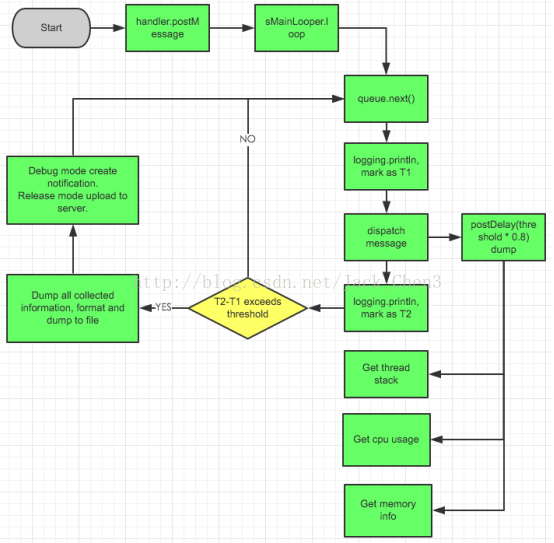
1.调用start方法的时候,start方法做了一件事:
Looper.getMainLooper().setMessageLogging(mBlockCanaryCore.monitor);
2.创建的mBlockCanaryCore,是实例化了BlockCanaryInternals:
public BlockCanaryInternals() {
stackSampler = new StackSampler(
Looper.getMainLooper().getThread(),
sContext.provideDumpInterval());
cpuSampler = new CpuSampler(sContext.provideDumpInterval());
setMonitor(new LooperMonitor(new LooperMonitor.BlockListener() {
@Override
public void onBlockEvent(long realTimeStart, long realTimeEnd,
long threadTimeStart, long threadTimeEnd) {
// Get recent thread-stack entries and cpu usage
ArrayList<String> threadStackEntries = stackSampler
.getThreadStackEntries(realTimeStart, realTimeEnd);
if (!threadStackEntries.isEmpty()) {
BlockInfo blockInfo = BlockInfo.newInstance()
.setMainThreadTimeCost(realTimeStart, realTimeEnd, threadTimeStart, threadTimeEnd)
.setCpuBusyFlag(cpuSampler.isCpuBusy(realTimeStart, realTimeEnd))
.setRecentCpuRate(cpuSampler.getCpuRateInfo())
.setThreadStackEntries(threadStackEntries)
.flushString();
LogWriter.save(blockInfo.toString());
if (mInterceptorChain.size() != 0) {
for (BlockInterceptor interceptor : mInterceptorChain) {
interceptor.onBlock(getContext().provideContext(), blockInfo);
}
}
}
}
}, getContext().provideBlockThreshold(), getContext().stopWhenDebugging()));
LogWriter.cleanObsolete();
}
3.创建的stackSampler和cpuSampler对象通过LooperPrinter对象设置给系统,被系统当做记录日志Printer使用,系统会在执行消息的前后都调用Printer的println方法记录日志,LoopPrinter中做哪些事呢:
@Override
public void println(String x) {
if (mStopWhenDebugging && Debug.isDebuggerConnected()) {
return;
}
if (!mPrintingStarted) {
mStartTimestamp = System.currentTimeMillis();
mStartThreadTimestamp = SystemClock.currentThreadTimeMillis();
mPrintingStarted = true;
startDump();
} else {
final long endTime = System.currentTimeMillis();
mPrintingStarted = false;
if (isBlock(endTime)) {
notifyBlockEvent(endTime);
}
stopDump();
}
}
StartDump()开始记录系统资源状态,下次执行时,消息执行结束时判断是否达到了卡顿的阀值,如果达到通知监听(在构造时传入)已经卡顿,同时停止记录系统资源状态。其中的开始记录和结束记录都是直接调用了构造BlockCanaryCore时创建的两个监视资源的成员.
4.卡顿的监听也是在BlockCanaryCore构造时创建的, 他在收到卡顿通知后取得资源监视器中存储的数据, 存储到外存, 最后通知mOnBlockEventInterceptor, 而这个成员是什么时候传入的呢? 答案是在构造BlockCanary的时候, 先得到BlockCanaryCore实例, 然后就是初始化通知. 这里是通过反射取得Notifier的实例, 并将之设置为BlockCanaryCore中的mOnBlockEventInterceptor成员. 在Notifier中就直接弹出通知, 展示数据了.
最后感谢大神的帖子:
http://www.jianshu.com/p/f6d32a1c4d17
http://blog.zhaiyifan.cn/2016/01/16/BlockCanaryTransparentPerformanceMonitor/
http://www.jianshu.com/p/cff5b068fc71