尊重原创,本文转自:https://www.cnblogs.com/FlyAway2013/p/8811385.html
前我们项目,所有的配置基本都是通过本地properties 文件进行配置的,比如ip地址、端口、消息中间件和数据库连接的各种参数,当我们需要切换环境或调整参数的时候,我们必须手动的修改这些配置。如果只有一个配置文件还好,但是,如果有很多这样的配置文件,而且又分布式部署在多台机器,那么这样, 无疑是非常低效而且容易出错的。
我们当前的项目,大都是分布式部署的项目,机器多,配置项更是繁多,因此,我们很有必要引入一个配置中心。
各开源配置中心对比矩阵如下:
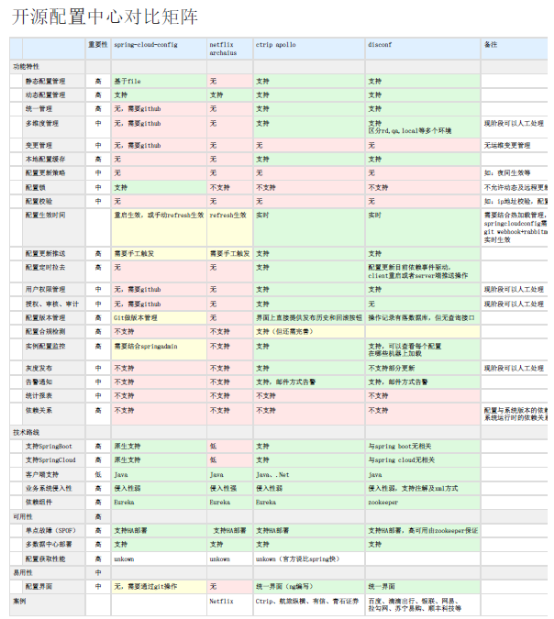
在对比了各家的开源产品之后,我们选用了携程的apollo : https://github.com/ctripcorp/apollo
Apollo介绍
Apollo(阿波罗)是携程框架部门研发的分布式配置中心,能够集中化管理应用不同环境、不同集群的配置,配置修改后能够实时推送到应用端,并且具备规范的权限、流程治理等特性,适用于微服务配置管理场景。
服务端基于Spring Boot和Spring Cloud开发,打包后可以直接运行,不需要额外安装Tomcat等应用容器。
Java客户端不依赖任何框架,能够运行于所有Java运行时环境,同时对Spring/Spring Boot环境也有较好的支持。
.Net客户端不依赖任何框架,能够运行于所有.Net运行时环境。
Apollo特性
- 统一管理不同环境、不同集群的配置
- Apollo提供了一个统一界面集中式管理不同环境(environment)、不同集群(cluster)、不同命名空间(namespace)的配置。
- 同一份代码部署在不同的集群,可以有不同的配置,比如zk的地址等
- 通过命名空间(namespace)可以很方便的支持多个不同应用共享同一份配置,同时还允许应用对共享的配置进行覆盖
- 配置修改实时生效(热发布)
- 用户在Apollo修改完配置并发布后,客户端能实时(1秒)接收到最新的配置,并通知到应用程序。
- 版本发布管理
- 所有的配置发布都有版本概念,从而可以方便的支持配置的回滚。
- 灰度发布
- 支持配置的灰度发布,比如点了发布后,只对部分应用实例生效,等观察一段时间没问题后再推给所有应用实例。
- 权限管理、发布审核、操作审计
- 应用和配置的管理都有完善的权限管理机制,对配置的管理还分为了编辑和发布两个环节,从而减少人为的错误。
- 所有的操作都有审计日志,可以方便的追踪问题。
- 客户端配置信息监控
- 可以方便的看到配置在被哪些实例使用
- 提供Java和.Net原生客户端
- 提供了Java和.Net的原生客户端,方便应用集成
- 支持Spring Placeholder, Annotation和Spring Boot的ConfigurationProperties,方便应用使用(需要Spring 3.1.1+)
- 同时提供了Http接口,非Java和.Net应用也可以方便的使用
- 提供开放平台API
- Apollo自身提供了比较完善的统一配置管理界面,支持多环境、多数据中心配置管理、权限、流程治理等特性。
- 不过Apollo出于通用性考虑,对配置的修改不会做过多限制,只要符合基本的格式就能够保存。
- 在我们的调研中发现,对于有些使用方,它们的配置可能会有比较复杂的格式,如xml, json,需要对格式做校验。
- 还有一些使用方如DAL,不仅有特定的格式,而且对输入的值也需要进行校验后方可保存,如检查数据库、用户名和密码是否匹配。
- 对于这类应用,Apollo支持应用方通过开放接口在Apollo进行配置的修改和发布,并且具备完善的授权和权限控制
- 部署简单
- 配置中心作为基础服务,可用性要求非常高,这就要求Apollo对外部依赖尽可能地少
- 目前唯一的外部依赖是MySQL,所以部署非常简单,只要安装好Java和MySQL就可以让Apollo跑起来
- Apollo还提供了打包脚本,一键就可以生成所有需要的安装包,并且支持自定义运行时参数
工作原理
总体架构:

- 用户在Portal操作配置发布
- Portal调用Admin Service的接口操作发布
- Admin Service发布配置后,发送ReleaseMessage给各个Config Service
- Config Service收到ReleaseMessage后,通知对应的客户端
客户端:

上图简要描述了Apollo客户端的实现原理:
- 客户端和服务端保持了一个长连接,从而能第一时间获得配置更新的推送。(通过Http Long Polling实现)
- 客户端还会定时从Apollo配置中心服务端拉取应用的最新配置。
- 这是一个fallback机制,为了防止推送机制失效导致配置不更新
- 客户端定时拉取会上报本地版本,所以一般情况下,对于定时拉取的操作,服务端都会返回304 - Not Modified
- 定时频率默认为每5分钟拉取一次,客户端也可以通过在运行时指定System Property: apollo.refreshInterval来覆盖,单位为分钟。
- 客户端从Apollo配置中心服务端获取到应用的最新配置后,会保存在内存中
- 客户端会把从服务端获取到的配置在本地文件系统缓存一份
- 在遇到服务不可用,或网络不通的时候,依然能从本地恢复配置
- 应用程序可以从Apollo客户端获取最新的配置、订阅配置更新通知
服务端部署
单机部署指南
将apollo-quick-start.zip 上传到某一个服务器, 作为配置中心, 解压, 修改sh脚本参数,
修改IP:
修改端口:
操作步骤:
1 修改apolloconfigdb.sql 的
# Config
# ------------------------------------------------------------
INSERT INTO `ServerConfig` (`Key`, `Cluster`, `Value`, `Comment`)
VALUES
('eureka.service.url', 'default', 'http://192.168.1.229:5998/eureka/', 'Eureka服务Url,多个service以英文逗号分隔'),
('namespace.lock.switch', 'default', 'false', '一次发布只能有一个人修改开关'),
('item.value.length.limit', 'default', '20000', 'item value最大长度限制'),
('config-service.cache.enabled', 'default', 'false', 'ConfigService是否开启缓存,开启后能提高性能,但是会增大内存消耗!'),
('item.key.length.limit', 'default', '128', 'item key 最大长度限制');
ip: 192.168.1.229
2 一定要先启动 cfg, 然后是 admin, 然后是 portal
admin一定要在 cfg启动成功 之后,
portal 一定要在 admin启动成功 之后,
D:\code\git\apollo\apollo-configservice\target>java -jar apollo-configservice-0.
10.0-SNAPSHOT.jar start -Dspring_datasource_username=ww
停止
./cfg/scripts/shutdown.sh ; ./adm/scripts/shutdown.sh ; ./ptl/scripts/shutdown.sh ;
启动apollo:
./cfg/scripts/shutdown.sh ; ./cfg/scripts/startup.sh ; ./adm/scripts/shutdown.sh ; ./adm/scripts/startup.sh ; ./ptl/scripts/shutdown.sh ; ./ptl/scripts/startup.sh ;
java -Dapollo_profile=github -Dspring.datasource.url=jdbc:mysql://localhost:3306/ApolloConfigDB?characterEncoding=utf8 -Dspring.datasource.username=root -Dspring.datasource.password=admin -jar cfg/apollo-configservice.jar
java -Dapollo_profile=github -Dspring.datasource.url=jdbc:mysql://localhost:3306/ApolloConfigDB?characterEncoding=utf8 -Dspring.datasource.username=root -Dspring.datasource.password=admin -jar adm/apollo-adminservice.jar
java -Dapollo_profile=github,auth -Ddev_meta=http://localhost:5998/ -Dserver.port=5999 -Dspring.datasource.url=jdbc:mysql://localhost:3306/ApolloPortalDB?characterEncoding=utf8 -Dspring.datasource.username=root -Dspring.datasource.password=admin -jar ptl/apollo-portal.jar
[root@VM228 apollo]# ./demo.sh start
==== starting service ====
Service logging file is ./service/apollo-service.log
Started [11050]
Waiting for config service startup....
Config service started. You may visit http://192.168.1.228:8080 for service status now!
Waiting for admin service startup...
Admin service started
==== starting portal ====
Portal logging file is ./portal/apollo-portal.log
Started [11196]
Waiting for portal startup....
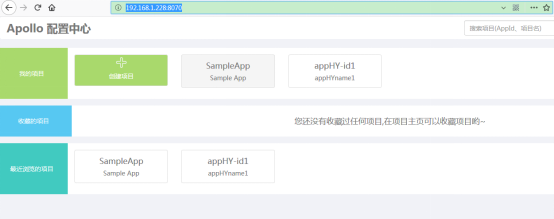
Portal started. You can visit http://192.168.1.228:8070 now!
测试:
系统出错,请重试或联系系统负责人 --- configdb 的serverconfig表 的: eureka.service.url 可以要重启。。
配置错误 。。。= http://192.168.4.112:5998/eureka/
使用portal: 访问 http://192.168.1.228:8070/, 管理员账号:apollo/admin

停止:
[root@VM228 apollo]# ./demo.sh stop
==== stopping portal ====
Stopped [11196]
==== stopping service ====
Stopped [11050]
分布式部署指南
我们暂时不启用它
参见:
https://github.com/ctripcorp/apollo/wiki/%E5%88%86%E5%B8%83%E5%BC%8F%E9%83%A8%E7%BD%B2%E6%8C%87%E5%8D%97
客户端部署和使用
(主要针对dubbo应用)
参考:https://github.com/ctripcorp/apollo/wiki/Java客户端使用指南
客户端部署跟我们之前部署方式一样,不过部署之前,需要我们对我们的dubbo应用做一些调整:
引入apollo-client依赖
apollo-client-项目分支-版本.jar(统一由架构部门或运维部门来发布)
如下:
<dependency>
<groupId>com.ctrip.framework.apollo</groupId>
<artifactId>apollo-client</artifactId>
<version> hy-linke-0.10.0</version>
</dependency>
统一配置和迁移
在应用中配置好META-INF/app.properties, META-INF/app.properties 是可选的,而且
把原先配置(必须是properties格式)复制一下,然后通过Apollo提供的文本编辑模式全部粘帖到应用的application namespace,发布配置
如果原来是其它格式,如yml,请先转成properties格式
最好把原先的配置文件如bootstrap.properties, application.properties从项目中删除,当然,我们也可以同时保留我们原来的application.properties配置,但是这样可能会有冲突,如果在本地和配置中心有有同名的配置,那么使用配置中心, 否则就使用其中存在的一方, 如果两个地方都没有,那么就使用默认值, 如果默认值也没有,那么spring启动就可能会出现异常。
代码中使用
配置方式1:通过@Value,如
public class TestJavaConfigBean {
@Value("${timeout:100}")
private int timeout;
private int batch;
@Value("${batch:200}")
public void setBatch(int batch) {
this.batch = batch;
}
public int getTimeout() {
return timeout;
}
public int getBatch() {
return batch;
}
}
@Configuration
@EnableApolloConfig
public class AppConfig {
@Bean
public TestJavaConfigBean javaConfigBean() {
return new TestJavaConfigBean();
}
}
配置方式2:通过@ ConfigurationProperties,如
@ConfigurationProperties(prefix = "redis.cache")
public class SampleRedisConfig {
private int expireSeconds;
private int commandTimeout;
public void setExpireSeconds(int expireSeconds) {
this.expireSeconds = expireSeconds;
}
public void setCommandTimeout(int commandTimeout) {
this.commandTimeout = commandTimeout;
}
}
@Configuration
@EnableApolloConfig
public class AppConfig {
@Bean
public SampleRedisConfig redisConfigBean() {
return new SampleRedisConfig ();
}
}
配置方式3:通过@ ApolloConfig获取整个namespace的配置
,如下,@ApolloConfig 可以和@Value一起使用,ApolloConfigChangeListener可以监听配置变化:
public class TestApolloAnnotationBean {
@ApolloConfig
private Config config; //inject config for namespace application
@ApolloConfig("application")
private Config anotherConfig; //inject config for namespace application
@ApolloConfig("FX.apollo")
private Config yetAnotherConfig; //inject config for namespace FX.apollo
@Value("${batch:100}")
private int batch;
//config change listener for namespace application
@ApolloConfigChangeListener
private void someOnChange(ConfigChangeEvent changeEvent) {
//update injected value of batch if it is changed in Apollo
if (changeEvent.isChanged("batch")) {
batch = config.getIntProperty("batch", 100);
}
}
//config change listener for namespace application
@ApolloConfigChangeListener("application")
private void anotherOnChange(ConfigChangeEvent changeEvent) {
//do something
}
//config change listener for namespaces application and FX.apollo
@ApolloConfigChangeListener({"application", "FX.apollo"})
private void yetAnotherOnChange(ConfigChangeEvent changeEvent) {
//do something
}
//example of getting config from Apollo directly
//this will always return the latest value of timeout
public int getTimeout() {
return config.getIntProperty("timeout", 200);
}
//example of getting config from injected value
//the program needs to update the injected value when batch is changed in Apollo using @ApolloConfigChangeListener shown above
public int getBatch() {
return this.batch;
}
}
配置方式4(不推荐):在传统的application.properties文件 通过${} 方式引入apollo配置:
applicationKey= ${apolloValue}
配置方式5((不推荐): 直接通过API的方式
获取默认namespace的配置(application)
Config config = ConfigService.getAppConfig(); //config instance is singleton for each namespace and is never null
String someKey = "someKeyFromDefaultNamespace";
String someDefaultValue = "someDefaultValueForTheKey";
String value = config.getProperty(someKey, someDefaultValue);
配置方式6((不推荐): 通过XML的方式
使用:
@Autowired
TestJavaConfigBean javaConfigBean;
@Autowired
SampleRedisConfig redisConfig;
@Autowired
TestApolloAnnotationBean apolloAnnotationBean;
注意事项
关于apollo配置文件
关于 META-INF/app.properties文件:它主要是用来定义app.id的。官方默认情况下,这个文件是不可缺少的,但是为了简化大家的开发,我这边已经修改了源码,设置了默认值hy,所以,这个文件现在就变成不是必须配置的了
关于server.properties 文件,位于C:\opt\settings\server.properties或/opt/settings/server.properties ,它主要是用来定义env和idc参数的。官方默认情况下,这个文件是不可缺少的,但是为了简化大家的开发,我这边已经修改了源码,设置了默认值env=dev,所以,这个文件现在就变成不是必须配置的了(如果有设置,那么,它是不可动态增加删除或修改, 只在启动的时候读取一次)
所以,现在来说, 我们已经不需要任何apollo配置文件了,我们直接在portal上配置即可。
相关的重要的环境变量,不要覆盖!:
l jvm 参数
env idc
l 系统环境变量:
ENV, app.id, idc
l 配置文件
/META-INF/app.properties: app.id
server.properties: env, idc
本地缓存文件
位于:
/opt/data/{appId}/config-cache 或C:\opt\data\{appId}\config-cache
启动顺序
我们的dubbo应用启动之前, apollo 必须先启动好,
否则,我们dubbo应用会一直等待,直到apollo准备就绪,并且可以在控制台看到如下输出:
...
2018-03-01 18:01:59,932 [Apollo-RemoteConfigLongPollService-1] WARN com.ctrip.framework.apollo.internals.RemoteConfigLongPollService.doLongPollingRefresh:193 - Long polling failed, will retry in 16 seconds. appId: SampleApp, cluster: default, namespaces: application+FX.apollo, long polling url: null, reason: Get config services failed from http://192.168.1.228:8080/services/config?appId=SampleApp&ip=192.168.1.222 [Cause: Could not complete get operation [Cause: connect timed out]]
2018-03-01 18:02:19,932 [Apollo-RemoteConfigLongPollService-1] WARN com.ctrip.framework.apollo.internals.RemoteConfigLongPollService.doLongPollingRefresh:193 - Long polling failed, will retry in 32 seconds. appId: SampleApp, cluster: default, namespaces: application+FX.apollo, long polling url: null, reason: Get config services failed from http://192.168.1.228:8080/services/config?appId=SampleApp&ip=192.168.1.222 [Cause: Could not complete get operation [Cause: connect timed out]]
2018-03-01 18:02:55,933 [Apollo-RemoteConfigLongPollService-1] WARN com.ctrip.framework.apollo.internals.RemoteConfigLongPollService.doLongPollingRefresh:193 - Long polling failed, will retry in 64 seconds. appId: SampleApp, cluster: default, namespaces: application+FX.apollo, long polling url: null, reason: Get config services failed from http://192.168.1.228:8080/services/config?appId=SampleApp&ip=192.168.1.222 [Cause: Could not complete get operation [Cause: connect timed out]]
2018-03-01 18:04:03,934 [Apollo-RemoteConfigLongPollService-1] WARN com.ctrip.framework.apollo.internals.RemoteConfigLongPollService.doLongPollingRefresh:193 - Long polling failed, will retry in 120 seconds. appId: SampleApp, cluster: default, namespaces: application+FX.apollo, long polling url: null, reason: Get config services failed from http://192.168.1.228:8080/services/config?appId=SampleApp&ip=192.168.1.222 [Cause: Could not complete get operation [Cause: connect timed out]]
...
注意其中轮询时间是从1,2,3,4,8,14,32, 方式一直增长,单位是s
问题:
因为数据库是: http://192.168.4.112:5998/eureka/
2018-03-22 12:01:41.470 INFO 3840 --- [ost-startStop-1] c.c.f.a.biz.service.BizDBPropertySource : Load config from DB : eureka.service.url = http://192.168.4.112:5998/eureka/
而portal 的参数是:
-Dapollo_profile=github,auth -Ddev_meta=http://localhost:5998/
于是portal 就启动不了。。
2018-03-22 12:02:30.321 ERROR 8536 --- [HealthChecker-1] c.c.f.a.portal.component.PortalSettings : Env is down. env: DEV, failed times: 3, meta server address: http://localhost:5998/
2018-03-22 12:02:40.322 ERROR 8536 --- [HealthChecker-1] c.c.f.a.portal.component.PortalSettings : Env health check failed, maybe because of meta server down or configure wrong meta server address. env: DEV, meta server address: http://localhost:5998/
com.ctrip.framework.apollo.common.exception.ServiceException: No available admin server. Maybe because of meta server down or all admin server down. Meta server address: http://localhost:5998/
at com.ctrip.framework.apollo.portal.component.RetryableRestTemplate.getAdminServices(RetryableRestTemplate.java:172)
at com.ctrip.framework.apollo.portal.component.RetryableRestTemplate.execute(RetryableRestTemplate.java:90)
at com.ctrip.framework.apollo.portal.component.RetryableRestTemplate.get(RetryableRestTemplate.java:56)
at com.ctrip.framework.apollo.portal.api.AdminServiceAPI$HealthAPI.health(AdminServiceAPI.java:47)
at com.ctrip.framework.apollo.portal.component.PortalSettings$HealthCheckTask.isUp(PortalSettings.java:127)
at com.ctrip.framework.apollo.portal.component.PortalSettings$HealthCheckTask.run(PortalSettings.java:103)
at java.util.concurrent.Executors$RunnableAdapter.call(Executors.java:511)
at java.util.concurrent.FutureTask.runAndReset(FutureTask.java:308)
at java.util.concurrent.ScheduledThreadPoolExecutor$ScheduledFutureTask.access$301(ScheduledThreadPoolExecutor.java:180)
at java.util.concurrent.ScheduledThreadPoolExecutor$ScheduledFutureTask.run(ScheduledThreadPoolExecutor.java:294)
at java.util.concurrent.ThreadPoolExecutor.runWorker(ThreadPoolExecutor.java:1142)
at java.util.concurrent.ThreadPoolExecutor$Worker.run(ThreadPoolExecutor.java:617)
at java.lang.Thread.run(Thread.java:745)
2018-03-22 12:02:40.328 ERROR 8536 --- [HealthChecker-1] c.c.f.a.portal.component.PortalSettings : Env is down. env: DEV, failed times: 4, meta server address: http://localhost:5998/
2018-03-22 12:02:50.530 INFO 8536 --- [HealthChecker-1] c.c.f.a.portal.component.PortalSettings : Env revived because env health check success. env: DEV
解决:
都改成localhost, 或者ip 就可以了Apollo配置中心