【用途】
管理依赖,自动关联源码
【下载与安装】
1.下载:
https://mirrors.tuna.tsinghua.edu.cn/apache/maven/maven-3/3.5.3/binaries/
Linux版:apache-maven-3.3.9-bin.tar.gz
Windows版:apache-maven-3.3.9-bin.zip
2.安装
解压即可,放在根路径下。
3.配置环境变量
M2_HOME=E:\apache-maven-3.3.9
PATH=…..;%M2_HOME%/bin;
【修改软件仓库】
1. conf/settings.xml
官方的库在国外经常连不上,连上也下载速度很慢。国内oschina的maven服务器很早之前就关了。配置阿里云的一个中央仓库,速度很快。在<mirrors>标签下加入上述内容即可。如下:
<mirrors>
        <!-- 阿里云仓库 -->
        <mirror>
            <id>alimaven</id>
            <mirrorOf>central</mirrorOf>
            <name>aliyun maven</name>
            <url>http://maven.aliyun.com/nexus/content/repositories/central/</url>
        </mirror>

        <!-- 中央仓库1 -->
        <mirror>
            <id>repo1</id>
            <mirrorOf>central</mirrorOf>
            <name>Human Readable Name for this Mirror.</name>
            <url>http://repo1.maven.org/maven2/</url>
        </mirror>

        <!-- 中央仓库2 -->
        <mirror>
            <id>repo2</id>
            <mirrorOf>central</mirrorOf>
            <name>Human Readable Name for this Mirror.</name>
            <url>http://repo2.maven.org/maven2/</url>
        </mirror>
    </mirrors>
2.修改本地库路径
默认:
Linux:~/.m2/repository
Windows:C:\Users\Administrator\.m2\repository
如果需要修改 :conf/settings.xml
<localRepository>/path/to/local/repo</localRepository>【体验Maven】
参考《Maven实战》
1.查看帮助:mvn:help system
cmd>mvnhelp:system
2.编写pom.xml文件(Project object Model)
<?xml version="1.0"?>
    <project>
 	<modelVersion>4.0.0</modelVersion>
	<!—groupid映射到文件夹结构,解析成路劲-->
        <groupId>org.apache.hadoop</groupId>
        <!—工件id映射到一个文件-->
	<artifactId>module</artifactId>
        <!—工件的版本,对应一个文件-->
	<version>2.7.3</version>
    </project>
</xml>
例:在F:\workspace\testMaven下创建pom.xml
<?xml version="1.0"?>
<project>
 	<modelVersion>4.0.0</modelVersion>
	<groupId>com.cskywit</groupId>
	<artifactId>helloworld</artifactId>
	<version>1.0</version>
</project>
3.创建文件夹
Maven假设项目主代码位于src/main/java目录,编写时需要遵循此约定
创建文件夹:F:\workspace\testMaven\src\main\java
在其中继续根据pom.xml定义创建文件夹如下:
F:\workspace\testMaven\src\main\java\com\cskywit\helloworld
4.创建Java类
F:\workspace\testMaven\src\main\java\com\cskywit\helloworld\HelloWorld.java
package com.cskywit.helloworld;
public class HelloWorld
{
	public static void main(String[] args){
		System.out.println("Hello,World!");
	}
}
5.使用maven编译Java源代码
cmd>tree /F

在有pom.xml文件的地方进入cmd执行:
cmd>mvn clean compile
编译无误后会生成target目录,可以用tree命令查看:

打包:
cmd>mvnclean package

尝试运行:
cmd>cd target
cmd>java –cp helloworld-1.0.jar com.cskywit.helloworld.HelloWorld
【Maven私服搭建】
1.下载Maven Web程序
Nexus是Maven仓库管理器,也可以叫Maven的私服。Nexus是一个强大的Maven仓库管理器,它极大地简化了自己内部仓库的维护和外部仓库的访问。利用Nexus你可以只在一个地方就能够完全控制访问和部署在你所维护仓库中的每个Artifact。Nexus是一套“开箱即用”的系统不需要数据库,它使用文件系统加Lucene来组织数据。详细查看博客http://blog.csdn.net/jiuqiyuliang/article/details/49407455。
下载地址:https://www.sonatype.com/download-sonatype-trial?submissionGuid=0b0bc55e-4039-4945-ae71-fd38dab4fa34
本次下载的是nexus-2.14.8-01-bundle.zip
2.部署Nexus
部署方式可分为直接部署和使用Tomcat方式,详请可以参考上文博客链接。这里直接部署:将压缩包解压缩到E:\tools\nexus-2.14.8-01-bundle,内含两个子目录,其中nexus-2.14.8-01包含Nexus运行所有需要的文件,如启动脚本、依赖jar包等,sonatype-work目录包含Nexus生成的配置文件、日志文件、仓库文件。该目录不是必须得,Nexus会在运行的时候动态的创建,不再过多的介绍。

打开E:\tools\nexus-2.14.8-01-bundle\nexus-2.14.8-01\bin\jsw可以看到针对不同的平台的运行环境:

打开Windows-x86-64的文件夹:
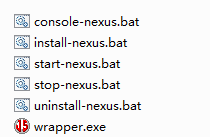
console-nexus.bat:启动Nexus服务器,命令窗口关闭后不会驻留在Windows服务中;
install-nexus.bat:将Nexus安装成为Windows服务,开机时自动启动,个人比较推荐;
start-nexus.bat:启动服务;
stop-nexus.bat:停止服务;
uninstall-nexus.bat:卸载Nexus在Windows中的服务;
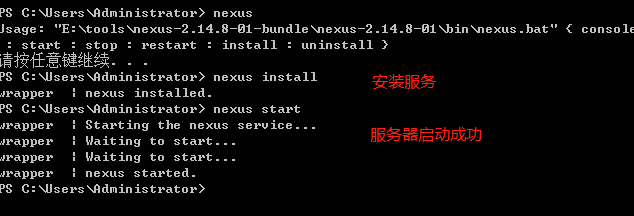
为方便启动和退出Nexus,将E:\tools\nexus-2.14.8-01-bundle\nexus-2.14.8-01\bin添加到环境变量PATH中。
打开浏览器,访问http://localhost:8081/nexus
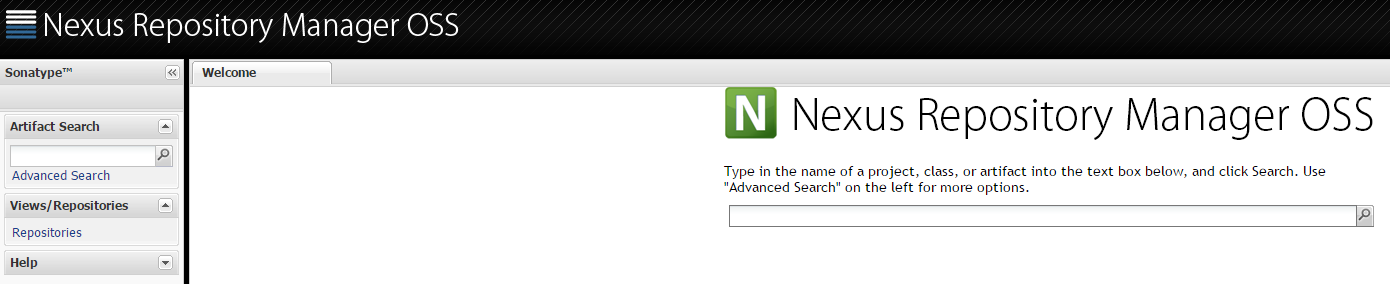
默认登录用户名/密码:admin/admin123
3.配置私服的仓库路径
E:\tools\nexus-2.14.8-01-bundle\nexus-2.14.8-01\nexus\WEB-INF\classes\nexus.properties
将私服仓库配置在E:/tools/maven-repo/nexus,该配置文件内容为:
nexus-work=E:/tools/maven-repo/nexus
runtime=${bundleBasedir}
nexus-app=${runtime}
配置保存后重启nexus。
4.向仓库添加内容
(1)如果已经有现成下好的仓库,直接复制到仓库位置即可;
(2)如果没有现成仓库,可以自行更新,按如下方式:
(a)网络自动下载方式:
进入Nexus Web控制端依次点击1.左边的Repositories 2.点击Central 3.点击下面的Configuration 4.找到Download Remote Indexes 5.选择true 6.右键Central选择repair index或者update index都行。

至此私服就开始向中央库下载更新索引了(前提你要有网络,否则会失败)。点击左边的Administration下的Scheduled Tasks可以查看当前任务进度。如果状态为running则标示任务已经开始执行。

更新索引会花费比较多的时间大概半小时到1小时左右。
如果想看进度可以打开nexus-2.14.4-03文件夹->logs->wapper.log查看日志。
如果日志中出现
jvm 1 | 2017-07-21 15:48:19,615+0800 INFO[pxpool-1-thread-1] admin org.sonatype.nexus.index.NexusScanningListener -Scanning of repositoryID="central" started.
标示更新索引已经开始。如果之后再没有信息表示正在进行。如果更新失败log里也会显示。如果显示finished则表示更新索引成功。
jvm 1 | 2017-07-21 15:53:18,583+0800 INFO[pxpool-1-thread-1] admin org.sonatype.nexus.index.NexusScanningListener -Scanning of repositoryID="central" finished
到这里,maven的私服算是搭建完成了。
(b)手动更新方式:
网络自动下载太慢而且总是失败,可以选择手动更新,这里参考了https://blog.csdn.net/zyf_balance/article/details/48130901。
Step1:下载以下3个文件到同一目录下
http://repo.maven.apache.org/maven2/.index/nexus-maven-repository-index.gz
http://repo.maven.apache.org/maven2/.index/nexus-maven-repository-index.properties
http://central.maven.org/maven2/org/apache/maven/indexer/indexer-cli/5.1.1/indexer-cli-5.1.1.jar
Step2:执行命令,执行完之后在同一目录下会生成indexer文件夹
java -jar indexer-cli-5.1.1.jar -u nexus-maven-repository-index.gz-d indexer
step3:将文件夹下的文件拷贝到以下目录中,该目录为central库对应的目录,nexus安装完成后就存在了
{nexus_home}\sonatype-work\nexus\indexer\central-ctx
5.配置maven的settings文件,指定私服的地址
此处参考了:https://blog.csdn.net/Dynamic_W/article/details/75661204
(1)编辑${M2_HOME}/conf/settings.xml文件,关于此配置文件更加详细的说明可以参考博客:
https://blog.csdn.net/Dynamic_W/article/details/77483311。
添加镜像:
添加镜像:
   <mirrors>
         <!-- 私服 -->
        <mirror>
            <id>nexus-mirror</id>
            <mirrorOf>maven-central</mirrorOf>
            <url>http://localhost:8081/nexus/content/repositories/central/</url>
        </mirror>
  </mirrors>
添加服务验证:
<server>
    <id>nexus</id>
    <username>admin</username>
    <password>admin123</password>
</server>
做构件的配置
	<profile>
		<id>nexuesProfile</id>
		<repositories>
			<repository>
				<id>maven-central</id>
				<name>maven-central</name>
				<url>http://localhost:8081/nexus/content/repositories/central/</url>
				<snapshots>
					<enabled>true</enabled>
				</snapshots>
				<releases>
					<enabled>true</enabled>
				</releases>
			</repository>
		</repositories>
	</profile>
激活构件
	<activeProfiles>
		<activeProfile>nexuesProfile</activeProfile>
	</activeProfiles>
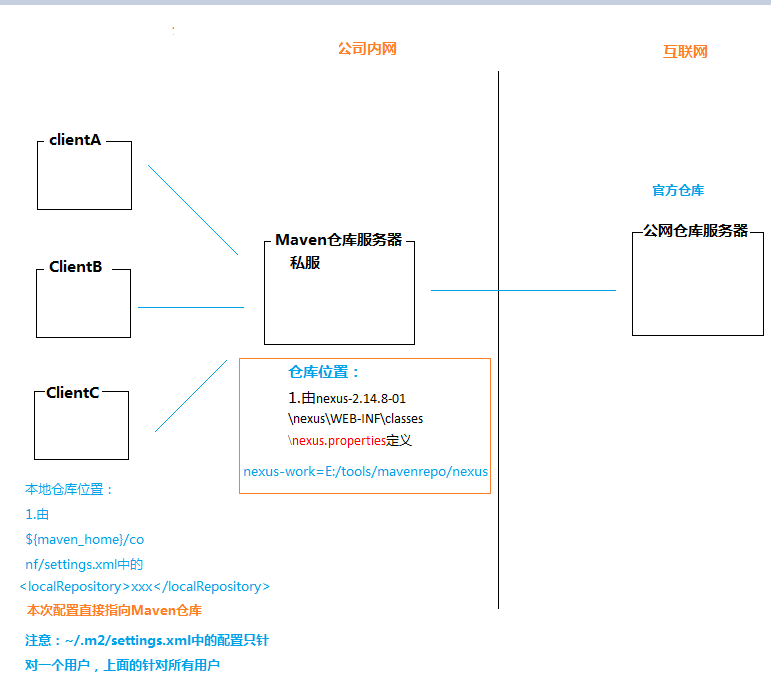
6.maven仓库、本地库与远程库的小结
7.maven常用命令
cmd>mvn clean //清除target目录
cmd>mvn clean compile //清除并编译
cmd>mvn clean package //清除并生成jar包
cmd>mvn package -Dmaven.test.skip=true
cmd>mvn package -DskipTests
cmd>mvn install //安装到本地仓库中
8.使用Archetype生成项目核心文件夹
cmd>mvn archetype:generate
cmd>mvn archetype:generate -DarchetypeCatalog=internal //初始化maven项目,解决卡问题

自动生成的POM文件如下:

【maven集成到eclipse】
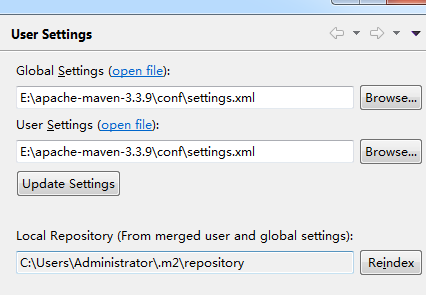
eclipse->window->Preferences->Maven->UserSettings
设置:
Global Settings:E:\apache-maven-3.3.9\conf\settings.xml
User Settings:E:\apache-maven-3.3.9\conf\settings.xml
自动解析本地仓库目录:C:\Users\Administrator\.m2\repository
【使用Eclipse创建Maven项目】
1.eclipse->new Project->new MavenProject
2.选择archetype版本(可使用默认)

3.配置GroupID,ArtifactID,version,Package
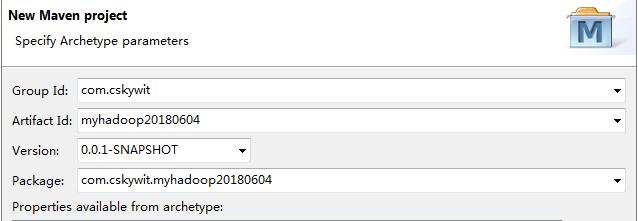
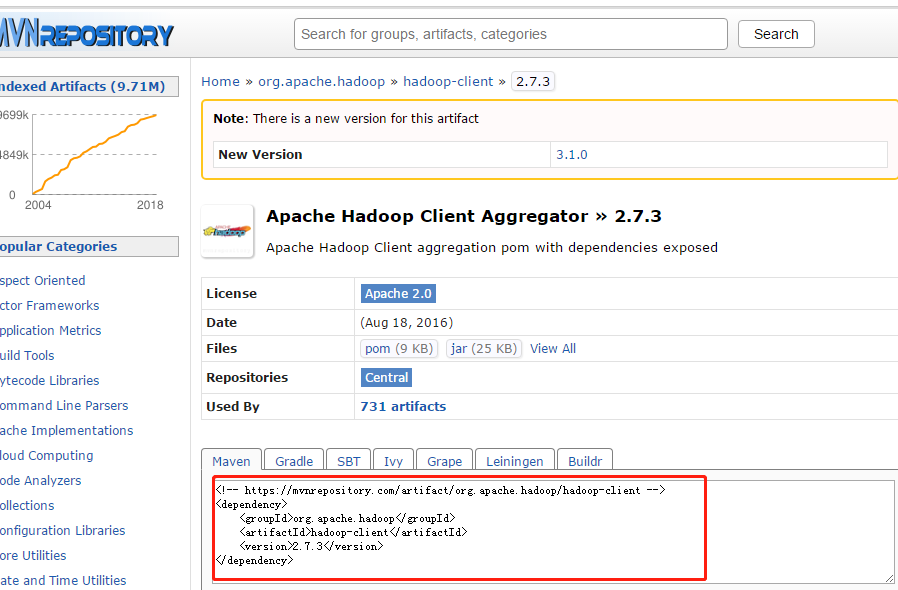
4.项目完成创建后自动生成POM.xml文件,打开该文件,为开发hadoop项目,在其中依赖部分加入:
<dependency>
      <groupId>org.apache.hadoop</groupId>
      <artifactId>hadoop-client</artifactId>
      <version>2.7.3</version>
      <scope>test</scope>
 </dependency
Eclipse将会调用maven自动下载本地库没有的文件。实际使用过程中以上ID不用记忆,可以直接百度xxx maven,如hadoop maven即可:
最后写代码测试一下:递归输出HDFS目录结构,使用单元测试运行
package com.cskywit.myhadoop20180604;

import java.io.FileNotFoundException;
import java.io.IOException;

import org.apache.hadoop.conf.Configuration;
import org.apache.hadoop.fs.FileStatus;
import org.apache.hadoop.fs.FileSystem;
import org.apache.hadoop.fs.Path;
import org.junit.Test;
/**
 * @author cskywit
 *  测试HDFS
 */
public class TestHDFS
{
	@Test
	public void listFS() throws Exception{
		Configuration conf = new Configuration();
		conf.set("fs.defaultFS", "hdfs://192.168.40.130:8020/");
		FileSystem fs = FileSystem.get(conf);
		printPath(fs, new Path("/"));
	}

	/**
	 *
	 * @param fs
	 * @param p
	 *
	 */
	private void printPath(FileSystem fs,Path p){
		try {
			//输出路径
			System.out.println(p.toUri().toString());
			if(fs.isDirectory(p)){
				FileStatus[] fileStatus=fs.listStatus(p);
				if(fileStatus !=null&&fileStatus.length >0){
					for(FileStatus f:fileStatus){
							Path P0 = f.getPath();
							printPath(fs, P0);
						}

					}
			}
		}catch (FileNotFoundException e) {
			// TODO Auto-generated catch block
			e.printStackTrace();
		} catch (IOException e) {
			// TODO Auto-generated catch block
			e.printStackTrace();
		}

	}

}
运行结果如下:
/
hdfs://192.168.40.130:8020/user
hdfs://192.168.40.130:8020/user/ctr
hdfs://192.168.40.130:8020/user/ctr/hadoop
hdfs://192.168.40.130:8020/user/ctr/hadoop/a.cmd
hdfs://192.168.40.130:8020/user/ctr/hadoop/mkFromWindows
hdfs://192.168.40.130:8020/user/ctr/hadoop/mkFromWindows/hello.txt