
原文发布于 Jimmy Song 的博客 [1]。
在上一篇博客 [2] 中我介绍了 Istio 中是如何管理证书的,这篇文章将指导你如何使用外置 CA,通过集成 SPIRE[3] 和 cert-manager[4] 实现细粒度的证书管理和自动证书轮换。
如果你还不了解什么是 SPIRE 以及为什么我们要使用 SPIRE,推荐你阅读以下内容:
• 为什么 Istio 要使用 SPIRE 做身份认证?[5]
• 如何在 Istio 中集成 SPIRE?[6]
• 零信任的基石:使用 SPIFFE 为基础设施创建通用身份 [7]
证书签发管理流程简介
下图展示了本文中使用的基于 cert-manager 和 SPIRE 的证书信任链:
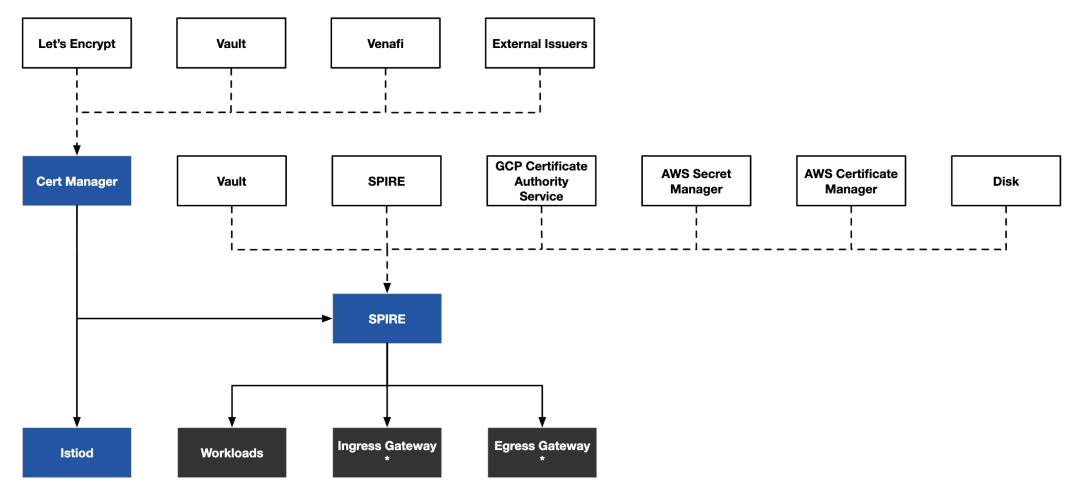
从图中你可以看出:
• cert-manager 作为根 CA 为 istiod 和 SPIRE 颁发证书,我们使用了自签名 Issuer[8] ,你还可以为其配置使用 Let’s Encrypt、Vault、Venafi 等内置 Issuer,或其他外置的 Issuer;另外你也可以选择使用其他 UpstreamAuthority[9] ,例如 Vault、SPIRE 联邦等;
• SPIRE 为 Istio 网格内工作负载和 Ingress Gateway、Egress Gateway 颁发 SVID 证书,用于服务间 mTLS;
• 其中网格外访问 Ingress Gateway 时的使用的证书及 Egress Gateway 访问网格外服务使用的证书需要额外配置;
下图展示了在 Istio 中集成 SPRIE 和 cert-manger 后的证书颁发和更新流程。
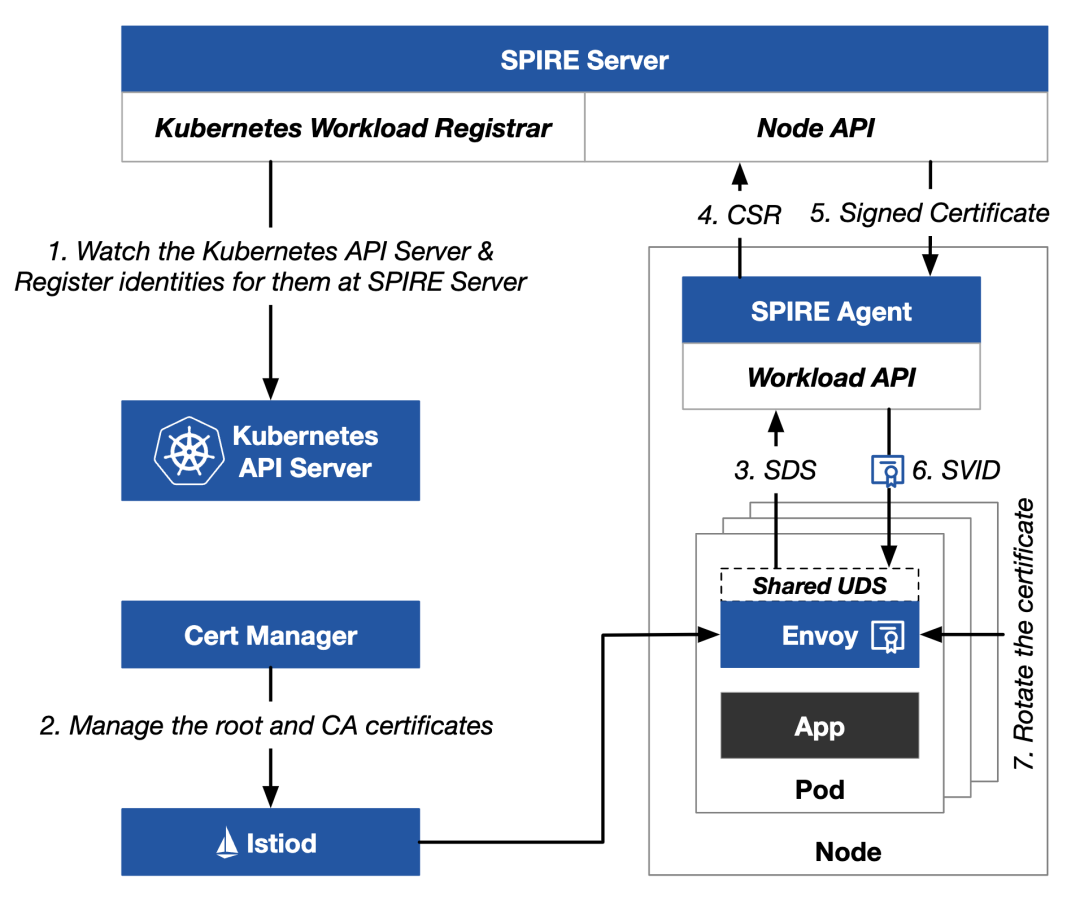
1. SPIRE Server 中的 Kubernetes Workload Registar 自动注册 Kubernetes 中的工作负载,为所有工作负载生成 SPIFFE 标准的身份;
2. cert-manager 为 istiod 颁发并管理 CA 证书;
3. 工作负载中的 Envoy 代理通过 UNIX Domain Socket(UDS)通过 SDS API 向同节点上的 SPIRE Agent 发送 CSR 请求;
4. SPIRE Agent 向 SPIRE Server 发送 CSR;
5. SPIRE Server 向 SPIRE Agent 返回签名后的证书;
6. SPIRE Agent 向工作负载返回签名后的证书;
7. SPIRE 负责工作负载的证书管理和更新;
在了解了大致流程后,下面我们将从手安装各个组件。
安装 cert-manager
运行下面的命令安装 cert-manager,我们将使用它来实现自动证书轮换:
kubectl apply -f https://github.com/cert-manager/cert-manager/releases/download/v1.10.1/cert-manager.yaml根 CA 是用自签名证书,运行下面的命令配置根 CA:
cat << EOF | kubectl apply -f -
---
apiVersion: cert-manager.io/v1
kind: Issuer
metadata:
  name: selfsigned
  namespace: cert-manager
spec:
  selfSigned: {}
---
apiVersion: cert-manager.io/v1
kind: Certificate
metadata:
  name: selfsigned-ca
  namespace: cert-manager
spec:
  isCA: true
  duration: 21600h
  secretName: selfsigned-ca
  commonName: certmanager-ca
  subject:
    organizations:
      - cert-manager
  issuerRef:
    name: selfsigned
    kind: Issuer
    group: cert-manager.io
---
apiVersion: cert-manager.io/v1
kind: ClusterIssuer
metadata:
  name: selfsigned-ca
spec:
  ca:
    secretName: selfsigned-ca
EOF
然后为 istiod 配置证书:
kubectl create namespace istio-system
cat << EOF | kubectl apply -f -
---
apiVersion: cert-manager.io/v1
kind: Certificate
metadata:
  name: cacerts
  namespace: istio-system
spec:
  secretName: cacerts
  duration: 1440h
  renewBefore: 360h
  commonName: istiod.istio-system.svc
  isCA: true
  usages:
    - digital signature
    - key encipherment
    - cert sign
  dnsNames:
    - istiod.istio-system.svc
  issuerRef:
    name: selfsigned-ca
    kind: ClusterIssuer
    group: cert-manager.io
EOF
现在我们已经安装好了 cert-manager,并创建了名为 selfsigned-ca 的 clusterIssuer,接下来,我们来安装 SPIRE 并将 cert-manager 作为 SPIRE 的 UpstreamAuthority[10] 。
安装 SPIRE
运行下面的命令快速安装 SPIRE:
kubectl apply -f https://gist.githubusercontent.com/rootsongjc/5dac0518cc432cbf844114faca74aa40/raw/814587f94bbef8fb1dd376282249dcb2a8f7fa1b/spire-with-cert-manager-upstream-authority-quick-start.yaml该 YAML 文件比起 Istio 1.16 安装包中的 samples/security/spire/spire-quickstart.yaml 文件增加了对 cert-manager 的适配,如:
• 为
spire-server-trust-roleClusterRole 增加了对cert-manager.ioAPI 组的权限;• 在 SPIRE Server 的配置中增加了
UpstreamAuthority "cert-manager"配置;
注意
SPIRE Server 配置中的 trust_domain 应与安装 Istio 时指定的 TRUST_DOMAIN 环境变量的值保持一致。
该命令中会安装 Kubernetes Workload Registrar[11] ,自动注册 Kubernetes 中的工作负载。所有工作负载将根据其服务账户注册 SPIFFE 标准的服务身份格式 spiffe://<trust-domain>/ns/<namespace>/sa/<service-account>。
如果你想调整 SPIRE CA 和 SVID 证书的 TTL,可以在 SPIRE Server 的配置中修改 ca_ttl(默认 24h) 和 default_svid_ttl(默认 1h),详见 SPIRE Server 配置 [12] 。
安装 Istio
运行下面的命令安装 Istio 并启用 CA 证书自动轮换:
istioctl operator init
istioctl install --skip-confirmation -f - <<EOF
apiVersion: install.istio.io/v1alpha1
kind: IstioOperator
metadata:
  namespace: istio-system
spec:
  profile: default
  meshConfig:
    # 信任域应与 SPIRE Server 中配置的信任域相同
    trustDomain: example.org
  values:
    global:
    # 自定义 sidecar 模板
    sidecarInjectorWebhook:
      templates:
        spire: |
          spec:
            containers:
            - name: istio-proxy
              volumeMounts:
              - name: workload-socket
                mountPath: /run/secrets/workload-spiffe-uds
                readOnly: true
            volumes:
              - name: workload-socket
                csi:
                  driver: "csi.spiffe.io"
                  readOnly: true
  components:
    pilot:
      k8s:
        env:
          # 如果启用,如果用户引入新的中间插件 CA,用户不需要重新启动 istiod 来获取证书。Istiod 会获取新添加的中间插件 CA 的证书并更新它。不支持插入新的 Root-CA。
          - name: AUTO_RELOAD_PLUGIN_CERTS
            value: "true"
    ingressGateways:
      - name: istio-ingressgateway
        enabled: true
        label:
          istio: ingressgateway
        k8s:
          overlays:
            - apiVersion: apps/v1
              kind: Deployment
              name: istio-ingressgateway
              patches:
                - path: spec.template.spec.volumes.[name:workload-socket]
                  value:
                    name: workload-socket
                    csi:
                      driver: "csi.spiffe.io"
                      readOnly: true
                - path: spec.template.spec.containers.[name:istio-proxy].volumeMounts.[name:workload-socket]
                  value:
                    name: workload-socket
                    mountPath: "/run/secrets/workload-spiffe-uds"
                    readOnly: true
EOF
因为我们要使用 Istio Operator 中声明的 spire 模板来部署工作负载,因此我们运行下面的命令部署 Bookinfo 应用:
istioctl kube-inject -f bookinfo-with-spire-template.yaml | kubectl apply -f -注意:上面命令中使用的 bookinfo-with-spire-template.yaml 文件可以在这个 Gist[13] 中找到,与 Istio 安装包中的 samples/bookinfo/platform/kube/bookinfo.yaml 文件唯一的区别就是每个 Deployment 的 template 中都增加了以下注解:
annotations:
  inject.istio.io/templates: "sidecar,spire"
使用下面的命令可以检查 SPIRE 是否给工作负载颁发了身份证明:
kubectl exec -i -t spire-server-0 -n spire -c spire-server -- /bin/sh -c "bin/spire-server entry show -socketPath /run/spire/sockets/server.sock"你可以在输出结果中看到 protuctpage 服务的身份信息:
Entry ID         : 68182621-aa9d-448d-9020-9b6ab3640b94
SPIFFE ID        : spiffe://example.org/ns/default/sa/bookinfo-productpage
Parent ID        : spiffe://example.org/k8s-workload-registrar/demo-cluster/node/gke-jimmy-cluster-default-pool-d5041909-5tzd
Revision         : 1
TTL              : default
Selector         : k8s:node-name:gke-jimmy-cluster-default-pool-d5041909-5tzd
Selector         : k8s:ns:default
Selector         : k8s:pod-uid:6244a82c-2862-4452-a592-f79a41e5ccff
DNS name         : productpage-v1-6999d7b9d9-7szxm
DNS name         : productpage.default.svc
查看 productpage pod 的证书信任链:
istioctl proxy-config secret deployment/productpage-v1 -o json | jq -r \
'.dynamicActiveSecrets[0].secret.tlsCertificate.certificateChain.inlineBytes' | base64 --decode > chain.pem
查看根证书:
istioctl proxy-config secret deployment/productpage-v1 -o json | jq -r \
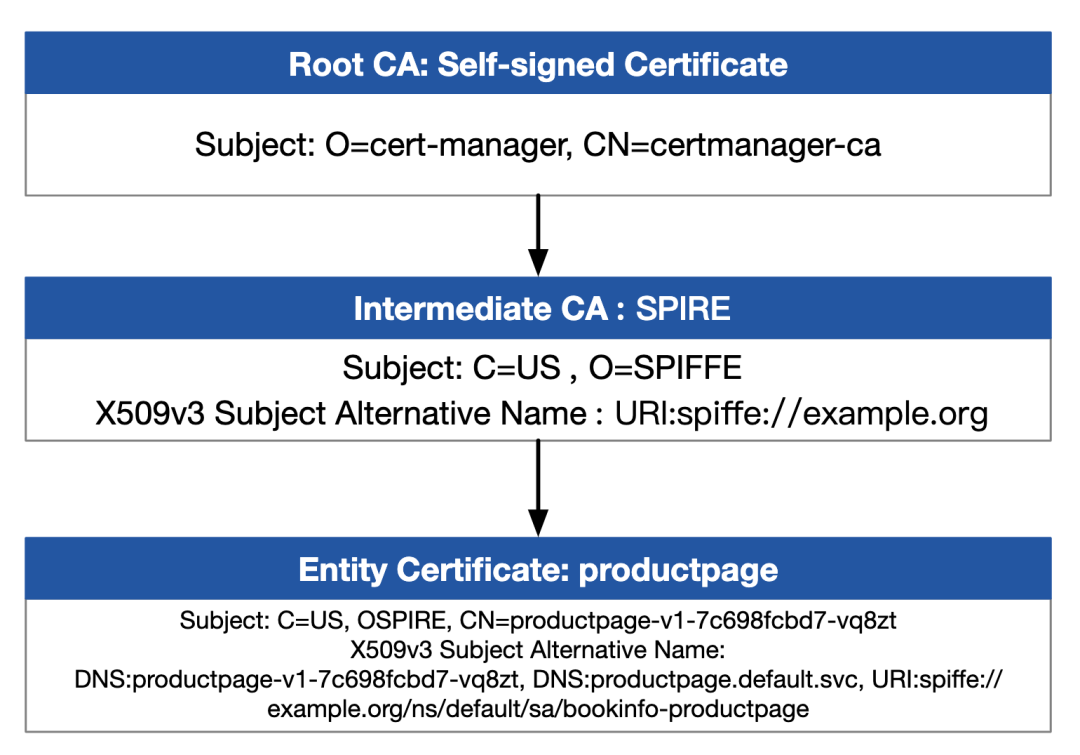
'.dynamicActiveSecrets[1].secret.validationContext.trustedCa.inlineBytes' | base64 --decode > root.pem使用文本编辑器打开 chain.pem 文件,你将可看到其中有两个证书,将这两个证书分别保存到独立的文件中,然后使用 openssl 命令 openssl x509 -noout -text -in $FILE 解析证书内容,你将看到如下的证书信任链。
查看 Istiod 的证书:
istioctl proxy-config secret deployment/istiod -o json | jq -r \
'.dynamicActiveSecrets[0].secret.tlsCertificate.certificateChain.inlineBytes' | base64 --decode > chain.pem
从证书信任链中我们可以看到:
• cert-manager 做为 PKI 的根节点为 istiod 颁发证书;
• SPIRE 作为中间 CA 再为各个工作负载颁发证书;
• Istio 网格中工作负载的 X509 v3 主体别名中的 URI 遵循了 SPIFF 身份规范;
设置证书自动轮换
如果你要修改 istiod 证书的轮换周期,从 60 天(1440 小时)缩短到 30 天(720 小时),运行下面的命令:
cat << EOF | kubectl apply -f -
---
apiVersion: cert-manager.io/v1
kind: Certificate
metadata:
  name: cacerts
  namespace: istio-system
spec:
  secretName: cacerts
  duration: 720h
  renewBefore: 360h
  commonName: istiod.istio-system.svc
  isCA: true
  usages:
    - digital signature
    - key encipherment
    - cert sign
  dnsNames:
    - istiod.istio-system.svc
  issuerRef:
    name: selfsigned-ca
    kind: ClusterIssuer
    group: cert-manager.io
EOF
运行下面的命令查看 istiod 的日志:
kubectl logs -l app=istiod -n istio-system -f过两分钟后,你将看到类似如下的证书更改记录:
2022-12-23T03:48:42.697360Z info Update Istiod cacerts
2022-12-23T03:48:42.697503Z info Using kubernetes.io/tls secret type for signing ca files
2022-12-23T03:48:42.778241Z info Istiod has detected the newly added intermediate CA and updated its key and certs accordingly
2022-12-23T03:48:42.779459Z info x509 cert - Issuer: "CN=istiod.istio-system.svc", Subject: "", SN: d7acac2301045f741e5e30cff380deaf, NotBefore: "2022-12-23T03:46:42Z", NotAfter: "2032-12-20T03:48:42Z"
2022-12-23T03:48:42.779561Z info x509 cert - Issuer: "CN=certmanager-ca,O=cert-manager", Subject: "CN=istiod.istio-system.svc", SN: 164bf045670a1716ed3f0f1c89b56122, NotBefore: "2022-12-23T03:48:14Z", NotAfter: "2023-01-22T03:48:14Z"
2022-12-23T03:48:42.779642Z info x509 cert - Issuer: "CN=certmanager-ca,O=cert-manager", Subject: "CN=certmanager-ca,O=cert-manager", SN: 8533dbfe0b84ed1fc4e3c76be7ef612f, NotBefore: "2022-12-20T07:50:12Z", NotAfter: "2025-06-07T07:50:12Z"
2022-12-23T03:48:42.779657Z info Istiod certificates are reloaded
要修改工作负载证书的自动轮换周期,你可以设置 pilot-agent 命令的环境变量 SECRET_TTL,默认值为 24h0m0s。
总结
在本文中,我们使用了 cert-manager 作为 PKI,将 SPIRE 集成到我们的证书信任链中,并为 Istio 网格中的工作负载创建身份和证书。通过使用 cert-manager,你不用担心 istiod 证书过期的问题,还可以根据需要更新证书。你还可以根据需要将 cert-manager 集成到其他证书供应商,如 Let’s Encrypt[14] 、HashiCorp Vault[15] 、Venafi[16] 等。你也可以使用 istio-csr[17] 直接让 cert-manager 来管理 Istio 中的证书,参考 使用 istio-csr 将外部 CA 与证书管理器集成 [18] ,或 使用 Vault 来存储证书 [19] 。
参考
• 将 Istio 纳入信任链:使用现有 PKI 作为信任根 - lib.jimmysong.io[20]
• 在生产中大规模自动化 Istio CA 轮换 - lib.jimmysong.io[21]
• 如何使用 Hashicorp Vault 作为一种更安全的方式来存储 Istio 证书 - lib.jimmysong.io[22]
• 如何在 Istio 中集成 SPIRE - lib.jimmysong.io[23]
• SPIRE Server Configuration Reference - spiffe.io[24]
• Server plugin: UpstreamAuthority “cert-manager” - github.com[25]
• Configuring SPIRE - spiffe.io[26]
• 使用 istio-csr 将外部 CA 与证书管理器集成 - istio.tetratelabs.io[27]
引用链接
[1] Jimmy Song 的博客: https://jimmysong.io/blog/cert-manager-spire-istio/[2] 上一篇博客: https://jimmysong.io/blog/istio-certificates-management/[3] SPIRE: https://spiffe.io/[4] cert-manager: https://cert-manager.io/[5] 为什么 Istio 要使用 SPIRE 做身份认证?: https://jimmysong.io/blog/why-istio-need-spire/[6] 如何在 Istio 中集成 SPIRE?: https://jimmysong.io/blog/how-to-integrate-spire-with-istio/[7] 零信任的基石:使用 SPIFFE 为基础设施创建通用身份: https://lib.jimmysong.io/spiffe/[8] 自签名 Issuer: https://cert-manager.io/docs/configuration/selfsigned/[9] UpstreamAuthority: https://spiffe.io/docs/latest/deploying/spire_server/[10] UpstreamAuthority: https://github.com/spiffe/spire/blob/main/doc/plugin_server_upstreamauthority_cert_manager.md[11] Kubernetes Workload Registrar: https://github.com/spiffe/spire/blob/main/support/k8s/k8s-workload-registrar/README.md[12] SPIRE Server 配置: https://spiffe.io/docs/latest/deploying/spire_server/[13] 这个 Gist: https://gist.githubusercontent.com/rootsongjc/5dac0518cc432cbf844114faca74aa40/raw/5f4ce4c857cfb9f45121b6e4d26d01b8d4e29b84/[14] Let’s Encrypt: https://letsencrypt.org/[15] HashiCorp Vault: https://www.vaultproject.io/[16] Venafi: https://www.venafi.com/[17] istio-csr: https://github.com/cert-manager/istio-csr[18] 使用 istio-csr 将外部 CA 与证书管理器集成: https://istio.tetratelabs.io/zh/blog/external-ca-integration-with-cert-manager-using-istio-csr/[19] 使用 Vault 来存储证书: https://lib.jimmysong.io/blog/how-to-use-hashicorp-vault-as-a-more-secure-way-to-store-istio-certificates/[20] 将 Istio 纳入信任链:使用现有 PKI 作为信任根 - lib.jimmysong.io: https://lib.jimmysong.io/blog/istio-trust/[21] 在生产中大规模自动化 Istio CA 轮换 - lib.jimmysong.io: https://lib.jimmysong.io/blog/automate-istio-ca-rotation-in-production-at-scale/[22] 如何使用 Hashicorp Vault 作为一种更安全的方式来存储 Istio 证书 - lib.jimmysong.io: https://lib.jimmysong.io/blog/how-to-use-hashicorp-vault-as-a-more-secure-way-to-store-istio-certificates/[23] 如何在 Istio 中集成 SPIRE - lib.jimmysong.io: https://lib.jimmysong.io/blog/istio-spire-integration/[24] SPIRE Server Configuration Reference - spiffe.io: https://spiffe.io/docs/latest/deploying/spire_server/#built-in-plugins[25] Server plugin: UpstreamAuthority “cert-manager” - github.com: https://github.com/spiffe/spire/blob/v1.5.3/doc/plugin_server_upstreamauthority_cert_manager.md[26] Configuring SPIRE - spiffe.io: https://spiffe.io/docs/latest/deploying/configuring/[27] 使用 istio-csr 将外部 CA 与证书管理器集成 - istio.tetratelabs.io: https://istio.tetratelabs.io/zh/blog/external-ca-integration-with-cert-manager-using-istio-csr/
获取更多云原生社区资讯,加入微信群,请加入云原生社区,点击阅读原文了解更多。