现在有ns1命名空间,现在创建两个pod,两个svc
[root@node1 istio]# cat pod1.yaml
apiVersion: v1
kind: Pod
metadata:
  name: pod1
  namespace: ns1
  labels:
    run: pod1
spec:
  containers:
    - name: pod1
      image: nginx
[root@node1 istio]# cat pod2.yaml
apiVersion: v1
kind: Pod
metadata:
  name: pod2
  namespace: ns1
  labels:
    run: pod2
spec:
  containers:
    - name: pod2
      image: nginx
[root@node1 istio]# kubectl get pod -n ns1 -o wide
NAME   READY   STATUS    RESTARTS   AGE   IP             NODE    NOMINATED NODE   READINESS GATES
pod1   2/2     Running   2          23h   10.233.96.31   node2   <none>           <none>
pod2   2/2     Running   2          23h   10.233.96.39   node2   <none>           <none>

[root@node1 istio]# kubectl get svc -n ns1
NAME   TYPE        CLUSTER-IP      EXTERNAL-IP   PORT(S)   AGE
sv1    ClusterIP   10.233.41.55    <none>        80/TCP    23h
sv2    ClusterIP   10.233.40.142   <none>        80/TCP    23h

[root@node1 istio]# kubectl get ep -n ns1
NAME   ENDPOINTS         AGE
sv1    10.233.96.31:80   23h
sv2    10.233.96.39:80   23h
修改其主页内容
[root@node1 istio]# kubectl exec -it pod1 bash -n ns1
root@pod1:/# echo "pod1" > /usr/share/nginx/html/index.html

[root@node1 istio]# kubectl exec -it pod2 bash -n ns1
root@pod2:/# echo "pod2" > /usr/share/nginx/html/index.html
暴露服务
[root@node1 istio]# kubectl expose --name=svc1 pod pod1 --port=80 -n ns1
[root@node1 istio]# kubectl expose --name=svc2 pod pod2 --port=80 -n ns1
这种访问是没有经过网格的, 这直接走的k8s的网络
[root@node1 istio]# curl 10.233.41.55
pod1
[root@node1 istio]# curl 10.233.40.142
pod2
创建网关
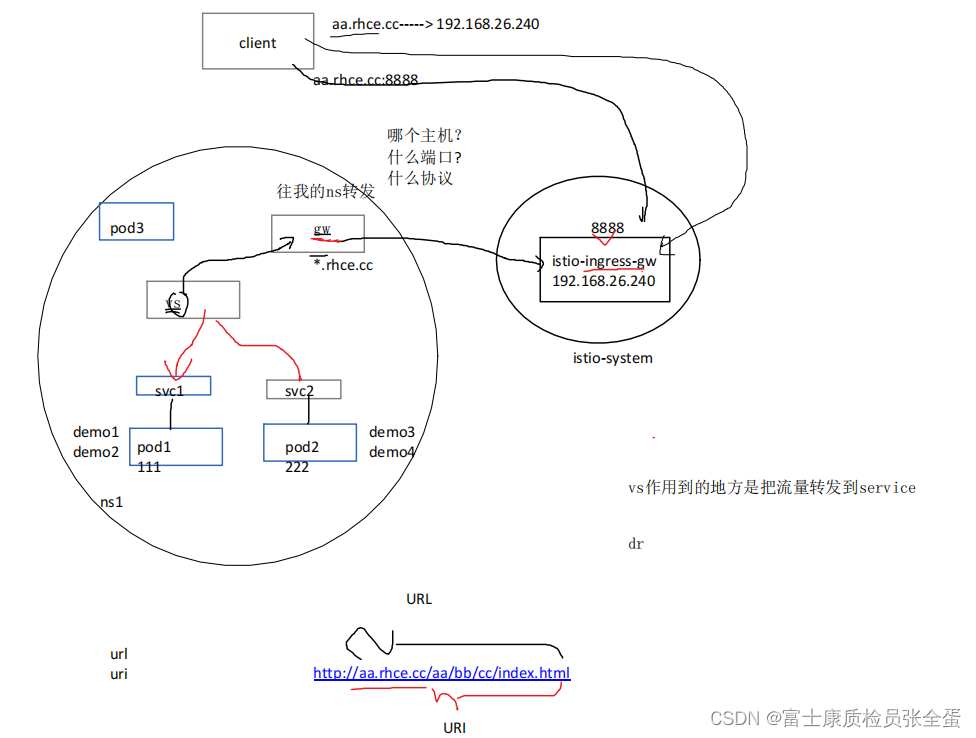
现在需要访问网关,要转发给gateway,也就是收到请求要先往ns1的命名空间转发,至于转发给谁先别管了。所以要在命名空间创建gateway,gateway就是要往哪个命名空间转发流量。
创建gw是和istio-ingress-gw控制器通信的,selector定义了和哪个控制器通信。
[root@node1 istio]# kubectl get pod -n istio-system -l istio=ingressgateway
NAME                                    READY   STATUS    RESTARTS   AGE
istio-ingressgateway-559d4ffc58-zsjf9   1/1     Running   3          22d
这就是入口控制器, 现在得写规则,告诉控制器,凡是访问某个域名的时候,什么端口,什么协议。
[root@node1 istio]# cat mygateway.yaml
apiVersion: networking.istio.io/v1alpha3
kind: Gateway
metadata:
  name: my-gateway
  namespace: ns1
spec:
  selector:
    istio: ingressgateway
  servers:
  - port:
      number: 80
      name: http
      protocol: HTTP
    hosts:
    - "aa.rhce.cc"
virtualService的基本使用
现在流量到达gw之后还不知道如何去做转发,所以现在还需要去建立virtual service,这样的话就将流量具体的定义在哪个svc上面了。
对于我们的gateway来说,它所接受的主机不一定是aa.rhce.cc,可能是bb.rhce.cc还可能是cc.rhce.cc,它能够定义的这些主机很多,我们这里只定义了一个aa.rhce.cc。访问这些主机流量都会被引入到ns1命名空间来。下面我们创建了vs,只导流路由访问主机a.rhce.cc的流量,其他的路由时不会去引用的。
    hosts:
    - "aa.rhce.cc"
    - "bb.rhce.cc"
    - "cc.rhce.cc"
vs一端连着gw,使用gw定义的规则,也就是使用哪个gateway,之后是要将收到的请求转发到哪里去。
[root@node1 istio]# cat vs.yaml
apiVersion: networking.istio.io/v1alpha3
kind: VirtualService
metadata:
  name: my-vs
  namespace: ns1
spec:
  hosts:
  - "aa.rhec.cc"
  gateways:
  - my-gateway
  http:
  - route:
    - destination:
        host: sv1
        port:
          number: 80


[root@node1 ~]# kubectl get vs -n ns1
NAME    GATEWAYS         HOSTS            AGE
my-vs   ["my-gateway"]   ["aa.rhec.cc"]   8m29s
[root@node1 ~]# kubectl get gw -n ns1
NAME         AGE
my-gateway   3h57m
如果你想让网格里面的主机访问网格里面的应用,那么可以直接写服务名。
[root@node1 istio]# cat vs.yaml
apiVersion: networking.istio.io/v1alpha3
kind: VirtualService
metadata:
  name: my-vs
  namespace: ns1
spec:
  hosts:
  - "aa.rhec.cc"
  - vs1
  gateways:
  - my-gateway
  http:
  - route:
    - destination:
        host: sv1
        port:
          number: 80
这样访问就走了istio的流量,也就是网格内部的主机访问sv1的时候将通过vs进行流量转发到sv1上面
[root@node1 ~]# kubectl exec -it pod2 bash -n ns1
kubectl exec [POD] [COMMAND] is DEPRECATED and will be removed in a future version. Use kubectl exec [POD] -- [COMMAND] instead.
Defaulting container name to pod2.
Use 'kubectl describe pod/pod2 -n ns1' to see all of the containers in this pod.
root@pod2:/# curl sv1
pod1
在网关里面也可以写上通配符,这就是泛域名,在gw和vs都可以配置
    hosts:
    - "*.rhce.cc"
hosts:
- "*"转发到端口
如果你去访问控制器地址+8888端口是不行的,因为没有监听在这个端口,开放的端口有80 443等端口。
[root@node1 httpbin]# kubectl get svc -n istio-system
NAME TYPE CLUSTER-IP EXTERNAL-IP PORT(S) AGE
istio-ingressgateway LoadBalancer 10.233.14.224 <pending> 15021:30406/TCP,80:30542/TCP,443:31241/TCP,31400:31309/TCP,15443:30692/TCP 22d开启8888端口
- name: http2
nodePort: 30542
port: 80
protocol: TCP
targetPort: 8080
- name: http3
nodePort: 30543
port: 8888
protocol: TCP
targetPort: 8080
[root@node1 httpbin]# kubectl get svc -n istio-system
NAME TYPE CLUSTER-IP EXTERNAL-IP PORT(S) AGE
istio-ingressgateway LoadBalancer 10.233.14.224 <pending> 15021:30406/TCP,80:30542/TCP,8888:30543/TCP,443:31241/TCP,31400:31309/TCP,15443:30692/TCP 22d此时你还要需修改gateway,虽然端口有了,但是网关接受还是不接受呢?因为网关心里面需要定义来自哪个端口的才能被接受。
apiVersion: networking.istio.io/v1alpha3
kind: Gateway
metadata:
name: my-gateway
namespace: ns1
spec:
selector:
istio: ingressgateway
servers:
- port:
number: 80
name: http1
protocol: HTTP
    hosts:
    - "*"
- port:
number: 8888
name: http2
protocol: HTTP
hosts:
- "*"vs端口也得修改
apiVersion: networking.istio.io/v1alpha3
kind: VirtualService
metadata:
  name: my-vs
  namespace: ns1
spec:
  hosts:
  - "*"
  gateways:
  - my-gateway
  http:
  - name: aaa
    match:
      port: 8888
  - route:
    - destination:
        host: sv1
        port:
          number: 80