//首先去高德注册一个自己key值
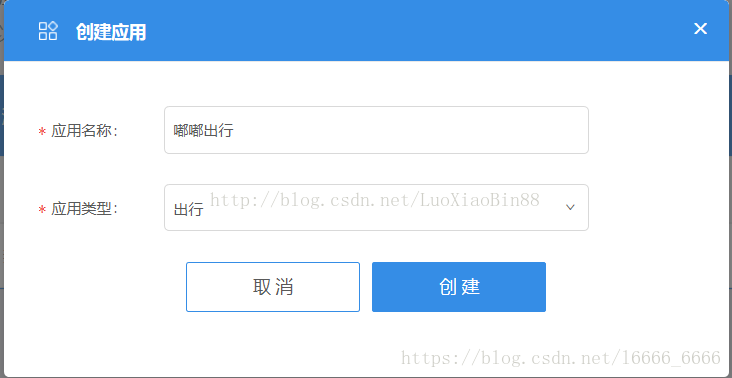
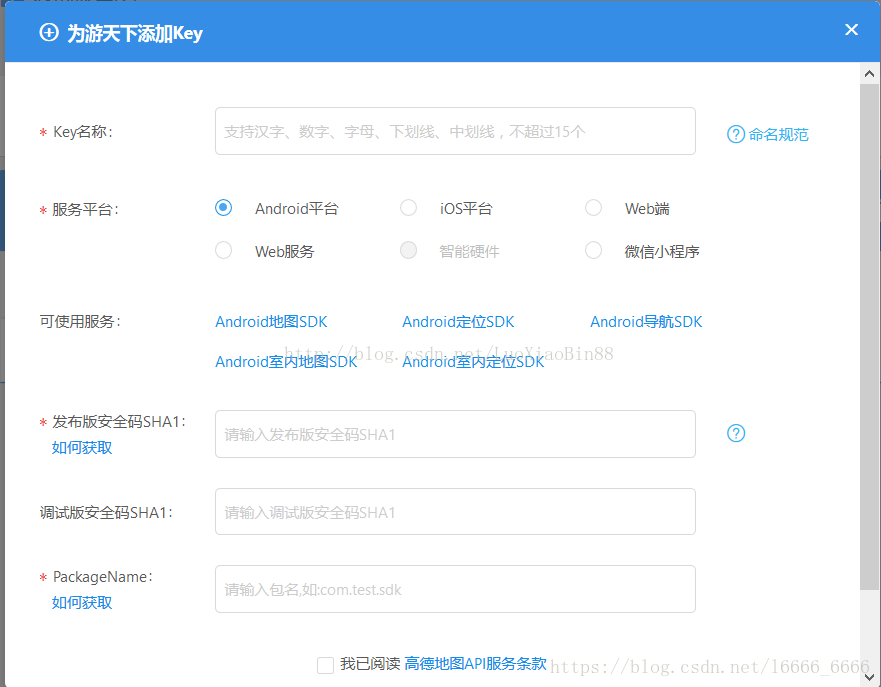
2.进入控制台,创建新应用,点击添加新的key
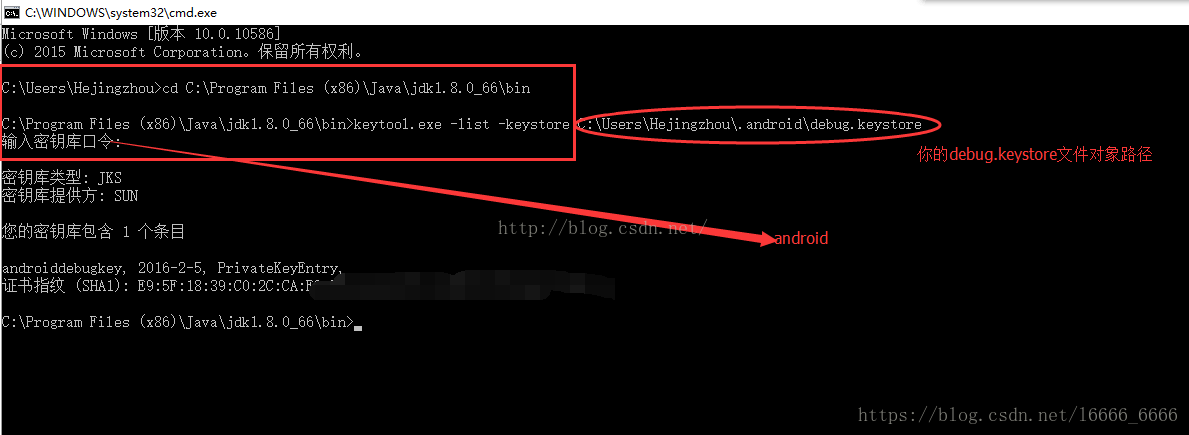
①找到安装Java的路径比如我的是
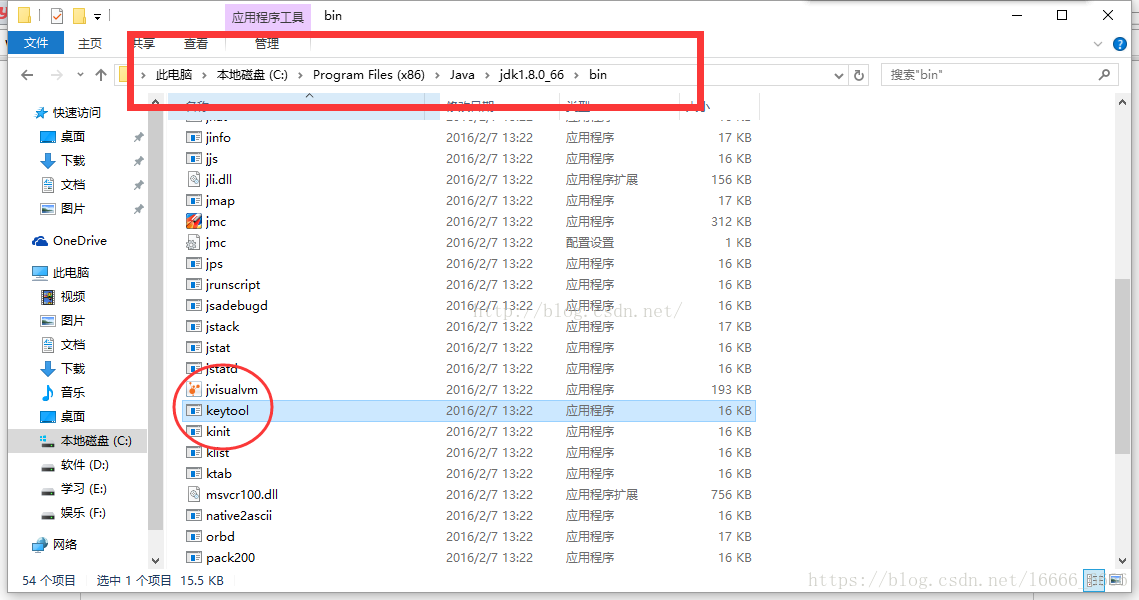
②打开运行先转到你的keytool文件夹路径下,然后回车。再运行它(输入keytool.exe 快捷键是Tab建和Linux一样),然后在后边输入命令 -list -keystore 输上后后边跟的就是你的debug.keystore文件的对象路径。然后提示输入密库口令 输入android ,好再回车就看见你的Sha1了
最近用的是Linux,今天开BaiduMap 查了一下,用下边的命令,看一下:
tcoy@tcoy:~$ cd ~/.android
tcoy@tcoy:~/.android$ tcoy@tcoy:~$ cd ~/.android
tcoy@tcoy:~$:未找到命令
tcoy@tcoy:~/.android$ ls
adbkey cache modem-nv-ram-5556
adbkey.pub ddms.cfg monitor-workspace
analytics.settings debug.keystore repositories.cfg
androidwin.cfg emu-update-last-check.ini sites-settings.cfg
avd metrics uid.txt
breakpad modem-nv-ram-5554
tcoy@tcoy:~/.android$ celart
celart:未找到命令
tcoy@tcoy:~/.android$ clear
tcoy@tcoy:~/.android$ keytool -exportcert -list -v -alias androiddebugkey -keystore ~/.android/debug.keystore
输入密钥库口令:
别名: androiddebugkey
创建日期: 2016-9-29
条目类型: PrivateKeyEntry
证书链长度: 1
证书[1]:
所有者: C=US, O=Android, CN=Android Debug
发布者: C=US, O=Android, CN=Android Debug
序列号: 1
有效期开始日期: Thu Sep 29 07:28:01 CST 2016, 截止日期: Sat Sep 22 07:28:01 CST 2046
证书指纹:
MD5: 25:11:54:7B:2D:DA:41××××××78:9F:F8:29:BC:4A
SHA1: A6:57:D1:55:0××××××9C:25:A5:6C:DE:3D:A8:AA:8F:6A:75:EE
SHA256: E4:8A:B1:58:6C:2C×××××:A7:FD:FF:A5:A6:F9:7C:DA:9F:8B:F3:8C:9D:B9:11:60:0A:8F:ED:6C:5A:96
签名算法名称: SHA1withRSA
版本: 1
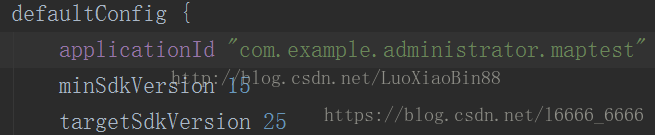
包名就是你的app中build.gradle中的applicationId
利用获得的SHA1和包名,完善上面步骤之后,可以获得一个key值:

//然后去文件的AndroidManifest当中配置权限


<!--允许程序打开网络套接字-->

<uses-permission android:name="android.permission.INTERNET" />

<!--允许程序设置内置sd卡的写权限-->

<uses-permission android:name="android.permission.WRITE_EXTERNAL_STORAGE" />

<!--允许程序获取网络状态-->

<uses-permission android:name="android.permission.ACCESS_NETWORK_STATE" />

<!--允许程序访问WiFi网络信息-->

<uses-permission android:name="android.permission.ACCESS_WIFI_STATE" />

<!--允许程序读写手机状态和身份--><uses-permission android:name="android.permission.READ_PHONE_STATE" />

<!--允许程序访问CellID或WiFi热点来获取粗略的位置--><uses-permission android:name="android.permission.ACCESS_COARSE_LOCATION" />


<meta-data

android:name="com.amap.api.v2.apikey"

   android:value="31707fdad7238344e392644c3b15c000">

   //开发者申请的key 自己申请的key值放入value里面

</meta-data>


//写去到清单文件android底下 否则出来的是黑屏
sourceSets{ main{ jniLibs.srcDirs=['libs'] }}

//去配置jar包然后把以下的导入到libs里面
activity_map.xml
arm64-v8a
armeabi
armeabi-v7a
x86
x86_64
AMap_Location_V4.0.1_20180426.jar
Android_Map3D_SDK_V6.2.0_20180427.
//布局文件
<?xml version="1.0" encoding="utf-8"?>
<FrameLayout xmlns:android="http://schemas.android.com/apk/res/android"
    xmlns:app="http://schemas.android.com/apk/res-auto"
    xmlns:tools="http://schemas.android.com/tools"
    android:layout_width="match_parent"
    android:layout_height="match_parent"
    tools:context="com.example.imitatejingdong.mapView.MapActivity">

    <com.amap.api.maps.MapView

        android:id="@+id/map"

        android:layout_width="match_parent"

        android:layout_height="match_parent"/>

    <TextView
        android:id="@+id/location_errInfo_text"
        android:layout_width="match_parent"
        android:layout_height="wrap_content"
        android:layout_gravity="bottom|left"
        android:layout_marginBottom="10dp"
        android:layout_marginLeft="10dp"
        android:background="#ff00"
        android:textColor="@color/colorAccent"
        android:text="TextView"
        android:visibility="gone"/>
    <RadioGroup
        android:id="@+id/gps_radio_group"
        android:layout_width="wrap_content"
        android:layout_height="wrap_content"
        android:layout_gravity="top|left"
        android:layout_marginLeft="10dp"
        android:layout_marginTop="10dp"
        android:background="#00ffff"
        android:orientation="horizontal" >

        <RadioButton
            android:id="@+id/gps_locate_button"
            android:layout_width="wrap_content"
            android:layout_height="wrap_content"
            android:checked="true"
            android:text="定位"
            android:textColor="@android:color/black" />

        <RadioButton
            android:id="@+id/gps_follow_button"
            android:layout_width="wrap_content"
            android:layout_height="wrap_content"
            android:text="追随"
            android:textColor="@android:color/black" />

        <RadioButton
            android:id="@+id/gps_rotate_button"
            android:layout_width="wrap_content"
            android:layout_height="wrap_content"
            android:text="旋转"
            android:textColor="@android:color/black" />
    </RadioGroup>

</FrameLayout>
public class MapActivity  extends AppCompatActivity iements LocationSource, AMapLocationListener,RadioGroup.OnCheckedChangeListener {
    private AMap aMap;
    private MapView mapView;
    // 处理定位更新
    private OnLocationChangedListener mListener;
    // 定位
    private AMapLocationClient mlocationClient;

    private AMapLocationClientOption mLocationOption;
    private RadioGroup mGPSModeGroup;

    private TextView mLocationErrText;
    @Override
protected void onCreate(Bundle savedInstanceState) {
super.onCreate(savedInstanceState);
setContentView(R.layout.activity_map);
//获取地图控件引用
mapView =findViewById(R.id.map);
//在activity执行onCreate时执行mMapView.onCreate(savedInstanceState),创建地图
mapView.onCreate(savedInstanceState);
init();
}
private void init() {
if (aMap == null) {
aMap = mapView.getMap();
setUpMap();
}
mGPSModeGroup = findViewById(R.id.gps_radio_group);
mGPSModeGroup.setOnCheckedChangeListener(this);
mLocationErrText = findViewById(R.id.location_errInfo_text);
mLocationErrText.setVisibility(View.GONE);
}
```
private void setUpMap() {
aMap.setLocationSource(this);//设置定位监听
    aMap.getUiSettings().setMyLocationButtonEnabled(true);//设置默认定位按钮是否显示

    aMap.setMyLocationEnabled(true);//设置为true表示显示定位层并可触发定位,false表示隐藏定位层并不可触发定位,默认是false

    //设置定位的类型为定位模式:定位(AMap.LOCATION_TYPE_LOCATE)、跟随(AMap.LOCATION_TYPE_MAP_FOLLOW)

    //地图根据面向方向旋转(AMap.LOCATION_TYPE_MAP_ROTATE)三种模式

    aMap.setMyLocationType(AMap.LOCATION_TYPE_LOCATE);

}

@Override
public void onCheckedChanged(RadioGroup group, int checkedId) {
    switch (checkedId) {
        case R.id.gps_locate_button:
            // 设置定位的类型为定位模式
            aMap.setMyLocationType(AMap.LOCATION_TYPE_LOCATE);
            break;
        case R.id.gps_follow_button:
            // 设置定位的类型为 跟随模式
            aMap.setMyLocationType(AMap.LOCATION_TYPE_MAP_FOLLOW);
            break;
        case R.id.gps_rotate_button:
            // 设置定位的类型为根据地图面向方向旋转
            aMap.setMyLocationType(AMap.LOCATION_TYPE_MAP_ROTATE);
            break;
    }
}
“`
 /**
     * 方法必须重写
     */

    @Override
    protected void onResume() {
        super.onResume();
        mapView.onResume();
    }

    /**
     * 方法必须重写
     */
    @Override
    protected void onPause() {
        super.onPause();
        mapView.onPause();
        deactivate();
    }

    /**
     * 方法必须重写
     */
    @Override
    protected void onSaveInstanceState(Bundle outState) {
        super.onSaveInstanceState(outState);
        mapView.onSaveInstanceState(outState);
    }

    /*  *
      * 方法必须重写
     */
    @Override
    protected void onDestroy() {
        super.onDestroy();
        mapView.onDestroy();
        if(null != mlocationClient){
            mlocationClient.onDestroy();
        }
    }
//定位成功后回调函数
@Override
public void onLocationChanged(AMapLocation aMapLocation) {
if (mListener != null && aMapLocation != null) {
if (aMapLocation != null && aMapLocation.getErrorCode() == 0) {
mLocationErrText.setVisibility(View.GONE);
mListener.onLocationChanged(aMapLocation);// 显示系统小蓝点
} else {
String errText = "定位失败," + aMapLocation.getErrorCode()+ ": " + aMapLocation.getErrorInfo();
Log.e("AmapErr",errText);
mLocationErrText.setVisibility(View.VISIBLE);
mLocationErrText.setText(errText);
}
}
}
//激活定位

   @Override
    public void activate(OnLocationChangedListener listener) {
        mListener = listener;
        if (mlocationClient == null) {
            mlocationClient = new AMapLocationClient(this);
            mLocationOption = new AMapLocationClientOption();
            //设置定位监听
            mlocationClient.setLocationListener(this);
            //设置为高精度定位模式
            mLocationOption.setLocationMode(AMapLocationClientOption.AMapLocationMode.Hight_Accuracy);
            //设置定位参数
            mlocationClient.setLocationOption(mLocationOption);
            // 此方法为每隔固定时间会发起一次定位请求,为了减少电量消耗或网络流量消耗,
            // 注意设置合适的定位时间的间隔(最小间隔支持为2000ms),并且在合适时间调用stopLocation()方法来取消定位请求
            // 在定位结束后,在合适的生命周期调用onDestroy()方法
            // 在单次定位情况下,定位无论成功与否,都无需调用stopLocation()方法移除请求,定位sdk内部会移除
            mlocationClient.startLocation();
        }
    }

   ```
 //停止定位
    @Override
    public void deactivate() {
        mListener = null;
        if (mlocationClient != null) {
            mlocationClient.stopLocation();
            mlocationClient.onDestroy();
        }
        mlocationClient = null;
    }

}
“`
·