前言
iOS系统不允许第三方定位,定位功能是对iOS系统定位的二次封装。通过封装,可将原始定位点无偏差的显示在高德地图上。目前,有两种获取当前位置信息的方法:
- 使用地图SDK中的定位功能。本文以2D地图SDK为例做相关介绍
- 使用iOS定位SDK,目前提供了独立的”iOS定位SDK”,无需展示地图即可获取用户位置信息,我们会在以后介绍。
1. 地图定位
1.1 开启定位
需在info.plist添加NSLocationWhenInUseUsageDescription或NSLocationAlwaysUsageDescription字段
- NSLocationWhenInUseUsageDescription表示应用在前台的时候可以搜到更新的位置信息。
- NSLocationAlwaysUsageDescription表示应用在前台和后台(suspend或terminated)都可以获取到更新的位置数据。
只要开启定位开关(MAMapView的showsUserLocation属性)就可以开始定位。
示例代码:
#import "ViewController.h"
#import <MAMapKit/MAMapKit.h>

@interface ViewController ()<MAMapViewDelegate>
{

    MAMapView *_mapView;
}
@end

@implementation ViewController

- (void)viewDidLoad {
    [super viewDidLoad];

    _mapView = [[MAMapView alloc] initWithFrame:CGRectMake(0, 0, CGRectGetWidth(self.view.bounds), CGRectGetHeight(self.view.bounds))];
    _mapView.delegate = self;

    [self.view addSubview:_mapView];

    // 地图SDK定位服务
    _mapView.showsUserLocation = YES; //YES 为打开定位,NO为关闭定位
    [_mapView setUserTrackingMode: MAUserTrackingModeFollow animated:YES]; //地图跟着位置移动

    [_mapView setZoomLevel:16.1 animated:YES];

}

#pragma mark - MAMapViewDelegate
-(void)mapView:(MAMapView *)mapView didUpdateUserLocation:(MAUserLocation *)userLocation updatingLocation:(BOOL)updatingLocation
{

    if(updatingLocation)
    {
        //取出当前位置的坐标
        NSLog(@"latitude : %f,longitude: %f",userLocation.coordinate.latitude,userLocation.coordinate.longitude);
    }
    // 该方法会频繁调用多次,但是不能通过关闭定位的方法来解决
//    _mapView.showsUserLocation = NO;
}
1.2 设置定位图层
将 MAMapView 添加到 Subview 中,开启定位后,会在地图上显示定位图层。高德地图 iOS SDK 支持自定义定位图层的样式。
通过setUserTrackingMode:可改变定位图层的显示模式:定位图层有3种显示模式,分别为:
- MAUserTrackingModeNone:仅在地图上显示,不跟随用户位置。
- MAUserTrackingModeFollow:跟随用户位置移动,并将定位点设置成地图中心点。
- MAUserTrackingModeFollowWithHeading:跟随用户的位置和角度移动。
1.3 自定义定位图层
定位图层由定位点处的标注(MAUserLocation)和精度圈(MACircle)组成。通过- (void)mapView:(MAMapView )mapView didAddAnnotationViews:(NSArray )views方法自定义定位标注和精度圈的样式。
示例代码:
// 添加用户大头针
- (void)mapView:(MAMapView *)mapView didAddAnnotationViews:(NSArray *)views
{
    MAAnnotationView *view = views[0];

    // 放到该方法中用以保证userlocation的annotationView已经添加到地图上了。
    if ([view.annotation isKindOfClass:[MAUserLocation class]])
    {
        MAUserLocationRepresentation *pre = [[MAUserLocationRepresentation alloc] init];
        pre.fillColor = [UIColor colorWithRed:0.9 green:0.1 blue:0.1 alpha:0.3];
        pre.strokeColor = [UIColor colorWithRed:0.1 green:0.1 blue:0.9 alpha:1.0];
        pre.image = [UIImage imageNamed:@"category_3"];
        pre.lineWidth = 3;
        pre.lineDashPattern = @[@6, @3];

        [_mapView updateUserLocationRepresentation:pre];

        view.calloutOffset = CGPointMake(0, 0);
    }
}
1.4 开启后台定位
高德地图iOS SDK V2.5.0版本提供后台持续定位的能力,即便你的app退到后台,且位置不变动时,也不会被系统挂起,可持久记录位置信息。该功能适用于记轨迹录或者出行类App司机端。
注意:后台定位必须将info.plist的字段改成NSLocationAlwaysUsageDescription字段。
只需要您的做以下几步操作:
- 添加代码。
_mapView.pausesLocationUpdatesAutomatically = NO;
_mapView.allowsBackgroundLocationUpdates = YES;//iOS9以上系统必须配置- 工程配置。
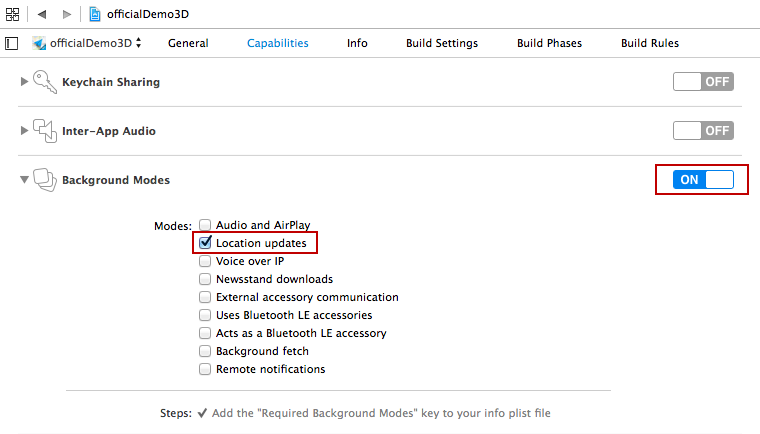
- 左侧目录中选中工程名,开启 TARGETS->Capabilities->Background Modes
- 在 Background Modes中勾选 Location updates,如下图所示:
2. 高德定位SDK
高德 iOS 定位 SDK 提供了不依赖于地图定位的定位功能,开发者可以无地图显示的场景中便捷地为应用程序添加定位功能。 iOS定位SDK提供了单次定位、连续定位、逆地理信息、地理围栏等功能。
2.1 SDK的集成
第一步:下载开发包并解压。
从中下载定位包,解压后得到 AMapLocationKit.framework 。
第二步:引入定位包。
在 TARGETS-Build Phases–Link Binary With Libraries 点击“+”,弹出添加列表后,点击“Add Other…”,添加 AMapLocationKit.framework到工程中;

第三步:引入系统库文件。
在 TARGETS-General-Linked Frameworks and Libraries 中点击“+”,弹出添加列表后添加如下系统库: CoreTelephony.framework, SystemConfiguration.framework, CoreLocation.framework, libz.tbd(Xcode7之前,是libz.dylib)。
第四步:环境配置
(1)配置 Other Link Flag。
在 TARGETS-Build Settings-Other Linker Flags 中添加如下内容: -ObjC;
(2)配置Architectures。
在 TARGETS-Build Settings-Architectures 点击出选择框,将值修改为 $(ARCHS_STANDARD)。

第五步:申请应用,获取注册appkey
在使用定位SDK时,需要对应用做Key机制验证,如果不添加Key,定位功能将不能使用: [AMapLocationServices sharedServices].apiKey = @”您的key”;
注意:
- 需要在info.plist中追加 NSLocationWhenInUseUsageDescription 或NSLocationAlwaysUsageDescription 字段,以申请定位权限。
- iOS9为了增强数据访问安全,将所有的http请求都改为了https,为了能够在iOS9中正常使用地图SDK,请在”Info.plist”中进行如下配置,否则影响SDK的使用。
2.2 持续定位
iOS定位SDK提供的持续定位功能获取定位数据(地图SDK可以将获取的数据进行展示),与CLLocationManager的使用方法类似。实现持续定位的步骤如下:
- 初始化AMapLocationManager对象,设置代理。
- 开启持续定位,调用AMapLocationManager提供的startUpdatingLocation方法实现。停止持续定位调用AMapLocationManager提供的stopUpdatingLocation方法实现。
- 接收位置更新,实现AMapLocationManagerDelegate代理的amapLocationManager:didUpdateLocation: 方法,处理位置更新。
示例代码:
#import "ViewController.h"
#import <AMapLocationKit/AMapLocationKit.h>

@interface ViewController ()<AMapLocationManagerDelegate>
{

    AMapLocationManager *_manager;
}
@end

@implementation ViewController

- (void)viewDidLoad {
    [super viewDidLoad];

    [AMapLocationServices sharedServices].apiKey = @"88d606ae8da9c5b8c01e03367526272a";

    // 初始化定位管家并设置代理
    _manager = [[AMapLocationManager alloc] init];
    _manager.delegate = self;

    // 开始持续定位
    [_manager startUpdatingLocation];

    // 停止定位
//    [_manager stopUpdatingLocation];


}

#pragma mark - AMapLocationManagerDelegate
- (void)amapLocationManager:(AMapLocationManager *)manager didUpdateLocation:(CLLocation *)location
{
    NSLog(@"location:{lat:%f; lon:%f; accuracy:%f}", location.coordinate.latitude, location.coordinate.longitude, location.horizontalAccuracy);
}

@end
2.3 单次定位
iOS定位SDK提供的单次定位方法基于苹果定位核心,苹果定位核心会在设备移动时连续返回定位结果,高德在此基础上封装了单次定位并适配了iOS 6到iOS 9系统。当设备可以正常联网时,还可以返回该定位点的位置信息(包括:省、市、区/县以及详细地址)。 单次定位区别于连续定位,无需设置代理和实现代理方法,与连续定位一样需要引入AMapLocationKit.h头文件。
- 初始化定位管家。
- 设置期望定位精度。
- 请求定位并拿到结果,调用AMapLocationManager的requestLocationWithReGeocode:completionBlock: 方法,请求一次定位。
示例代码:
#import "ViewController.h"
#import <AMapLocationKit/AMapLocationKit.h>

@interface ViewController ()<AMapLocationManagerDelegate>
{
    AMapLocationManager *_manager;
}
@end

@implementation ViewController

- (void)viewDidLoad {
    [super viewDidLoad];

    [AMapLocationServices sharedServices].apiKey = @"88d606ae8da9c5b8c01e03367526272a";

    // 初始化定位管家并设置代理
    _manager = [[AMapLocationManager alloc] init];


    // 单次定位
    // 带逆地理信息的一次定位(返回坐标和地址信息)
    [_manager setDesiredAccuracy:kCLLocationAccuracyHundredMeters];// 设置定位精度
    // 定位超时时间,最低2s,
    _manager.locationTimeout = 30;
    // 逆地理请求超时时间,最低2s,
    _manager.reGeocodeTimeout = 30;
    // 高精度:kCLLocationAccuracyBest,精度很高的一次定位,偏差在10米以内,耗时在10s左右。

    // 带逆地理(返回坐标和地址信息)。
    // 获取单次定位信息,第一个参数设置为NO,则不会返回地址信息。
    [_manager requestLocationWithReGeocode:NO completionBlock:^(CLLocation *location, AMapLocationReGeocode *regeocode, NSError *error) {

        if (error) {
            NSLog(@"locError:{%ld - %@};", (long)error.code, error.localizedDescription);
            return;
        }
        NSLog(@"location:%@", location);
        if (regeocode) {
            NSLog(@"reGeocode:%@", regeocode);
        }
    }];
}
2.4 后台定位
iOS定位SDK提供后台持续定位的能力,可持久记录位置信息,适用于记轨迹录。需要引入AMapLocationKit.h头文件。
更改info.plist
将info.plist的字段改成NSLocationAlwaysUsageDescription字段。配置后台定位
左侧目录中选中工程名,开启 TARGETS->Capabilities->Background Modes
在 Background Modes中勾选 Location updates,如下图所示:

示例代码:
#import "ViewController.h"
#import <AMapLocationKit/AMapLocationKit.h>

@interface ViewController ()<AMapLocationManagerDelegate>
{
    AMapLocationManager *_manager;
}
@end

@implementation ViewController

- (void)viewDidLoad {
    [super viewDidLoad];

    [AMapLocationServices sharedServices].apiKey = @"88d606ae8da9c5b8c01e03367526272a";

    // 初始化定位管家并设置代理
    _manager = [[AMapLocationManager alloc] init];
    _manager.delegate = self;

    // 后台定位
    //设置允许后台定位参数,保持不会被系统挂起
    [_manager setPausesLocationUpdatesAutomatically:NO];

    [_manager setAllowsBackgroundLocationUpdates:YES];//iOS9(含)以上系统需设置
    // 开始持续定位
    [_manager startUpdatingLocation];

}

#pragma mark - AMapLocationManagerDelegate
- (void)amapLocationManager:(AMapLocationManager *)manager didUpdateLocation:(CLLocation *)location
{
    NSLog(@"location:{lat:%f; lon:%f; accuracy:%f}", location.coordinate.latitude, location.coordinate.longitude, location.horizontalAccuracy);
}
2.5 定位辅助功能
定位SDK为我们提供了一些辅助功能,主要有一下两种:
- 区域判断:判断目标经纬度是否在大陆及港、澳地区,方便开发者按需切换国内/海外功能,目前支持判断目标经纬度是否在大陆及港、澳地区,方便开发者按需切换区域功能。
- 地理围栏:以一个圆形的地理边界作为虚拟围栏,当手机进入、离开该区域时,手机可以接收自动通知。
示例代码:
#import "ViewController.h"
#import <AMapLocationKit/AMapLocationKit.h>
#import <MAMapKit/MAMapKit.h>

@interface ViewController ()<AMapLocationManagerDelegate>
{
    MAMapView *_mapView;
    AMapLocationManager *_manager;
}
@end

@implementation ViewController

- (void)viewDidLoad {
    [super viewDidLoad];

    [AMapLocationServices sharedServices].apiKey = @"88d606ae8da9c5b8c01e03367526272a";

    // 初始化定位管家并设置代理
    _manager = [[AMapLocationManager alloc] init];
    _manager.delegate = self;

    // 辅助功能
    // 区域判断
    //设置一个目标经纬度
    CLLocationCoordinate2D coodinate = CLLocationCoordinate2DMake(39.948691, 116.492479);
    //返回是否在大陆及港、澳地区
    BOOL flag= AMapLocationDataAvailableForCoordinate(coodinate);
    NSLog(@"%d",flag);

    // 地理围栏
    AMapLocationCircleRegion *cirRegion200 = [[AMapLocationCircleRegion alloc] initWithCenter:CLLocationCoordinate2DMake(40, 119) radius:200.0 identifier:@"circleRegion200"];

    AMapLocationCircleRegion *cirRegion300 = [[AMapLocationCircleRegion alloc] initWithCenter:CLLocationCoordinate2DMake(40, 119) radius:300.0 identifier:@"circleRegion300"];

    //添加地理围栏
    [_manager startMonitoringForRegion:cirRegion200];
    [_manager startMonitoringForRegion:cirRegion300];


    // 初始化地图
    _mapView = [[MAMapView alloc] initWithFrame:self.view.bounds];
    [self.view addSubview:_mapView];

    //添加Overlay
    MACircle *circle200 = [MACircle circleWithCenterCoordinate:CLLocationCoordinate2DMake(40, 119) radius:200.0];
    MACircle *circle300 = [MACircle circleWithCenterCoordinate:CLLocationCoordinate2DMake(40, 119) radius:300.0];
    [_mapView addOverlay:circle200];
    [_mapView addOverlay:circle300];

    [_mapView setVisibleMapRect:circle300.boundingMapRect];
}

- (void)amapLocationManager:(AMapLocationManager *)manager didEnterRegion:(AMapLocationRegion *)region {
    NSLog(@"进入围栏:%@", region);
}

- (void)amapLocationManager:(AMapLocationManager *)manager didExitRegion:(AMapLocationRegion *)region {
    NSLog(@"走出围栏:%@", region);
}

@end