一、前言
对于大模型在一些安全级别较高的领域,比如在金融服务领域实施人工智能解决方案时,面临的最大挑战之一是数据隐私、安全性和监管合规性。
因为担心数据泄露的问题,很多银行或机构都会回避利用人工智能的优势潜力,尤其是对于GPT-4这样的模型,在国内应用基本上是不太现实的问题。
为了克服这一挑战并充分利用人工智能的力量,一个可行的办法是针对特定任务进行人工智能或大型语言模型(LLM)的微调,以确保数据安全地保存在您的私有服务器或虚拟私有云中。
今天,我们就聊聊如何使用LoRA(低阶自适应)和PEFT(参数高效微调)等最先进的LLM微调技术来有效地微调预训练模型。首先解释微调的基本原理和关键概念,然后以如何使用Google Colab微调模型的具体示例结束。在这个例子中,我们选择了Mistral 7B模型,它被称为迄今为止尺寸最优秀的模型,并且完全开放且免费访问。
二、微调的基本原理
2.1、微调的力量
微调是就是将通用的预训练语言模型训练为专业模型的关键所在。比如,我们所熟知的GPT-3模型正是通过微调从而进化成为众所周知的 ChatGPT 聊天机器人。
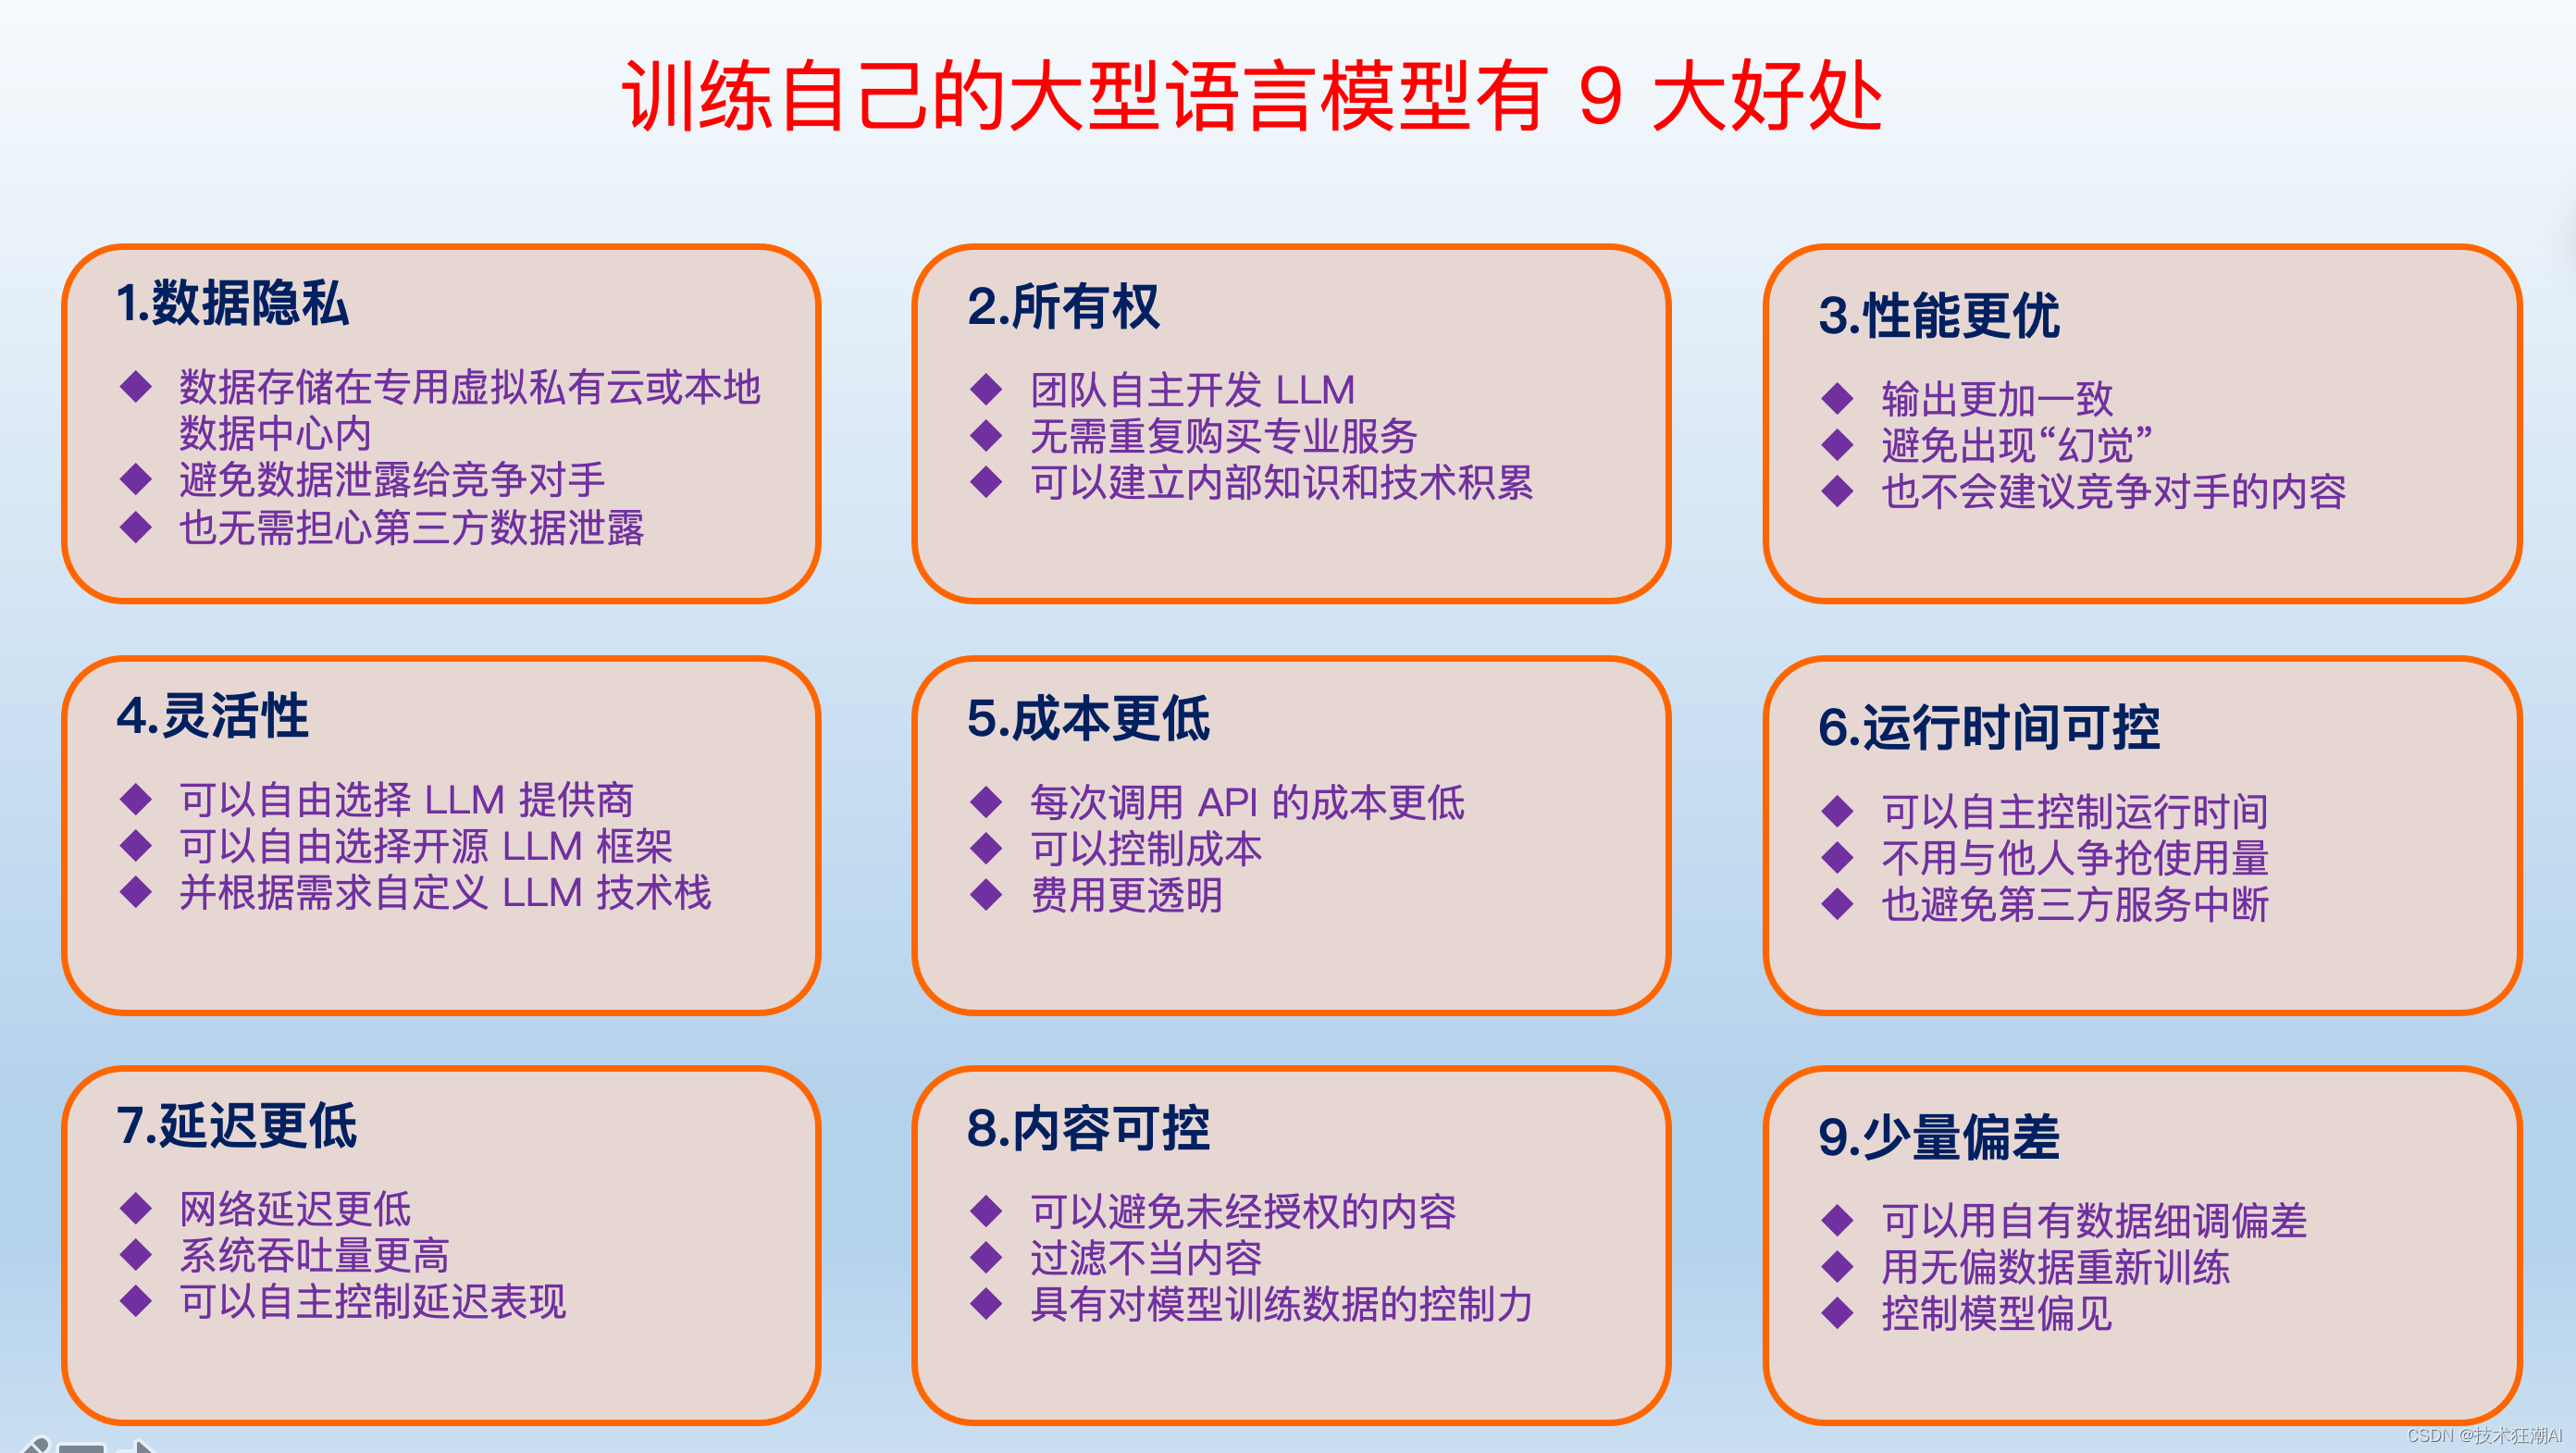
这里我总结了对自己的语言模型进行微调训练的几点好处:
-
隐私性:数据保留在本地或 VPC 中,防止泄露和违反法规,例如 《生成式人工智能服务管理暂行办法》。
-
可靠性:减少幻觉、增强一致性、减少偏见并过滤掉不需要的信息。
-
性价比:保持对正常运行时间的控制,减少延迟,降低每个请求的成本。
-
透明度:获得更大的控制权并确保模型行为的透明度提高。
毕竟外面通用模型最重要还是商业效果,自己微调后就能紧紧围绕自己的需求来优化啦。总之,为了让机器说实在话,还是要自己动手微调的好。
2.2、微调方法
一般有以下几种微调方法可以使大型语言模型适应特定任务,包括:
-
语境学习/检索增强生成
-
指令学习
-
根据人类反馈进行强化学习 (RLHF)
在本文中,我们将重点讨论其中一种方法——指令学习。
2.3、什么是指令微调
指令微调是一个过程,它根据明确的指令调整大型语言模型以执行特定任务。
它涉及使用包含给定域中{instructions, outputs}对的数据集。该数据集帮助模型学习如何在收到这些类型的指令时提供正确的响应。在此训练过程中,可以调整模型的底层权重,或者可以采用其他方法对其进行训练。如果执行正确,此过程将使模型能够理解和执行以前可能难以处理的指令。
2.4、如何进行指令微调
一般常见的指令微调方法有以下几种可供选择:
-
完全微调:此方法需要从头开始使用新数据训练整个预训练模型。它更新所有模型层和参数。虽然它可以带来高精度,但它需要大量的计算资源和时间。它最适合与原始预训练任务显着不同的任务。
-
参数高效微调 (PEFT):例如,LoRA:PEFT 专注于仅更新模型参数的一个子集。它通常涉及冻结模型的某些层或部分。这种方法可以减少计算资源,实现更快的微调。PEFT 中的著名方法包括 LoRA、AdaLoRA 和 Adaption Prompt (LLaMA Adapter)。当新任务与原始预训练任务具有相似性时,它是合适的。最近的 PEFT 最先进技术实现了与完全微调相当的性能。
-
QLoRA:QLoRA 涉及通过量化降低模型参数的精度。这减少了内存使用量,并支持在精度降低的硬件上进行更快的推理。在资源受限的设备(如手机或边缘设备)上部署模型时,这尤其有用。
接下来,我们将使用 PEFT LoRA 微调我们的 Mistral-7B 模型。简而言之,PEFT 方法使您能够获得与完全微调相当的性能,而训练参数却很少。
三、模型微调实战
3.1、安装必要的软件包
首先,安装下面列出的所需依赖项。我们将通过安装主要分支的库来使用最新功能。
!pip install -q -U bitsandbytes
!pip install -q -U git+https://github.com/huggingface/transformers.git
!pip install -q -U git+https://github.com/huggingface/peft.git
!pip install -q -U git+https://github.com/huggingface/accelerate.git
!pip install -q datasets
此外,我们将定义一些辅助函数来改进显示并简化与模型的交互。
from IPython.display import HTML, display
def set_css():
  display(HTML('''
  <style>
    pre {
        white-space: pre-wrap;
    }
  </style>
  '''))
get_ipython().events.register('pre_run_cell', set_css)


def get_completion(query: str, model, tokenizer) -> str:
  device = "cuda:0"

  prompt_template = """
  下面是描述任务的指令。编写适当完成请求的响应。
  ### Question:
  {query}

  ### Answer:
  """

  prompt = prompt_template.format(query=query)
  encodeds = tokenizer(prompt, return_tensors="pt", add_special_tokens=True)
  model_inputs = encodeds.to(device)

  generated_ids = model.generate(**model_inputs, max_new_tokens=1000, do_sample=True, pad_token_id=tokenizer.eos_token_id)
  decoded = tokenizer.batch_decode(generated_ids)
  return (decoded[0])
3.2、加载模型并进行量化
我们将使用 QLoRA 量化加载模型以减少内存使用。如果您还没有探索过 QLoRA 量化。
import torch
from transformers import AutoTokenizer, AutoModelForCausalLM, BitsAndBytesConfig

bnb_config = BitsAndBytesConfig(
    load_in_4bit=True,
    bnb_4bit_use_double_quant=True,
    bnb_4bit_quant_type="nf4",
    bnb_4bit_compute_dtype=torch.bfloat16
)

model_id = "mistralai/Mistral-7B-v0.1"

model = AutoModelForCausalLM.from_pretrained(model_id, quantization_config=bnb_config, device_map="auto")
tokenizer = AutoTokenizer.from_pretrained(model_id, add_eos_token=True)
加载模型后,我们将对基本模型进行初始推理。
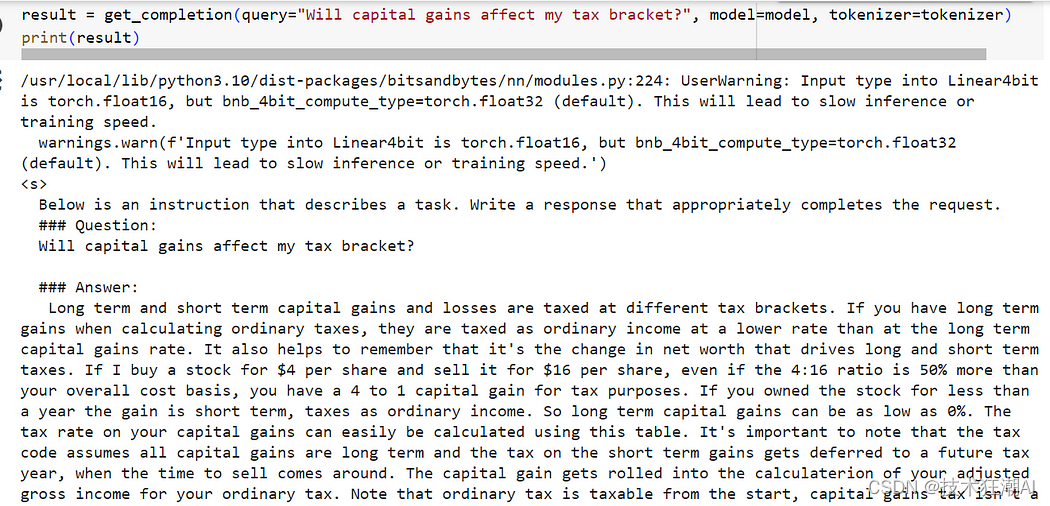
result = get_completion(query="Will capital gains affect my tax bracket?", model=model, tokenizer=tokenizer)
print(result)

结果似乎并没有达到预期,因为该模型提供了一个与我们的问题相关的引文列表,但并没有直接回应我们的指示。
这是因为像 Mistral 7B 这样的自回归模型可以预测序列中的下一个标记。他们需要指令微调来使他们的回答与人类的期望保持一致。
3.3、准备指令微调数据集
我们准备来加载一个金融数据集,以便对我们的基本金融知识模型进行微调。这里我们将仅使用原始数据集的 10% 来进行演示。
from datasets import load_dataset
data = load_dataset("gbharti/finance-alpaca", split='train[:10%]')

# Explore the data
df = data.to_pandas()
df.head(10)
让我们看一下初始数据集。它包含 4 列:指令、文本(数据集中为空)、输入、输出。

我们还将数据集格式化为“Prompt”,以帮助模型更好地理解和标记它。
def generate_prompt(data_point):
    """
    Generate input text based on a prompt, task instruction, (context info.), and answer

    :param data_point: dict: Data point
    :return: dict: tokenized prompt
    """

    if data_point['input']:
        text = 'Below is an instruction that describes a task, paired with an input that provides' \
               ' further context. Write a response that appropriately completes the request.\n\n'
        text += f'### Instruction:\n{data_point["instruction"]}\n\n'
        text += f'### Input:\n{data_point["input"]}\n\n'
        text += f'### Response:\n{data_point["output"]}'

    else:
        text = 'Below is an instruction that describes a task. Write a response that ' \
               'appropriately completes the request.\n\n'
        text += f'### Instruction:\n{data_point["instruction"]}\n\n'
        text += f'### Response:\n{data_point["output"]}'
    return text

text_column = [generate_prompt(data_point) for data_point in data]
data = data.add_column("prompt", text_column)

data = data.shuffle(seed=1234)

data = data.map(lambda samples: tokenizer(samples["prompt"]), batched=True)

data = data.train_test_split(test_size=0.1)
train_data = data["train"]
test_data = data["test"]
3.4、应用 LoRA
让我们加载一个 PeftModel 并指定我们将使用低秩适配器 (LoRA),使用 getpeftmodel 实用程序函数和 PEFT 的 preparemodelforkbittraining 方法。
from peft import prepare_model_for_kbit_training

model.gradient_checkpointing_enable()
model = prepare_model_for_kbit_training(model)

def print_trainable_parameters(model):
    """
    Prints the number of trainable parameters in the model.
    """
    trainable_params = 0
    all_param = 0

    for _, param in model.named_parameters():
        all_param += param.numel()
        if param.requires_grad:
            trainable_params += param.numel()

    print(
        f"trainable params: {trainable_params} || all params: {all_param} || trainable%: {100 * trainable_params / all_param}"
    )

from peft import LoraConfig, get_peft_model

lora_config = LoraConfig(
    r=8,
    lora_alpha=32,
    target_modules=["q_proj", "k_proj", "v_proj", "o_proj"],
    lora_dropout=0.05,
    bias="none",
    task_type="CAUSAL_LM"
)

peft_model = get_peft_model(model, lora_config)
print_trainable_parameters(peft_model)
model.add_adapter(lora_config, adapter_name="adapter")
3.5、运行训练
首先,登录Hugging Face平台,这样我们就可以将微调后的模型推送到Hub上供以后使用。
from huggingface_hub import notebook_login
notebook_login()
然后,设置训练参数并启动训练过程。对于此演示,我们将仅运行 100 个步骤。
import transformers

tokenizer.pad_token = tokenizer.eos_token

trainer = transformers.Trainer(
    model=model,
    train_dataset=train_data,
    eval_dataset=test_data,
    args=transformers.TrainingArguments(
        per_device_train_batch_size=1,
        gradient_accumulation_steps=4,
        warmup_steps=0.03,
        max_steps=100,
        learning_rate=2e-4,
        fp16=True,
        logging_steps=1,
        output_dir="outputs_mistral_b_finance_finetuned_test",
        optim="paged_adamw_8bit",
        save_strategy="epoch",
        push_to_hub=True
    ),
    data_collator=transformers.DataCollatorForLanguageModeling(tokenizer, mlm=False),

)

model.config.use_cache = False
trainer.train()
你可以在 Hub 上共享适配器,或者也可以在本地保存微调模型和适配器。
model.push_to_hub("mistral_b_finance_finetuned_test")
tokenizer.push_to_hub("mistral_b_finance_finetuned_test")
3.6、定性评估模型
直接从 Hub 加载适配器。
import torch
from peft import PeftModel, PeftConfig
from transformers import AutoModelForCausalLM, AutoTokenizer

peft_model_id = "Ronal999/mistral_b_finance_finetuned_test"
config = PeftConfig.from_pretrained(peft_model_id)

model = AutoModelForCausalLM.from_pretrained(
    config.base_model_name_or_path,
    return_dict=True,
    load_in_4bit=True,
    device_map='auto'
)

tokenizer = AutoTokenizer.from_pretrained(config.base_model_name_or_path)
model = PeftModel.from_pretrained(model, peft_model_id)
然后,利用从 Hub 加载的训练模型进行推理。提出同样的问题并检查结果。
result = get_completion(query="Will capital gains affect my tax bracket?", model=model, tokenizer=tokenizer)
print(result)
因此,我们可以看到,即使仅使用 100 个数据点进行训练,模型的响应也更加连贯。
Jupyter Notebook 的完整代码:
https://github.com/Crossme0809/frenzyTechAI/blob/main/finetune_mistral-7b/Finetune_Mistral7B_on_a_single_GPU_with_PEFT.ipynb
四、其它微调方案
虽然HuggingFace库很用户友好,但在微调自定义模型时仍需要编写一些代码。是否还有更方便简单的方案呢。
你还有两种其它的选择:
-
AutoTrain:这是一种适合初学者的模型微调方法。只需运行一个命令,就可以开始了。
-
声明式配置微调:这种方法介于AutoTrain和低级API训练之间。您可以在单个YAML文件中定义模型、数据和训练参数。此方法可以显著减少所需的时间、精力和专业知识。
五、总结
PEFT是一种调整大型LLM的有效方法,可以节省大量计算和存储资源,同时提供与完全微调相当的性能。即使进行了仅涉及数据集中100个示例的适度微调过程,我们也注意到模型在指定任务上的性能有了显著提高。
通过微调我们发现,拥有高质量的数据集是塑造定制模型最终性能的关键。例如,研究表明,你只需使用 1,000 个高质量样本即可通过微调 LLaMA (v1) 模型(具有 650 亿个参数)来超越 GPT-3 (DaVinci003)。
六、References
[1]. PEFT: Parameter-Efficient Fine-Tuning of Billion-Scale Models on Low-Resource Hardware(https://huggingface.co/blog/peft)
[2]. LoRA: Low-Rank Adaptation of Large Language Models(https://arxiv.org/abs/2106.09685)
七、相关推荐
BERT 模型微调实战:如何使用 Huggingface Transformers 微调BERT实现问答和文本分类问题
LangChain 与 LangSmith:构建与微调支持LLM的智能应用双重攻略
AutoTrain:在Google Colab上微调LLM最简单的方法