目录
文章目录
- 目录
- 实验一
- 实验二
- 实验三
-
- (1)首先我在u+上看完了老师的相关课程,感触很深
- (2)于是开始找素材和教程,这里我学习的是b站蔡先森_rm-rf的课,很巧,这位b站的老师也姓蔡。
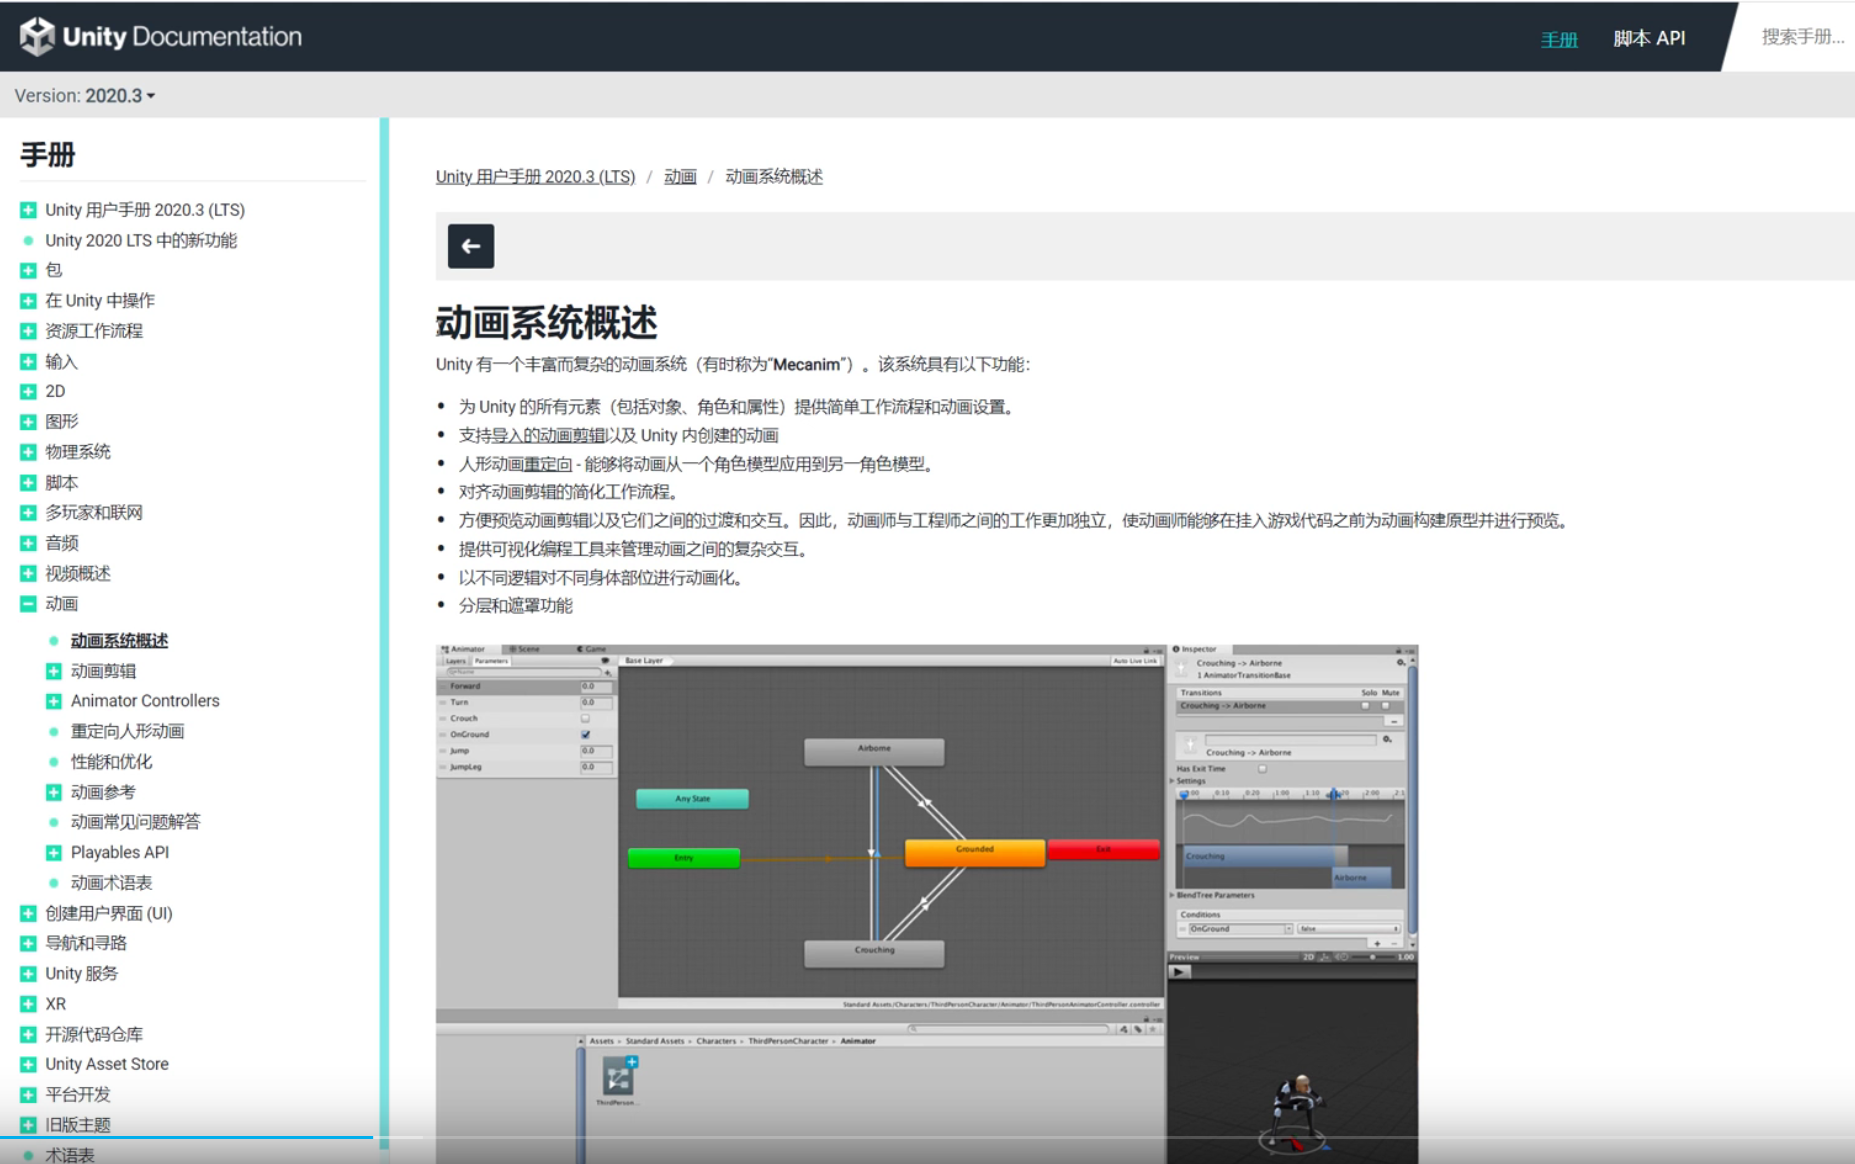
- (3)在unity设计"人物"的动画:静止、走路
- (4)实现相机跟随
- (5)设置奔跑
- (6)设置重力
- (7)设置刚体,防止模型掉下去
- (8)设计跳跃
- (9)设置游戏菜单
- (10)了解射线,实现射击
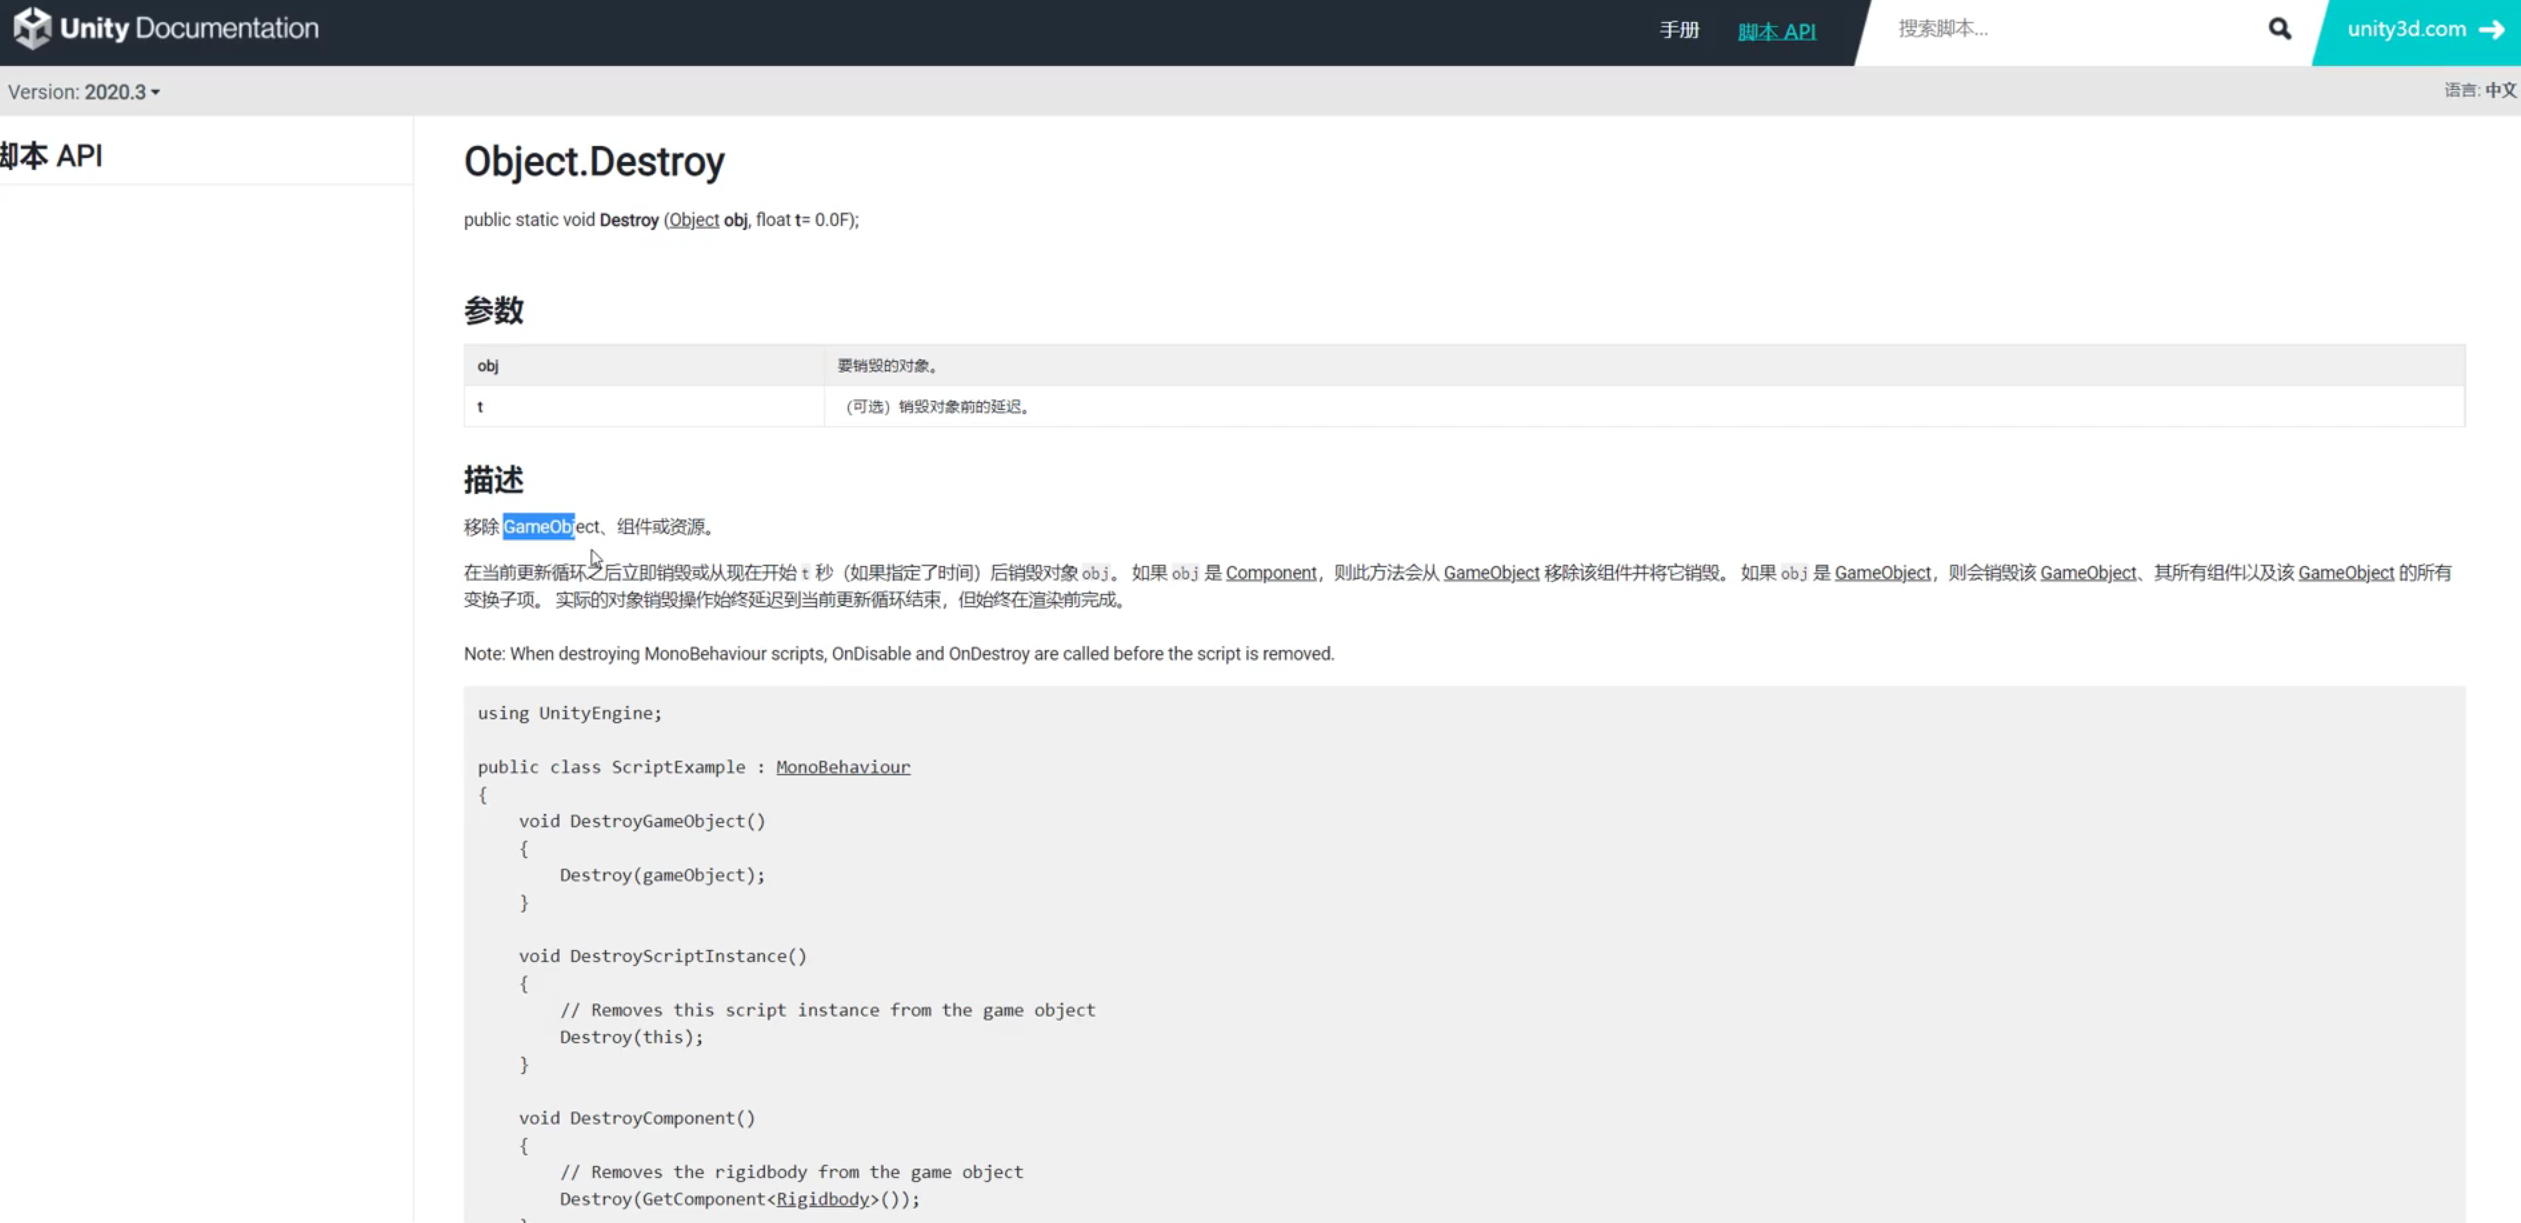
- queryTriggerInteraction 指定该查询是否应该命中触发器。
- (11)实现射速控制
- (12)设计射击子弹数量,打空一个弹夹
- (12)增加子弹显示界面ui
- (13)实现子弹的装填
- (15)人物行走奔跑脚步声
- 可以看到已经成功播放了。
- (16)添加枪口火焰,声音,光效
- (17)添加弹孔和火花特效
- (19)增加拿出枪械、静止、查看武器动画
- (20)增加行走、奔跑动画
- (21)P21增加换子弹的两种动画
- (22)P22增加开火、瞄准逻辑
- (23)P23增加瞄准开火动画
- (24)P24实现射击抛出弹壳效果
- (25)实现半自动和全自动模式
- 实验四
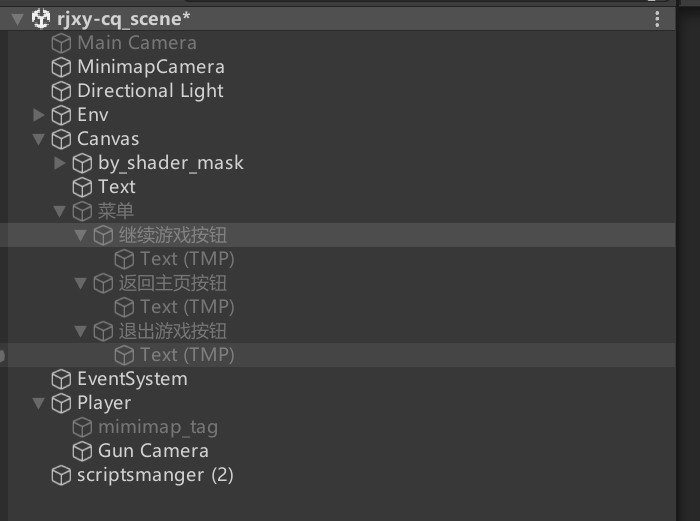
实验一
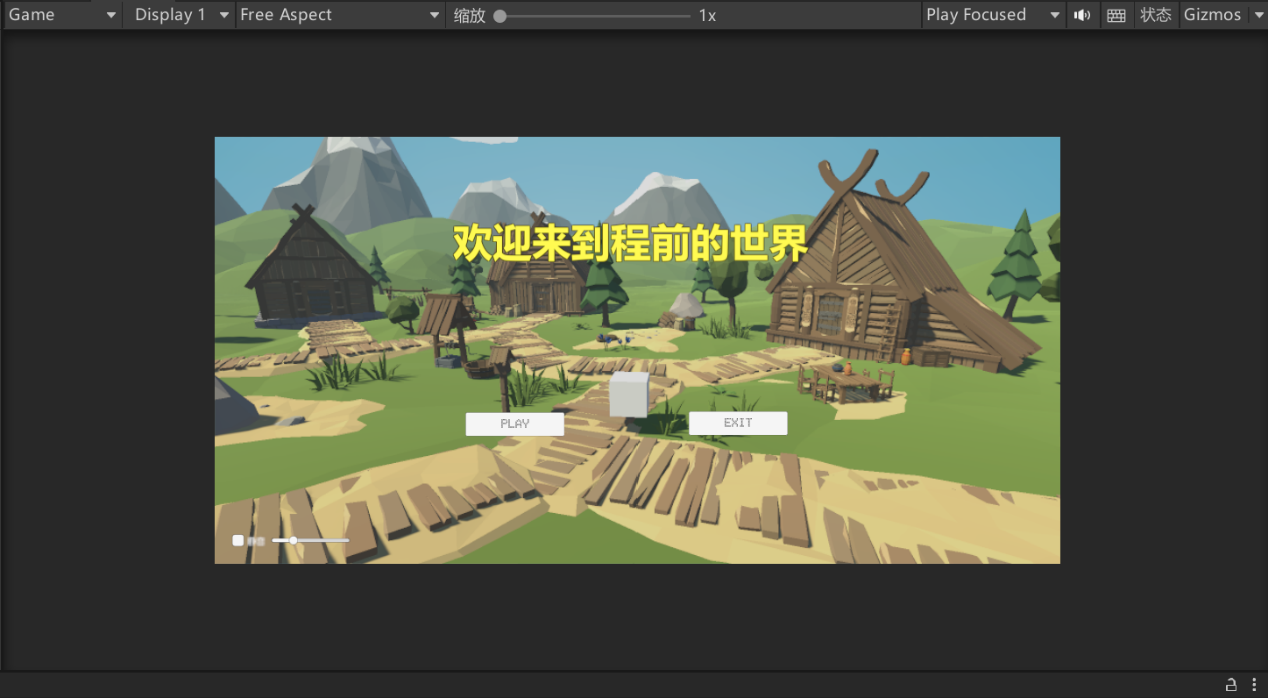
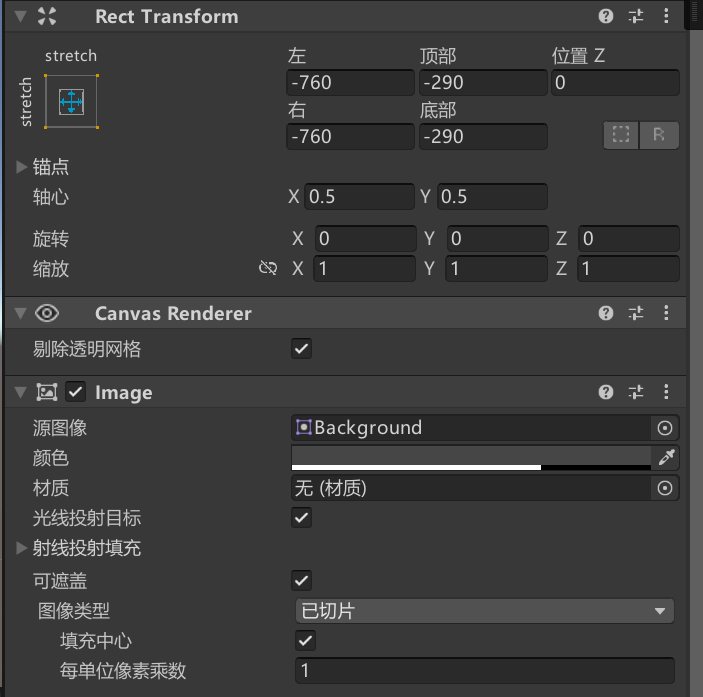
(1)设计如下UI界面,其中包含了canvas、Panel、Text、Button、Image、RawImage等UI元素
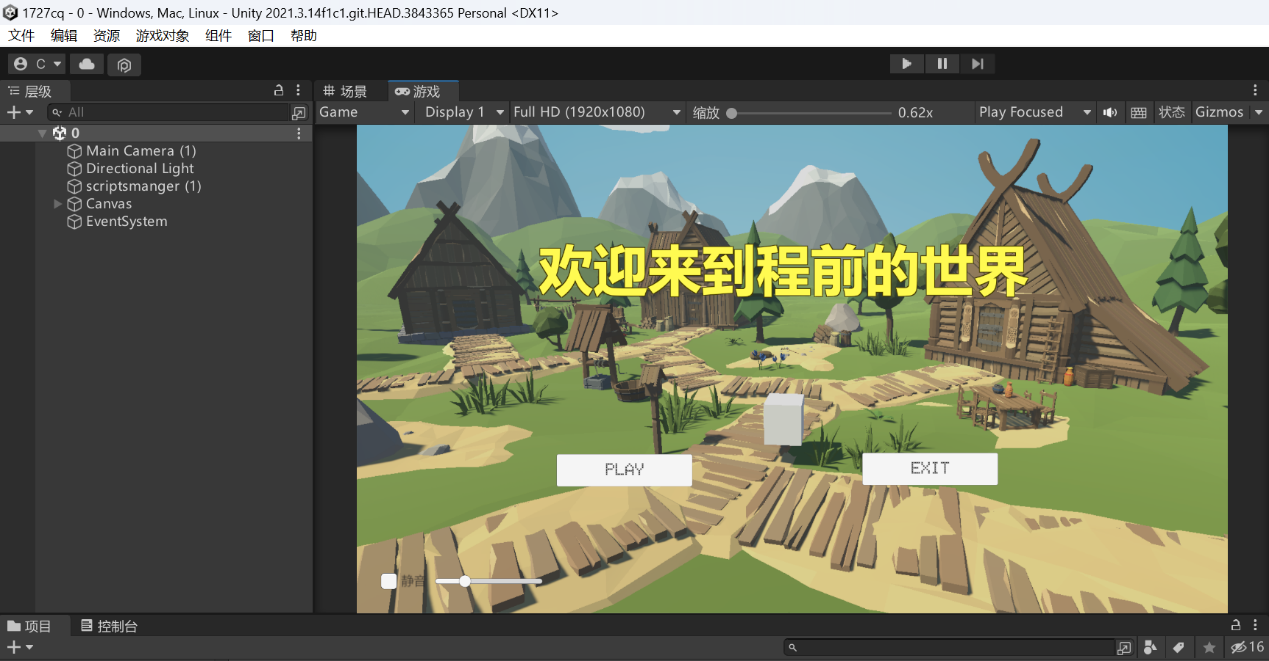
(2)实现点击Play按钮转换场景,点击Exit退出游戏的功能
创建脚本:Login.cs
在脚本中添加:using UnityEngine.SceneManagement;
脚本内容:
using System.Collections;
using System.Collections.Generic;
using UnityEngine;
using UnityEngine.SceneManagement;
public class Login : MonoBehaviour
{
public void Enter()
{
SceneManager.LoadScene(1);
}
public void ReturnUi()
{
SceneManager.LoadScene(0);
}
public void ExitGame()
{
Application.Quit();
}
}
脚本中编号为1的场景在之后的实验中会逐渐完善。这次受到蔡老师上课的启发,决心做一款属于自己的fps射击游戏。
将脚本中的方法挂载到Button上

然后将enter()方法添加进去,如图所示
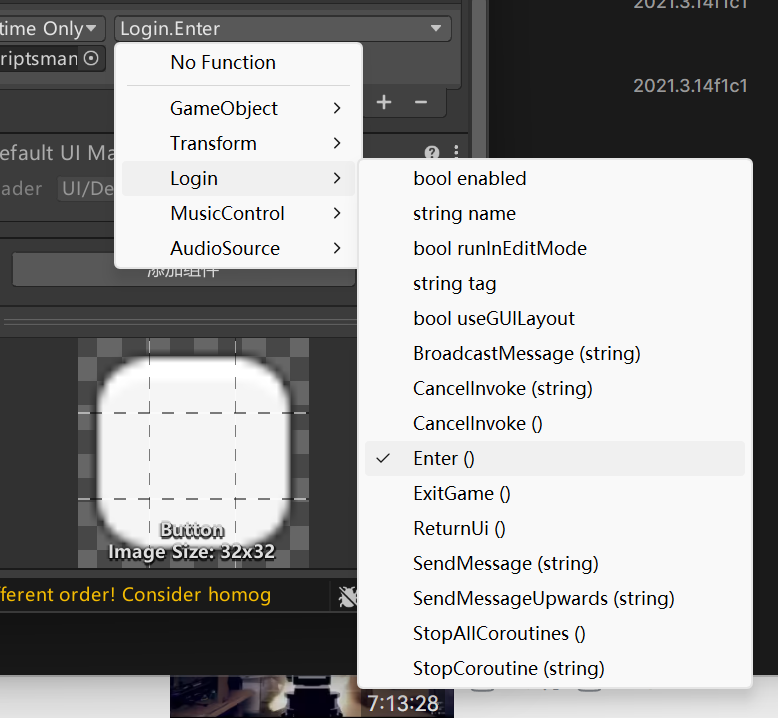
同理,将exit()方法添加到第二个Button中
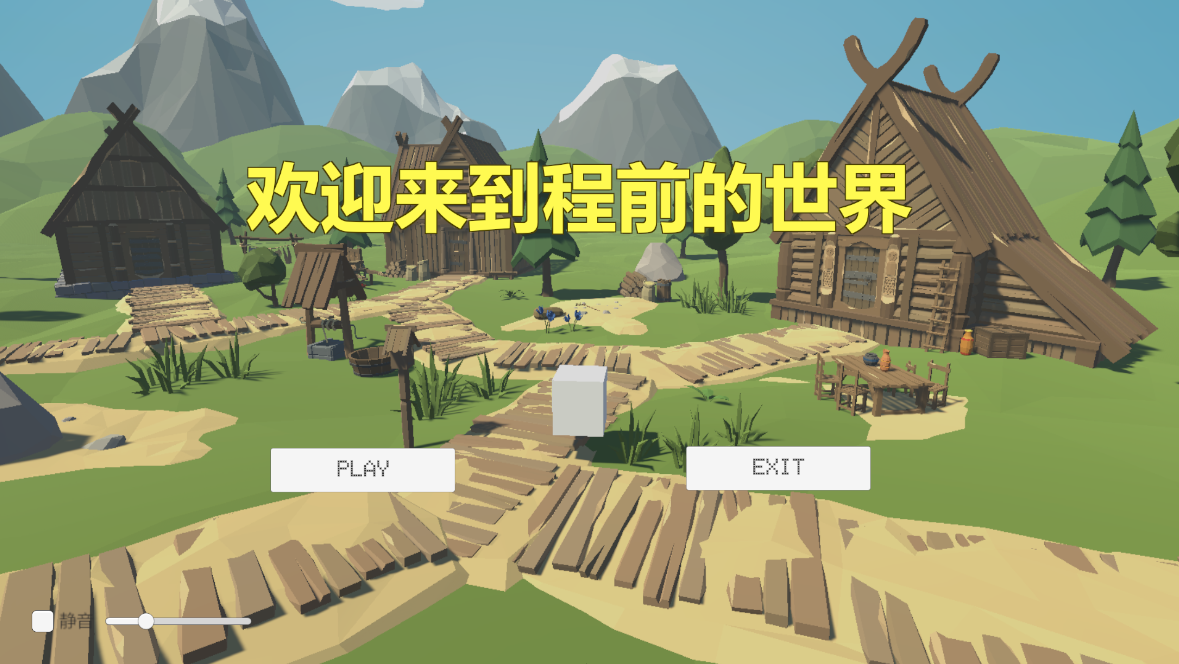
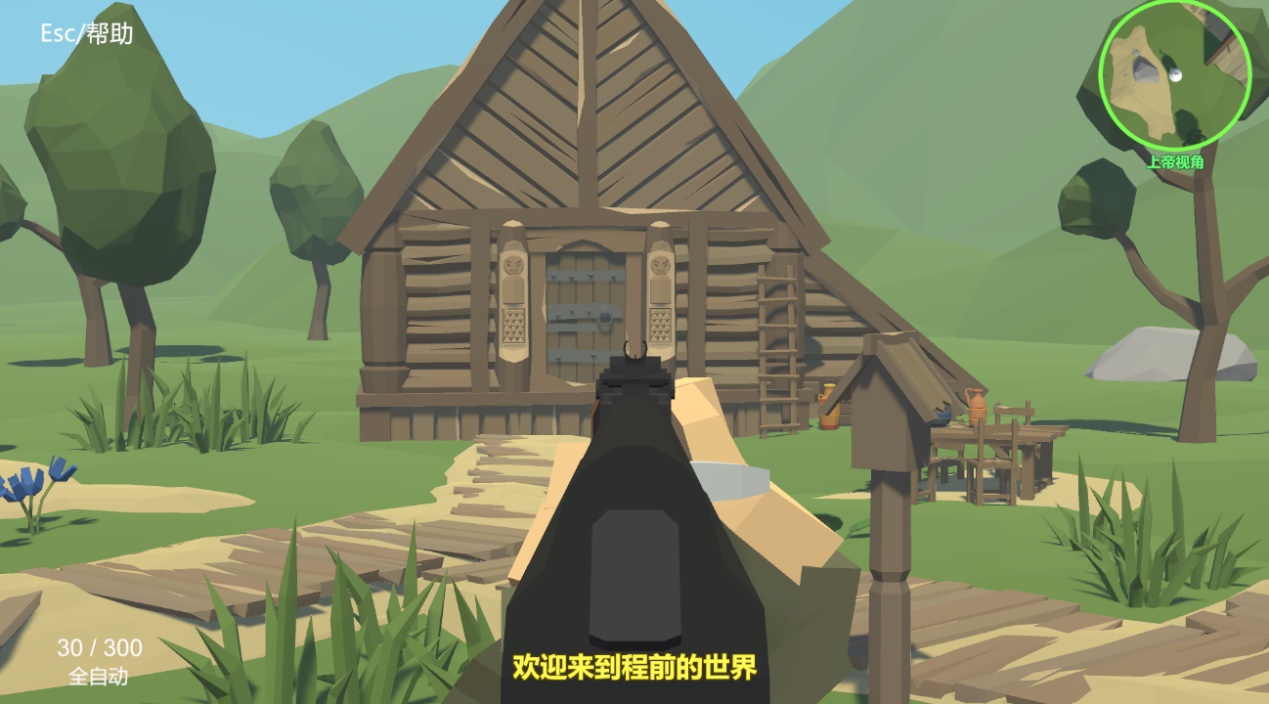
接下来运行程序,点击"进入我的世界",可得到:
(3)主界面添加音量滑动杆、静音等功能;
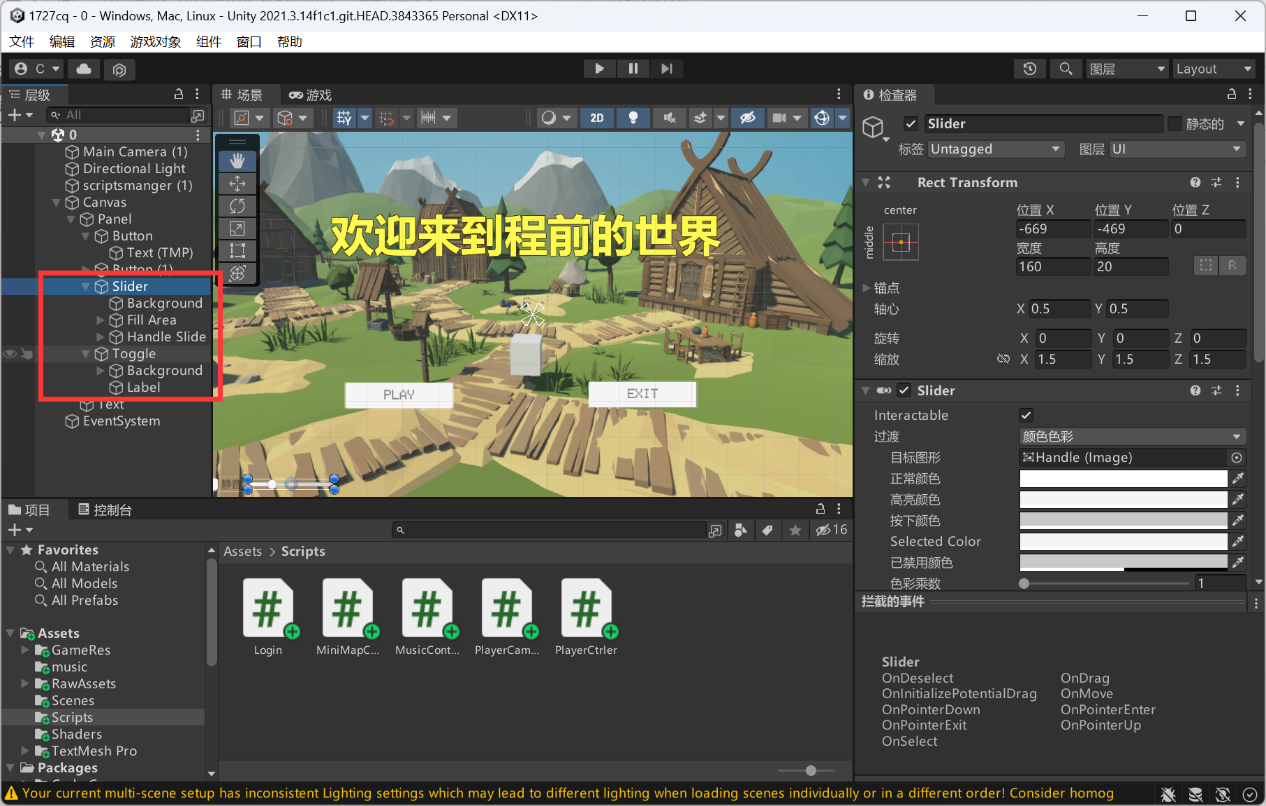
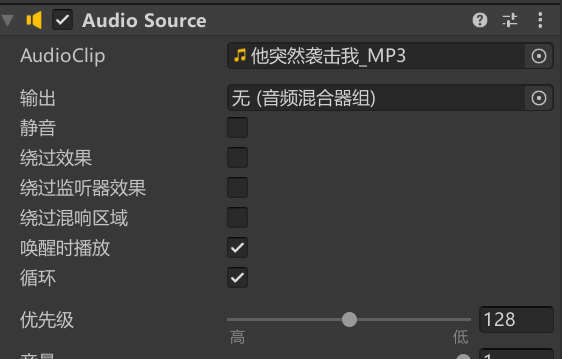
在脚本管理器中添加Audio
Source,将下载好的音乐文件放入AudioClip中(其中Unity支持AIFF WAV MP3
OGG等)
如下图所示:
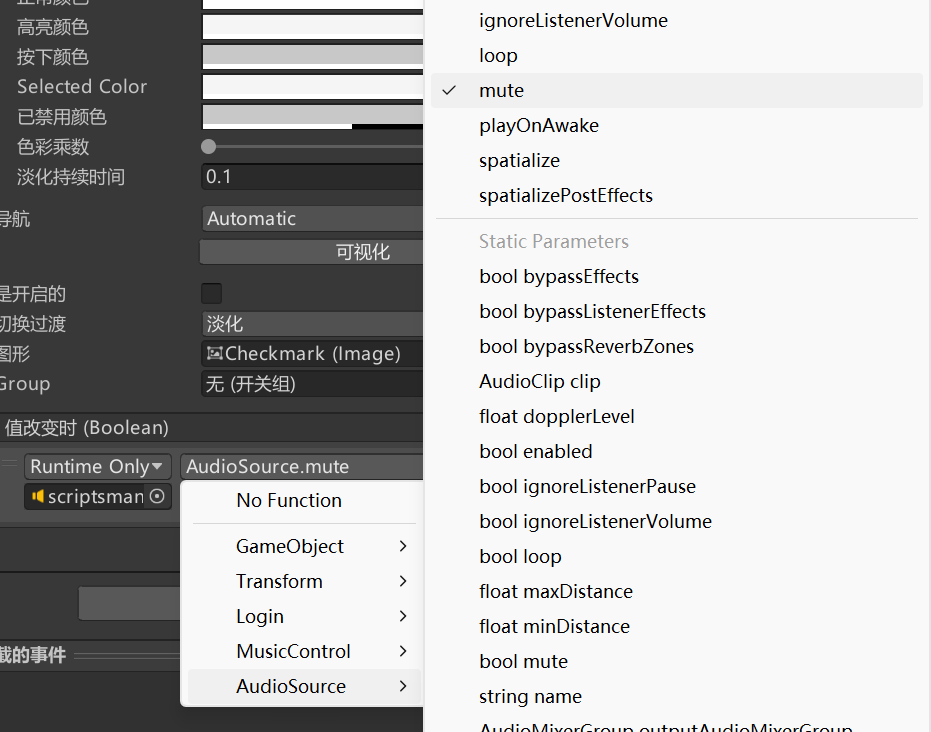
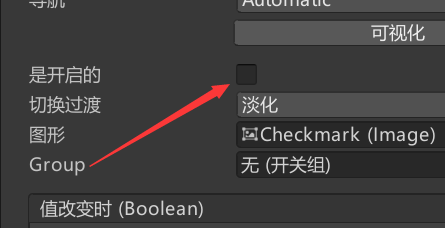
如图在Toggle中添加脚本管理器
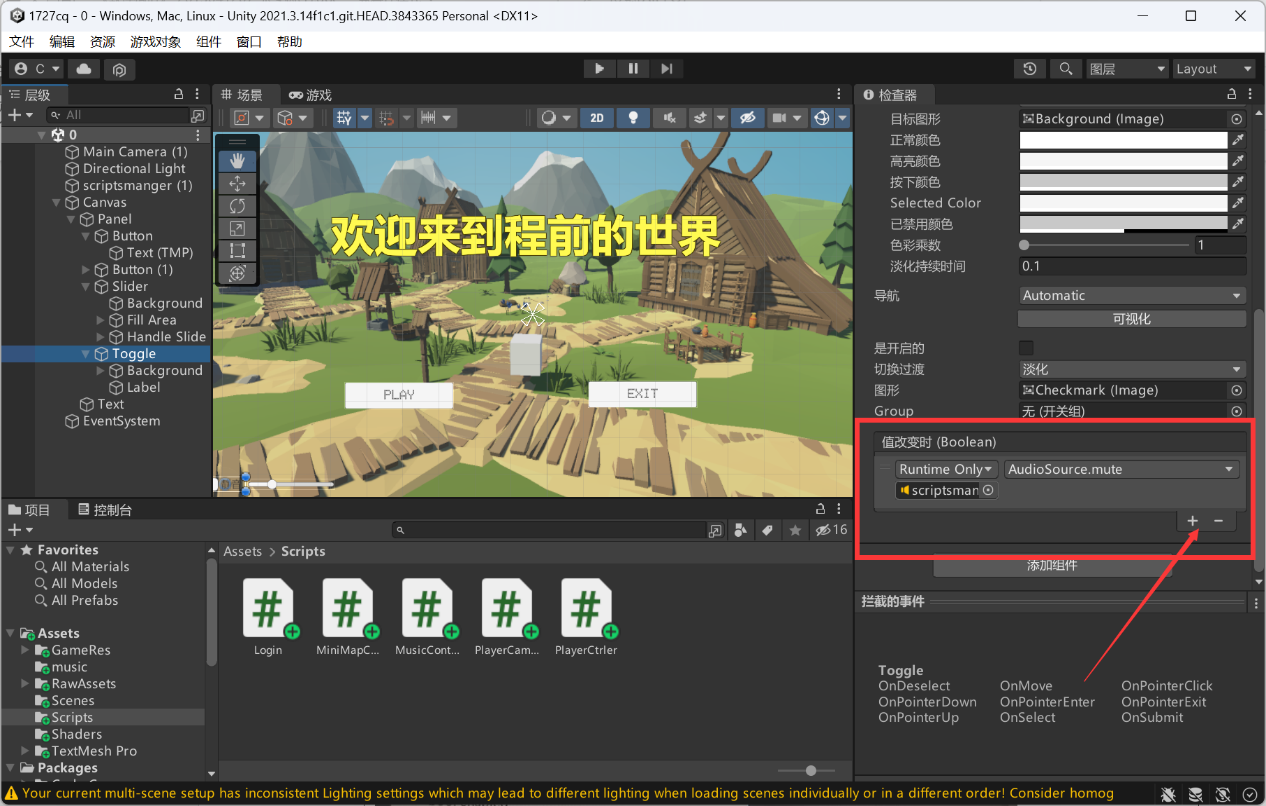
并找到mute
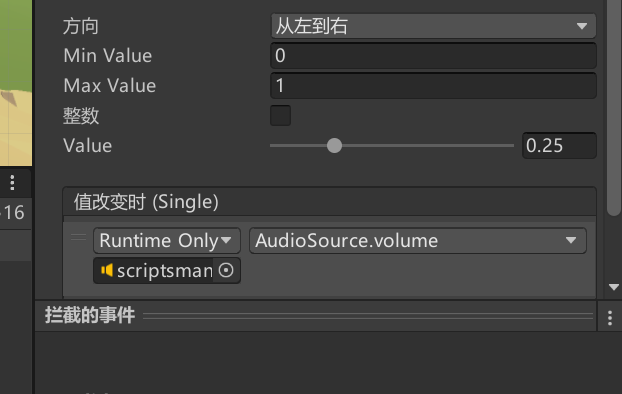
在Slider中添加volume
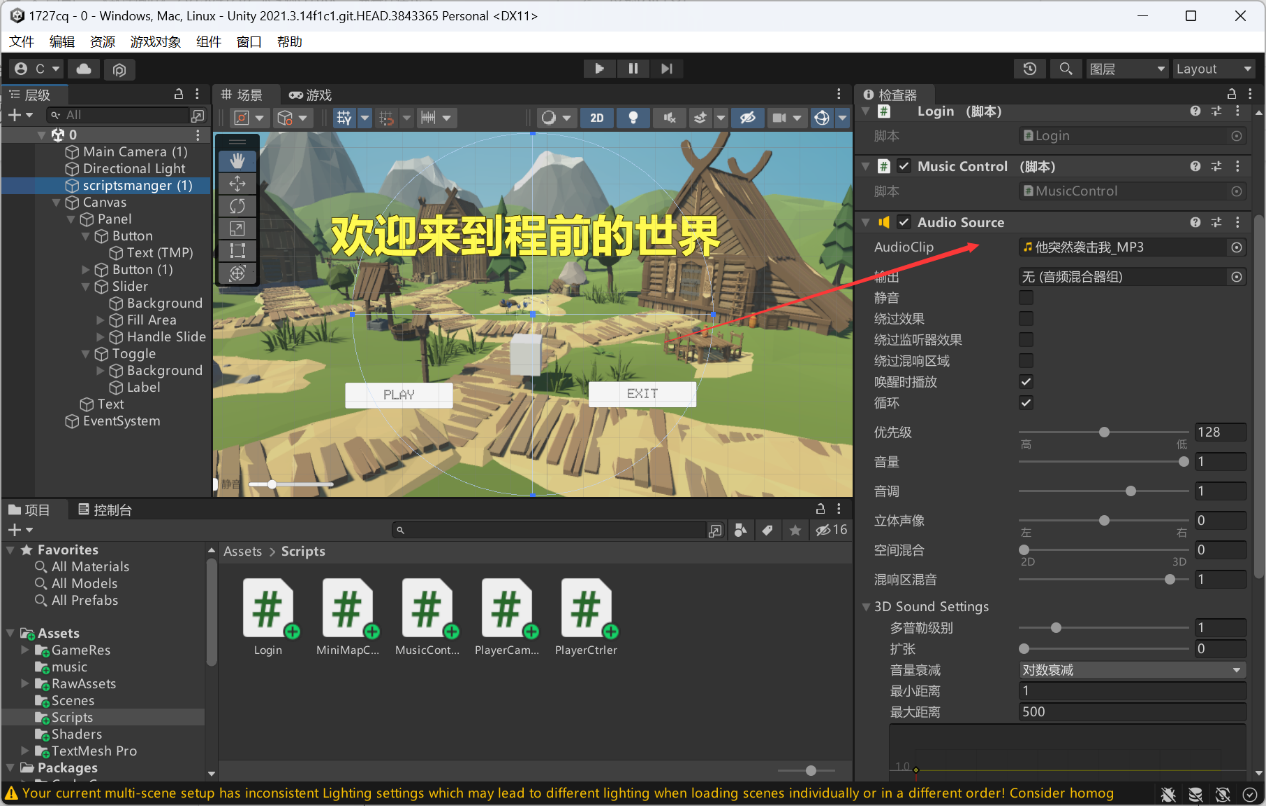
添加脚本:MusicControl.cs
using System.Collections;
using System.Collections.Generic;
using UnityEngine;
public class MusicControl : MonoBehaviour
{
// Start is called before the first frame update
void Start()
{
}
// Update is called once per frame
void Update()
{
MusicPlayControl();
}
void MusicPlayControl()
{
if (Input.GetKeyDown(KeyCode.O))
{
GetComponent<AudioSource>().Pause();
}
else if (Input.GetKeyDown(KeyCode.P))
{
GetComponent<AudioSource>().UnPause();
}
}
}
该脚本的意思是当按下P键时音乐暂停播放,按下空格键时音乐继续播放
注意:将这两个选项选中
并将下面选项去掉(Toggle中)
最终的UI设计界面:
实验的结论
通过这次实验,我学会了用一些基本元素来进行UI设计,因为我喜欢玩三蹦子和原神的缘故吧,这次的作业也是按照动漫像素风来做的,ui美化方面还有待提高。
实验二
(1)在3d MAX中制作一扇门,实现"开门""关门"动画,并将动画导出。
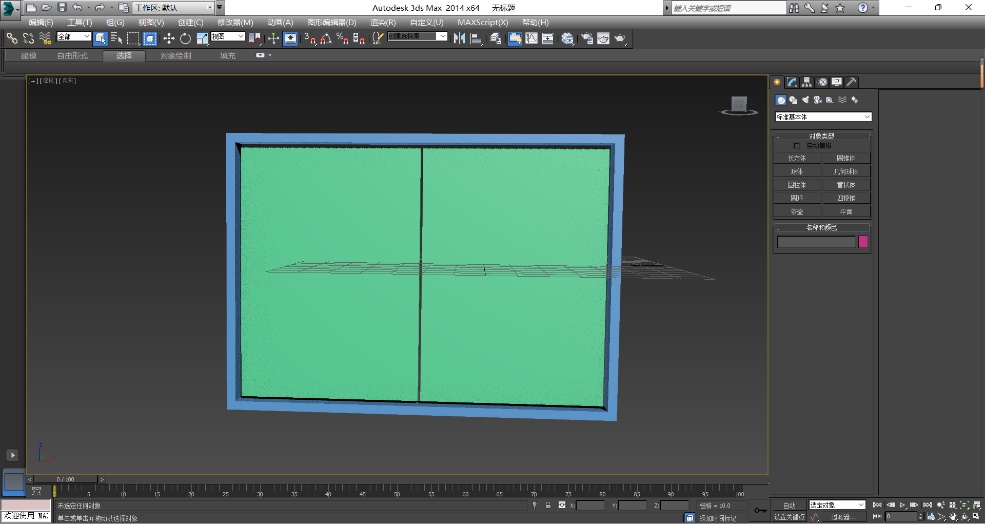
导出的文件后缀为FBX,按照关键帧进行分割,在0-30帧进行开门操作,30-60帧进行关门操作。
(2)在unity设计场景
也借鉴了一些github大佬做的简单场景,正好是像素风,也符合自己的个人审美。场景做的比较简单,只有最简单的wasd移动,没有跳跃。
因为这个门做的不是很符合场景的画风,所以导入动画的任务,分发给后续的子弹射击,奔跑等场景。
如下图所示:

实验的结论
在这次实验中,学着在3dMax和unity中建模,有些操作在一开始的时候还是很不熟练,一些模型的制作也不太成熟,总体做的比较简陋,动画的实现也比较少,画面的画风美化还也需要多下功夫。
实验三
(1)首先我在u+上看完了老师的相关课程,感触很深
(2)于是开始找素材和教程,这里我学习的是b站蔡先森_rm-rf的课,很巧,这位b站的老师也姓蔡。

https://www.bilibili.com/video/BV1vL4y1x7Qx?p=1
(3)在unity设计"人物"的动画:静止、走路
如图所示
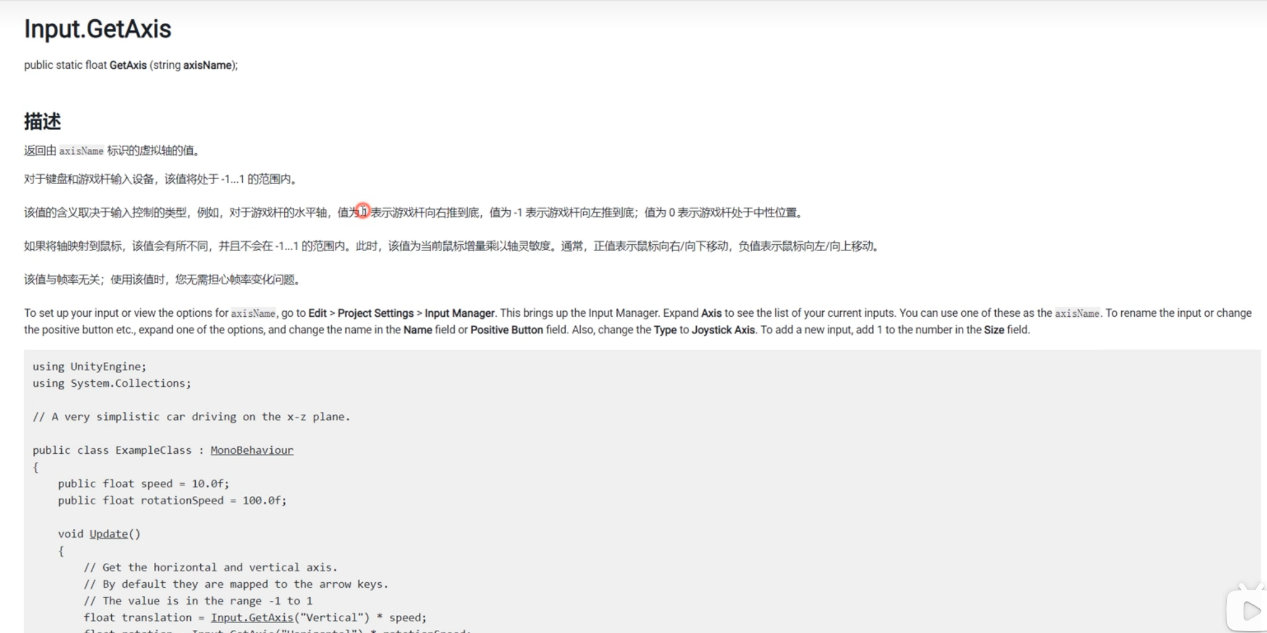
参考官方文档来写。
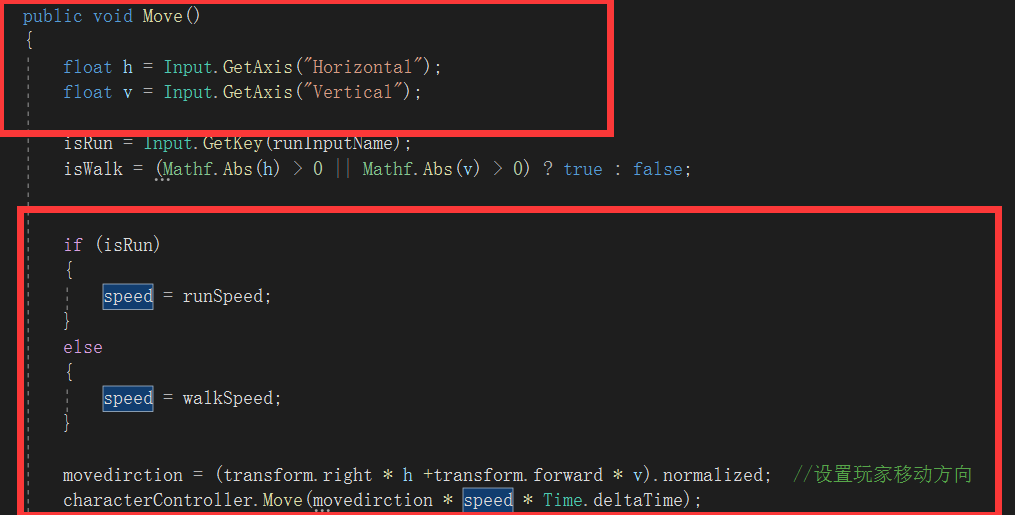
这里参考网络上的脚本,使用GetAxis()方法,他有两种:Vertical:获得垂直方向Horizontal:获得水平方向。
float h = Input.GetAxis(“Horizontal”);//这个代码的意思是
对应键盘上面的左右箭头,当按下左或右箭头时触发
float v=Input.GetAxis(“Vertical”);
//对应键盘上面的上下箭头,当按下上或下箭头时触发
运用这些代码就可以实现简单的前后左右移动啦。
Input代表输入设备(键盘)输入
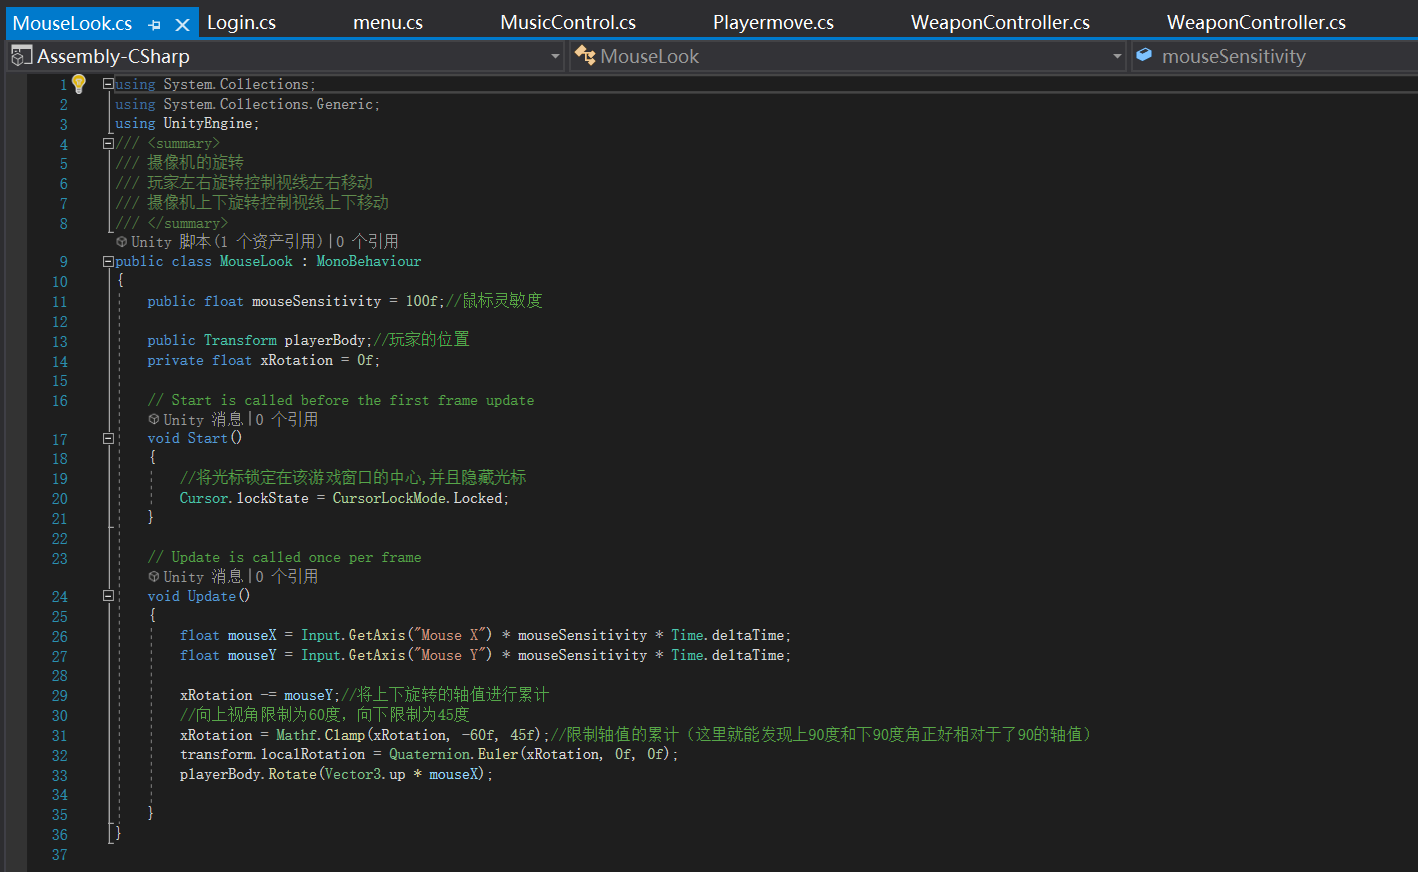
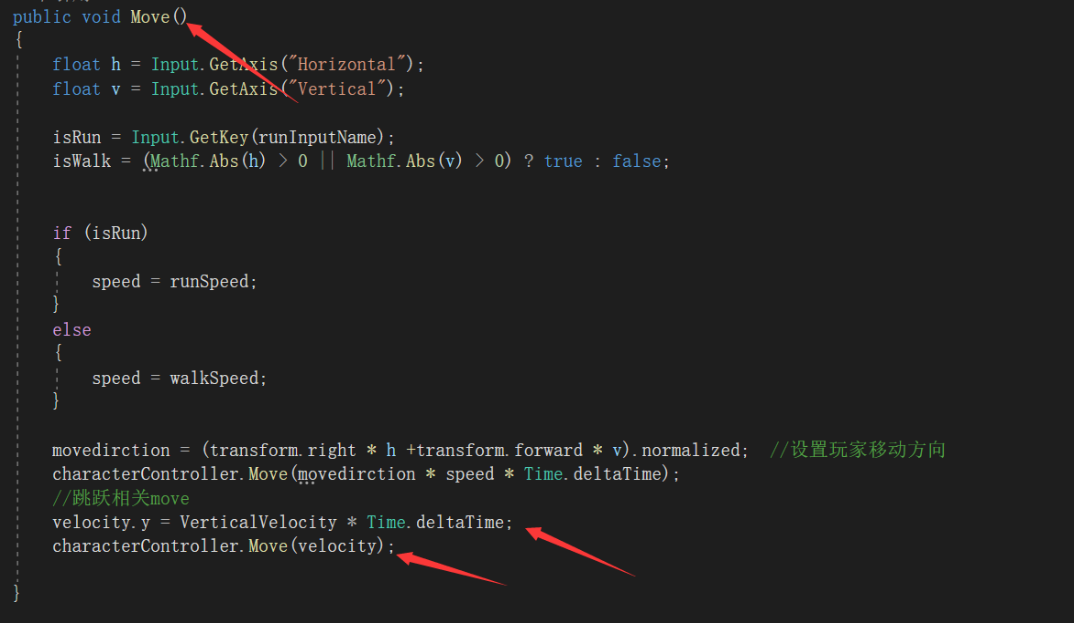
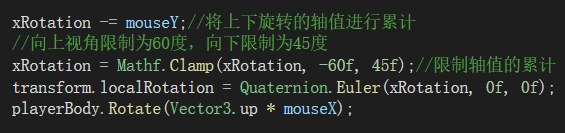
(4)实现相机跟随
目录层次,把他放在player下,实现绑定。
这里要注意的一点是Time.deltaTime;这个特殊的存在。我的理解是这是个和游戏的帧率有关的时间单位。
Time.deltaTime的官方解释为"上一帧与当前帧间隔的秒数"
可以理解为"一帧的时间"
Update()代码是这样的:Time.deltaTime *
10,表示一帧移动的距离,即一帧的时间*速度,这里的时间是上一帧到当前帧的时间,10表示每秒钟移动的距离,因此二者相乘就是一帧移动的距离,由于Update()函数在一秒内执行的次数就是帧数,所以当时间经过一秒,对象的移动距离即为帧数*每一帧的时间*速度,也就是一秒移动的距离,与10m/s相对应。
这里展示一下我微调过后的代码吧
using System.Collections;
using System.Collections.Generic;
using UnityEngine;
/// <summary>
/// 摄像机的旋转
/// 玩家左右旋转控制视线左右移动
/// 摄像机上下旋转控制视线上下移动
/// </summary>
public class MouseLook : MonoBehaviour
{
public float mouseSensitivity = 100f;//鼠标灵敏度
public Transform playerBody;//玩家的位置
private float xRotation = 0f;
// Start is called before the first frame update
void Start()
{
//将光标锁定在该游戏窗口的中心,并且隐藏光标
Cursor.lockState = CursorLockMode.Locked;
}
// Update is called once per frame
void Update()
{
float mouseX = Input.GetAxis(“Mouse X”) * mouseSensitivity *
Time.deltaTime;
float mouseY = Input.GetAxis(“Mouse Y”) * mouseSensitivity *
Time.deltaTime;
xRotation -= mouseY;//将上下旋转的轴值进行累计
//向上视角限制为60度,向下限制为45度
xRotation = Mathf.Clamp(xRotation, -60f,
45f);//限制轴值的累计(这里就能发现上90度和下90度角正好相对于了90的轴值)
transform.localRotation = Quaternion.Euler(xRotation, 0f, 0f);
playerBody.Rotate(Vector3.up * mouseX);
}
}
轴数限制良好的限制了上下角度的移动方向。
//将光标锁定在该游戏窗口的中心,并且隐藏光标
Cursor.lockState = CursorLockMode.Locked;
锁定鼠标,
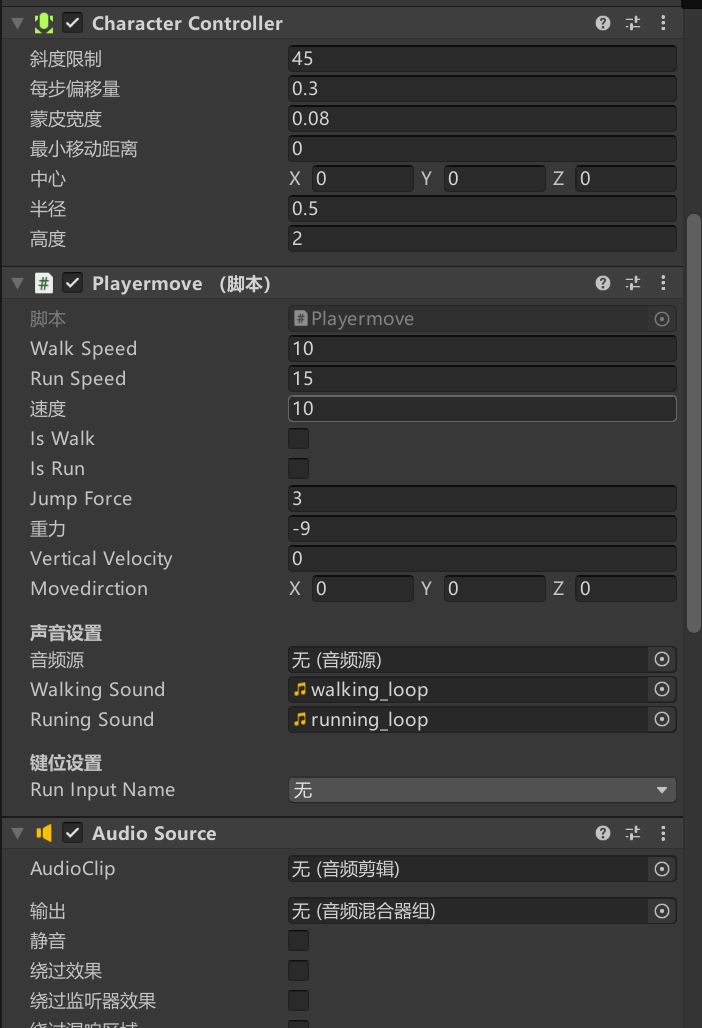
(5)设置奔跑
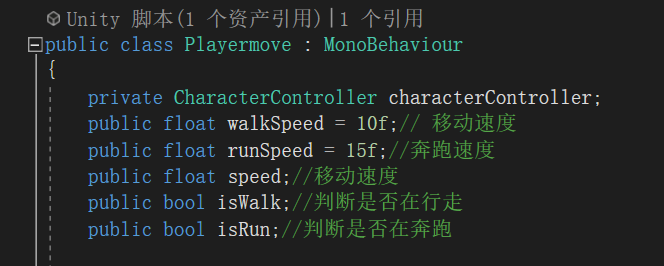
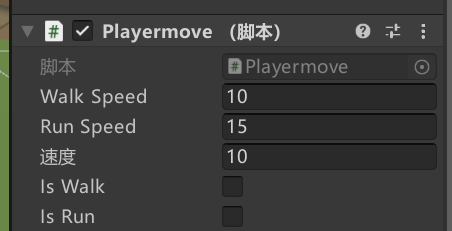
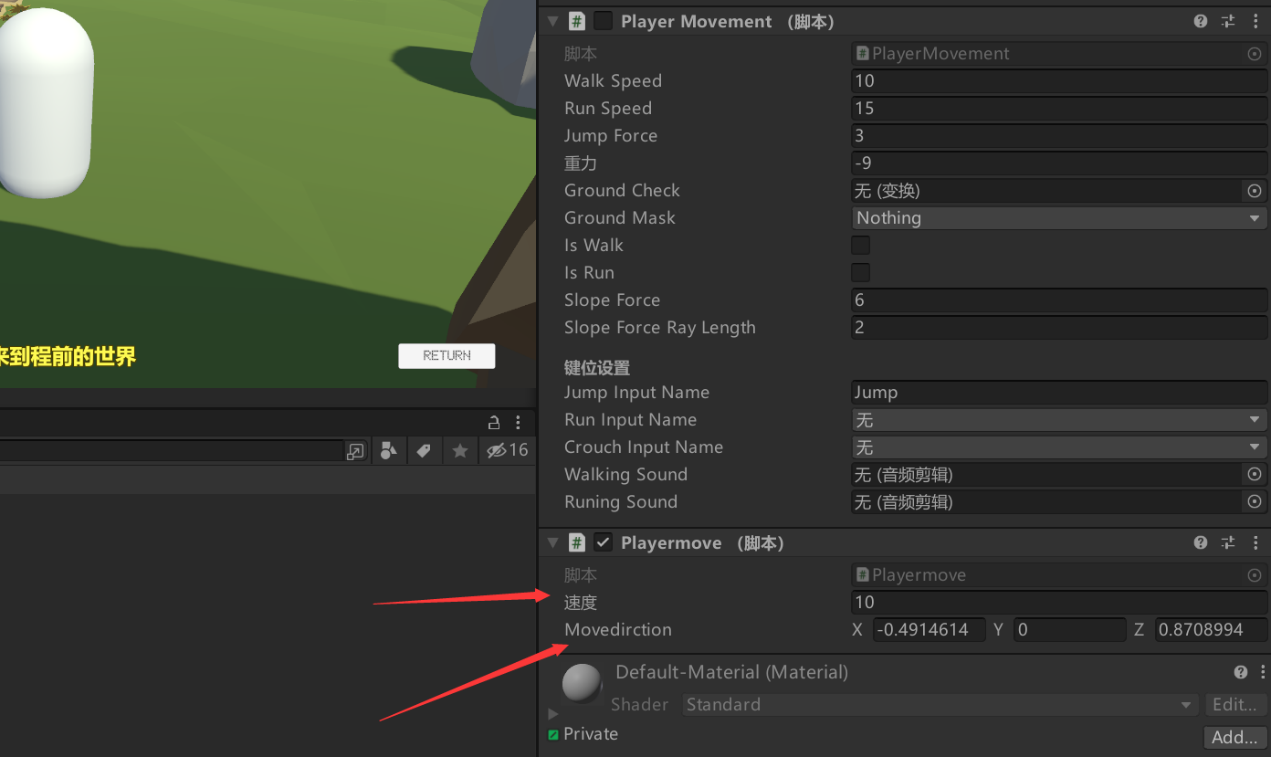
设置变量,方便ui界面调试
(6)设置重力
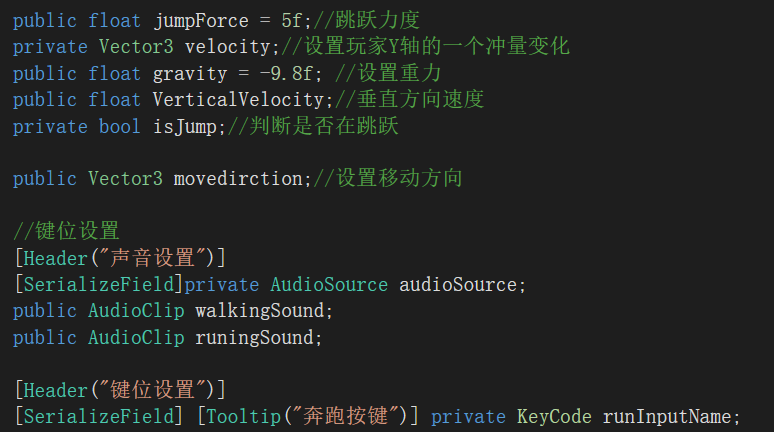 声明变量
声明变量
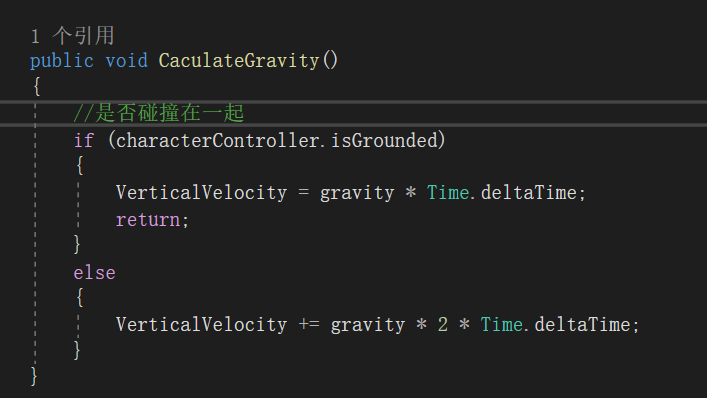
重力变量乘时间用来模拟重力,图中*2是为了游戏手感调整加入的。
(7)设置刚体,防止模型掉下去
我们导入的这个像素风模型,他的所有建筑物都不是刚体。我们试验的圆柱体可以轻松穿过任何物体。我们要利用unity特性,设置刚体碰撞。
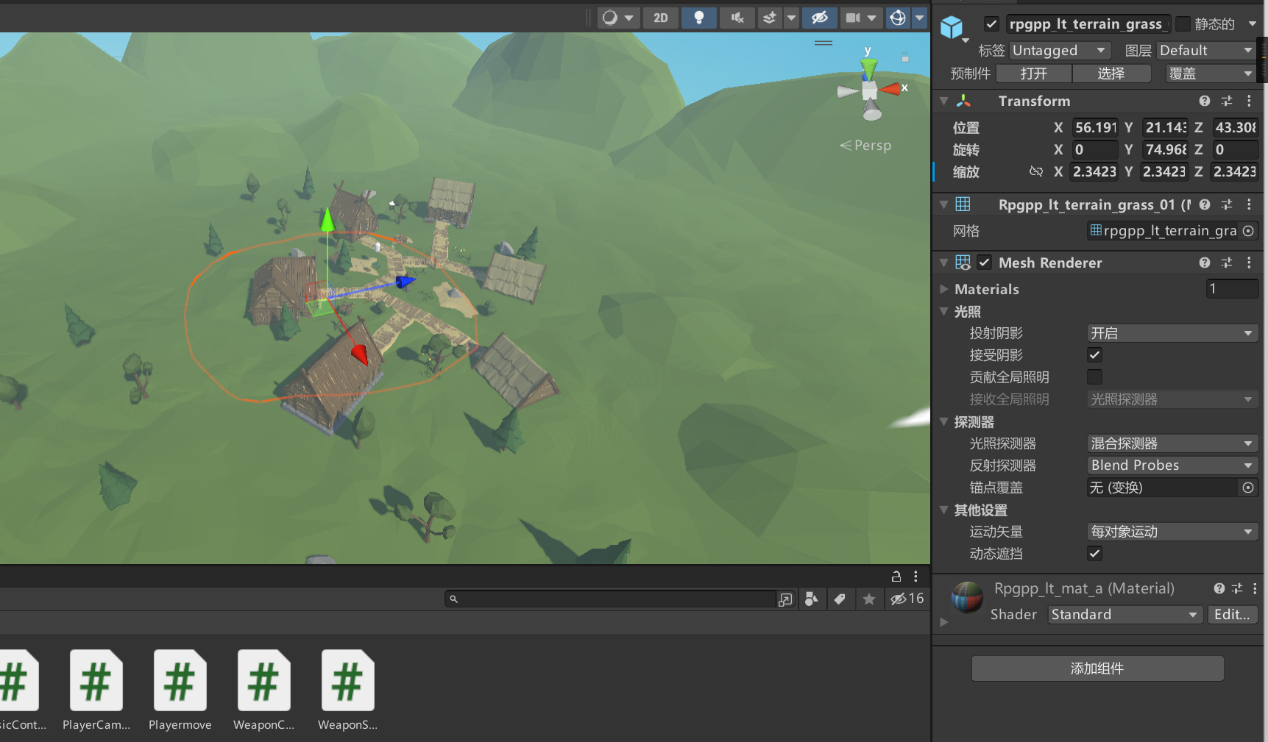
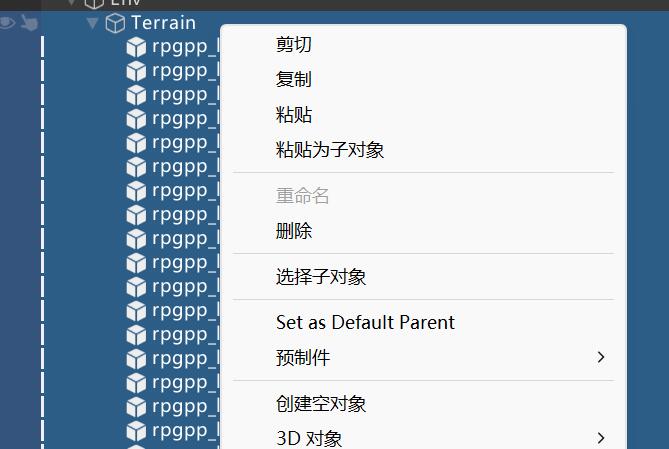
选择模型里的地面,山头,建筑物分类,选择子对象。批量设置刚体
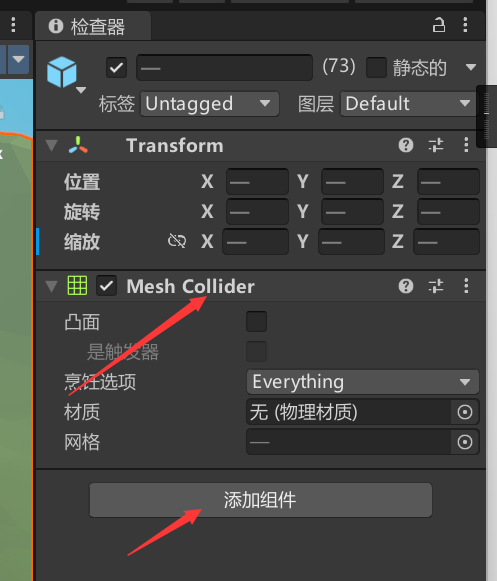
现在已经不会掉下去了。
(8)设计跳跃
其实重力和起跳我都没有按照b站的视频来走。视频里的碰撞体感觉大材小用了。我选择了其他的方法,很简单的模拟重力和起跳。
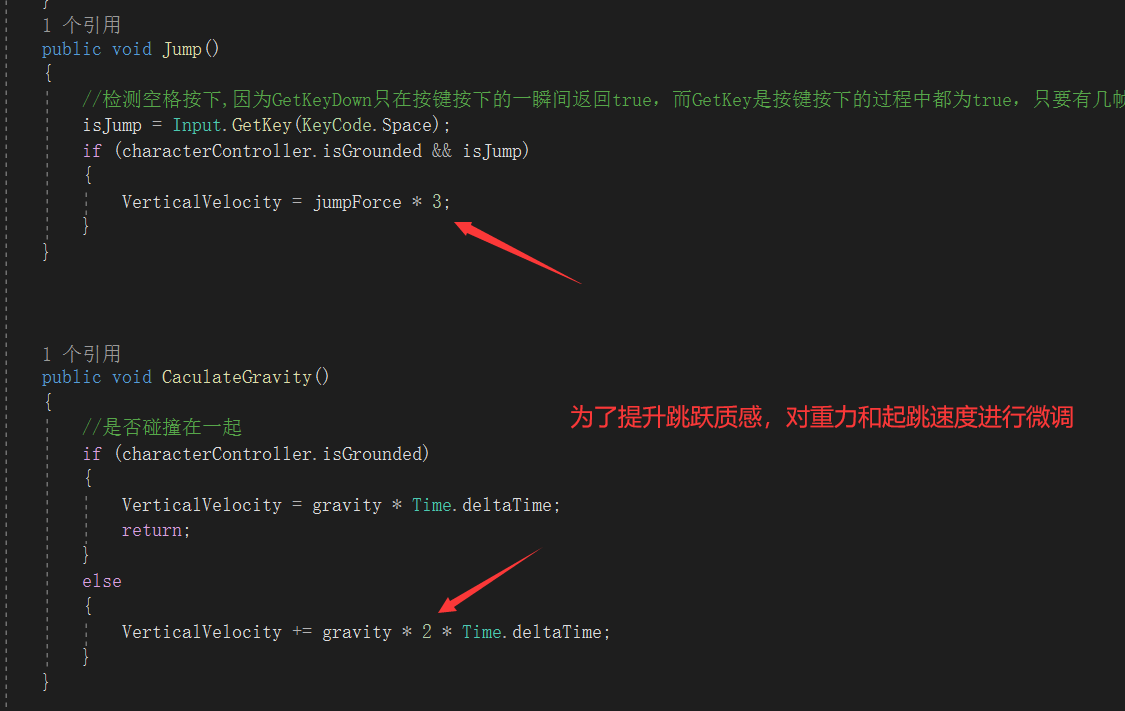
加入update()方法里

将计算出的跳跃和重力变量,加入move方法。
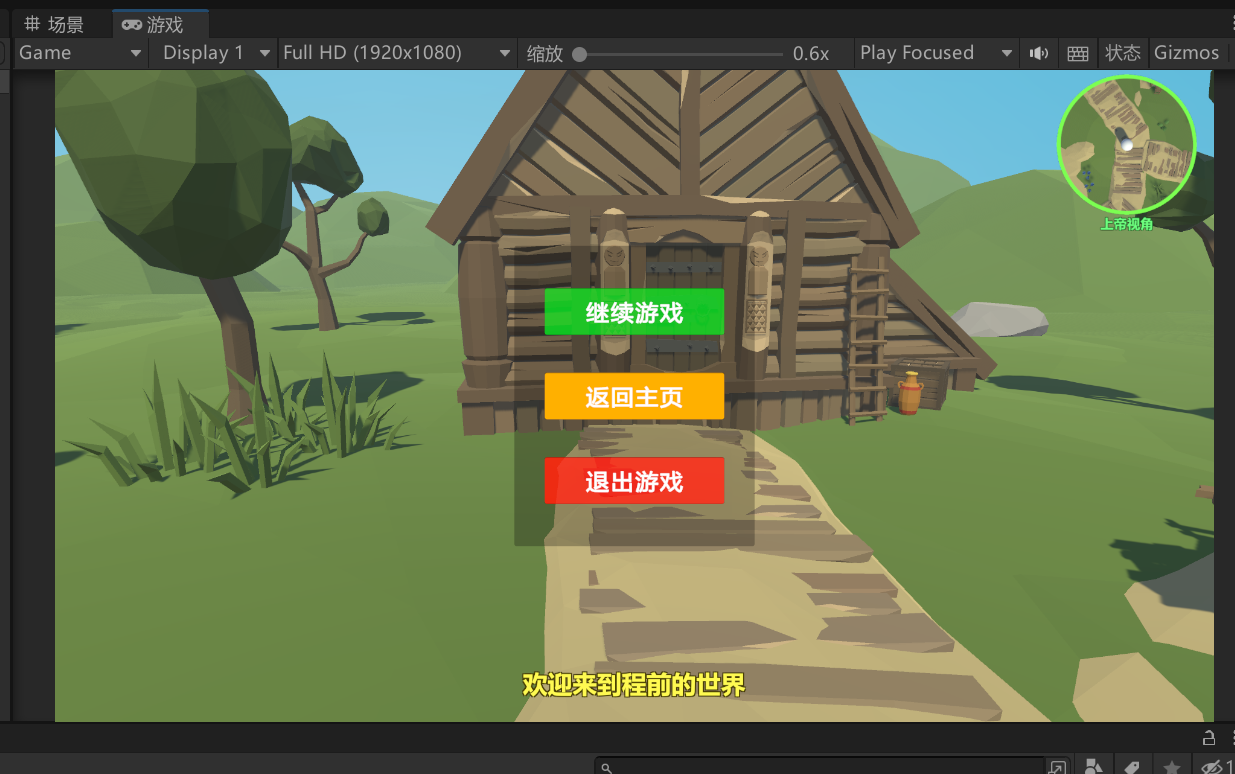
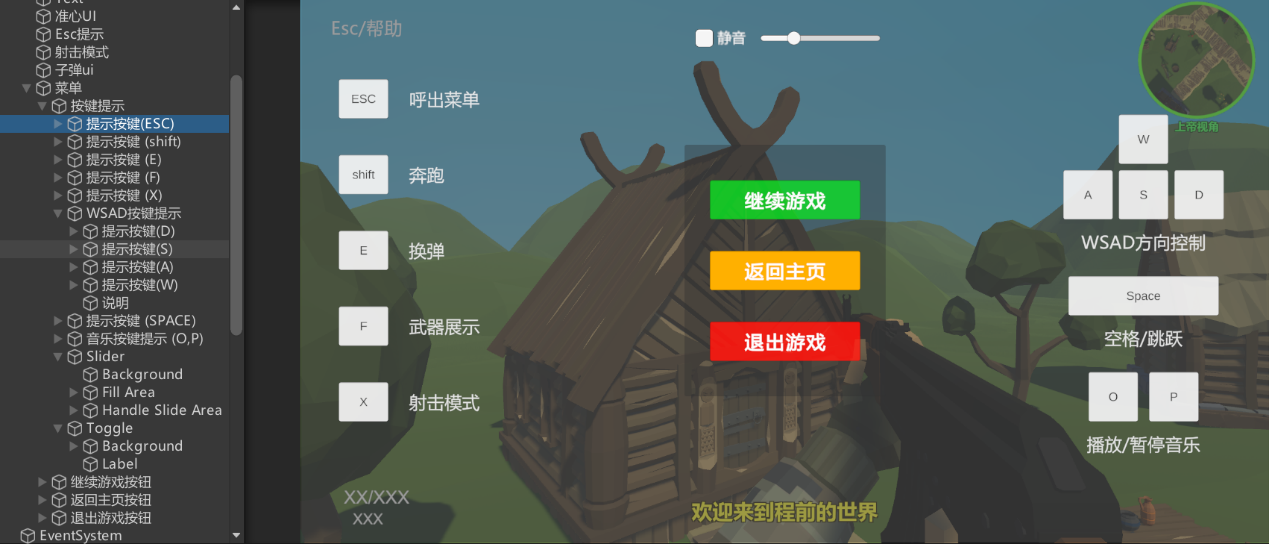
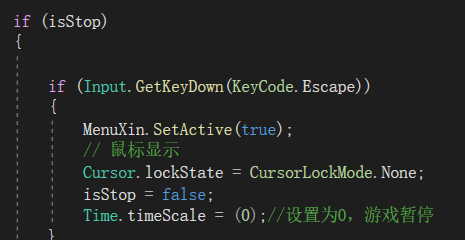
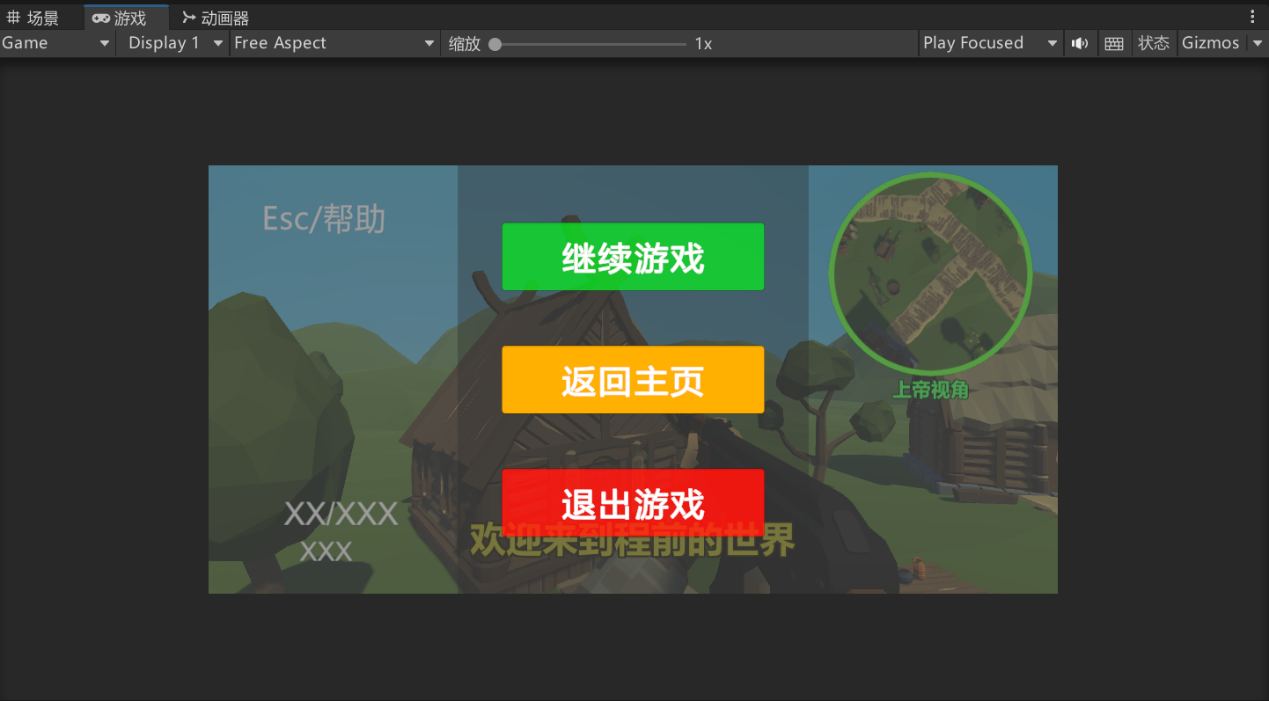
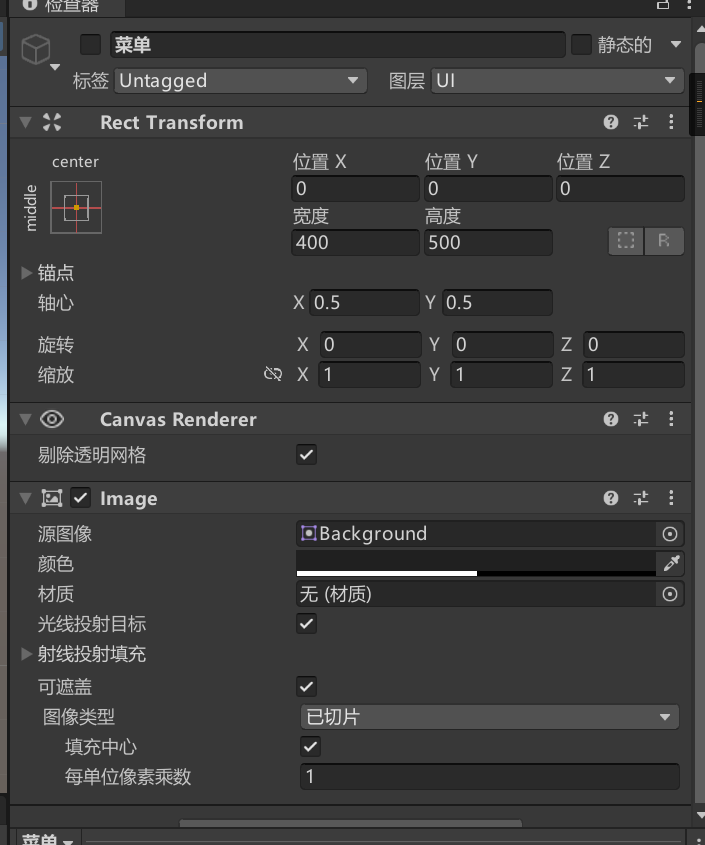
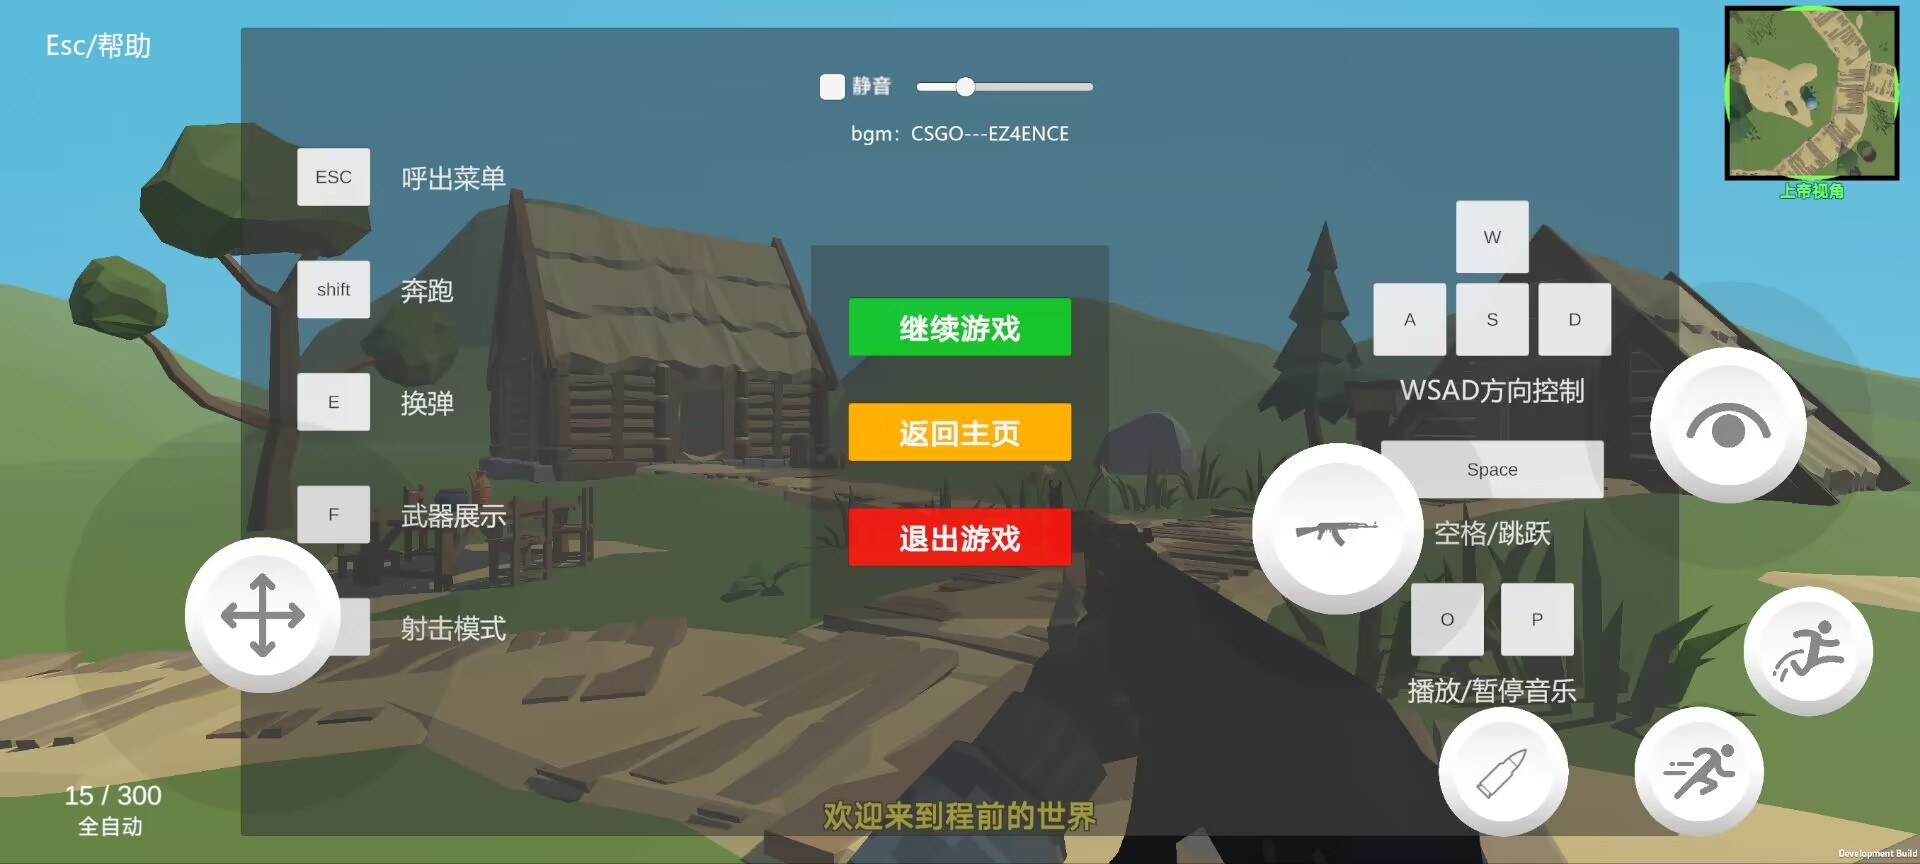
(9)设置游戏菜单
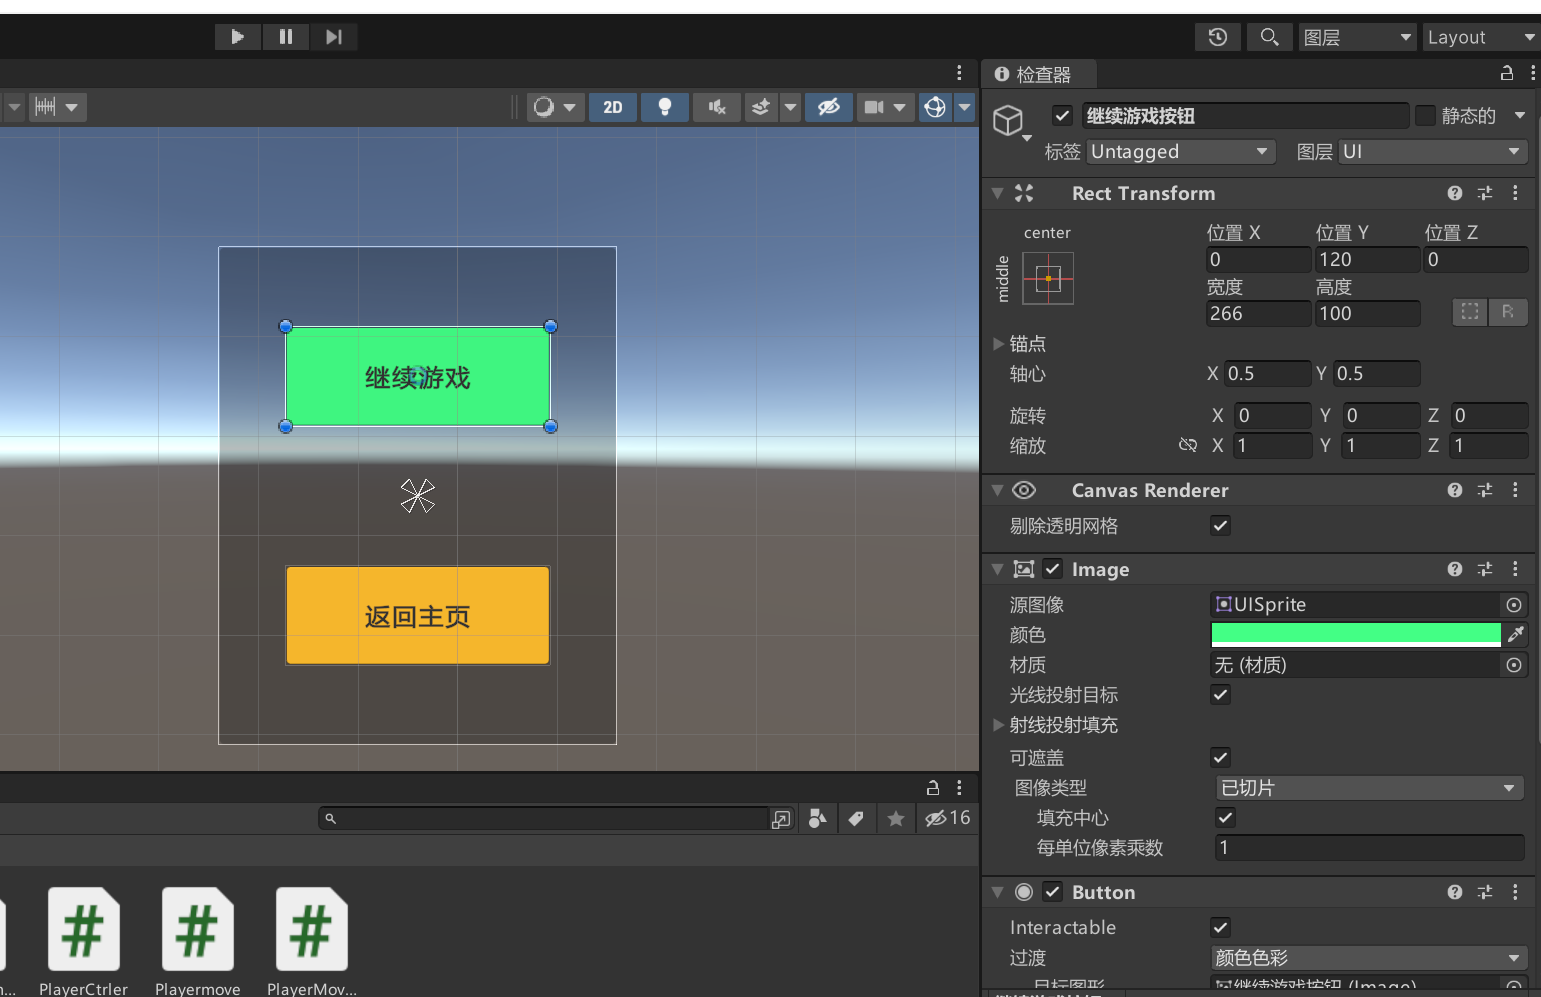
设计ui,添加按钮
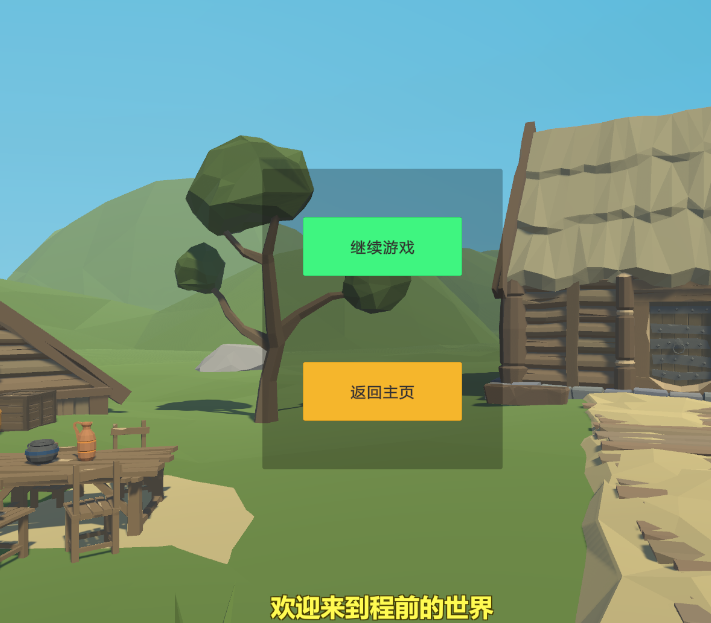
预览,然后再美化一下
接下来设计脚本。
using System.Collections;
using System.Collections.Generic;
using UnityEngine;
using UnityEngine.SceneManagement;
public class menu : MonoBehaviour
{
public GameObject MenuXin;
public bool isStop = true;
// Start is called before the first frame update
void Start()
{
}
// Update is called once per frame
void Update()
{
if (isStop)
{
if (Input.GetKeyDown(KeyCode.Escape))
{
MenuXin.SetActive(true);
// 鼠标显示
Cursor.lockState = CursorLockMode.None;
isStop = false;
Time.timeScale = (0);//设置为0,游戏暂停
}
}
else
{
if (Input.GetKeyDown(KeyCode.Escape))
{
MenuXin.SetActive(false);
// 鼠标锁定并消失
Cursor.lockState = CursorLockMode.Locked;
isStop = true;
Time.timeScale = (1);//设置为1,游戏继续
}
}
}
public void Resume()
{
MenuXin.SetActive(false);
// 鼠标锁定并消失
Cursor.lockState = CursorLockMode.Locked;
isStop = true;
Time.timeScale = (1);//设置为1,游戏继续
}
public void Restart()
{
MenuXin.SetActive(false);
// 鼠标显示
Cursor.lockState = CursorLockMode.None;
isStop = true;
Time.timeScale = (1);//设置为1,游戏继续
SceneManager.LoadScene(0);
}
public void Quit()
{
Application.Quit();
}
}
这里要注意一下这两句话
MenuXin.SetActive(true);//显示/隐藏菜单
Cursor.lockState = CursorLockMode.None;//接触鼠标锁定
剩下的也都是基础的设计逻辑
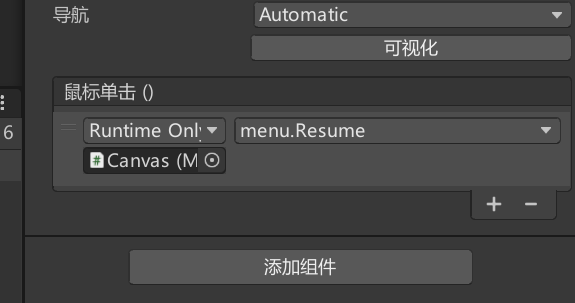
绑定按钮
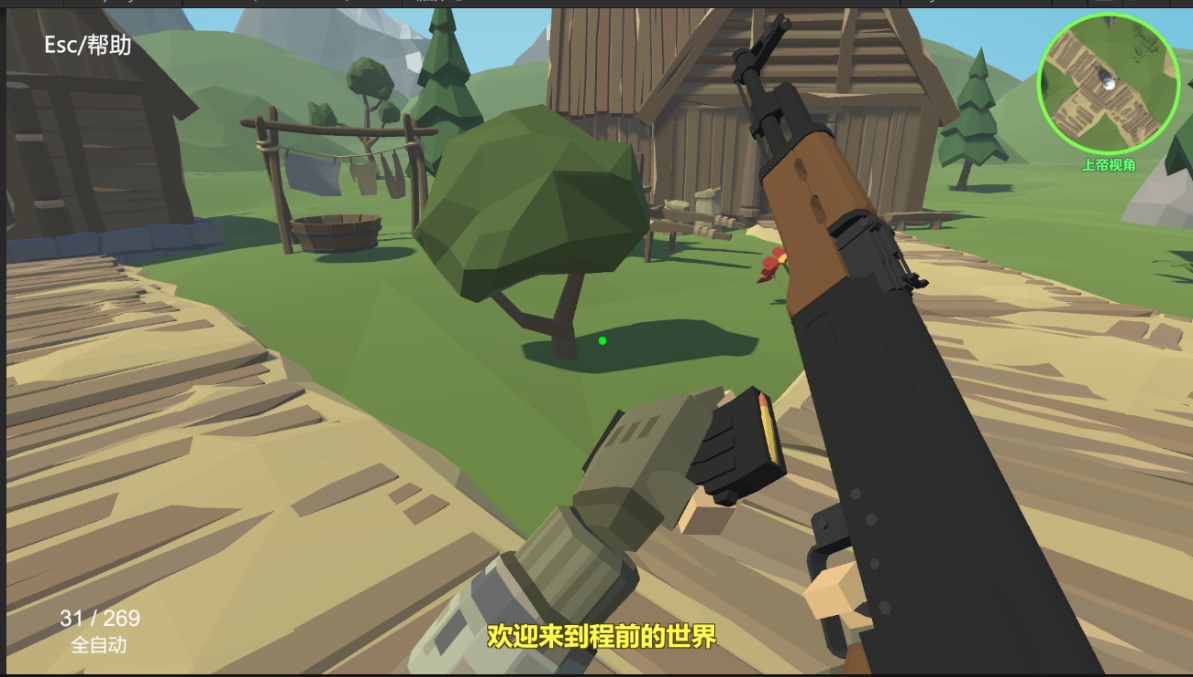
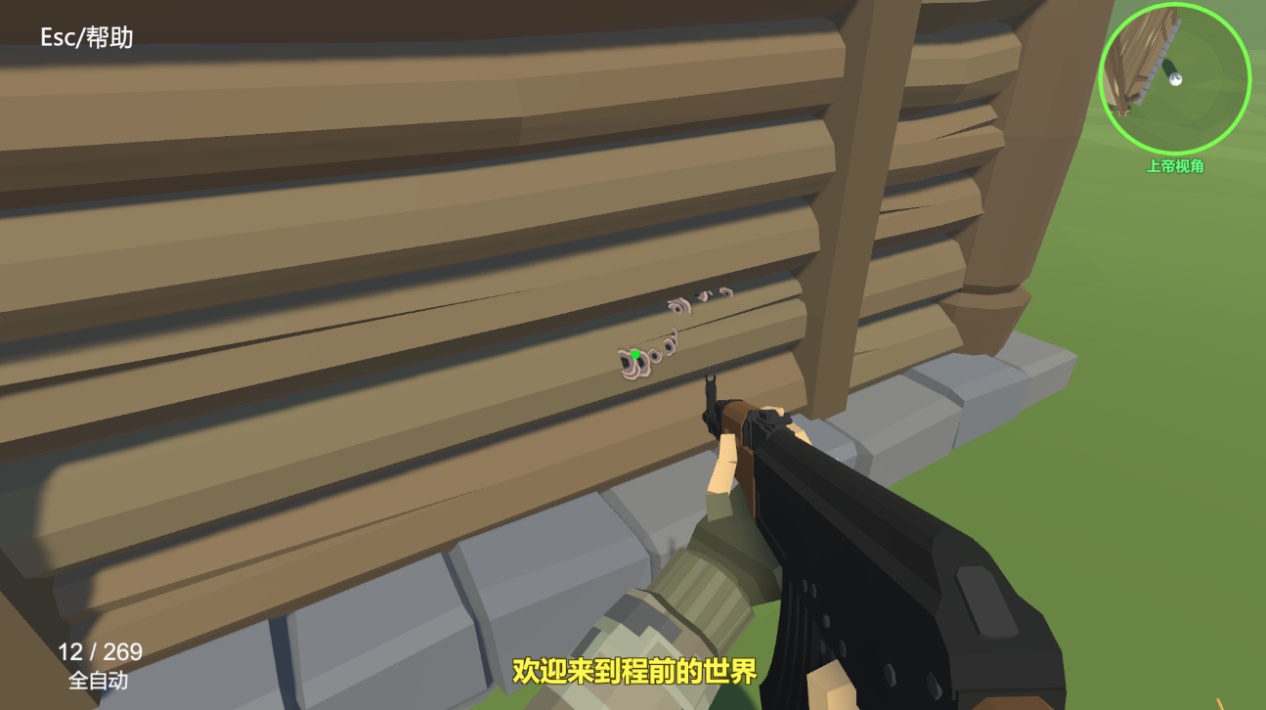
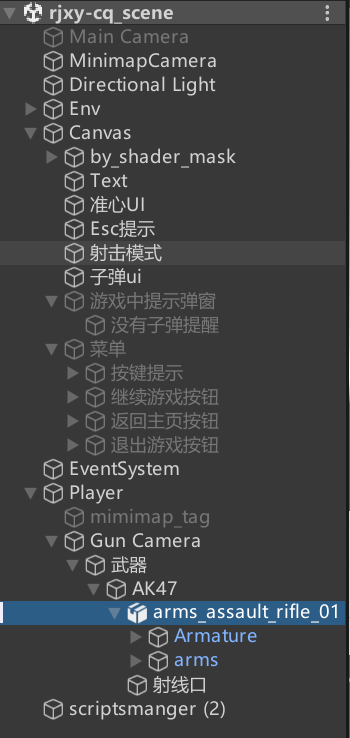
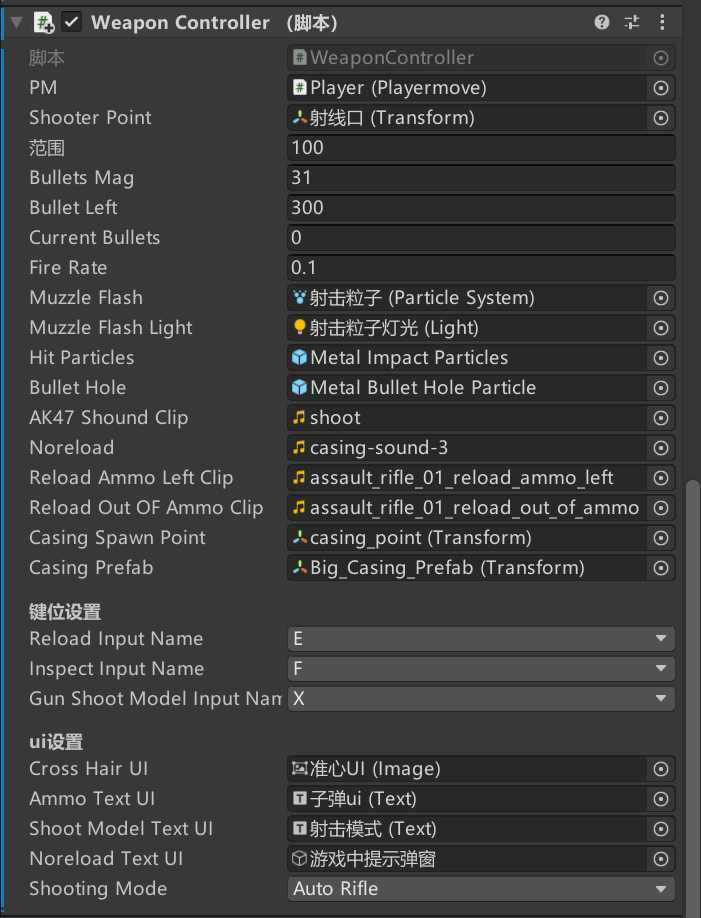
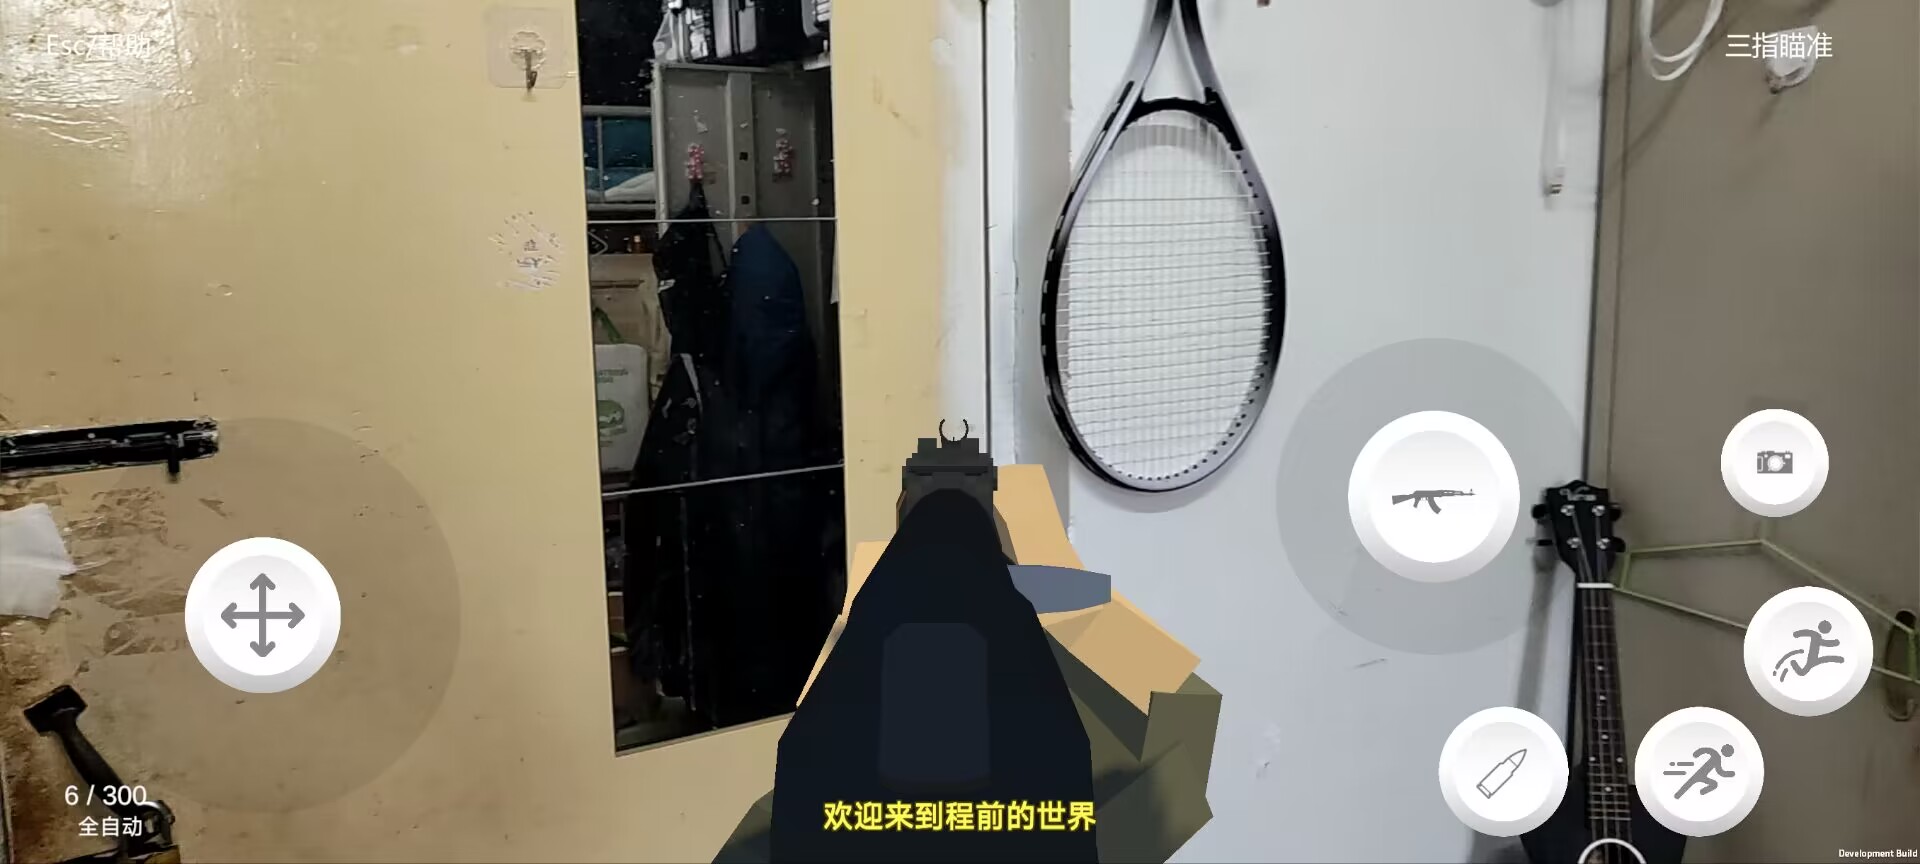
(10)了解射线,实现射击

在player/GunCamera下拖入枪的模型
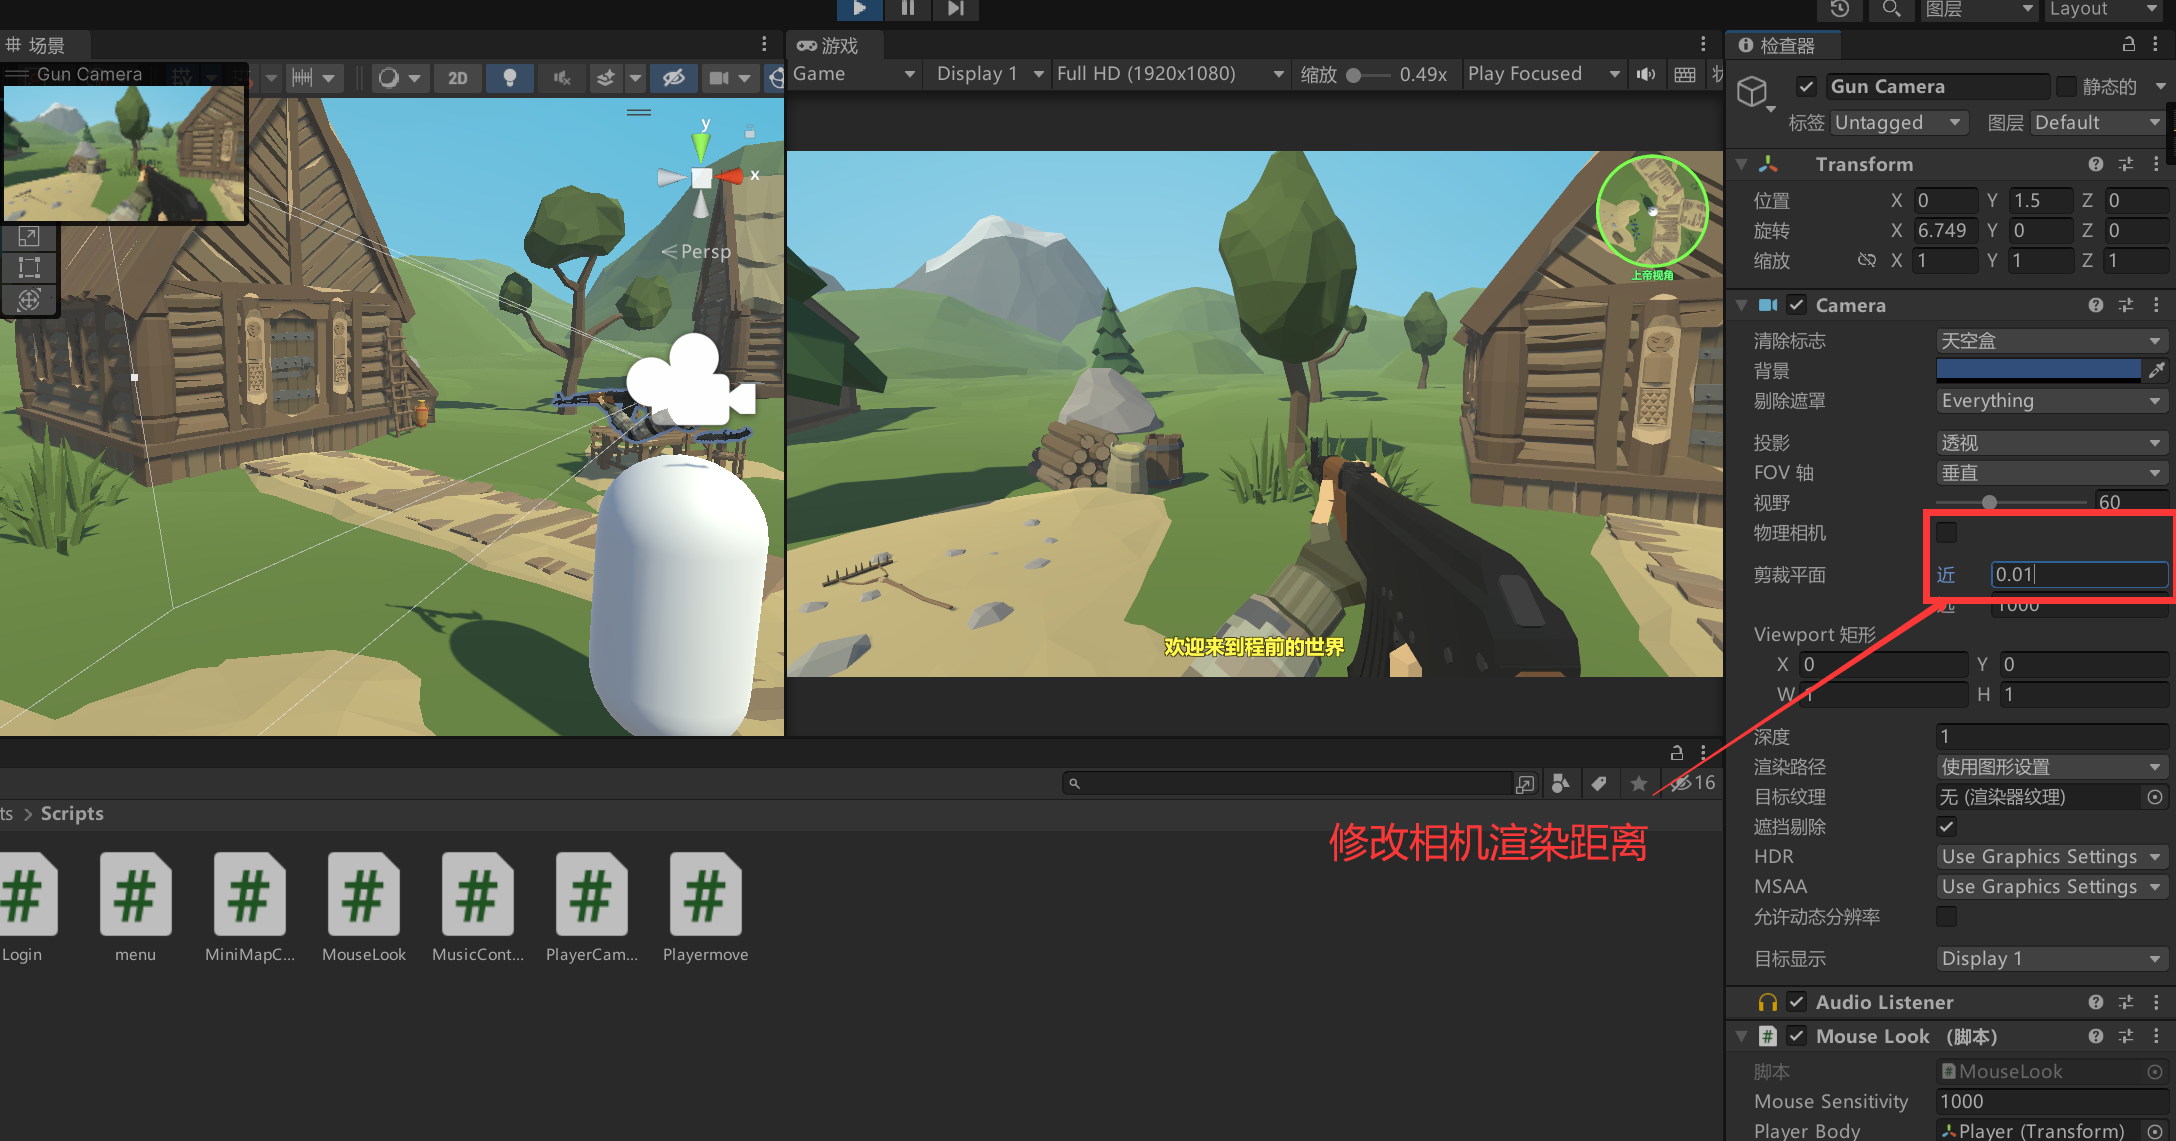
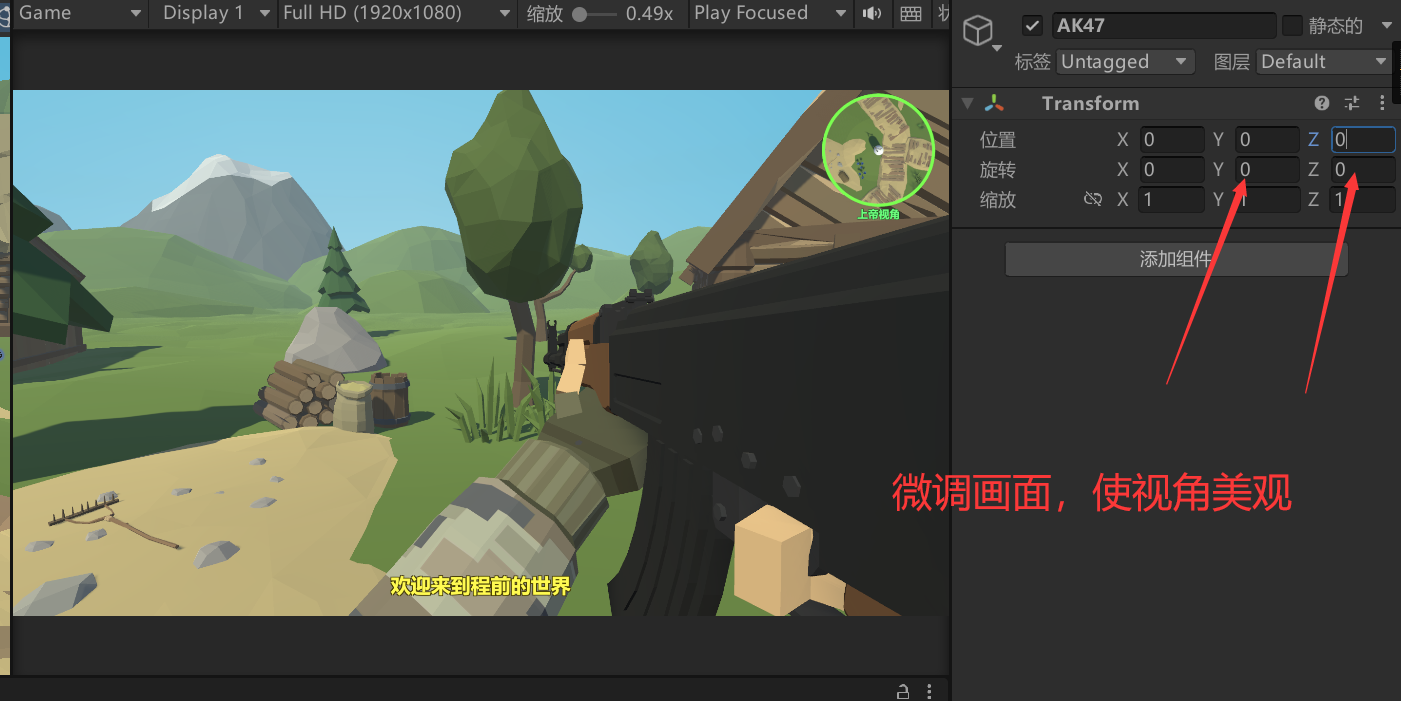
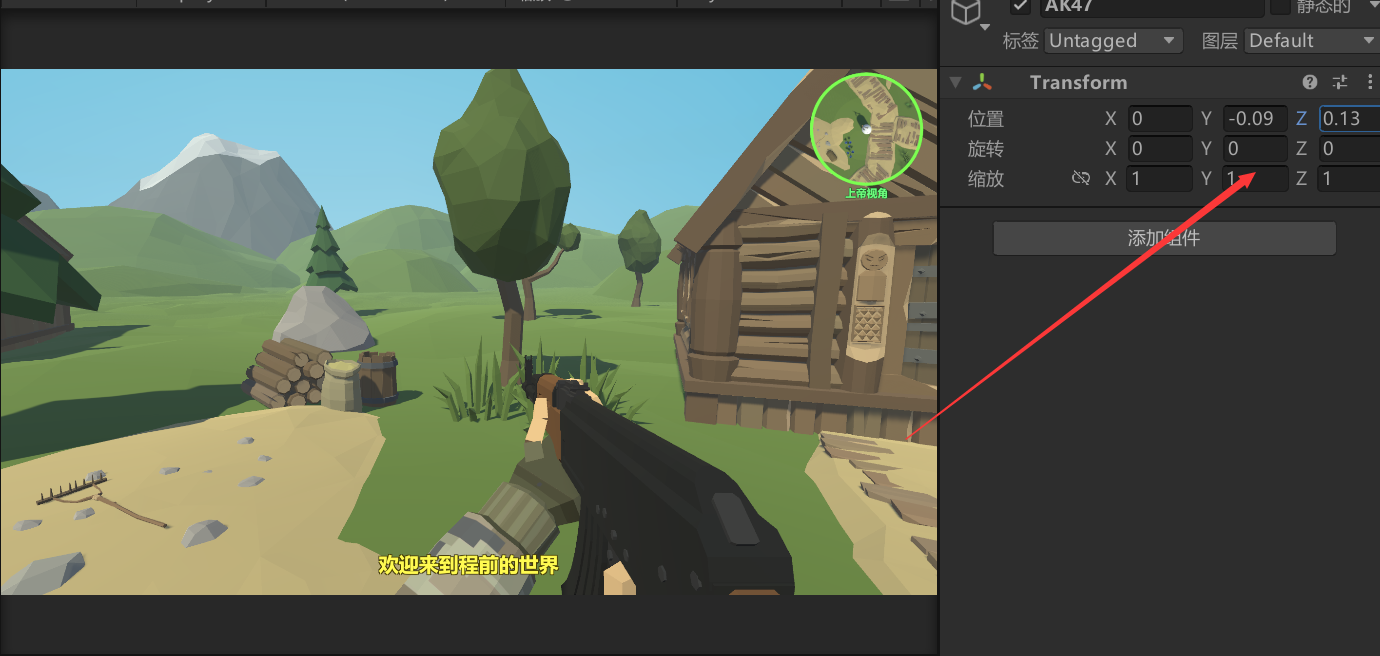
然后添加准心
在刚刚的画布下新建图片ui。
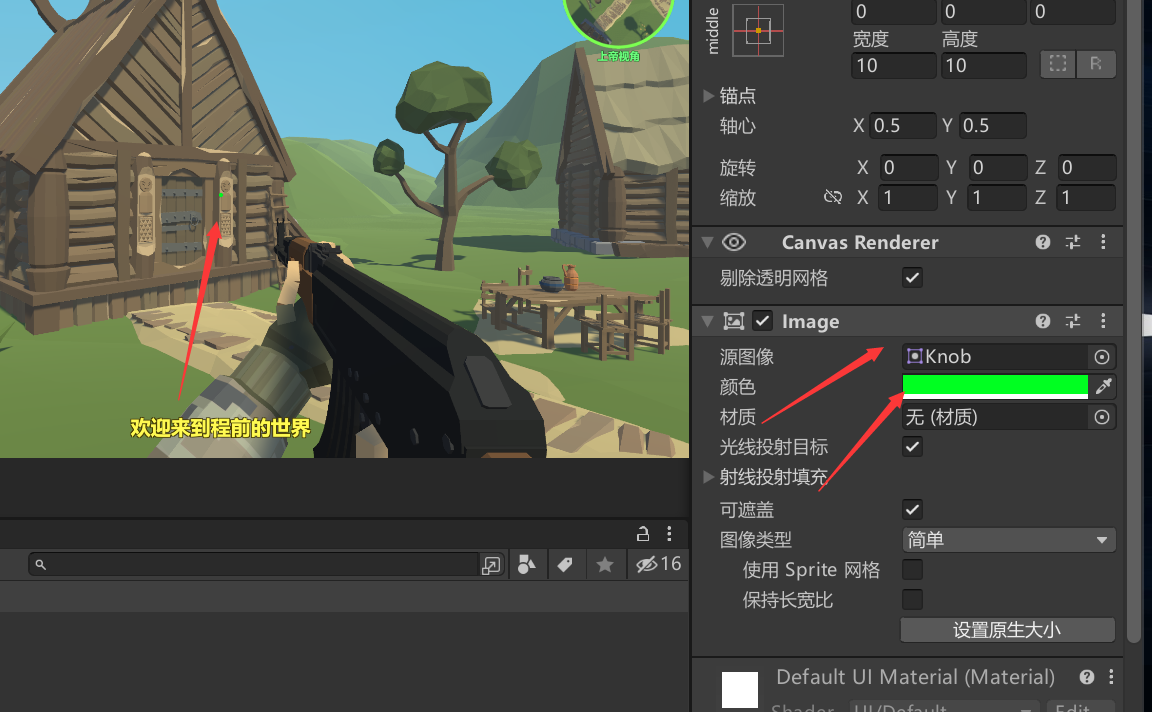
调整颜色大小,置于中心,改为绿色充当我们的准心。

同时设置空对象—射线口,调整位置到枪口位置,用来发射射线
写代码,创建对象
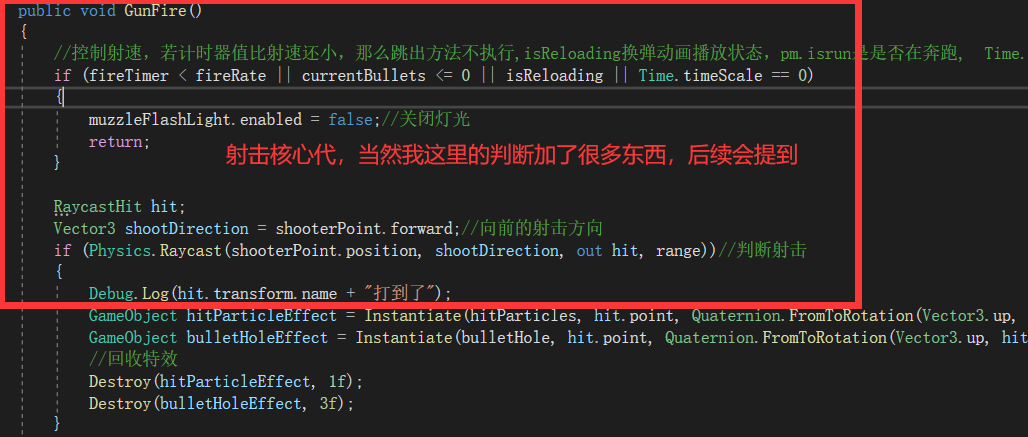
实现射击的核心代码
这里比较难的是引入射线检测这个函数。
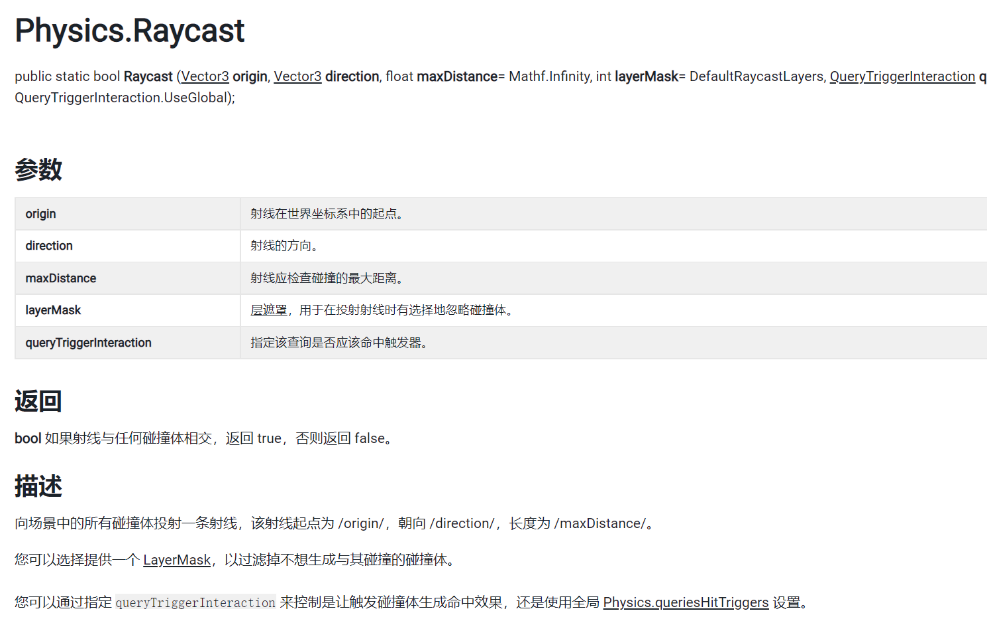
origin 射线在世界坐标系中的起点。
direction 射线的方向。
maxDistance 射线应检查碰撞的最大距离。
layerMask [层遮罩]{.underline},用于在投射射线时有选择地忽略碰撞体。
queryTriggerInteraction 指定该查询是否应该命中触发器。
所以这里我们写Physics.Raycast(shooterPoint.position, shootDirection, out
hit, range)来判断射击。
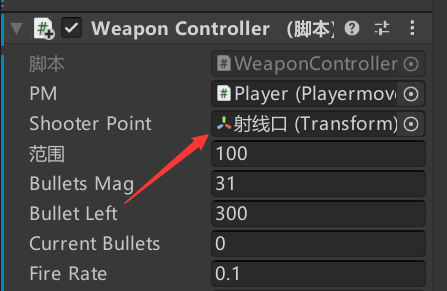
将刚刚创建的空对象—射线口拖入到这里,供脚本调用。

查看debug.log的输出内容,我们可以看到,射线已经生效了。
(11)实现射速控制
不加射速控制的射线,在游戏里是不能正常对战的。因为一秒不到就能射完一个弹夹的子弹,太离谱了。所以我们要设置一个量去影响它的射击间隔时间。
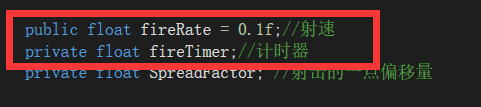

它存在的目的就是为了控制发射的。
当射击计时器小于咱们预设的射速值的话,直接返回return,不进行射击。这样就可以良好的控制射击间隔啦。
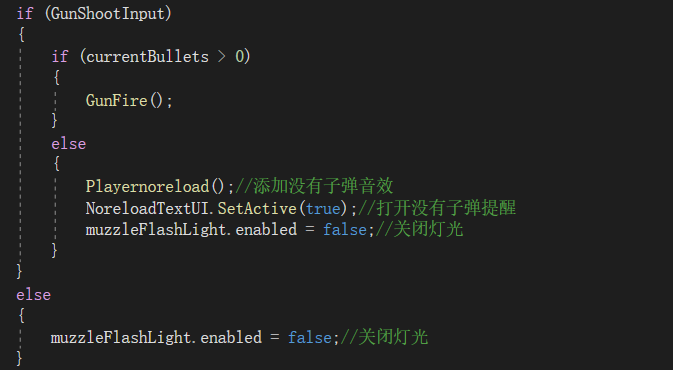
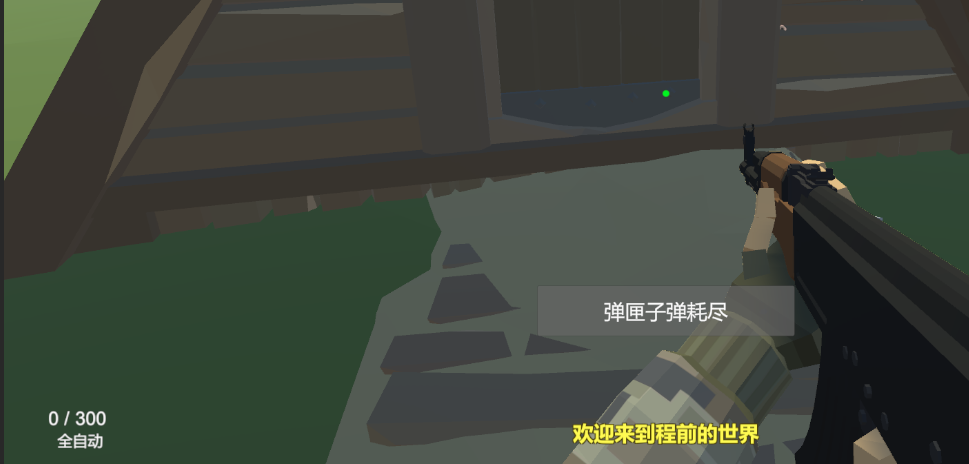
(12)设计射击子弹数量,打空一个弹夹

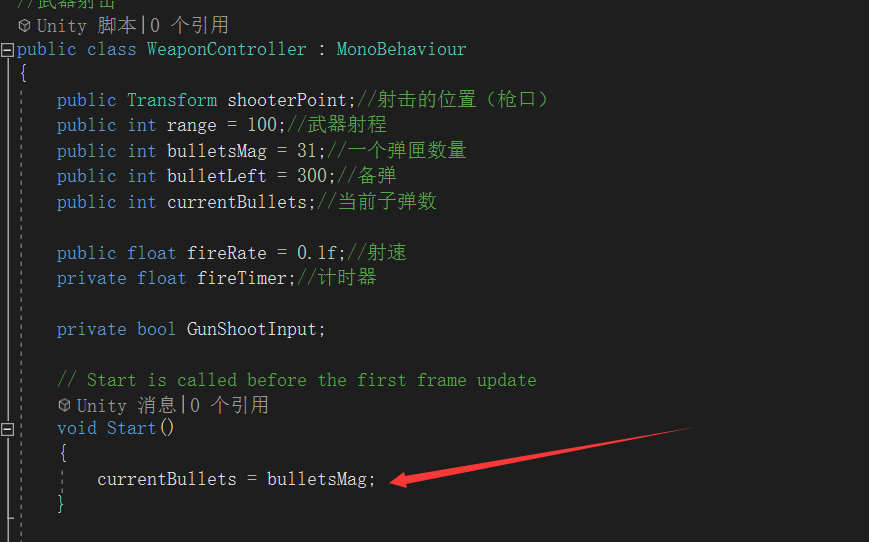
开始前将一个弹夹的子弹数,赋值给现有子弹数。
设置参数,每次射后使用 来减少一颗子弹。

开火之前进行判断,如果现有子弹数小于等于0,不进行开火。
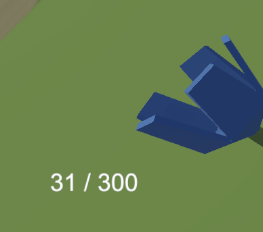
(12)增加子弹显示界面ui

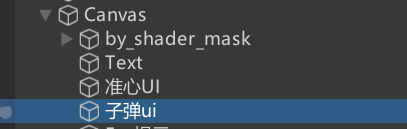
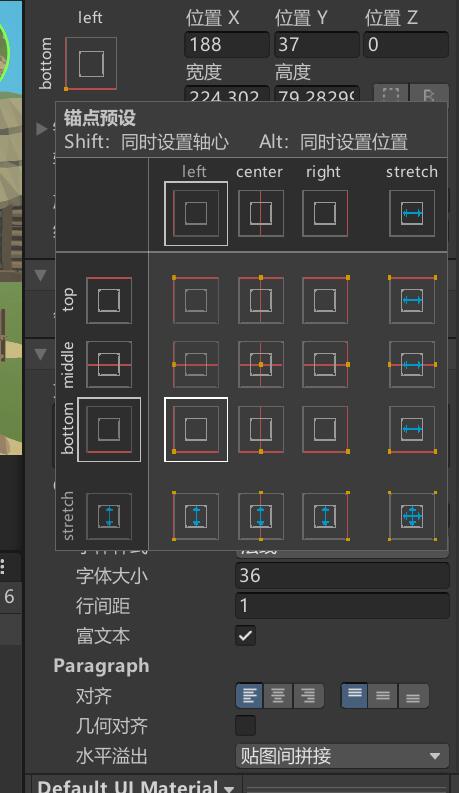

效果展示
然后定义数据
放入start()和开火方法里。
把对象拖入脚本,每次开火后ui显示的子弹数会发生变化。
(13)实现子弹的装填

设置键位

书写判断 调用方法
简单的逻辑代码
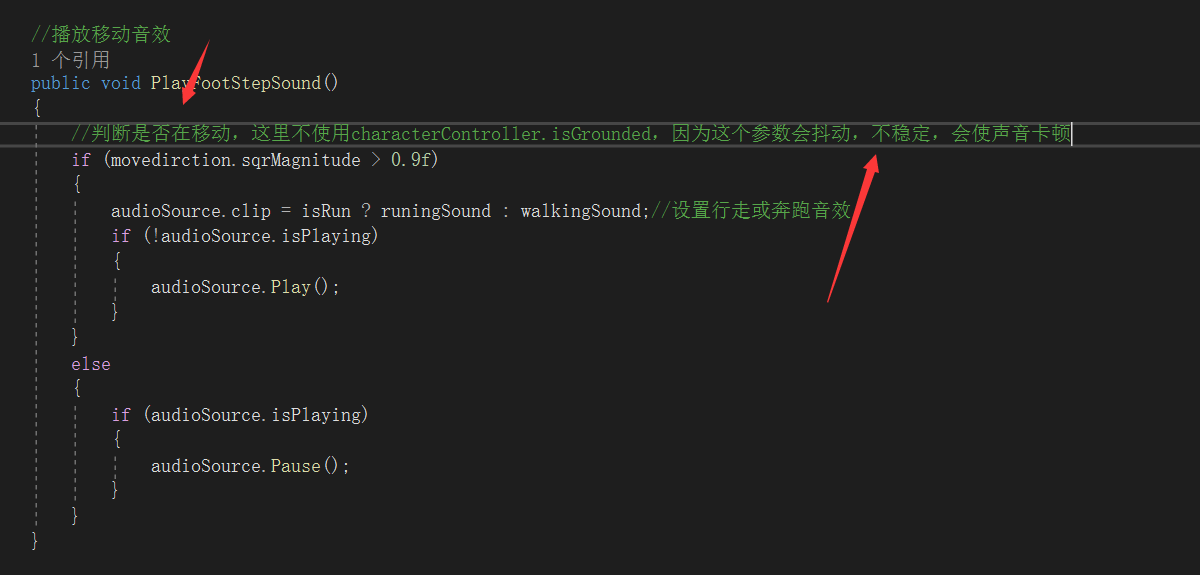
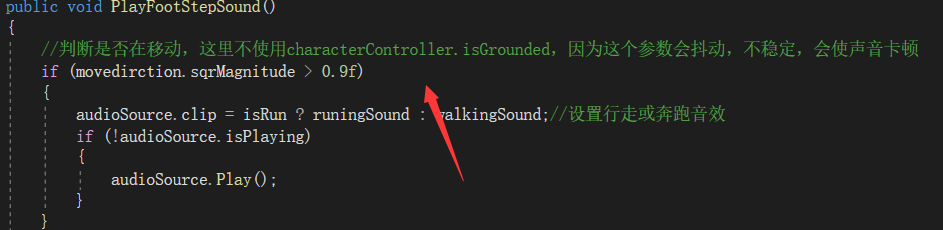
(15)人物行走奔跑脚步声
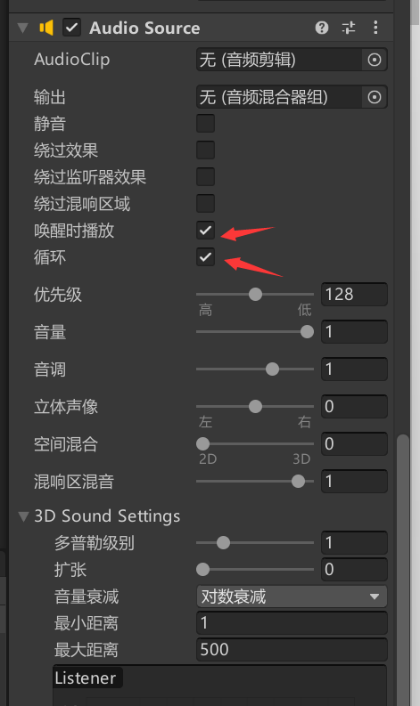
给player添加audio source
设置公共变量

设置对应音效
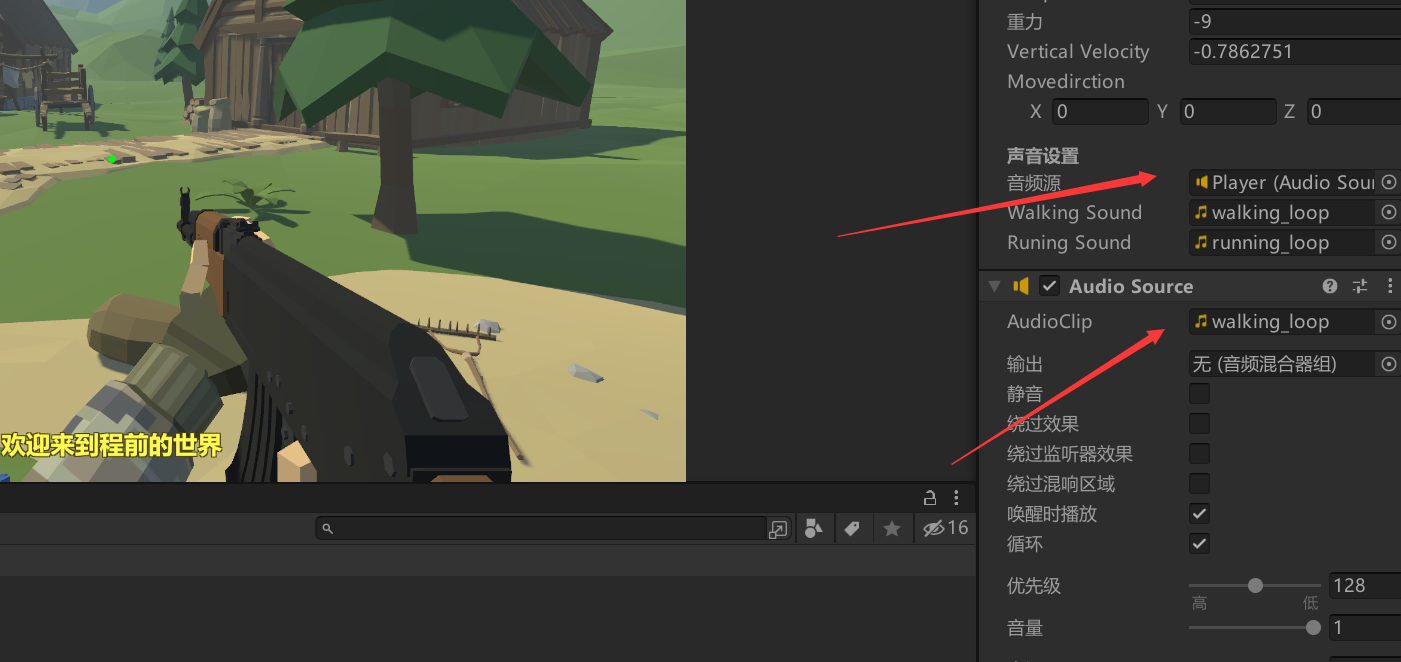
可以看到已经成功播放了。
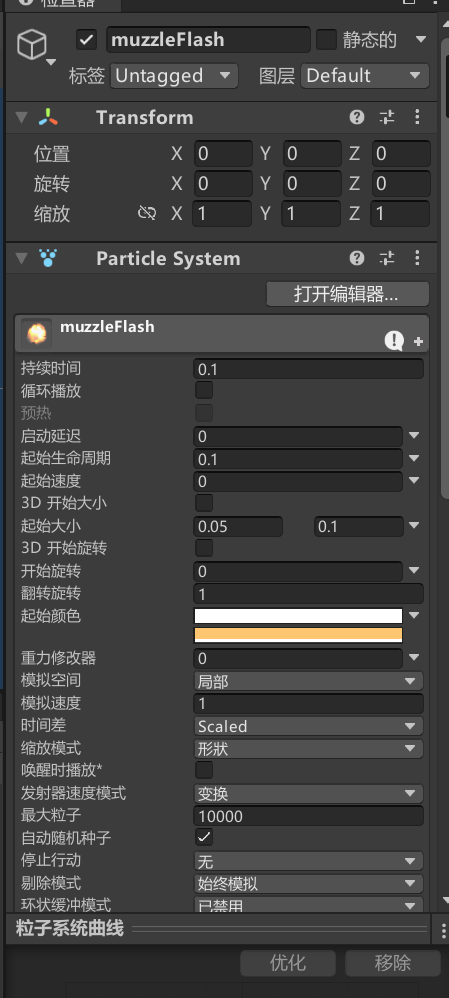
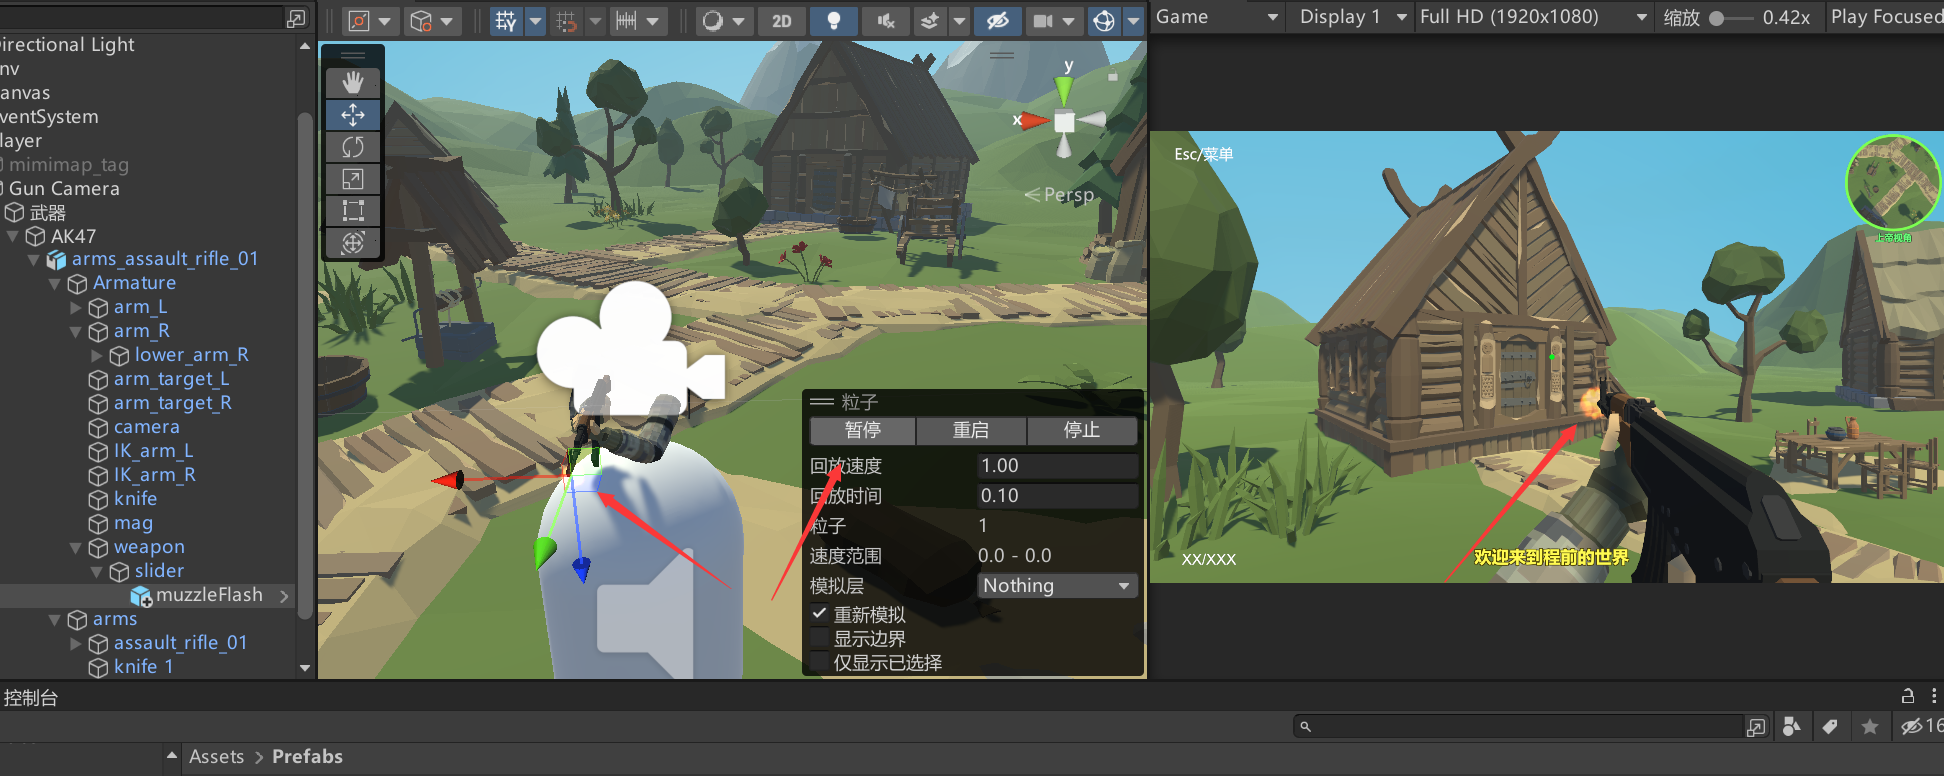
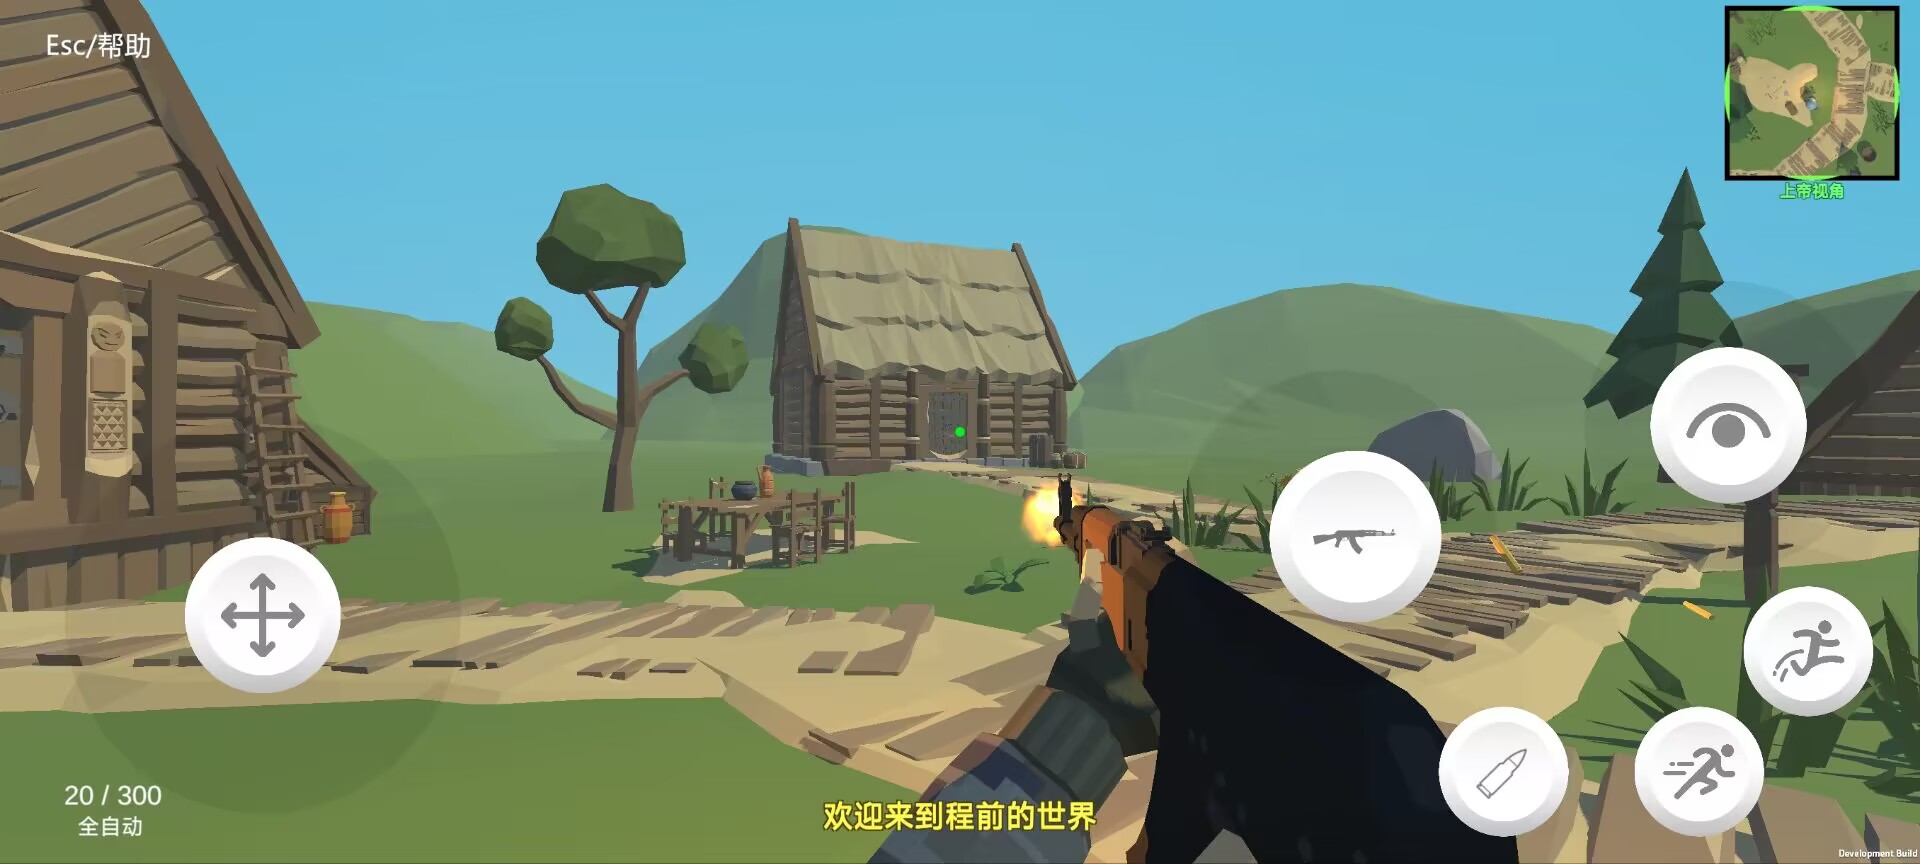
(16)添加枪口火焰,声音,光效
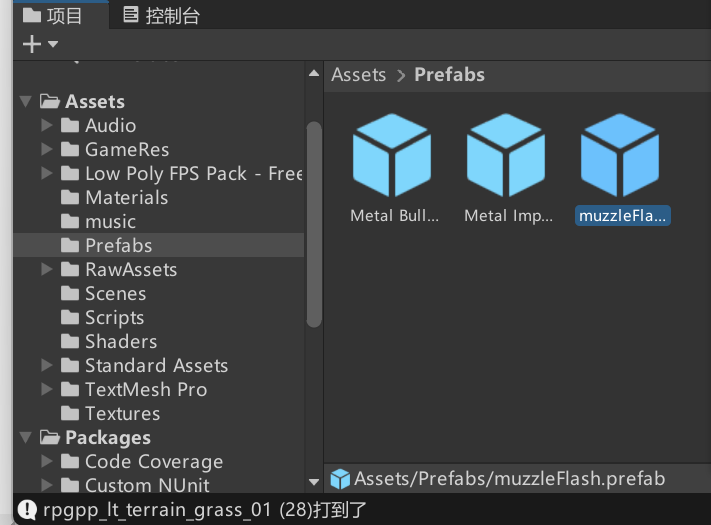
找到枪口开火粒子特效
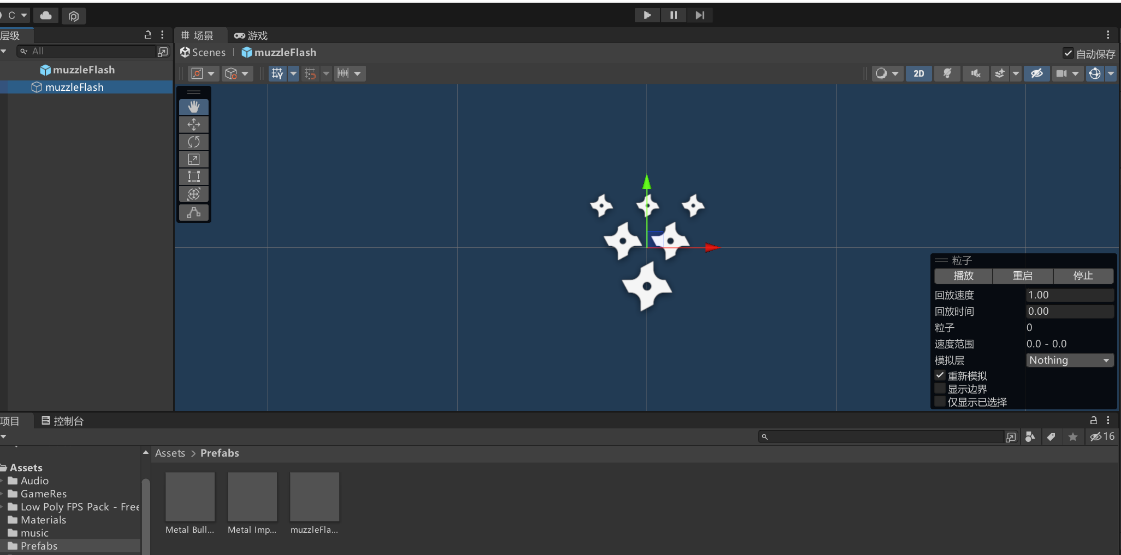
播放查看效果

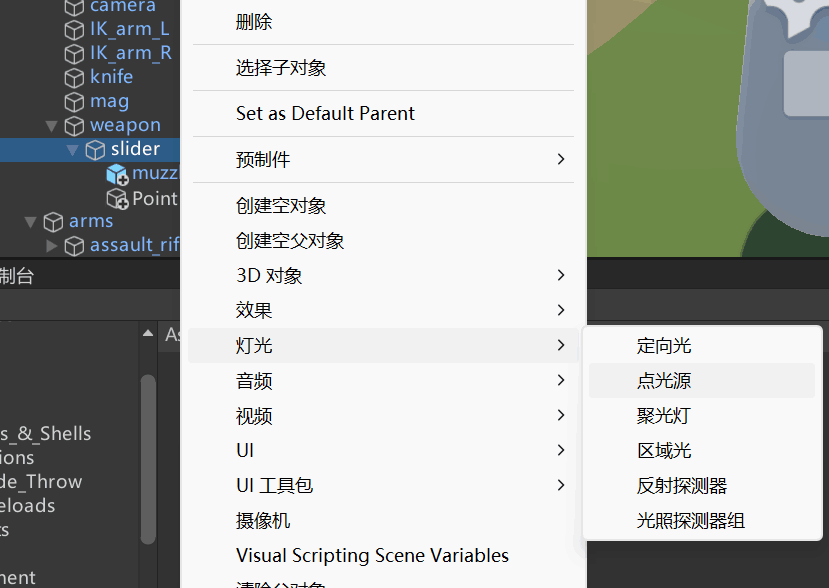
添加粒子和点光照

手册介绍

调整粒子位置


设置变量
设计播放音效方法
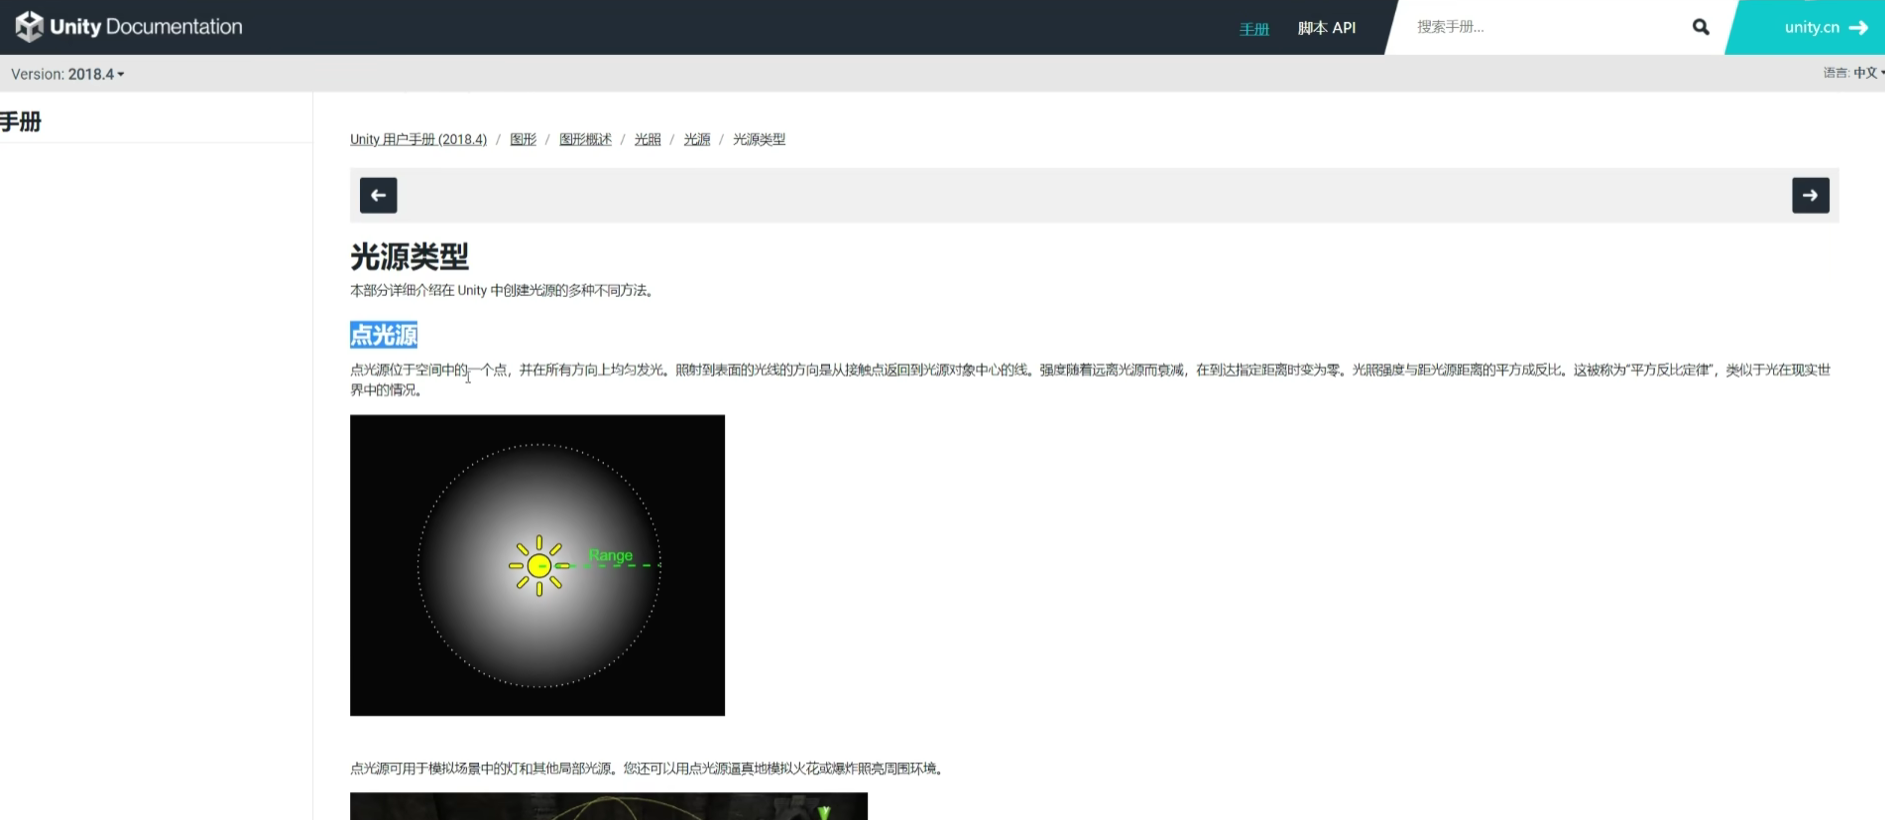
官方手册对点光源介绍
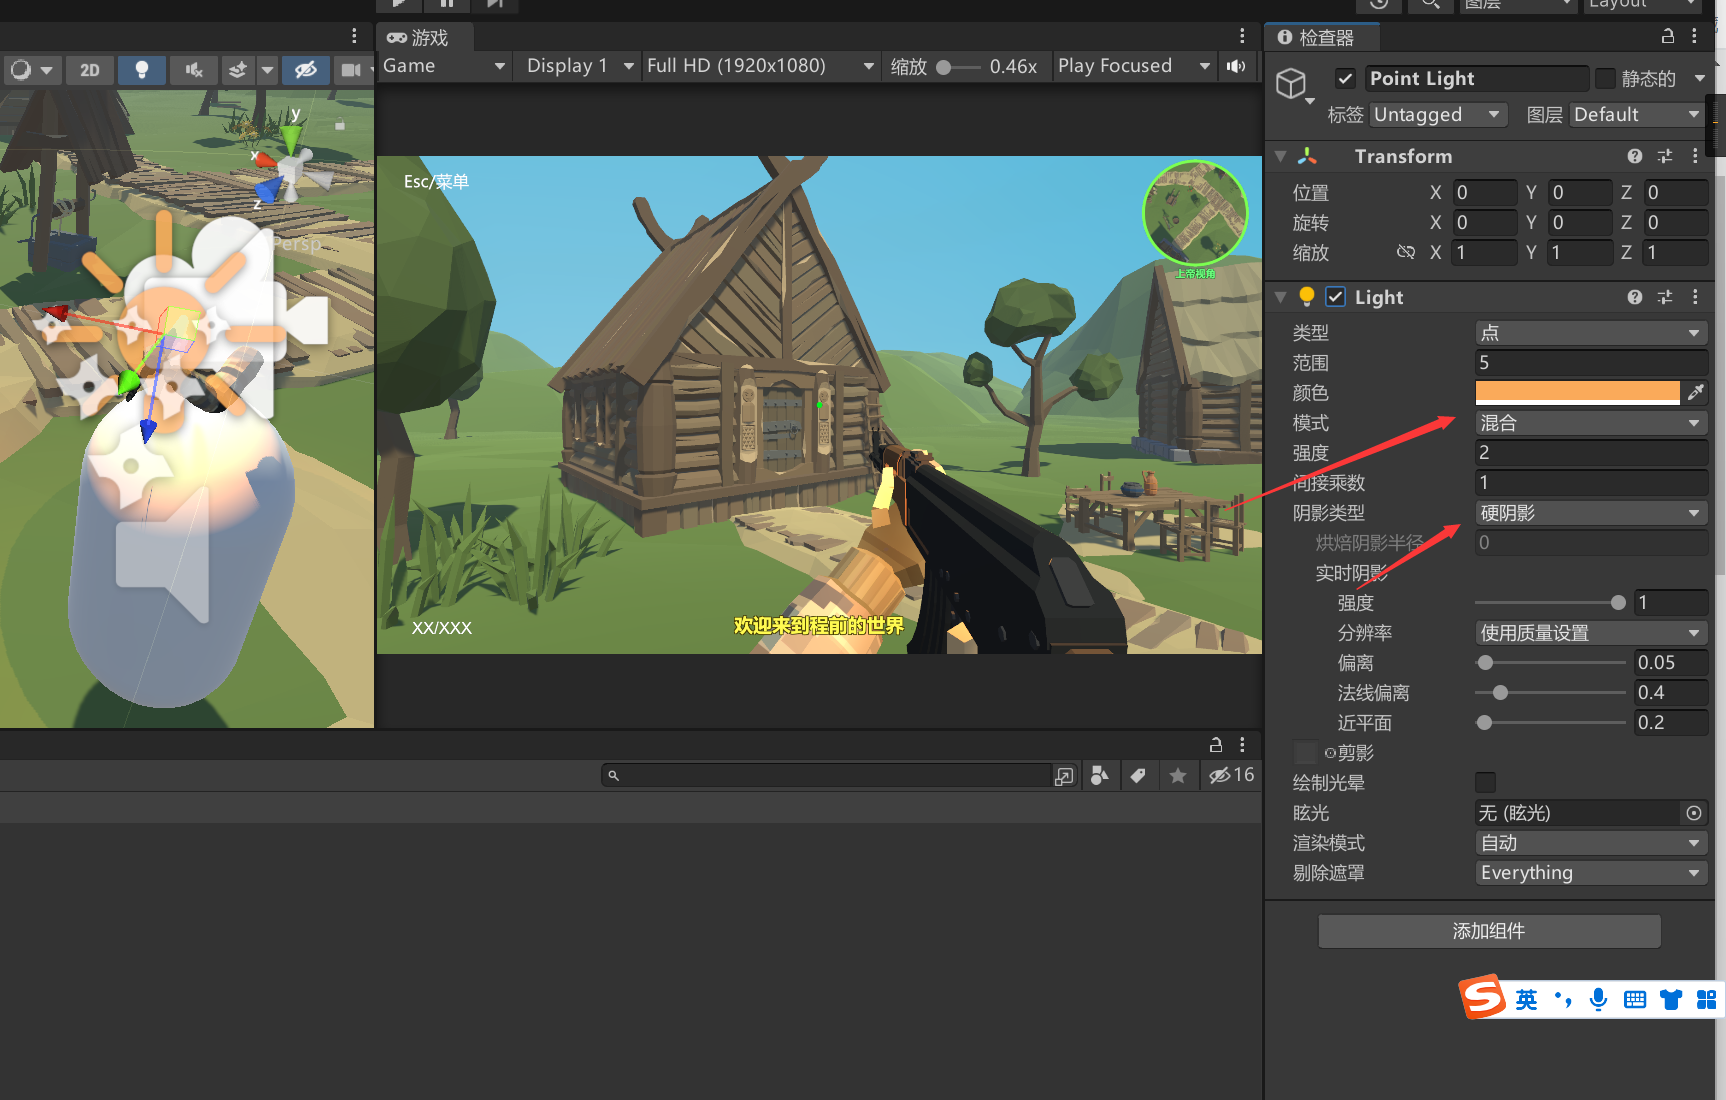
设置颜色 范围 强度等等参数
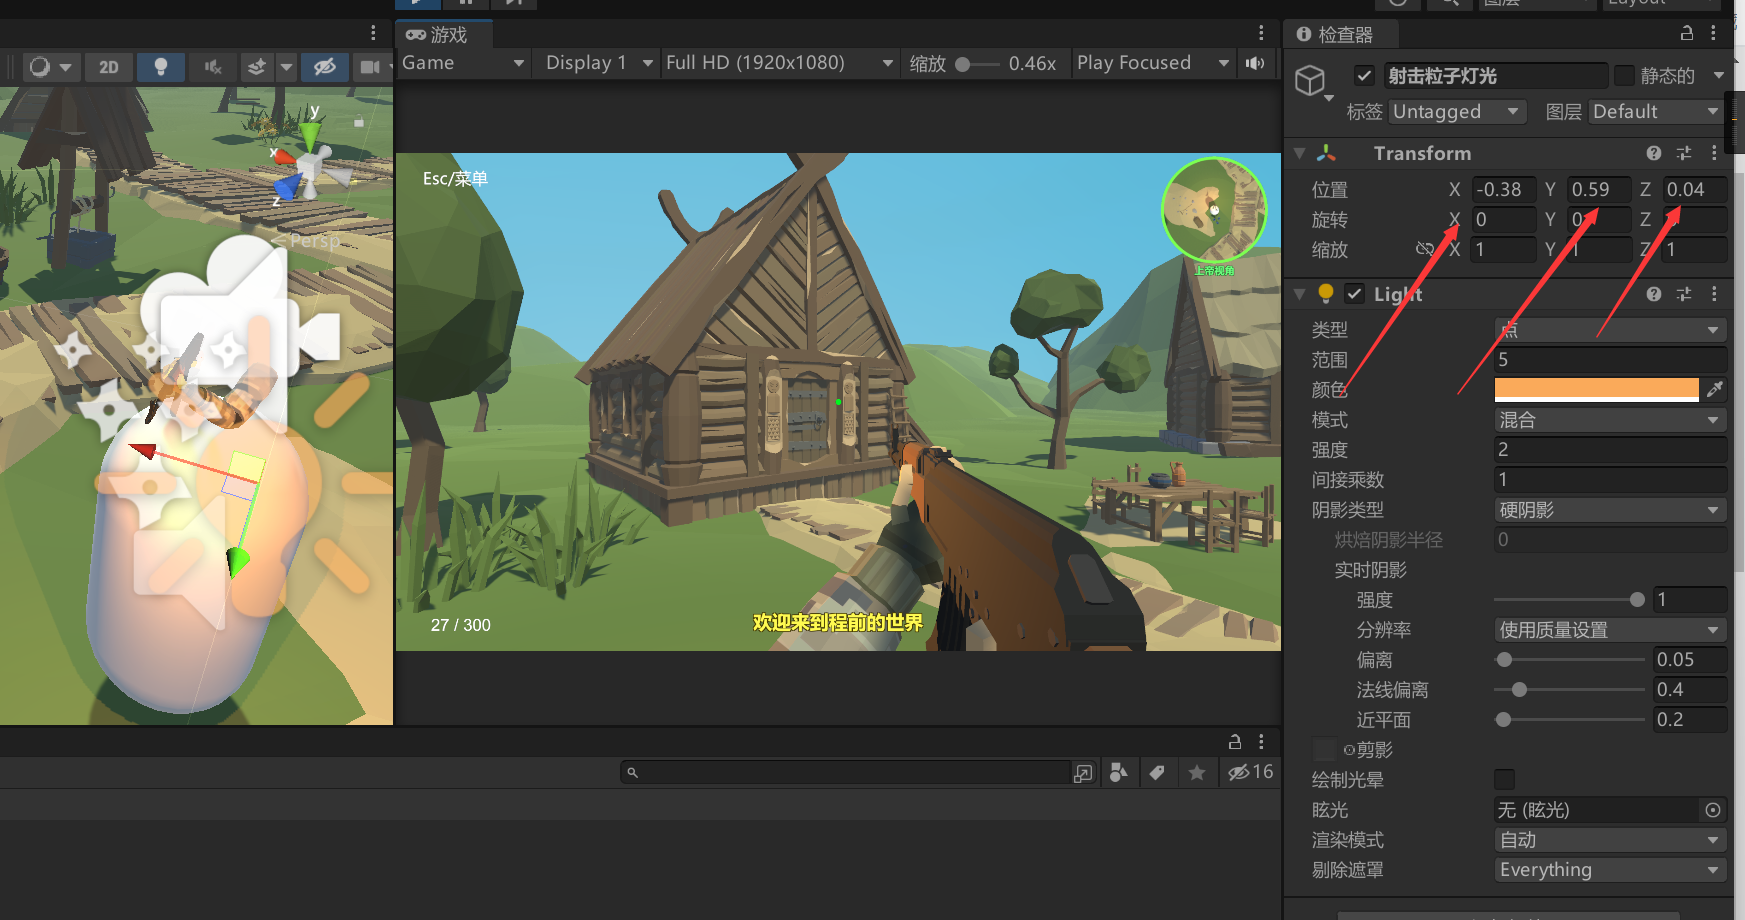
设置光源位置,逐渐逼真起来。
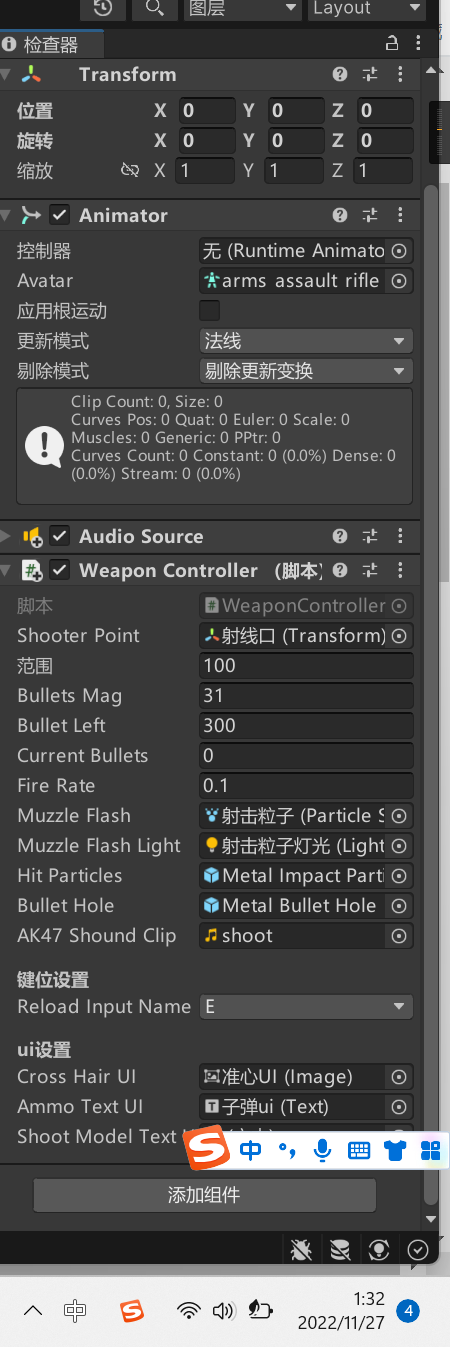
把对象拖入脚本对应的公共变量
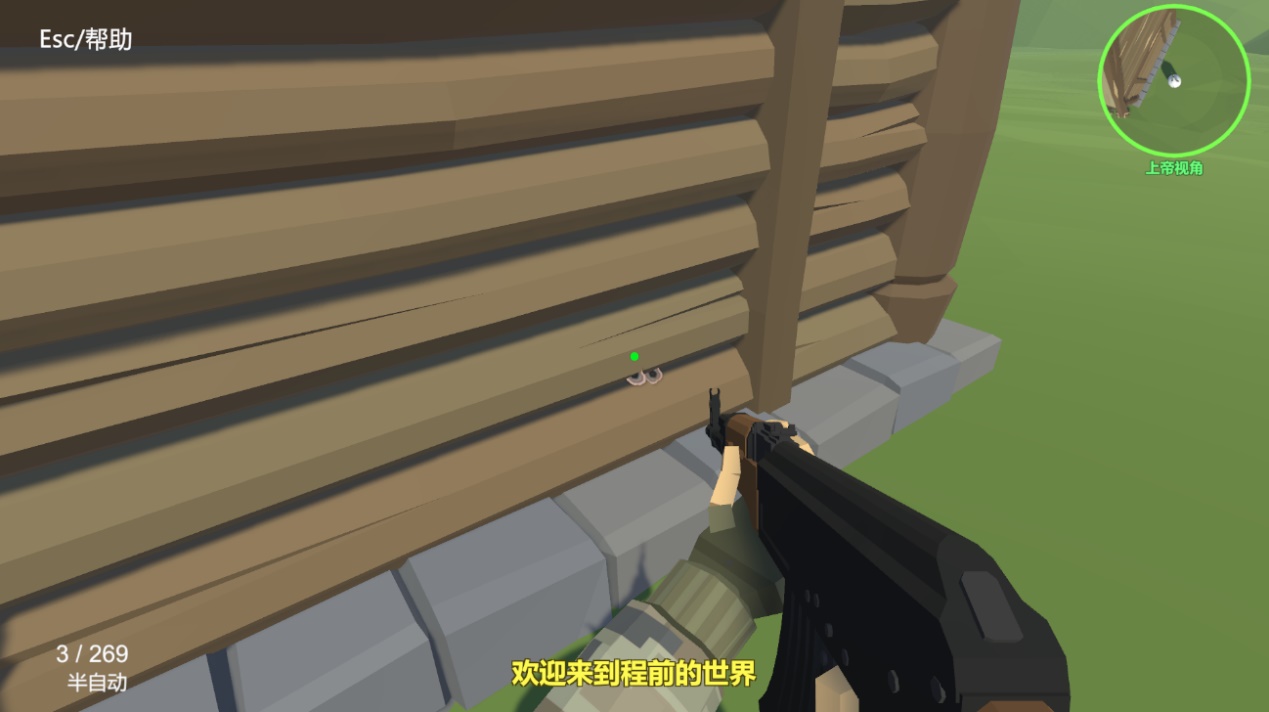
(17)添加弹孔和火花特效
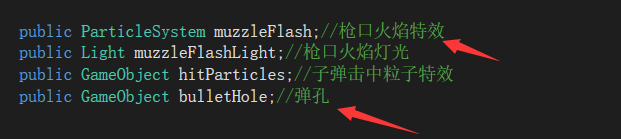
设置变量


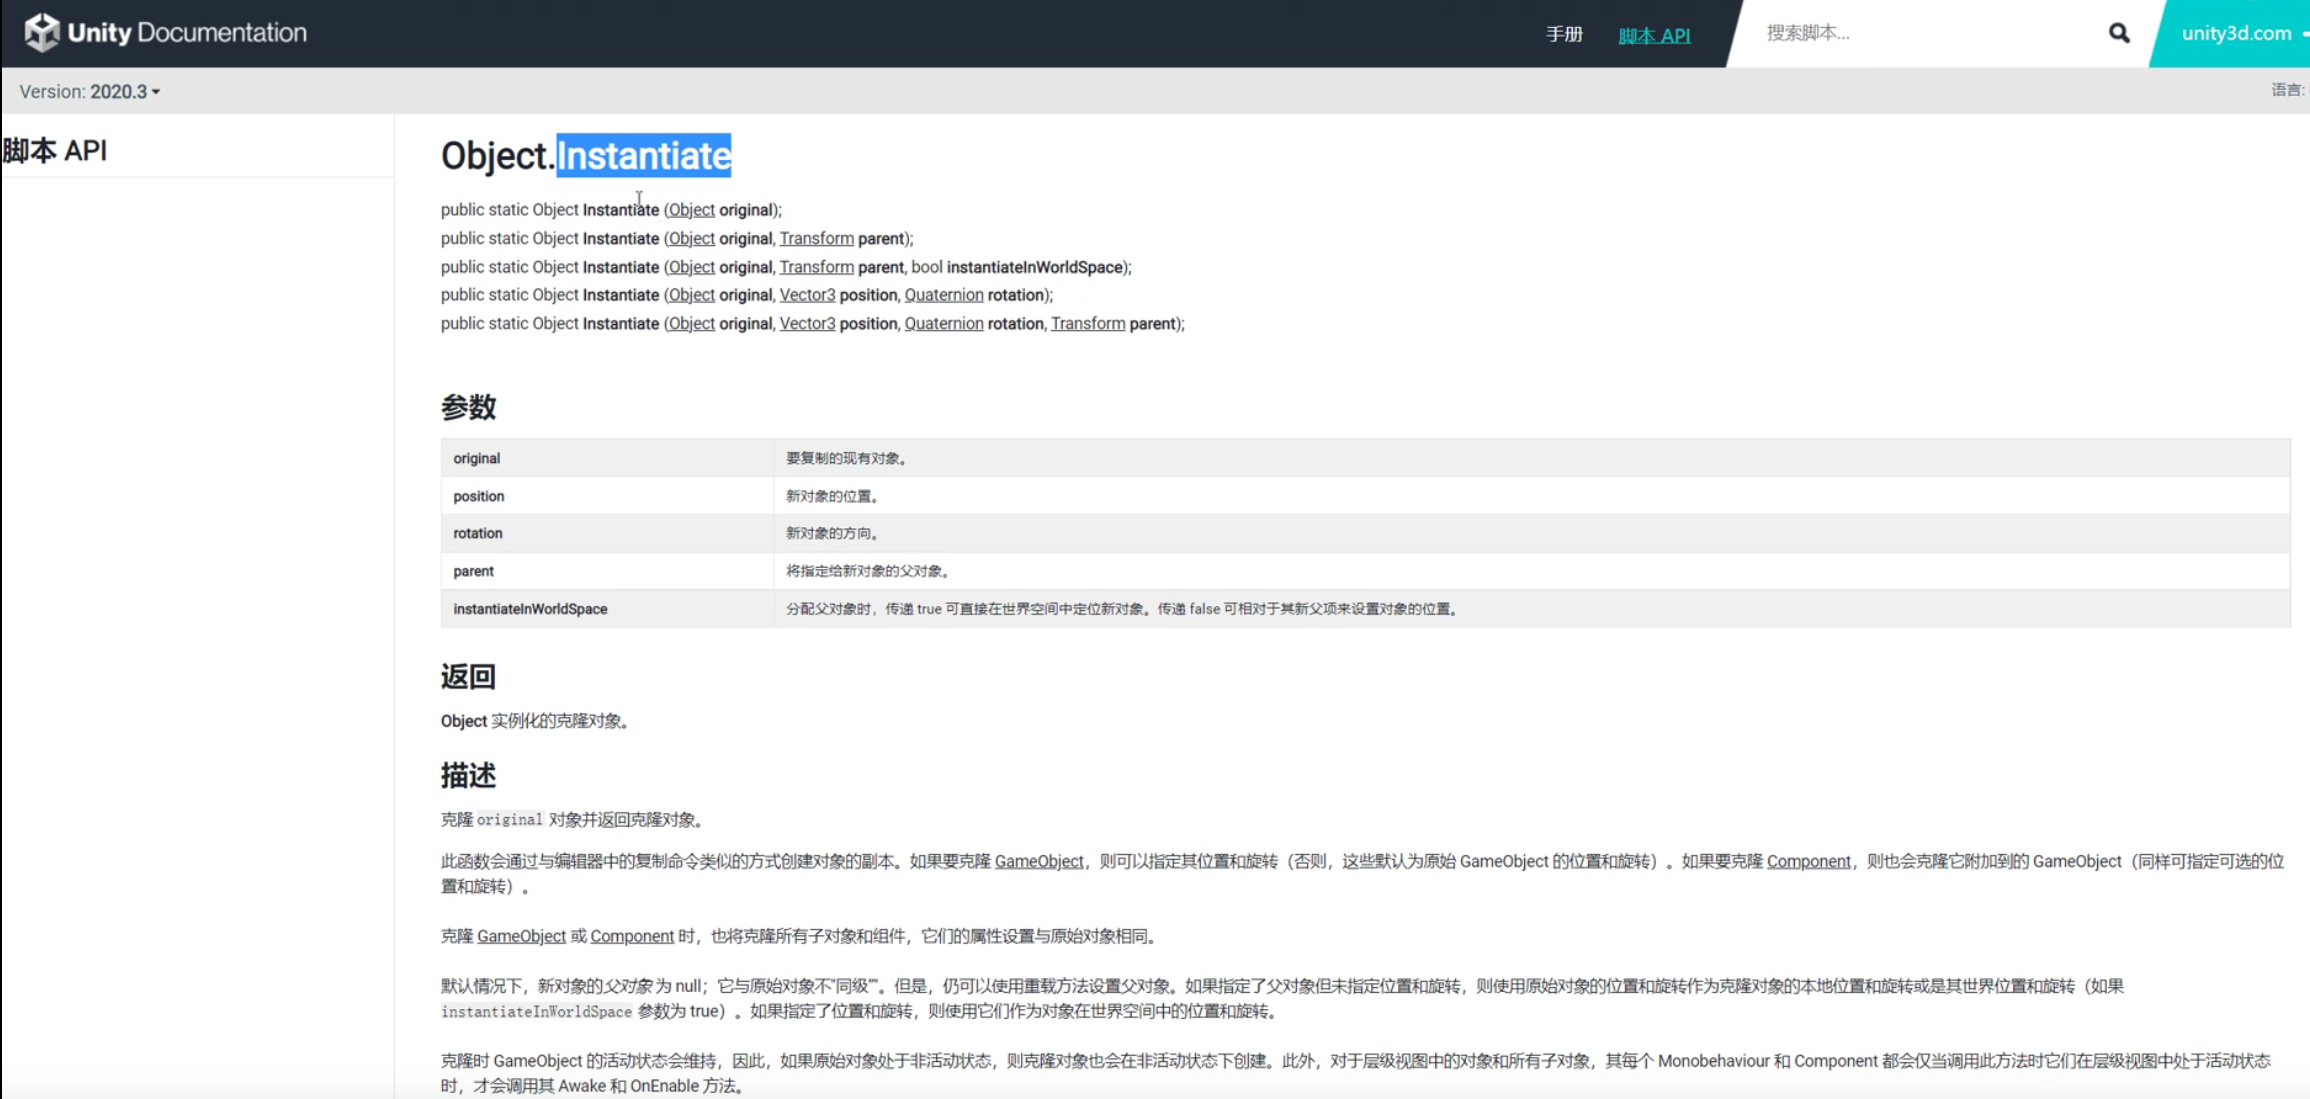
核心代码就是实例化和回收
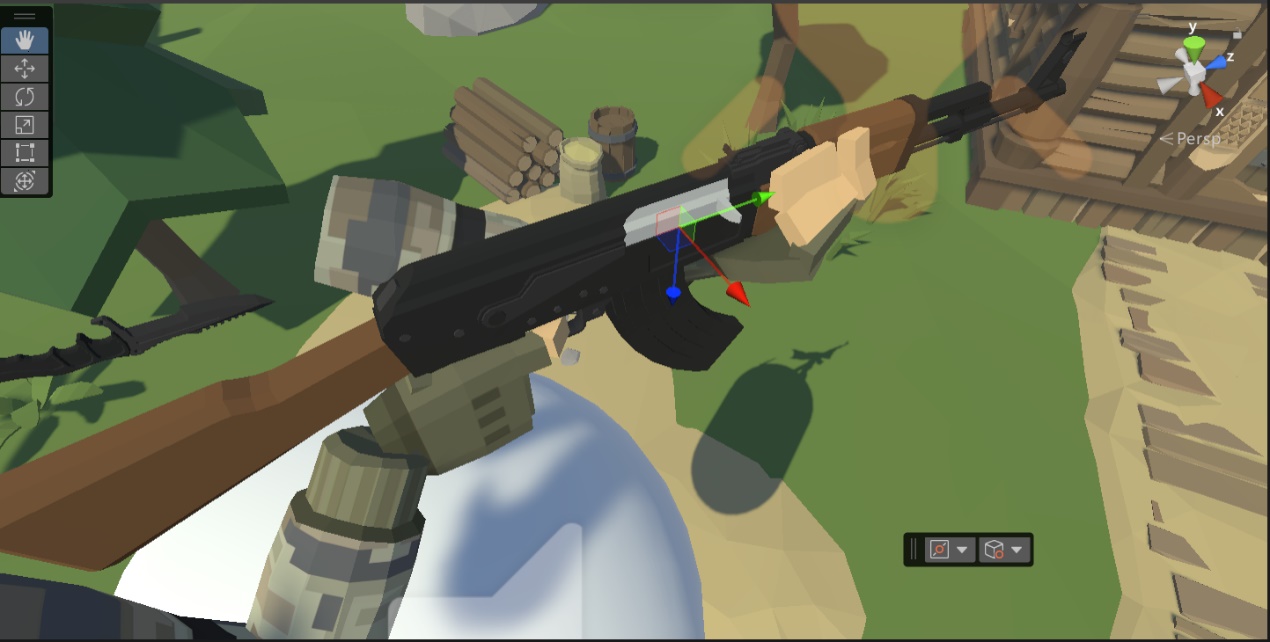
(18)添加武器手臂摇摆
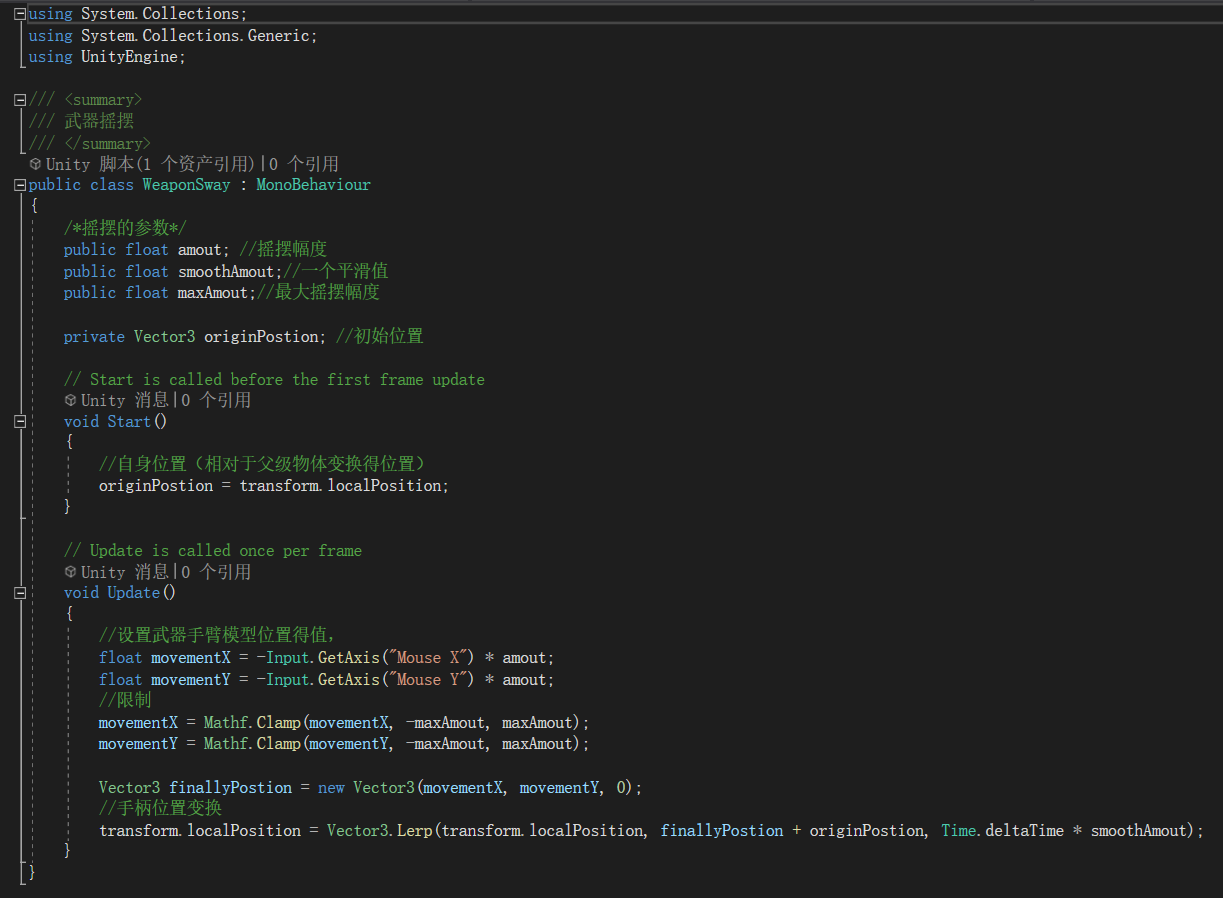
通过移动视角,模拟武器手臂摆动
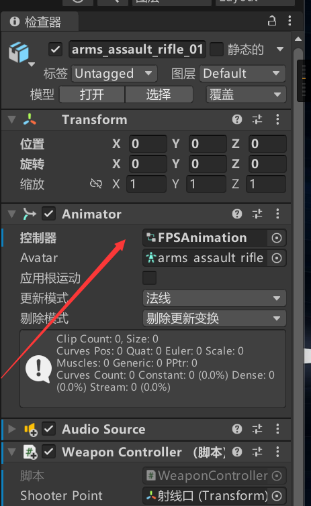
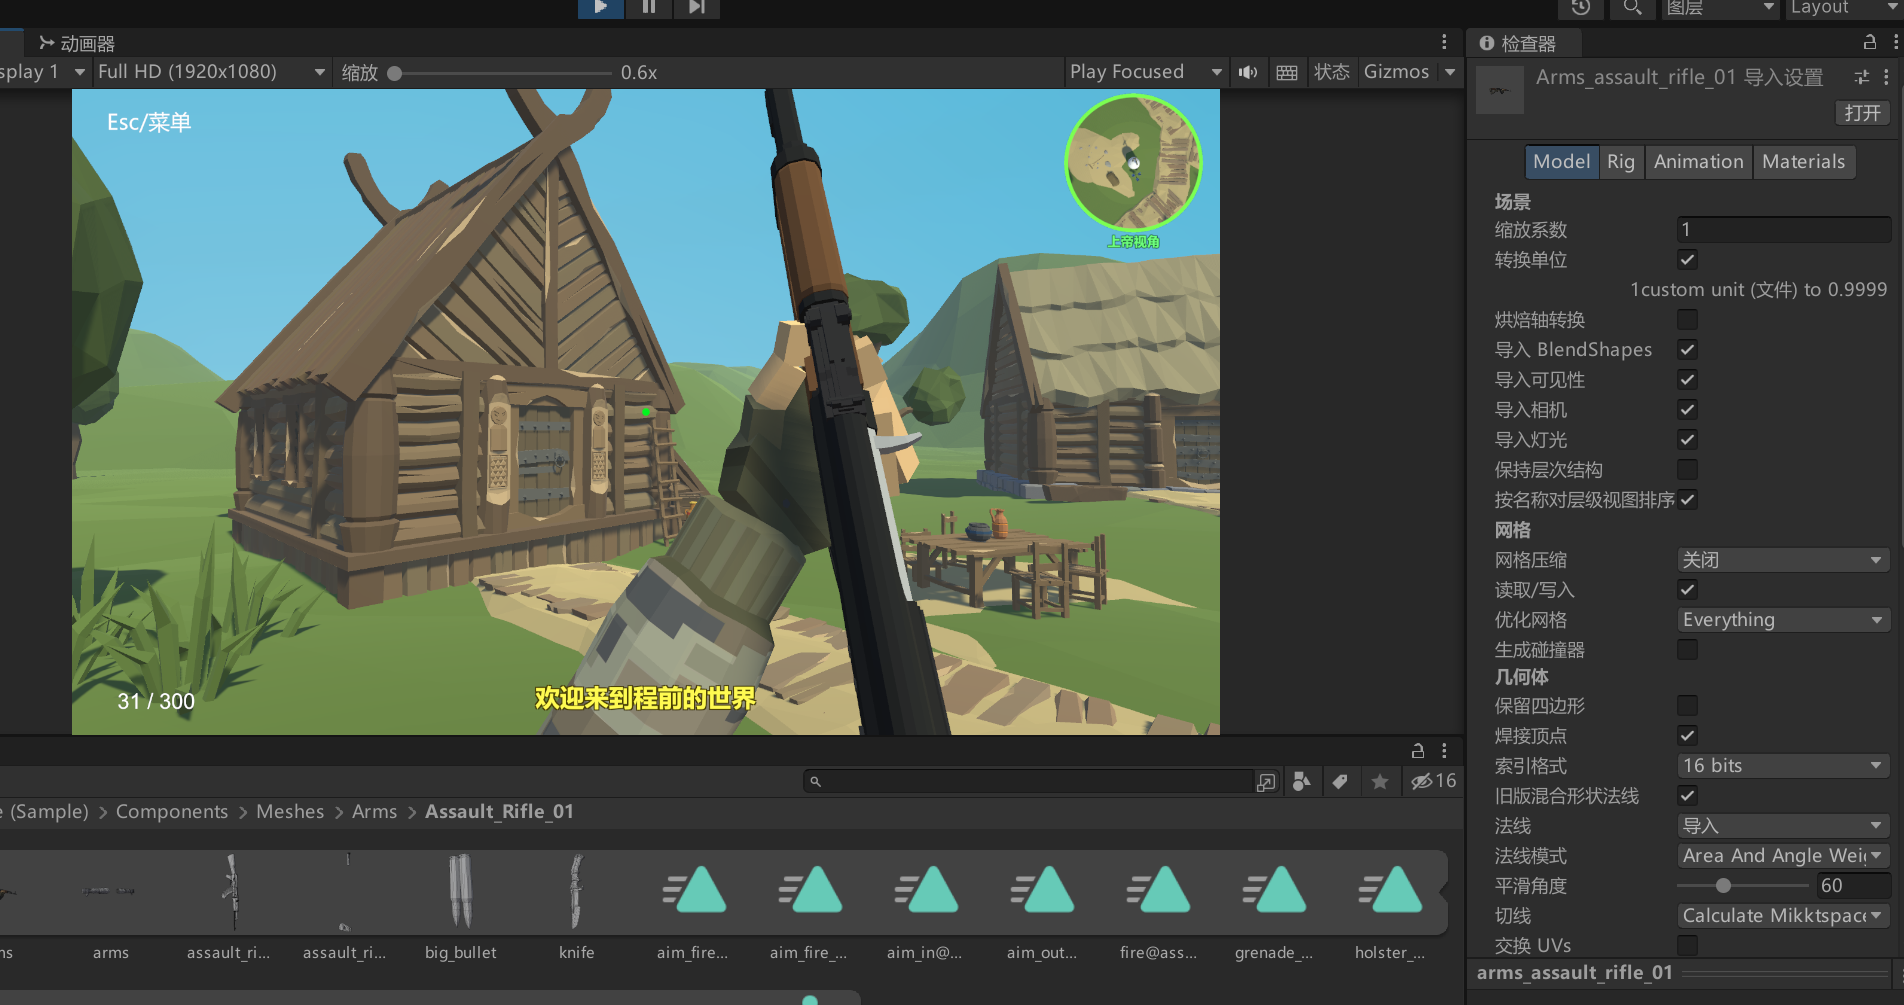
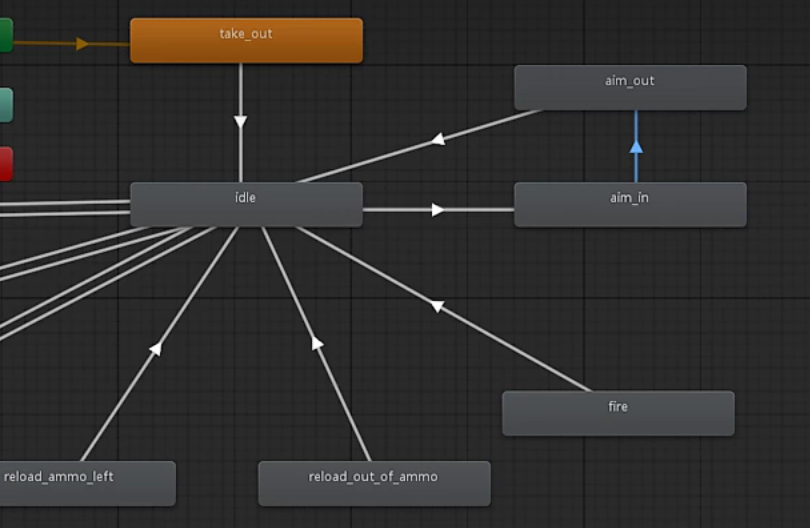
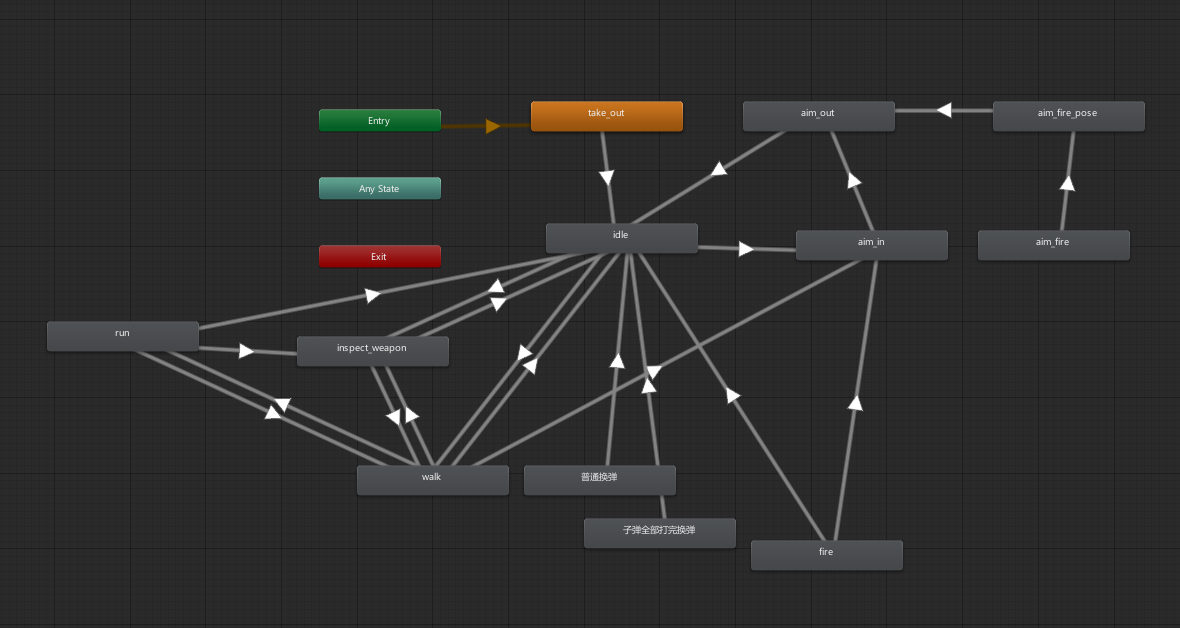
(19)增加拿出枪械、静止、查看武器动画
添加动画控制器

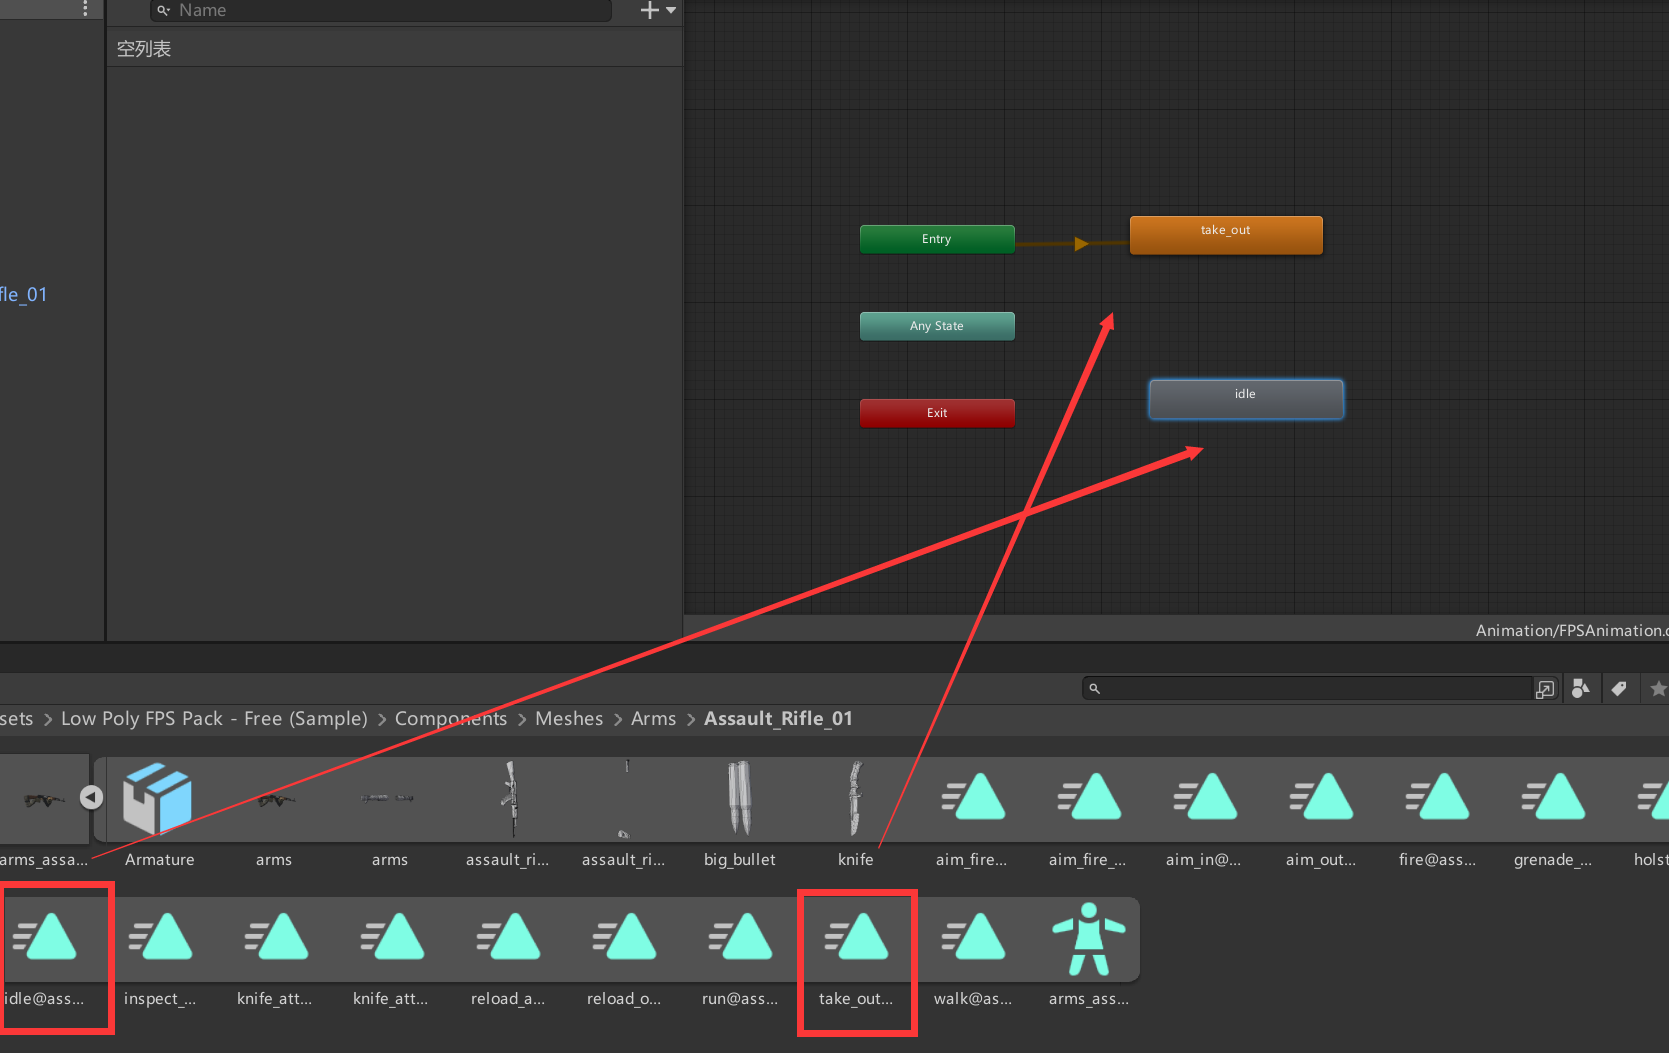
拖入动画
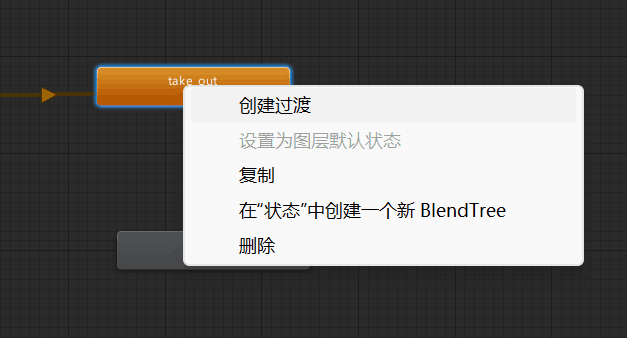
创建过度
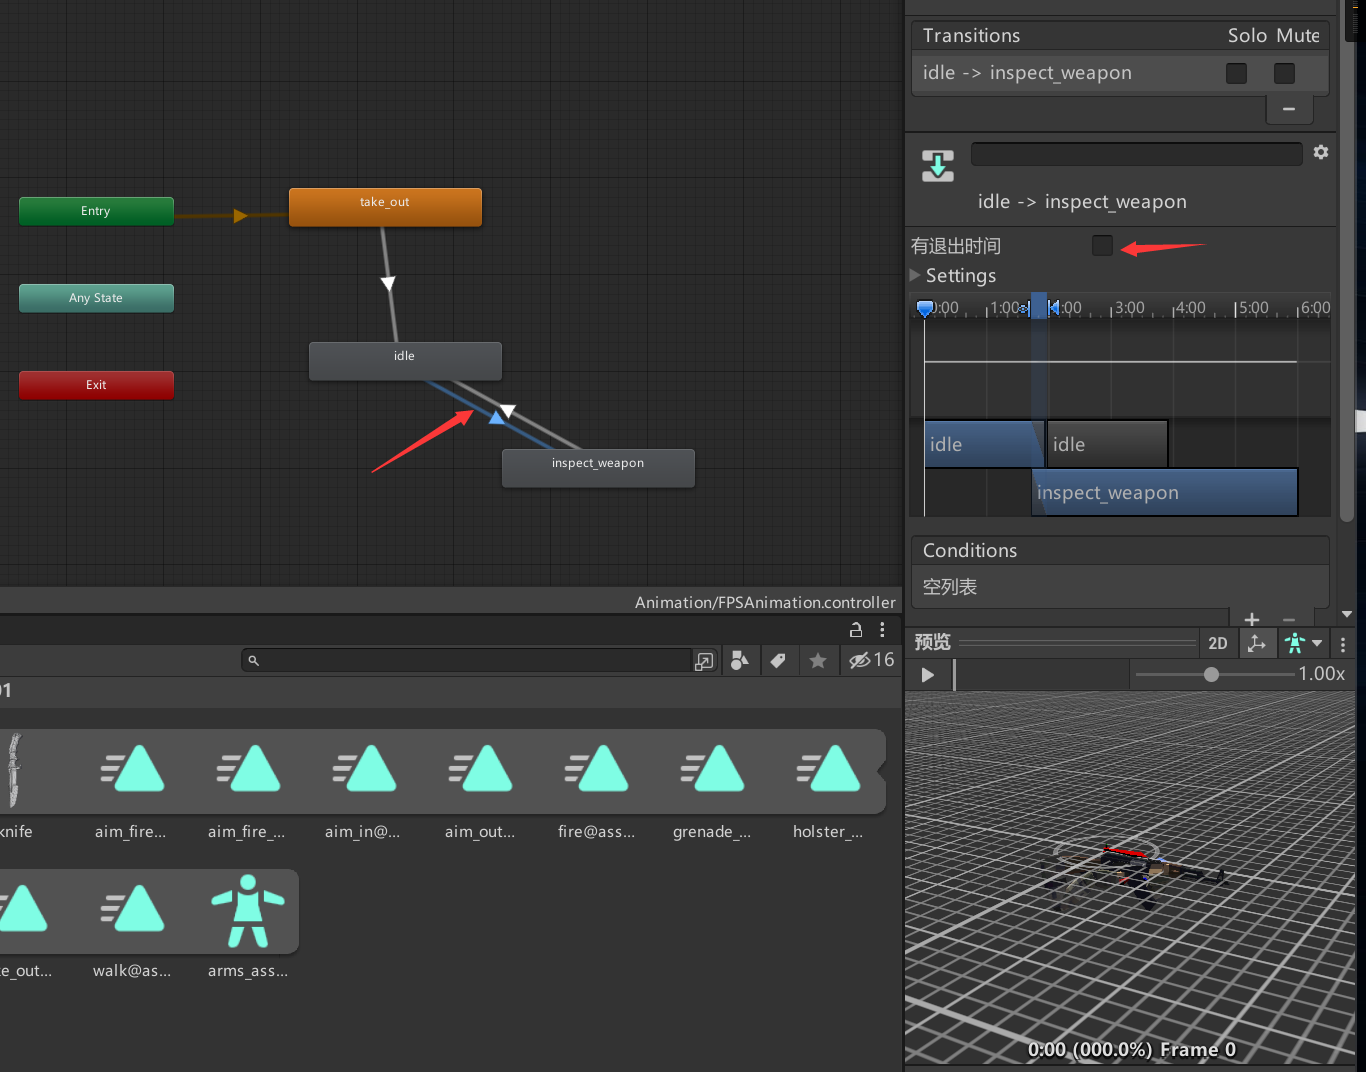
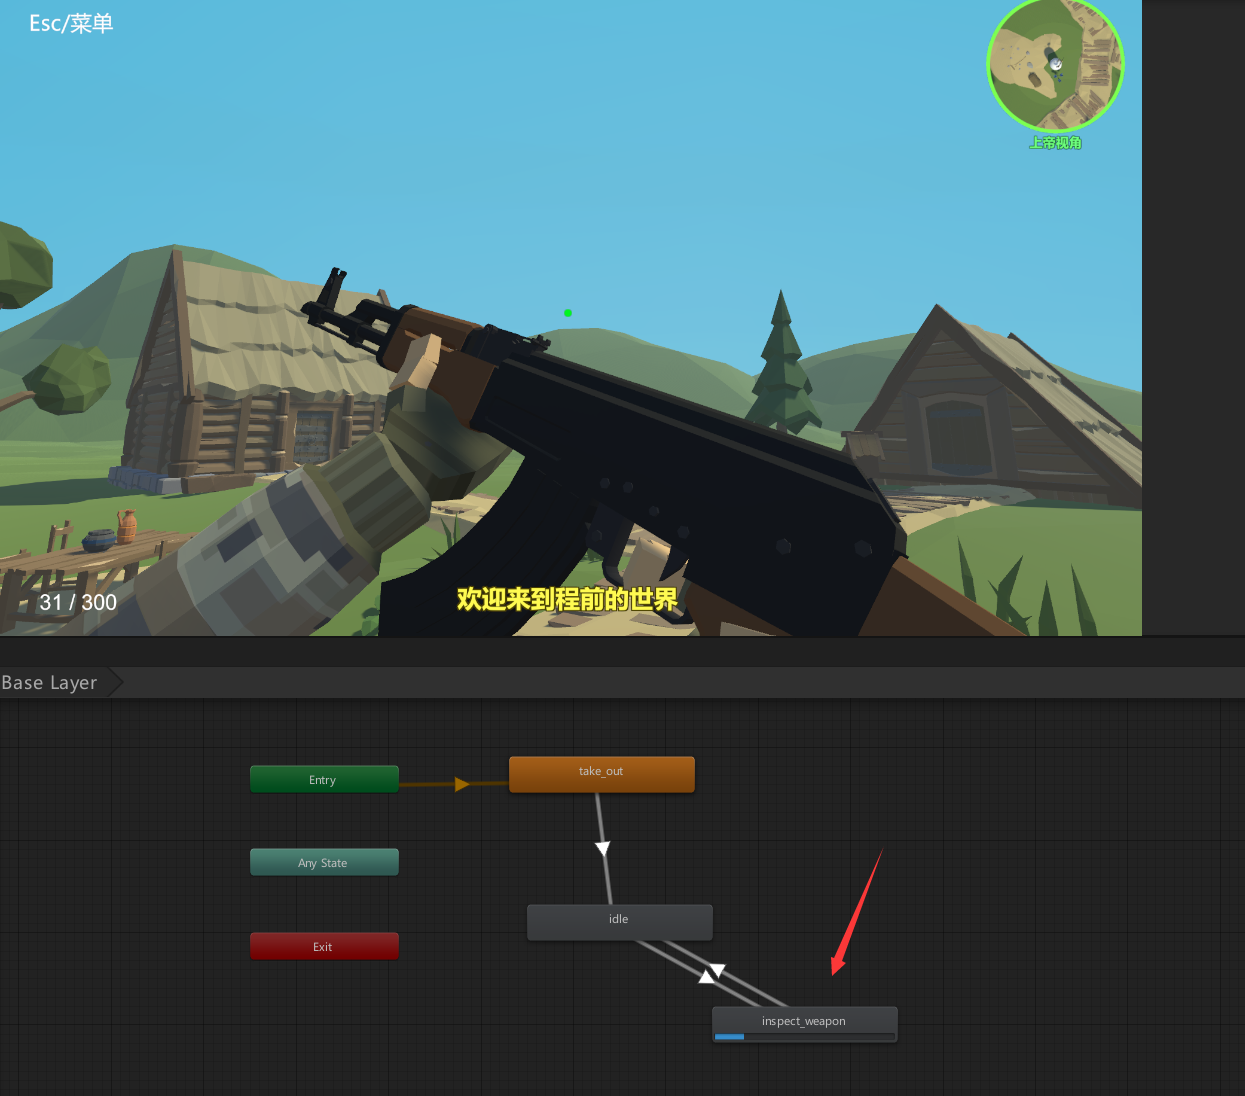
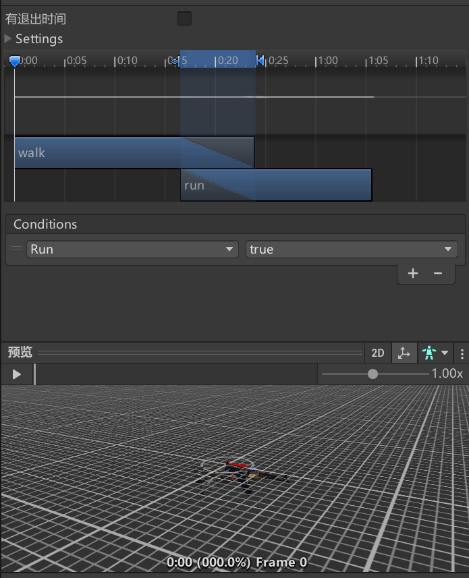
现在已经可以播放对应动画了
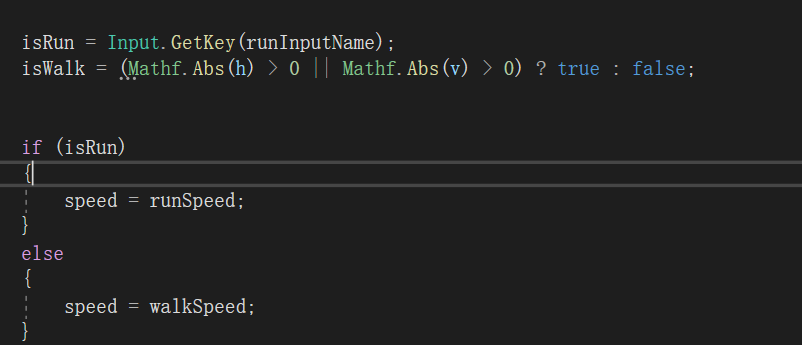
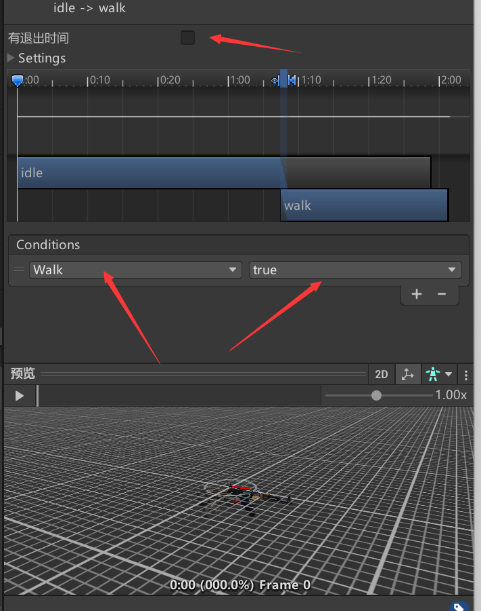
(20)增加行走、奔跑动画

在playermove添加iswalk判断并赋值
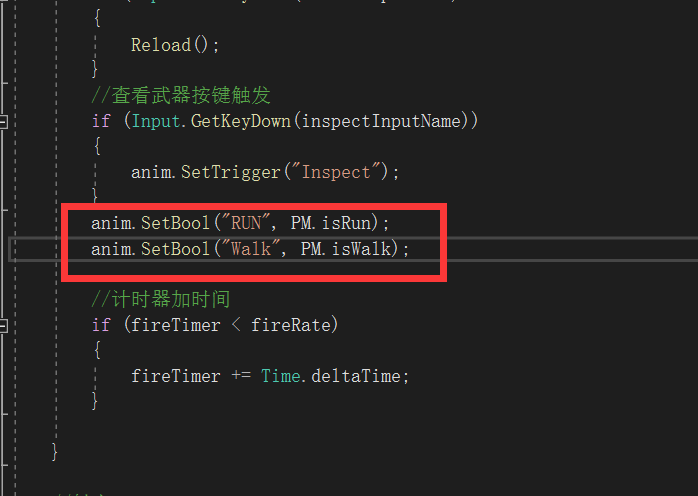
在WeaponController调用这两个变量
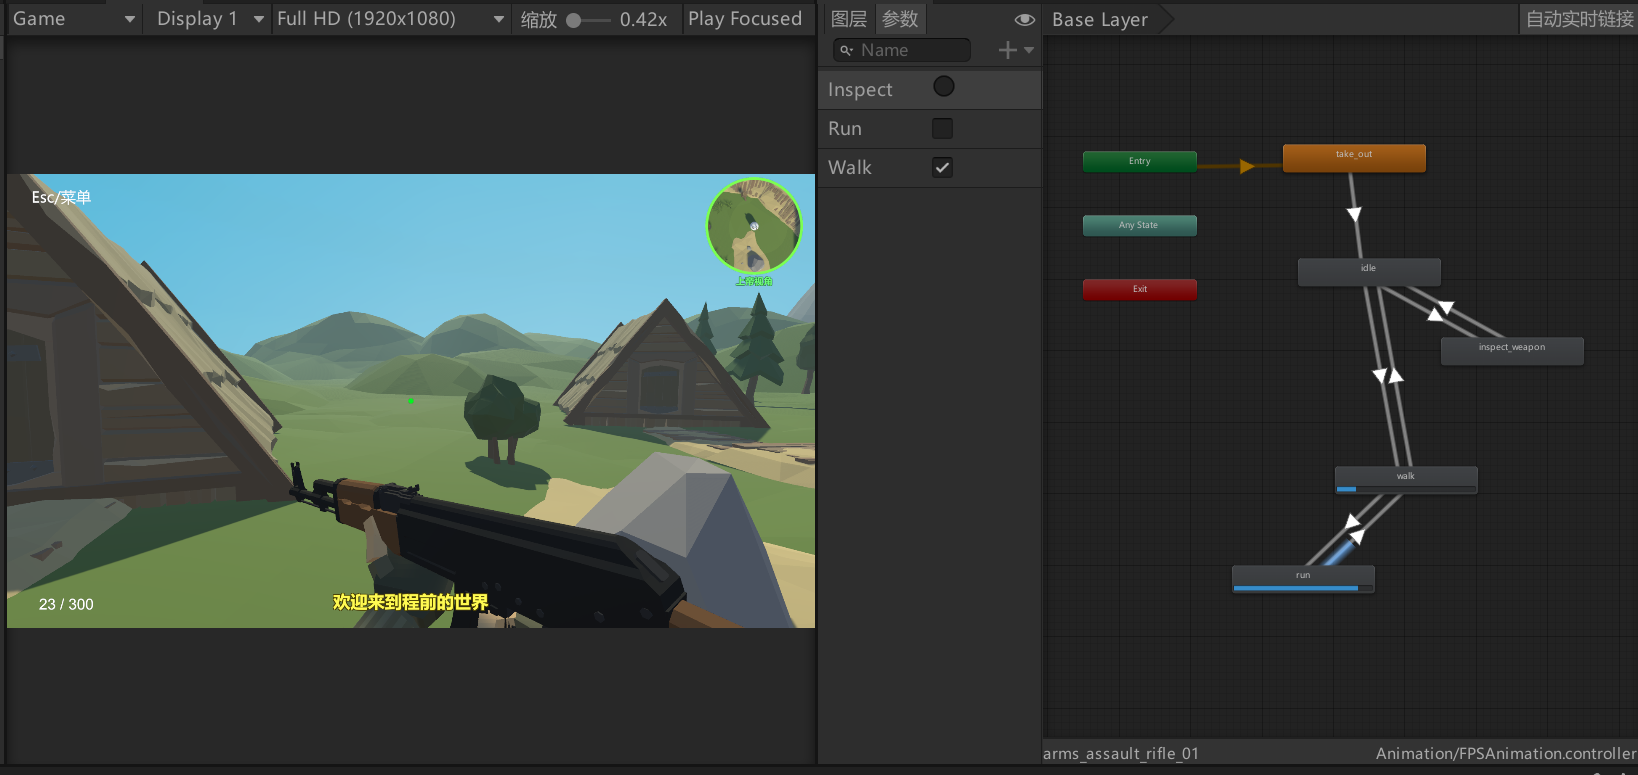
动画管理器里设置参数
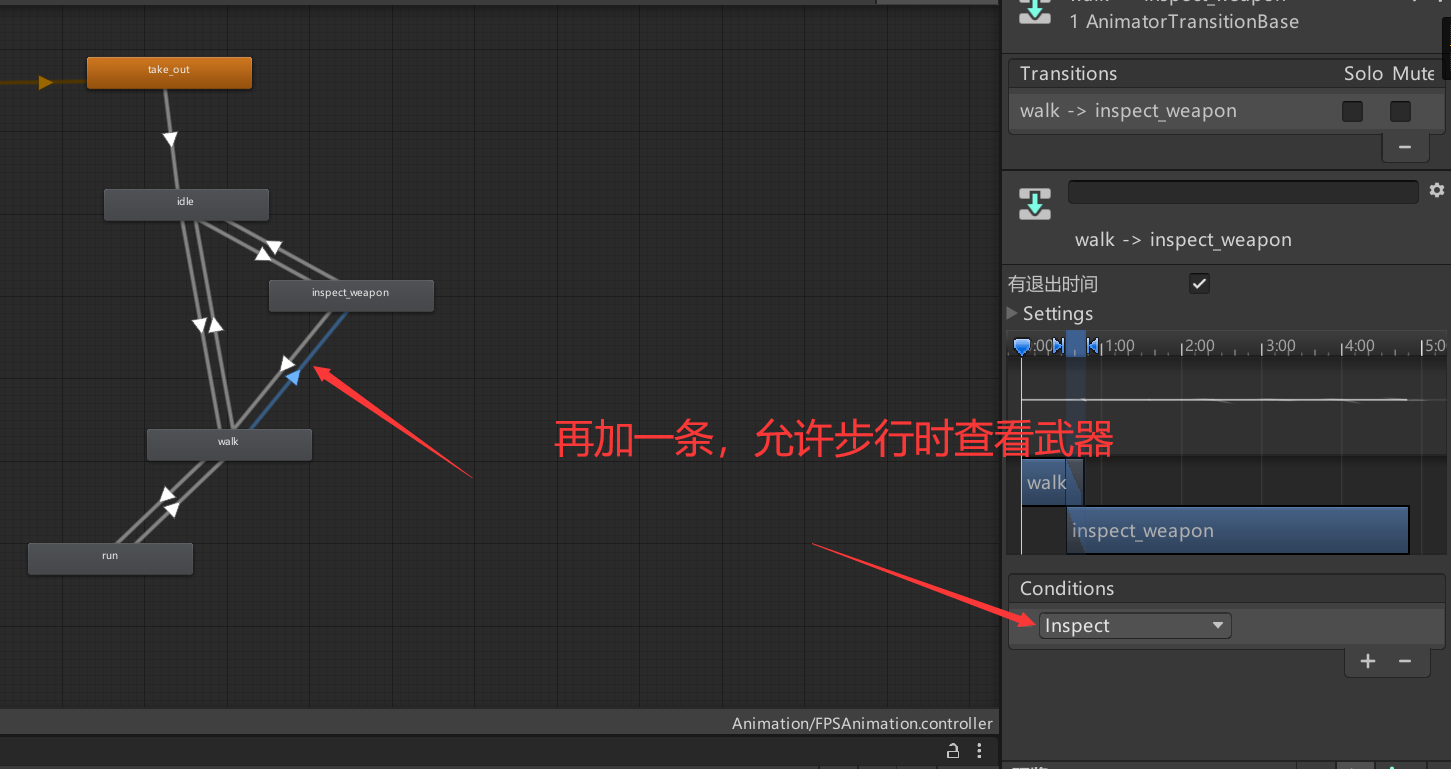
再加一条,允许步行时查看武器
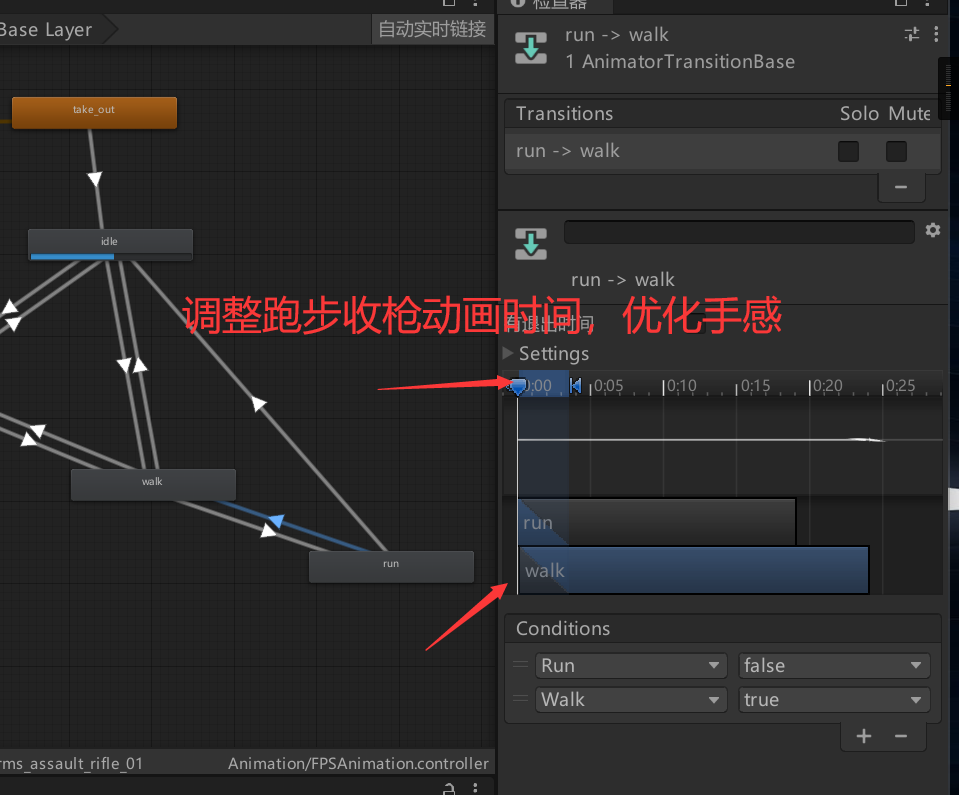
调整跑步收枪动画时间,优化手感
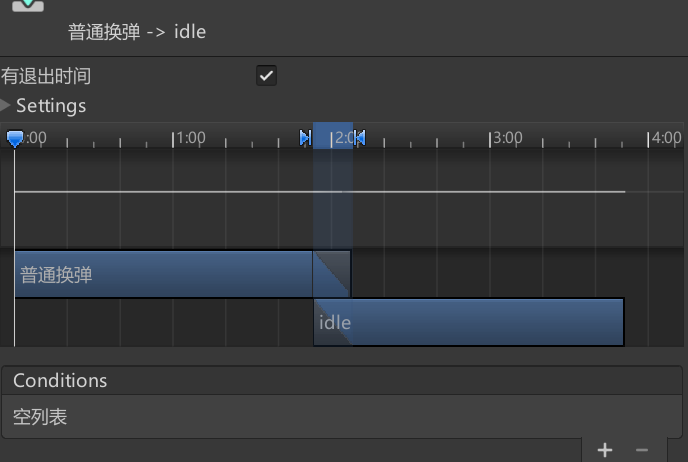
(21)P21增加换子弹的两种动画

同时要设置换弹时,不能开火
设置状态量

加入开火判断
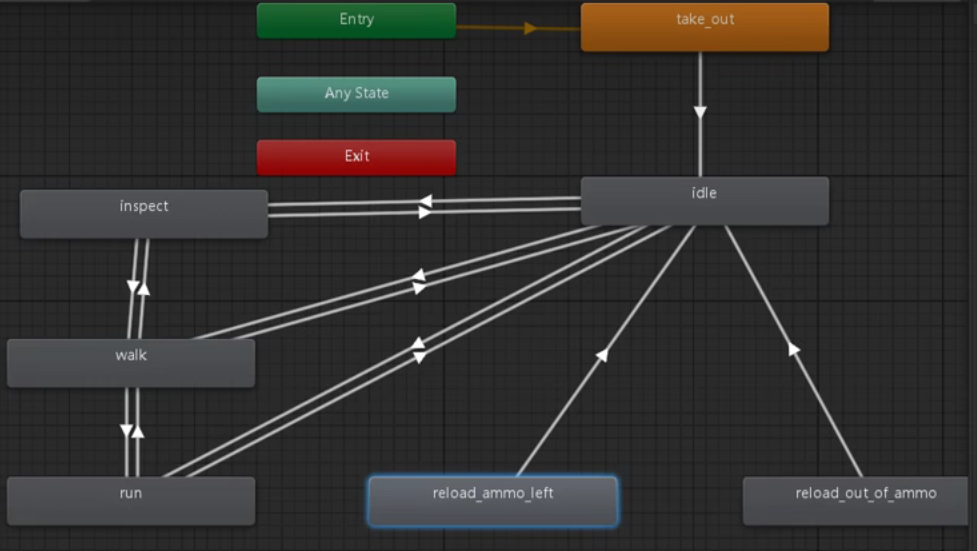
效果展示
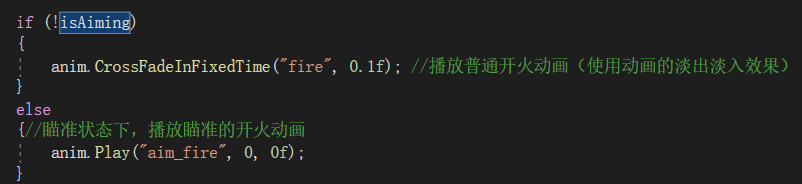
(22)P22增加开火、瞄准逻辑

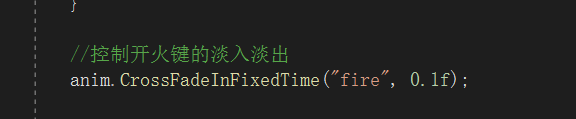
查看文档,这里我们使用这个方法控制开火动画

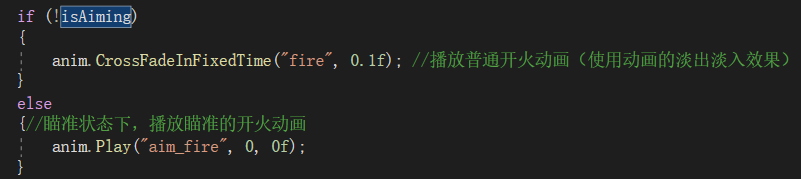
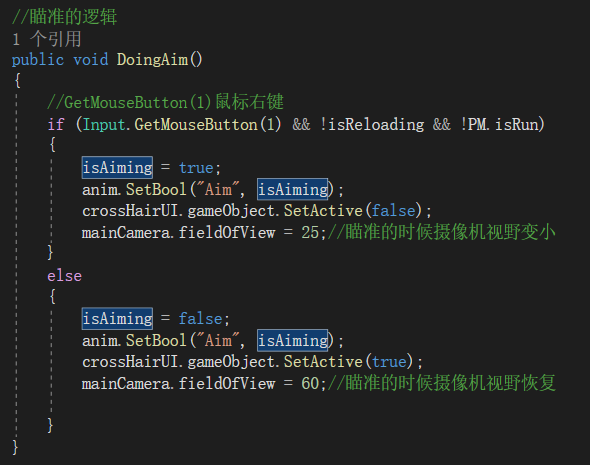
我们这里通过调整相机视野,达到瞄准的目的
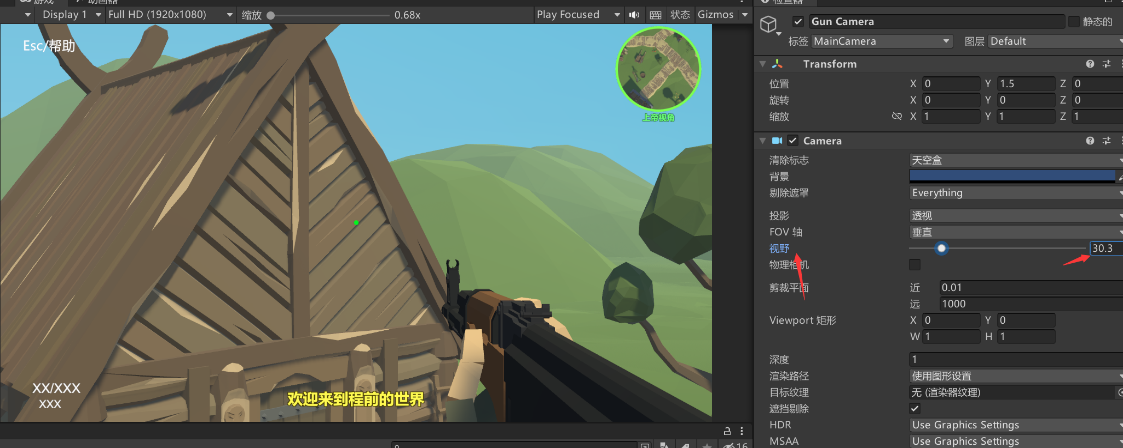
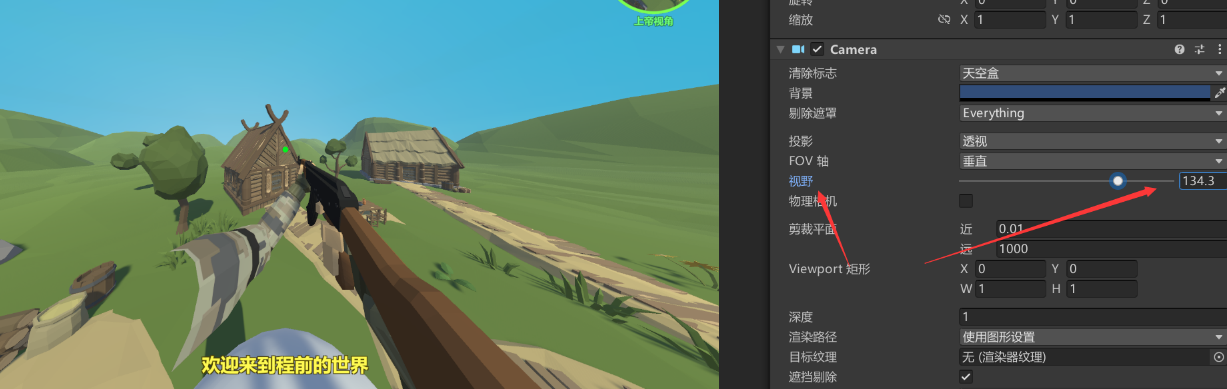
来一组对比图
效果展示
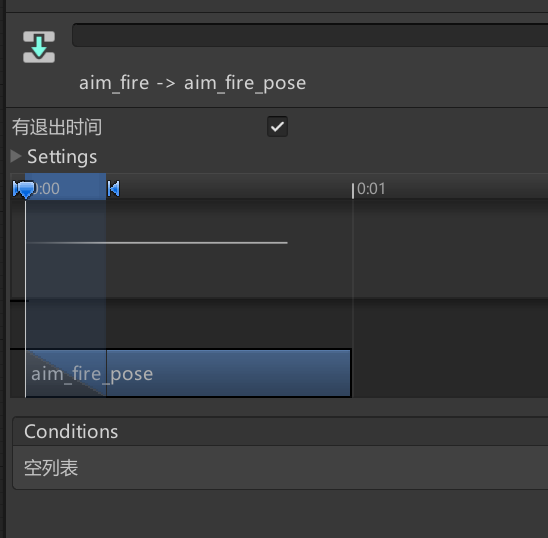
(23)P23增加瞄准开火动画


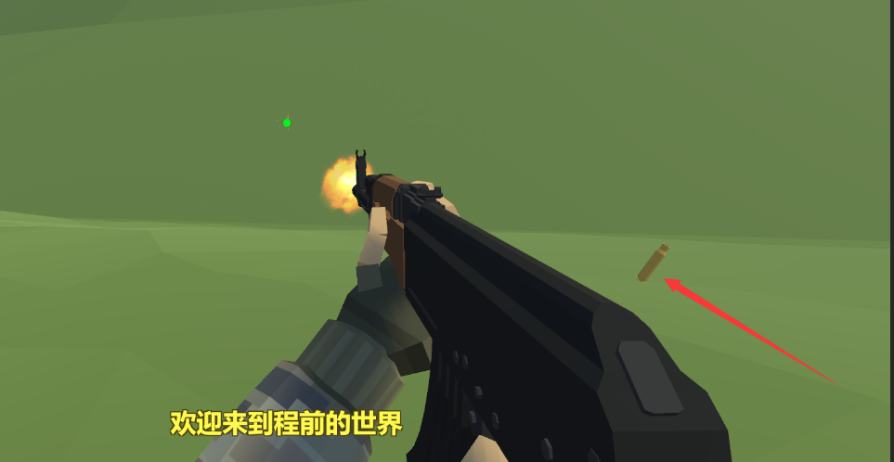
(24)P24实现射击抛出弹壳效果
设置空对象,调整弹壳射出的位置

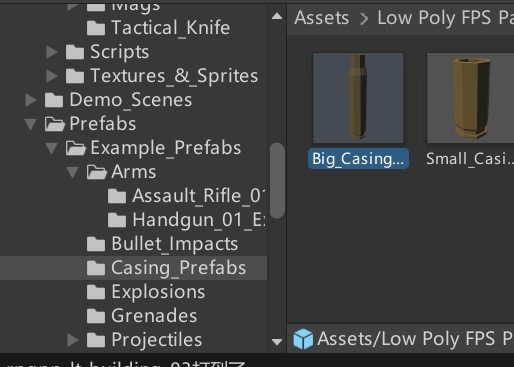
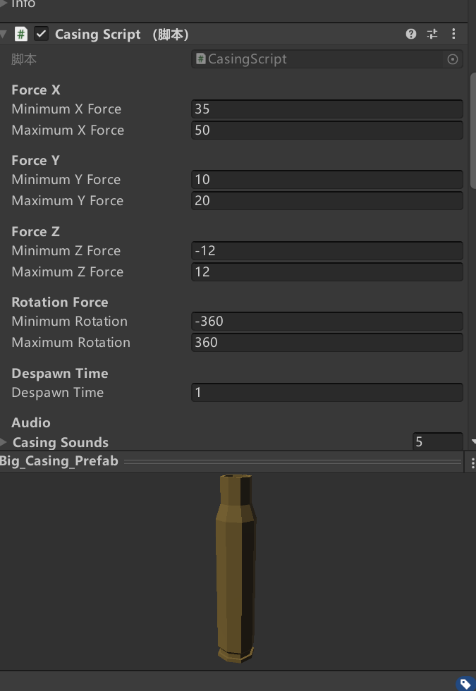
这个素材自带弹壳弹出脚本。因为涉及到蛋壳的无规则运动,和各种非线性运动。这里我们之间调用模型里的。


(25)实现半自动和全自动模式

画布下添加text
设置枚举类型变量
开始时,定义一些默认的值

按键定义

设计一下整理的判断逻辑
全自动与半自动主要的实现代码是通过对鼠标键位的获取实现的。
Input.GetMouseButton(0);
Input.GetMouseButtonDown(0);
GetMouseButton:每一帧鼠标处于按下状态都会返回true,
Input.GetMouseButton(0):表示鼠标左键按下,
Input.GetMouseButton(1):表示鼠标右键按下,
Input.GetMouseButton(2):表示鼠标中键按下
GetMouseButtonDown:鼠标按下的那一帧返回true,
Input.GetMouseButtonDown(0):表示鼠标左键按下,
Input.GetMouseButtonDown(1):表示鼠标右键按下,
Input.GetMouseButtonDown(2):表示鼠标中键按下
设置Ui更新
实验的结论
通过这次实验,学会了"触发器"的使用,主要注意三点:两物体都必须有"碰撞组件";被碰物体的碰撞器的isTrigger属性必须打勾;施碰物体必须有刚体组件。在实验过程中,由于一开始使用Character
Controller组件,导致了运行程序的时候报错,最后慢慢也是改好了,不管还是有很多要改进的地方需要再精雕细琢。
实验四
(1)添加音乐配置
using System.Collections;
using System.Collections.Generic;
using UnityEngine;
public class MusicControl : MonoBehaviour
{
// Start is called before the first frame update
void Start()
{
}
// Update is called once per frame
void Update()
{
MusicPlayControl();
}
void MusicPlayControl()
{
if (Input.GetKeyDown(KeyCode.O))
{
GetComponent<AudioSource>().Pause();
}
else if (Input.GetKeyDown(KeyCode.P))
{
GetComponent<AudioSource>().UnPause();
}
}
}
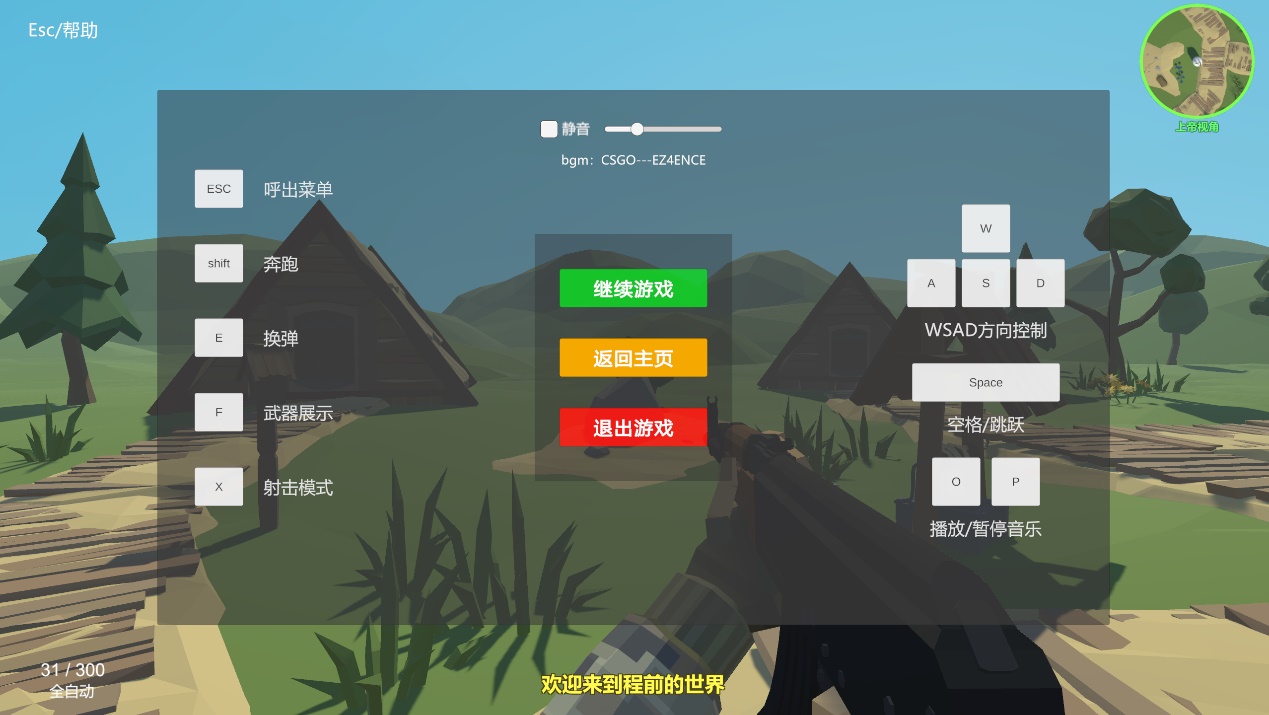
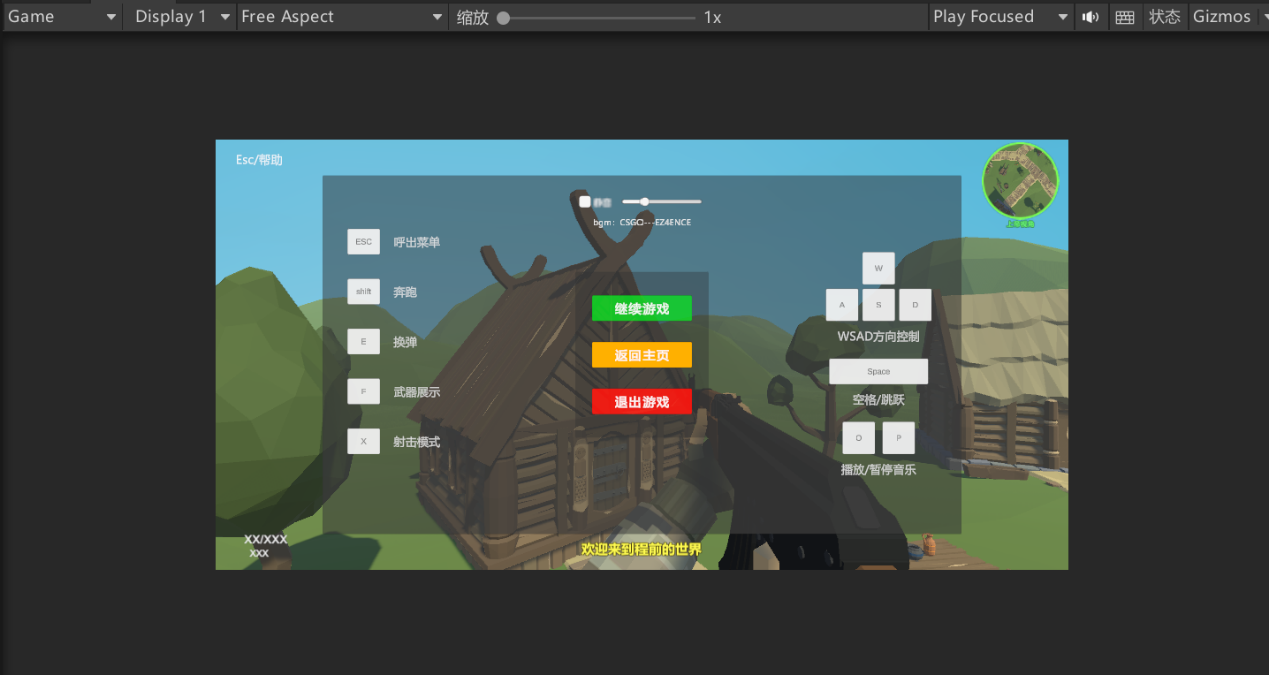
(2)添加键位提示
其实就是简单的添加按钮,不过还是模仿了印象中游戏的键位布局,感觉这样比较美观没有违和感。
需要注意的是,要把"按键提示层"放到第一位。Unity渲染的时候有个逻辑就是,放在前面的先渲染,后面的后渲染。后渲染的会把前面的层数遮盖掉。为了不遮挡中心的按钮,把该画布放最前面,充当底子。
(3)修复bug,优化整体逻辑
项目整体做完之后,还是有不少bug的,我们对其进行整理优化。


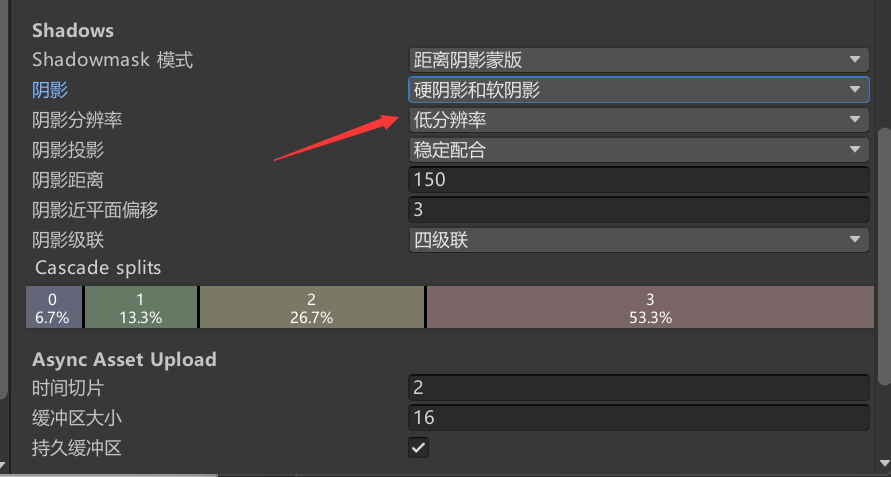
然后就是界面优化
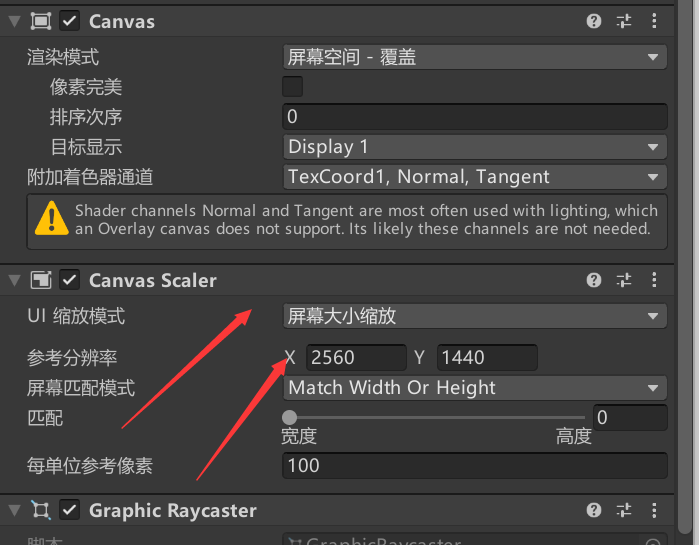
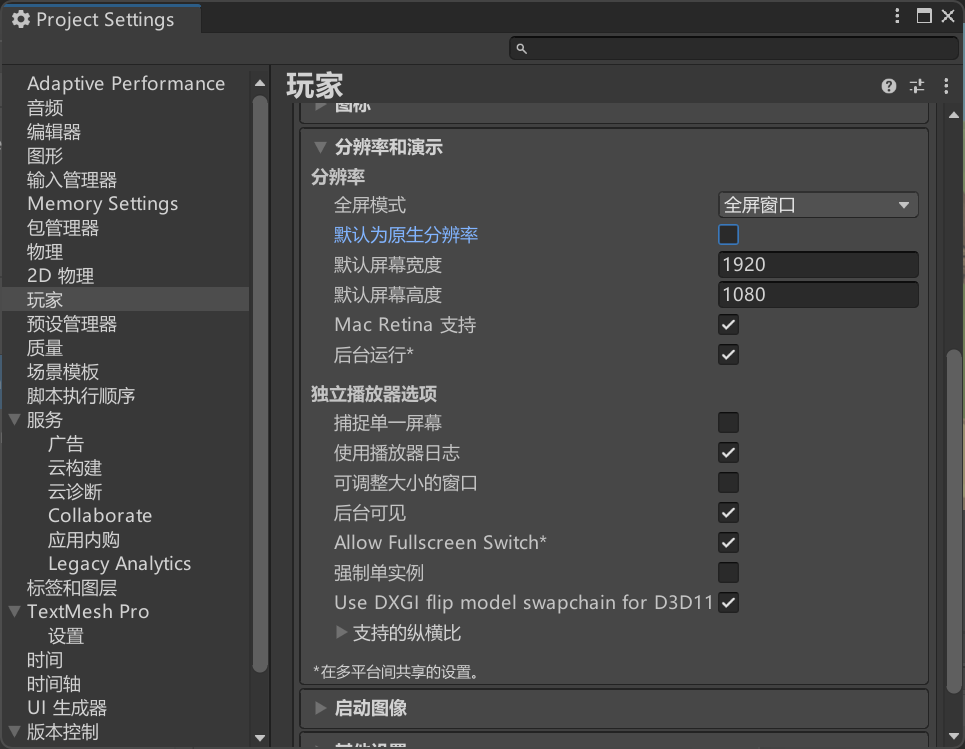
这里选为屏幕大小缩放模式,参考的分辨率为我电脑的分辨率,因为我的电脑是2k屏,整体的ui设计我也是按照2k屏幕来的
界面一进行同样的调整

为优化前:
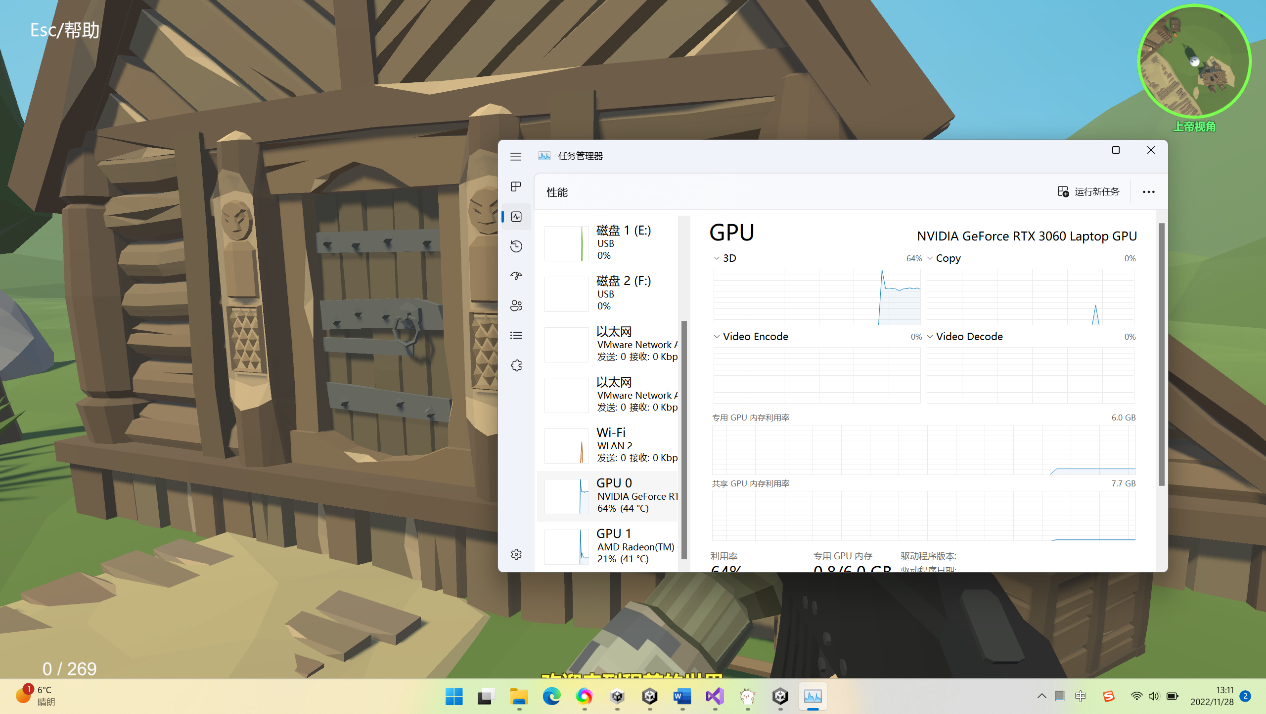
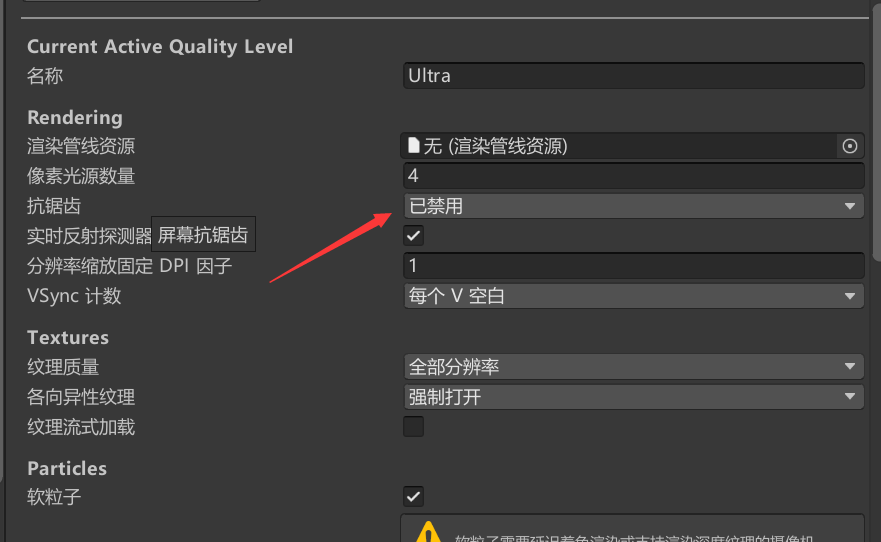
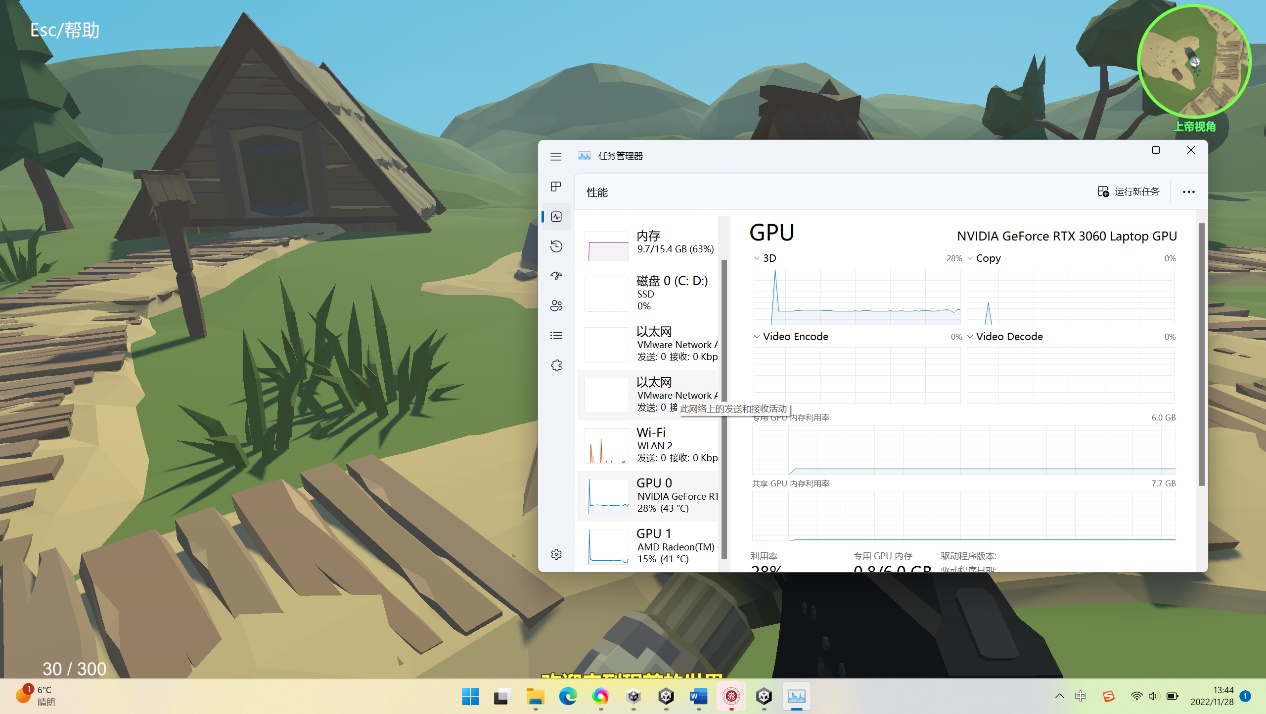
限制帧率为60后gpu占用量达到28%

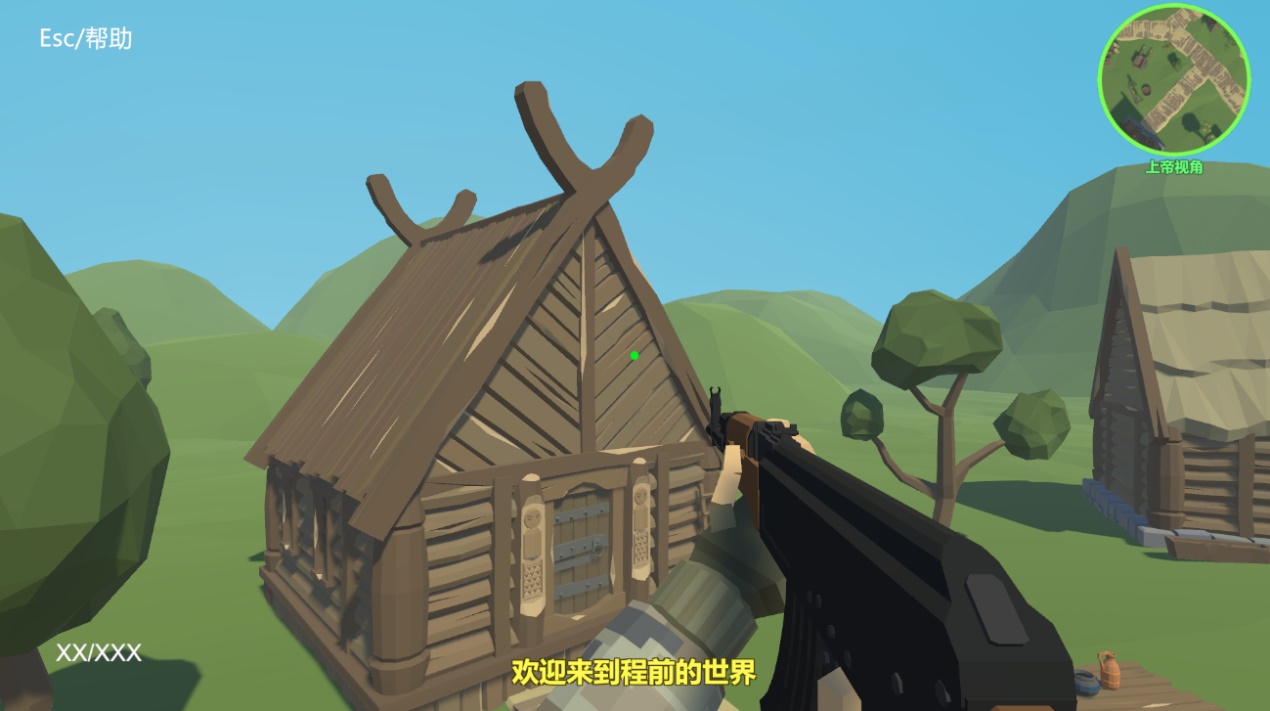
(4)项目展示:
脚本
Menu:
using System.Collections;
using System.Collections.Generic;
using UnityEngine;
using UnityEngine.SceneManagement;
public class menu : MonoBehaviour
{
public GameObject MenuXin;
public bool isStop = true;
// Start is called before the first frame update
void Start()
{
}
// Update is called once per frame
void Update()
{
if (isStop)
{
if (Input.GetKeyDown(KeyCode.Escape))
{
MenuXin.SetActive(true);
// 鼠标显示
Cursor.lockState = CursorLockMode.None;
isStop = false;
Time.timeScale = (0);//设置为0,游戏暂停
}
}
else
{
if (Input.GetKeyDown(KeyCode.Escape))
{
MenuXin.SetActive(false);
// 鼠标锁定并消失
Cursor.lockState = CursorLockMode.Locked;
isStop = true;
Time.timeScale = (1);//设置为1,游戏继续
}
}
}
public void Resume()
{
MenuXin.SetActive(false);
// 鼠标锁定并消失
Cursor.lockState = CursorLockMode.Locked;
isStop = true;
Time.timeScale = (1);//设置为1,游戏继续
}
public void Restart()
{
MenuXin.SetActive(false);
// 鼠标显示
Cursor.lockState = CursorLockMode.None;
isStop = true;
Time.timeScale = (1);//设置为1,游戏继续
SceneManager.LoadScene(0);
}
public void Quit()
{
Application.Quit();
}
}
MiniMapCameraFollow:
using UnityEngine;
/// <summary>
/// 小地图摄像机跟随
/// Auhor: linxinfa
/// </summary>
public class MiniMapCameraFollow : MonoBehaviour
{
public Transform targetPlayer;
/// <summary>
/// 高度
/// </summary>
public float distanceUp = 1.3f;
private Transform m_cameraTransform;
void Awake()
{
m_cameraTransform = transform;
}
void LateUpdate()
{
if (null == targetPlayer) return;
m_cameraTransform.position = targetPlayer.position + Vector3.up *
distanceUp;
}
}
MouseLook:
using System.Collections;
using System.Collections.Generic;
using UnityEngine;
/// <summary>
/// 摄像机的旋转
/// 玩家左右旋转控制视线左右移动
/// 摄像机上下旋转控制视线上下移动
/// </summary>
public class MouseLook : MonoBehaviour
{
public float mouseSensitivity = 100f;//鼠标灵敏度
public Transform playerBody;//玩家的位置
private float xRotation = 0f;
// Start is called before the first frame update
void Start()
{
//将光标锁定在该游戏窗口的中心,并且隐藏光标
Cursor.lockState = CursorLockMode.Locked;
}
// Update is called once per frame
void Update()
{
float mouseX = Input.GetAxis(“Mouse X”) * mouseSensitivity *
Time.deltaTime;
float mouseY = Input.GetAxis(“Mouse Y”) * mouseSensitivity *
Time.deltaTime;
xRotation -= mouseY;//将上下旋转的轴值进行累计
//向上视角限制为60度,向下限制为45度
xRotation = Mathf.Clamp(xRotation, -60f,
45f);//限制轴值的累计(这里就能发现上90度和下90度角正好相对于了90的轴值)
transform.localRotation = Quaternion.Euler(xRotation, 0f, 0f);
playerBody.Rotate(Vector3.up * mouseX);
}
}
MusicControl:
using System.Collections;
using System.Collections.Generic;
using UnityEngine;
public class MusicControl : MonoBehaviour
{
// Start is called before the first frame update
void Start()
{
}
// Update is called once per frame
void Update()
{
MusicPlayControl();
}
void MusicPlayControl()
{
if (Input.GetKeyDown(KeyCode.O))
{
GetComponent<AudioSource>().Pause();
}
else if (Input.GetKeyDown(KeyCode.P))
{
GetComponent<AudioSource>().UnPause();
}
}
}
PlayerCameraFollow:
using UnityEngine;
/// <summary>
/// 第三人称视角摄像机跟随
/// Author: linxinfa
/// </summary>
public class PlayerCameraFollow : MonoBehaviour
{
public Transform targetPlayer;
/// <summary>
/// 距离
/// </summary>
public float distanceAway = 1.7f;
/// <summary>
/// 高度
/// </summary>
public float distanceUp = 1.3f;
/// <summary>
/// 平滑度
/// </summary>
public float smooth = 2f;
private Vector3 m_targetPos;
private Transform m_cameraTransform;
void Awake()
{
m_cameraTransform = transform;
}
void LateUpdate()
{
if (null == targetPlayer) return;
// 计算摄像机的目标坐标
m_targetPos = targetPlayer.position + Vector3.up * distanceUp -
targetPlayer.forward * distanceAway;
// 插值设置坐标,有个平滑跟随效果
m_cameraTransform.position = Vector3.Lerp(m_cameraTransform.position,
m_targetPos, Time.deltaTime * smooth);
// 设置摄像机角度,对准跟随目标
m_cameraTransform.LookAt(targetPlayer);
}
}
Playermove:
using System.Collections;
using System.Collections.Generic;
using UnityEngine;
public class Playermove : MonoBehaviour
{
private CharacterController characterController;
public float walkSpeed = 10f;// 移动速度
public float runSpeed = 15f;//奔跑速度
public float speed;//移动速度
public bool isWalk;//判断是否在行走
public bool isRun;//判断是否在奔跑
public float jumpForce = 5f;//跳跃力度
private Vector3 velocity;//设置玩家Y轴的一个冲量变化
public float gravity = -9.8f; //设置重力
public float VerticalVelocity;//垂直方向速度
private bool isJump;//判断是否在跳跃
public Vector3 movedirction;//设置移动方向
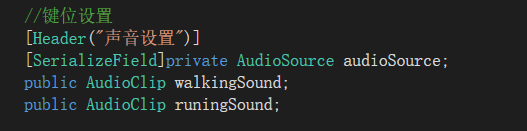
//键位设置
[Header(“声音设置”)]
[SerializeField]private AudioSource audioSource;
public AudioClip walkingSound;
public AudioClip runingSound;
[Header(“键位设置”)]
[SerializeField] [Tooltip(“奔跑按键”)] private KeyCode
runInputName;
// Start is called before the first frame update
void Start()
{
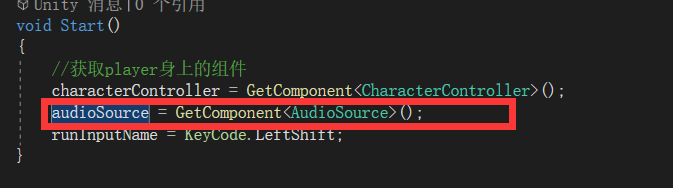
//获取player身上的组件
characterController = GetComponent<CharacterController>();
audioSource = GetComponent<AudioSource>();
runInputName = KeyCode.LeftShift;
}
// Update is called once per frame
void Update()
{
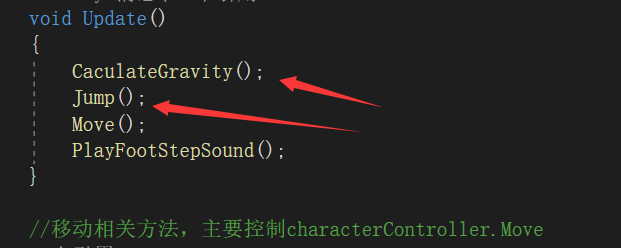
CaculateGravity();
Jump();
Move();
PlayFootStepSound();
}
//移动相关方法,主要控制characterController.Move
public void Move()
{
float h = Input.GetAxis(“Horizontal”);
float v = Input.GetAxis(“Vertical”);
isRun = Input.GetKey(runInputName);
isWalk = (Mathf.Abs(h) > 0 || Mathf.Abs(v) > 0) ? true : false;
if (isRun)
{
speed = runSpeed;
}
else
{
speed = walkSpeed;
}
movedirction = (transform.right * h +transform.forward *
v).normalized; //设置玩家移动方向
characterController.Move(movedirction * speed * Time.deltaTime);
//跳跃相关move
velocity.y = VerticalVelocity * Time.deltaTime;
characterController.Move(velocity);
}
//播放移动音效
public void PlayFootStepSound()
{
//判断是否在移动,这里不使用characterController.isGrounded,因为这个参数会抖动,不稳定,会使声音卡顿
if (movedirction.sqrMagnitude > 0.9f)
{
audioSource.clip = isRun ? runingSound :
walkingSound;//设置行走或奔跑音效
if (!audioSource.isPlaying)
{
audioSource.Play();
}
}
else
{
if (audioSource.isPlaying)
{
audioSource.Pause();
}
}
}
public void Jump()
{
//检测空格按下,因为GetKeyDown只在按键按下的一瞬间返回true,而GetKey是按键按下的过程中都为true,只要有几帧的时间都能在IsGrounded为true的那么一帧跳起来。
isJump = Input.GetKey(KeyCode.Space);
if (characterController.isGrounded && isJump)
{
VerticalVelocity = jumpForce * 3;
}
}
public void CaculateGravity()
{
//是否碰撞在一起
if (characterController.isGrounded)
{
VerticalVelocity = gravity * Time.deltaTime;
return;
}
else
{
VerticalVelocity += gravity * 2 * Time.deltaTime;
}
}
}
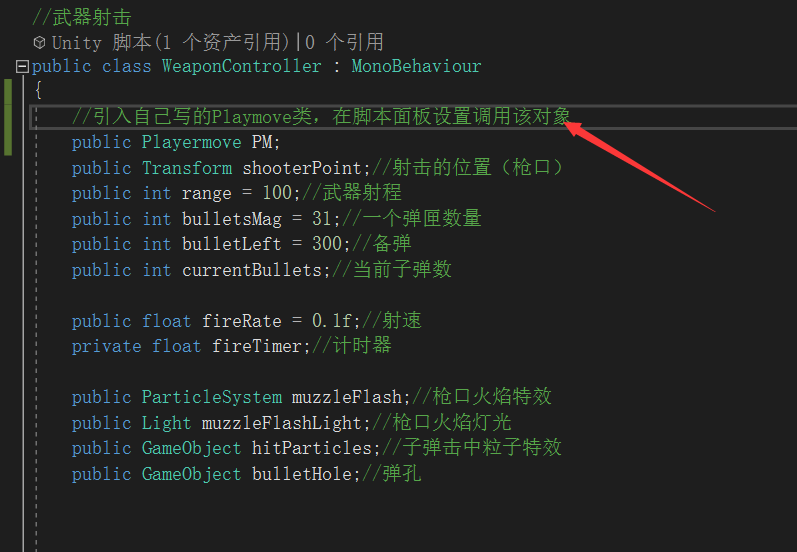
WeaponController:
using System.Collections;
using System.Collections.Generic;
using UnityEngine;
using UnityEngine.UI;
//武器射击
public class WeaponController : MonoBehaviour
{
//引入自己写的Playmove类,在脚本面板设置调用该对象
public Playermove PM;
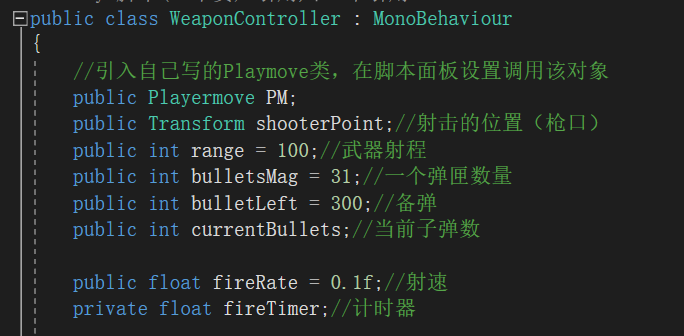
public Transform shooterPoint;//射击的位置(枪口)
public int range = 100;//武器射程
public int bulletsMag = 31;//一个弹匣数量
public int bulletLeft = 300;//备弹
public int currentBullets;//当前子弹数
public float fireRate = 0.1f;//射速
private float fireTimer;//计时器
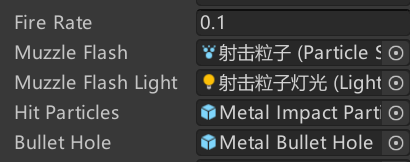
public ParticleSystem muzzleFlash;//枪口火焰特效
public Light muzzleFlashLight;//枪口火焰灯光
public GameObject hitParticles;//子弹击中粒子特效
public GameObject bulletHole;//弹孔
[Header(“声音设置”)]
private AudioSource audioSource;
public AudioClip AK47ShoundClip;/*枪声音效片段*/
[Tooltip(“没有子弹提示音效”)] public AudioClip
noreload;//换子弹1音效片段
[Tooltip(“普通换弹音效”)] public AudioClip
reloadAmmoLeftClip;//换子弹1音效片段
[Tooltip(“子弹全部打完音效”)] public AudioClip
reloadOutOFAmmoClip;//换子弹2音效片段(拉枪栓)
private bool isReloading;//判断是否在装弹
private bool isAiming;//判断是否在瞄准
public Transform casingSpawnPoint;//子弹壳抛出的位置
public Transform casingPrefab; //子弹壳预制体
[Header(“键位设置”)]
[SerializeField] [Tooltip(“填装子弹按键”)] public KeyCode
reloadInputName;
[SerializeField] [Tooltip(“查看武器按键”)] private KeyCode
inspectInputName;
[SerializeField] [Tooltip(“自动半自动切换按键”)] private KeyCode
GunShootModelInputName;
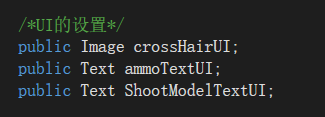
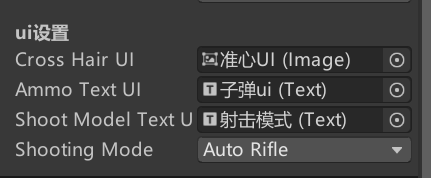
[Header(“ui设置”)]
[SerializeField] [Tooltip(“选择准心组件”)] public Image
crossHairUI;
[SerializeField] [Tooltip(“ui显示子弹”)] public Text ammoTextUI;
[SerializeField] [Tooltip(“ui显示射击模式”)] public Text
ShootModelTextUI;
[SerializeField] [Tooltip(“ui弹夹提示”)] public GameObject
NoreloadTextUI;
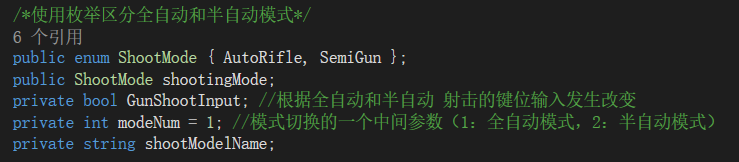
/*使用枚举区分全自动和半自动模式*/
public enum ShootMode { AutoRifle, SemiGun };
public ShootMode shootingMode;
private bool GunShootInput; //根据全自动和半自动 射击的键位输入发生改变
private int modeNum = 1;
//模式切换的一个中间参数(1:全自动模式,2:半自动模式)
private string shootModelName;
private Animator anim;
private Camera mainCamera;
//private bool GunShootInput;//是否在开枪
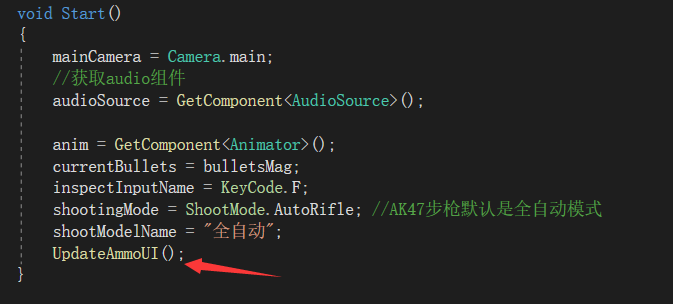
// Start is called before the first frame update
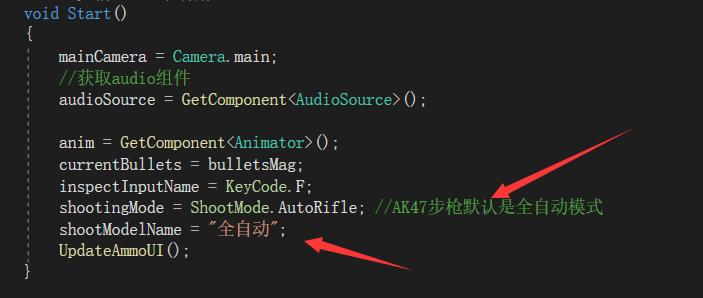
void Start()
{
mainCamera = Camera.main;
//获取audio组件
audioSource = GetComponent<AudioSource>();
anim = GetComponent<Animator>();
currentBullets = bulletsMag;
inspectInputName = KeyCode.F;
shootingMode = ShootMode.AutoRifle; //AK47步枪默认是全自动模式
shootModelName = “全自动”;
UpdateAmmoUI();
}
// Update is called once per frame
void Update()
{
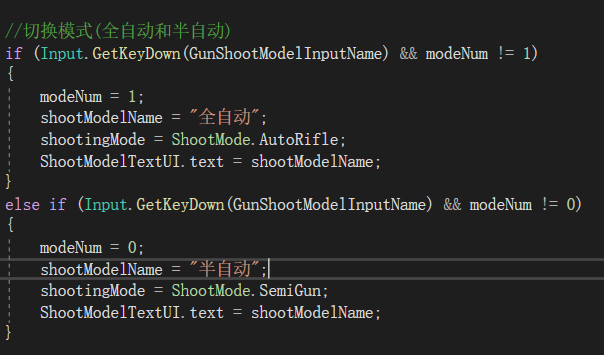
//切换模式(全自动和半自动)
if (Input.GetKeyDown(GunShootModelInputName) && modeNum != 1)
{
modeNum = 1;
shootModelName = “全自动”;
shootingMode = ShootMode.AutoRifle;
ShootModelTextUI.text = shootModelName;
}
else if (Input.GetKeyDown(GunShootModelInputName) && modeNum != 0)
{
modeNum = 0;
shootModelName = “半自动”;
shootingMode = ShootMode.SemiGun;
ShootModelTextUI.text = shootModelName;
}
/*控制射击模式的转换 后面就要用代码去动态控制了*/
switch (shootingMode)
{
case ShootMode.AutoRifle:
GunShootInput = Input.GetMouseButton(0);
fireRate = 0.1f;
break;
case ShootMode.SemiGun:
GunShootInput = Input.GetMouseButtonDown(0);
fireRate = 0.2f;
break;
}
//获取鼠标左键
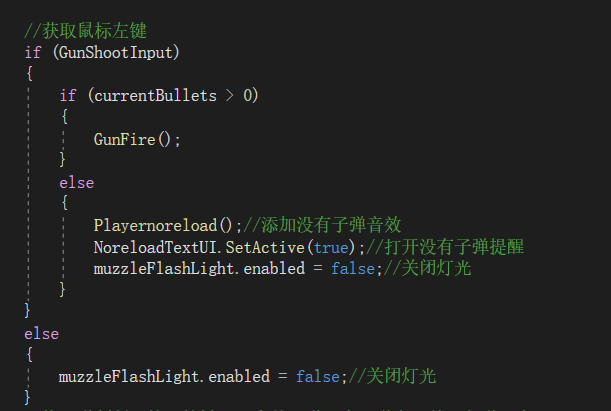
if (GunShootInput)
{
if (currentBullets > 0)
{
GunFire();
}
else
{
Playernoreload();//添加没有子弹音效
NoreloadTextUI.SetActive(true);//打开没有子弹提醒
muzzleFlashLight.enabled = false;//关闭灯光
}
}
else
{
muzzleFlashLight.enabled = false;//关闭灯光
}
//换子弹判断,按下按键后,当前子弹要少于弹夹,并且备弹要大于0
if (Input.GetKeyDown(reloadInputName) && currentBullets < bulletsMag &&
bulletLeft > 0)
{
Reload();
}
//查看武器按键触发
if (Input.GetKeyDown(inspectInputName))
{
//查看武器动画
anim.SetTrigger(“Inspect”);
}
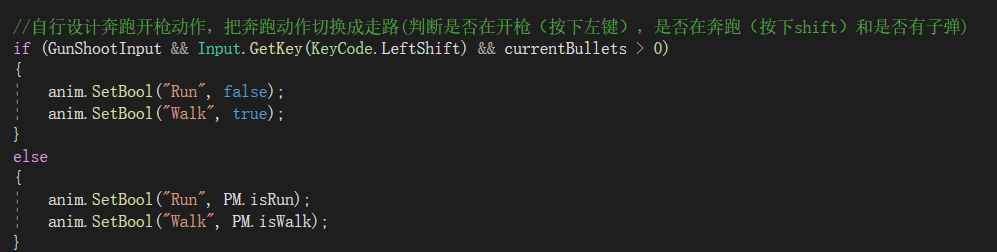
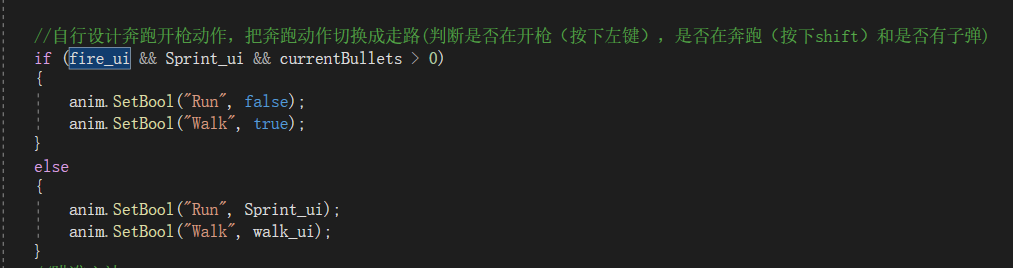
//自行设计奔跑开枪动作,把奔跑动作切换成走路(判断是否在开枪(按下左键),是否在奔跑(按下shift)和是否有子弹)
if (GunShootInput && Input.GetKey(KeyCode.LeftShift) && currentBullets
> 0)
{
anim.SetBool(“Run”, false);
anim.SetBool(“Walk”, true);
}
else
{
anim.SetBool(“Run”, PM.isRun);
anim.SetBool(“Walk”, PM.isWalk);
}
//瞄准方法
DoingAim();
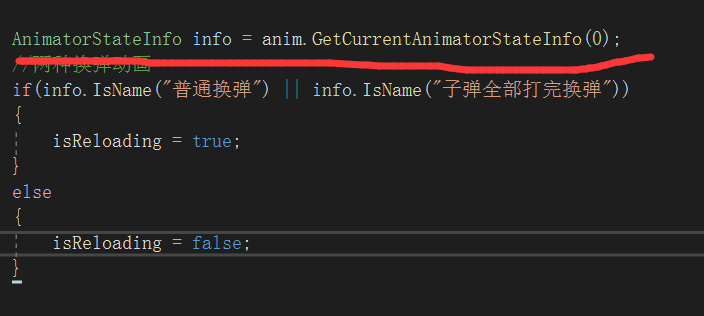
AnimatorStateInfo info = anim.GetCurrentAnimatorStateInfo(0);
//两种换弹动画
if(info.IsName(“普通换弹”) || info.IsName(“子弹全部打完换弹”))
{
isReloading = true;
}
else
{
isReloading = false;
}
//计时器加时间
if (fireTimer < fireRate)
{
fireTimer += Time.deltaTime;
}
}
//射击
public void GunFire()
{
//控制射速,若计时器值比射速还小,那么跳出方法不执行,isReloading换弹动画播放状态,pm.isrun是是否在奔跑,
Time.timeScale == 0 解决暂停菜单走火问题
if (fireTimer < fireRate || currentBullets <= 0 || isReloading
|| Time.timeScale == 0)
{
muzzleFlashLight.enabled = false;//关闭灯光
return;
}
RaycastHit hit;
Vector3 shootDirection = shooterPoint.forward;//向前的射击方向
if (Physics.Raycast(shooterPoint.position, shootDirection, out hit,
range))//判断射击
{
Debug.Log(hit.transform.name + “打到了”);
GameObject hitParticleEffect = Instantiate(hitParticles, hit.point,
Quaternion.FromToRotation(Vector3.up,
hit.normal));//实例出子弹击中的火光特效
GameObject bulletHoleEffect = Instantiate(bulletHole, hit.point,
Quaternion.FromToRotation(Vector3.up, hit.normal));//实例出弹孔特效
//回收特效
Destroy(hitParticleEffect, 1f);
Destroy(bulletHoleEffect, 3f);
}
if (!isAiming)
{
anim.CrossFadeInFixedTime(“fire”, 0.1f);
//播放普通开火动画(使用动画的淡出淡入效果)
}
else
{//瞄准状态下,播放瞄准的开火动画
anim.Play(“aim_fire”, 0, 0f);
}
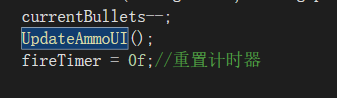
//实例抛弹壳
Instantiate(casingPrefab, casingSpawnPoint.transform.position,
casingSpawnPoint.transform.rotation);
currentBullets–;
//更新ui子弹
UpdateAmmoUI();
muzzleFlash.Play();//火光粒子特效
PlayerShootSound();//播放射击音效
muzzleFlashLight.enabled = true;//启用灯光
fireTimer = 0f;//重置计时器
//自定义奔跑开枪
}
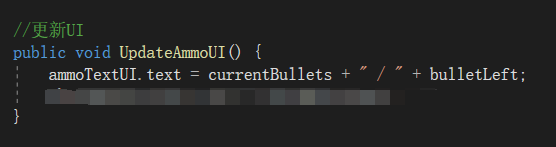
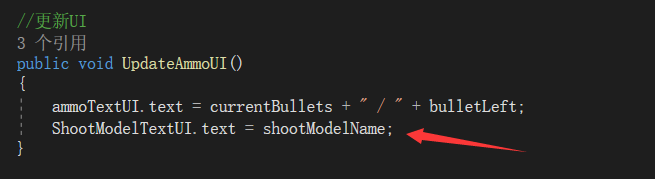
//更新UI
public void UpdateAmmoUI()
{
ammoTextUI.text = currentBullets + " / " + bulletLeft;
ShootModelTextUI.text = shootModelName;
}
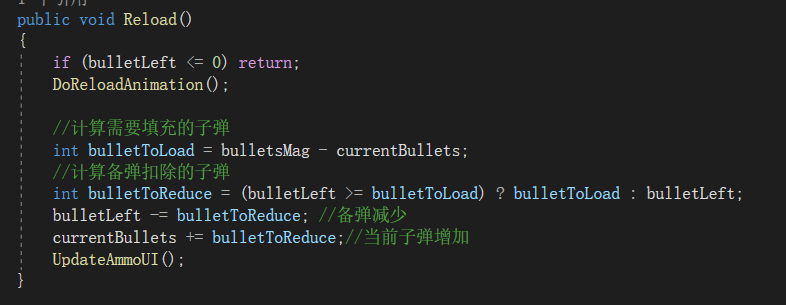
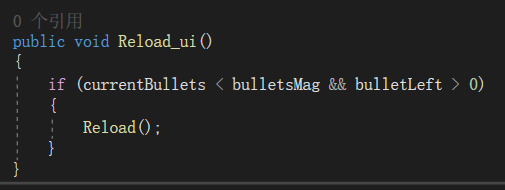
public void Reload()
{
if (bulletLeft <= 0) return;
DoReloadAnimation();
//计算需要填充的子弹
int bulletToLoad = bulletsMag - currentBullets;
//计算备弹扣除的子弹
int bulletToReduce = (bulletLeft >= bulletToLoad) ? bulletToLoad :
bulletLeft;
bulletLeft -= bulletToReduce; //备弹减少
currentBullets += bulletToReduce;//当前子弹增加
NoreloadTextUI.SetActive(false);//关闭没有子弹提醒
UpdateAmmoUI();
}
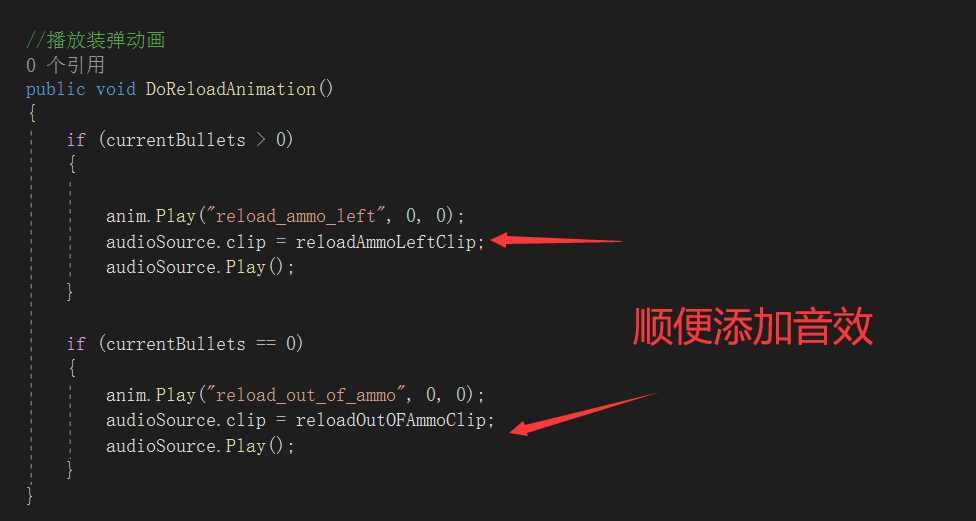
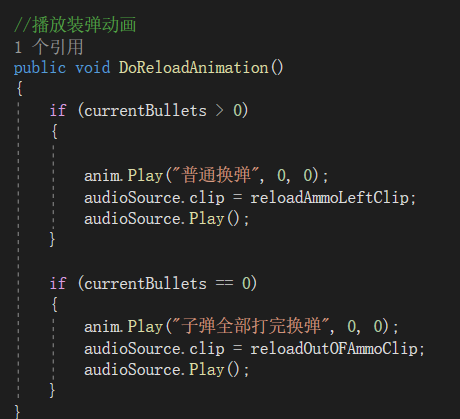
//播放装弹动画
public void DoReloadAnimation()
{
if (currentBullets > 0)
{
anim.Play(“普通换弹”, 0, 0);
audioSource.clip = reloadAmmoLeftClip;
audioSource.Play();
}
if (currentBullets == 0)
{
anim.Play(“子弹全部打完换弹”, 0, 0);
audioSource.clip = reloadOutOFAmmoClip;
audioSource.Play();
}
}
//播放射击音效
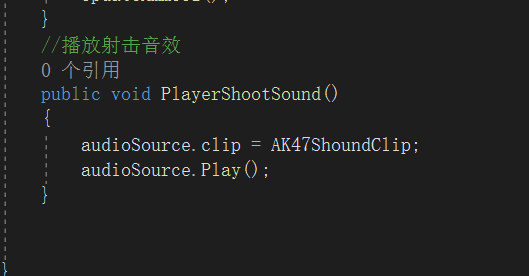
public void PlayerShootSound()
{
audioSource.clip = AK47ShoundClip;
audioSource.Play();
}
//播放没有子弹音效
public void Playernoreload()
{
audioSource.clip = noreload;
audioSource.Play();
}
//瞄准的逻辑
public void DoingAim()
{
//GetMouseButton(1)鼠标右键
if (Input.GetMouseButton(1) && !isReloading && !PM.isRun)
{
isAiming = true;
anim.SetBool(“Aim”, isAiming);
crossHairUI.gameObject.SetActive(false);
mainCamera.fieldOfView = 25;//瞄准的时候摄像机视野变小
}
else
{
isAiming = false;
anim.SetBool(“Aim”, isAiming);
crossHairUI.gameObject.SetActive(true);
mainCamera.fieldOfView = 60;//瞄准的时候摄像机视野恢复
}
}
}
WeaponSway:
using System.Collections;
using System.Collections.Generic;
using UnityEngine;
/// <summary>
/// 武器摇摆
/// </summary>
public class WeaponSway : MonoBehaviour
{
/*摇摆的参数*/
public float amout; //摇摆幅度
public float smoothAmout;//一个平滑值
public float maxAmout;//最大摇摆幅度
private Vector3 originPostion; //初始位置
// Start is called before the first frame update
void Start()
{
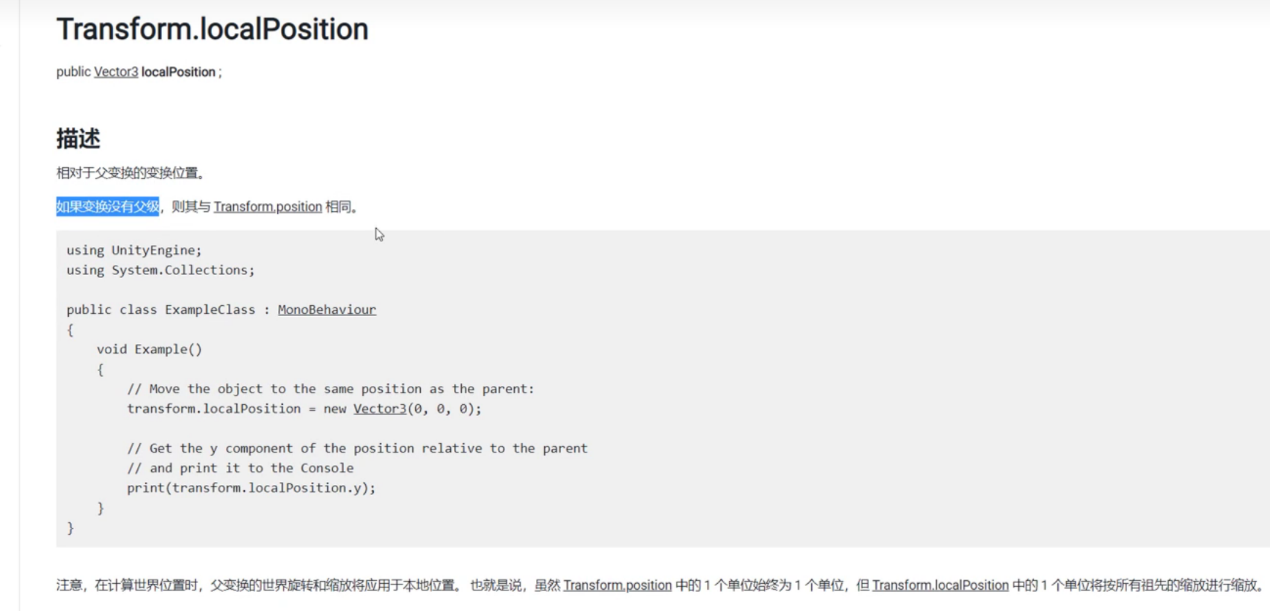
//自身位置(相对于父级物体变换得位置)
originPostion = transform.localPosition;
}
// Update is called once per frame
void Update()
{
//设置武器手臂模型位置得值,
float movementX = -Input.GetAxis(“Mouse X”) * amout;
float movementY = -Input.GetAxis(“Mouse Y”) * amout;
//限制
movementX = Mathf.Clamp(movementX, -maxAmout, maxAmout);
movementY = Mathf.Clamp(movementY, -maxAmout, maxAmout);
Vector3 finallyPostion = new Vector3(movementX, movementY, 0);
//手柄位置变换
transform.localPosition = Vector3.Lerp(transform.localPosition,
finallyPostion + originPostion, Time.deltaTime * smoothAmout);
}
}
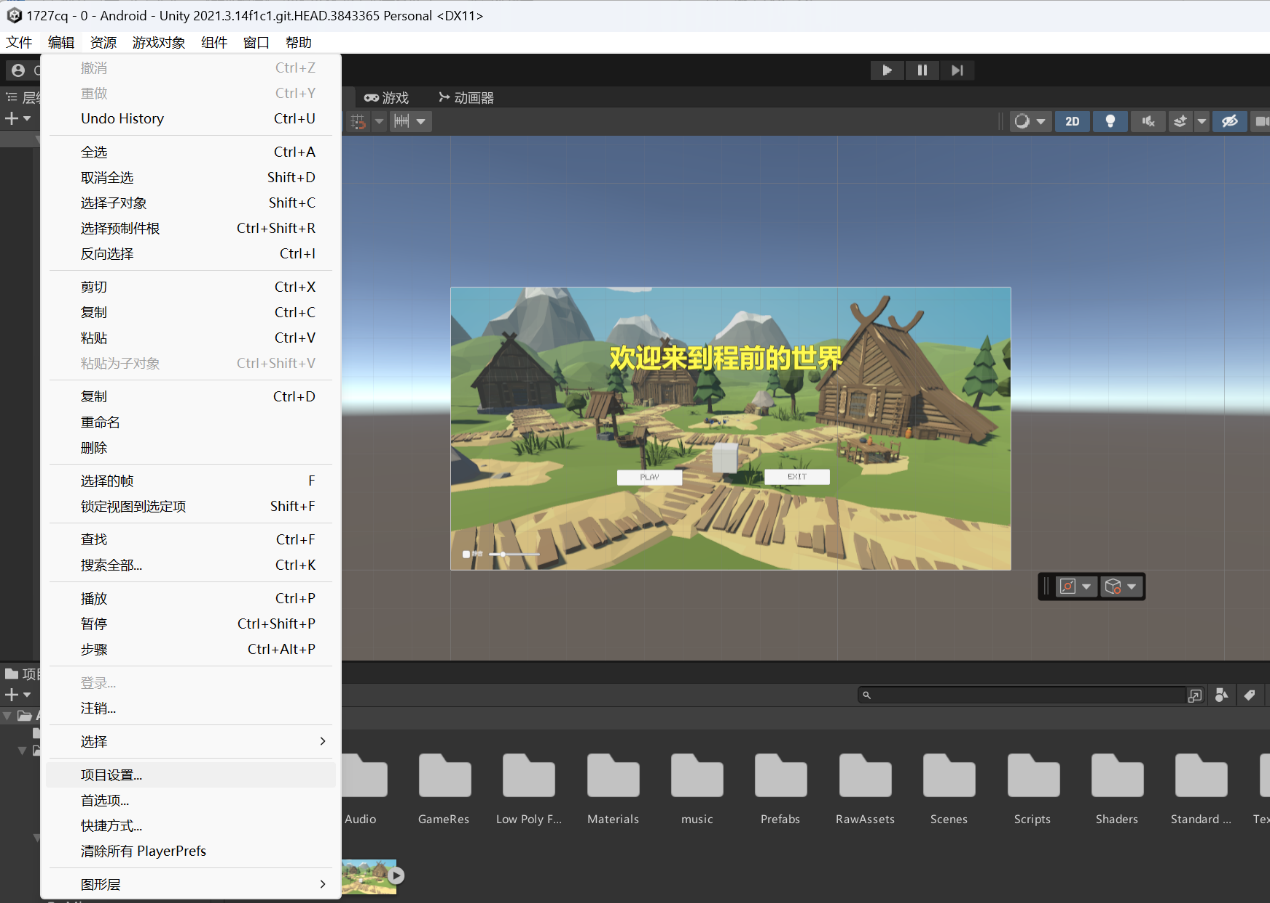
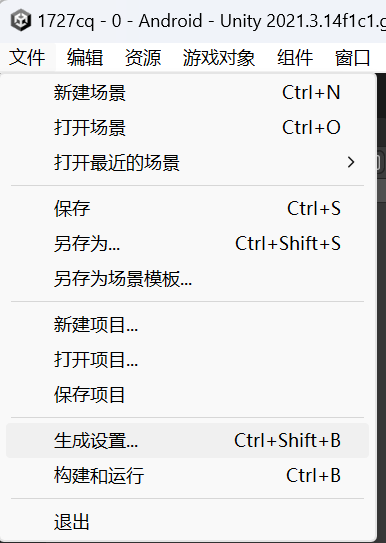
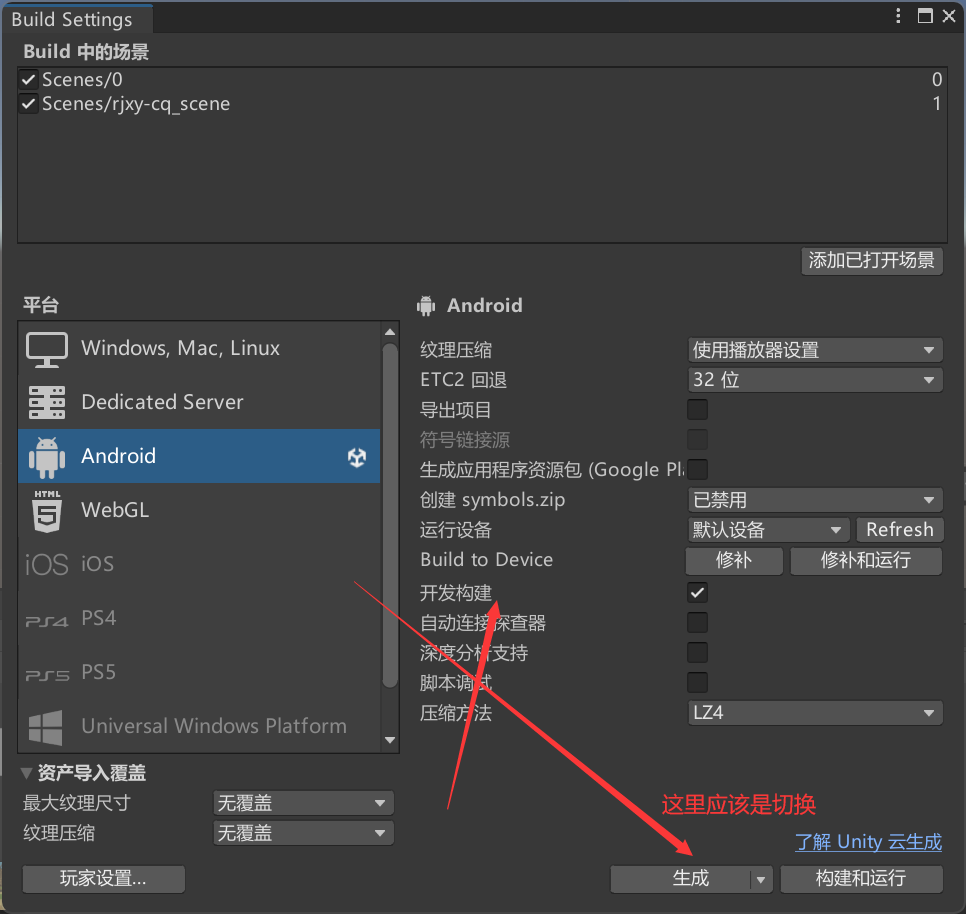
(5)编译手机端apk
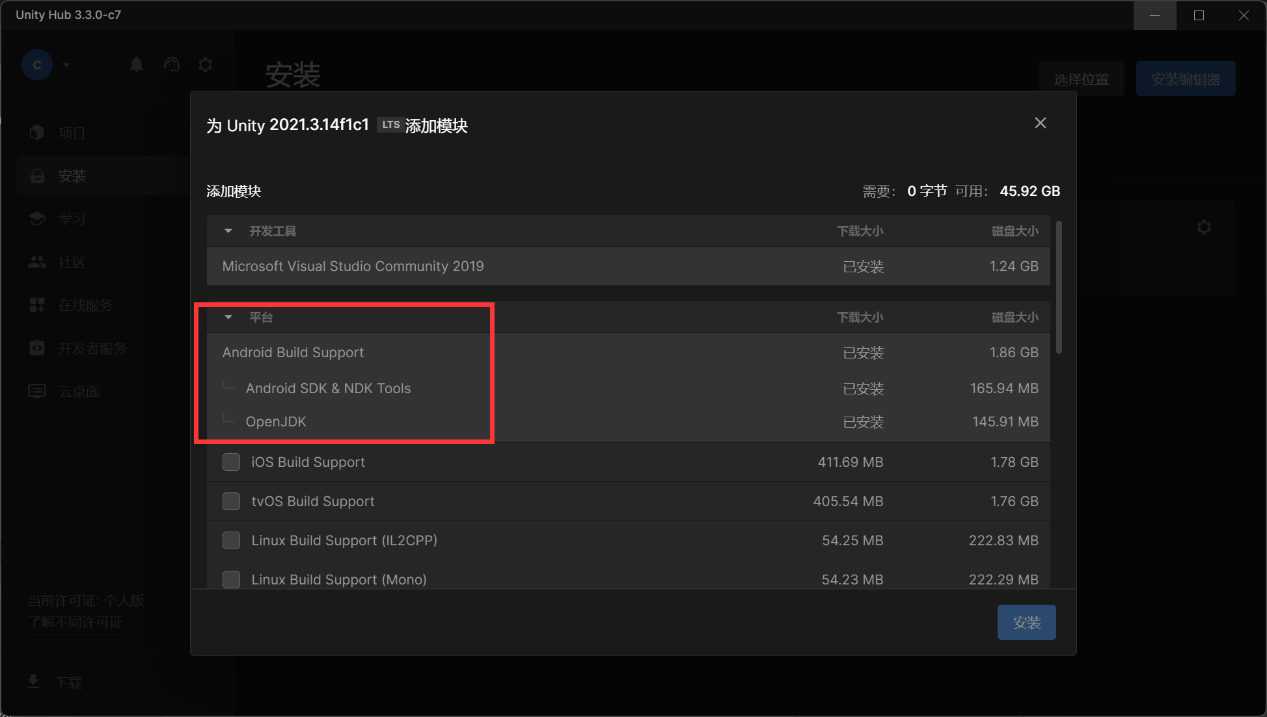
安装安卓相关组件
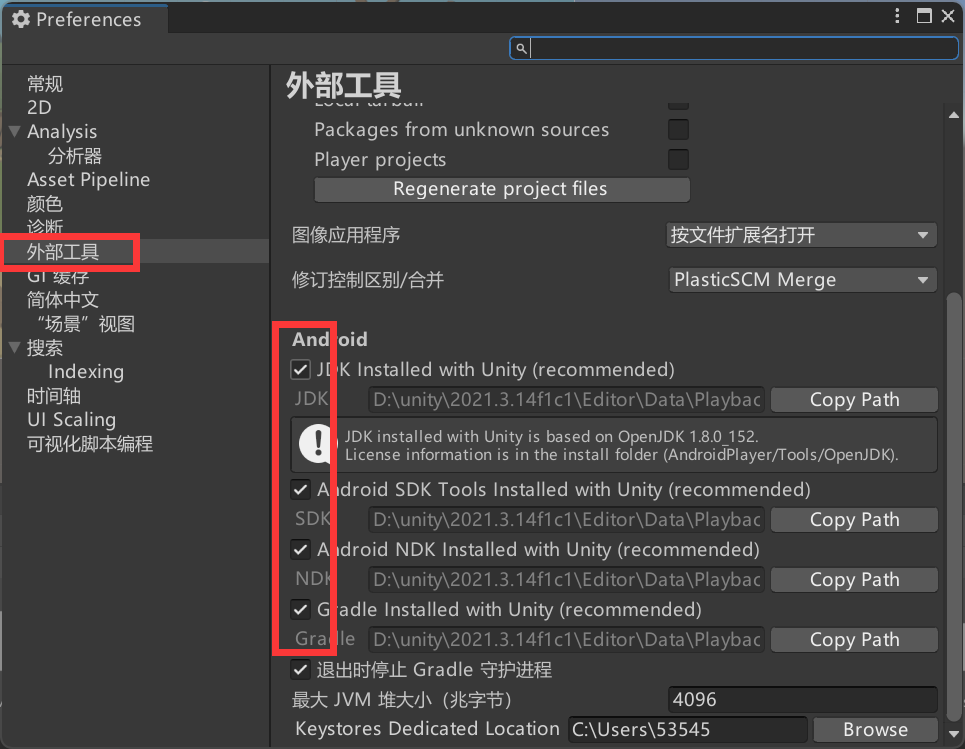
全部勾选
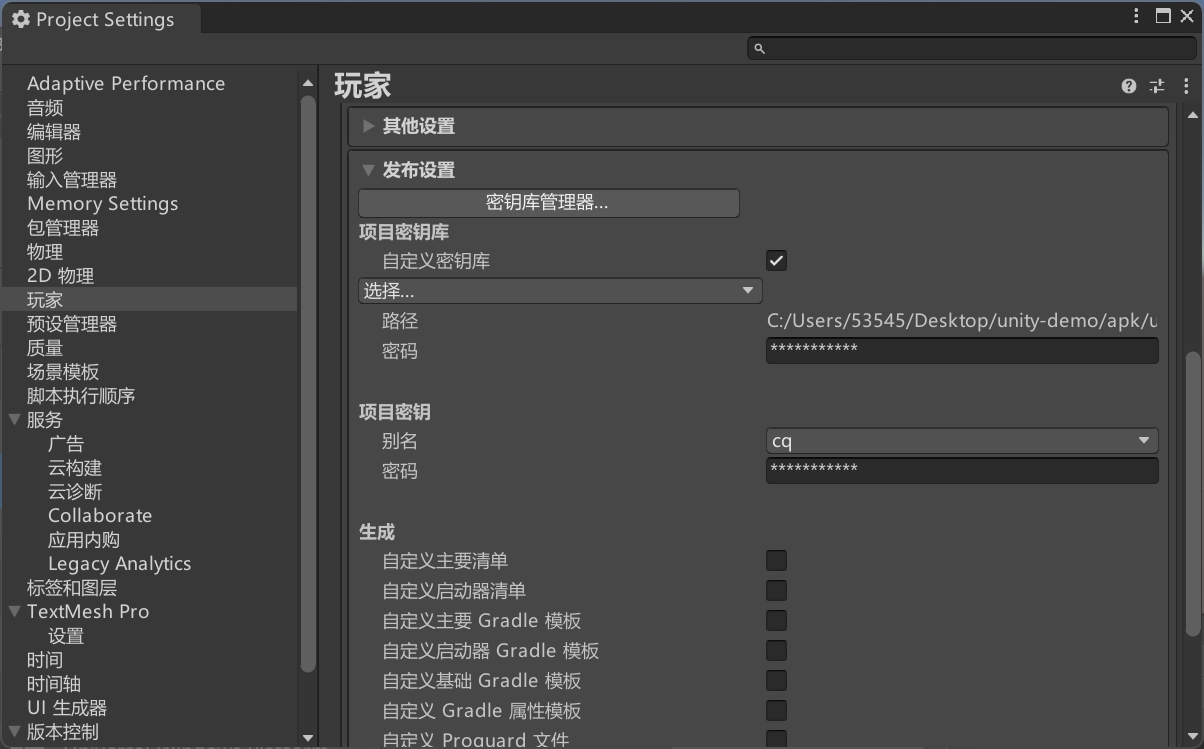
点击密钥库管理器
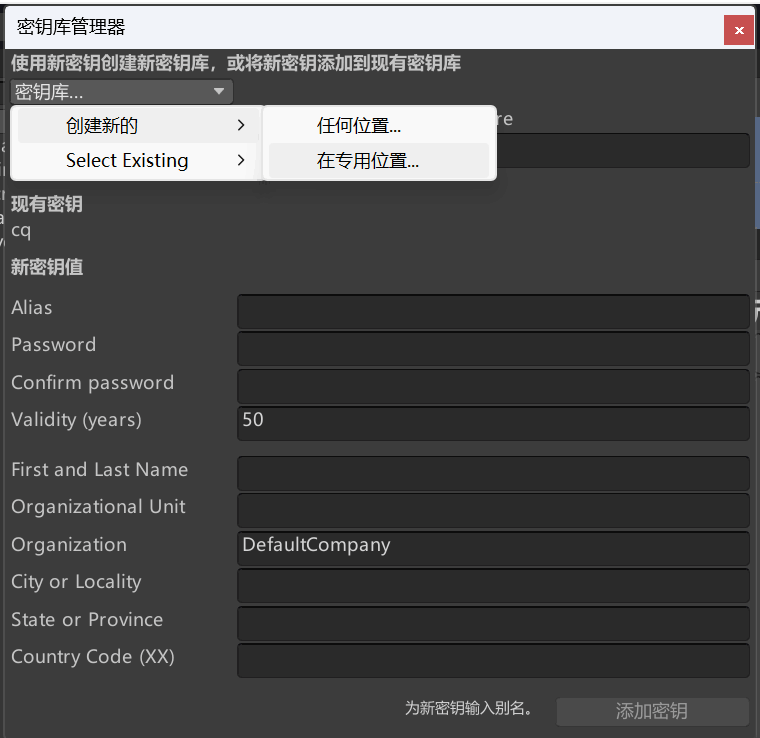
创建
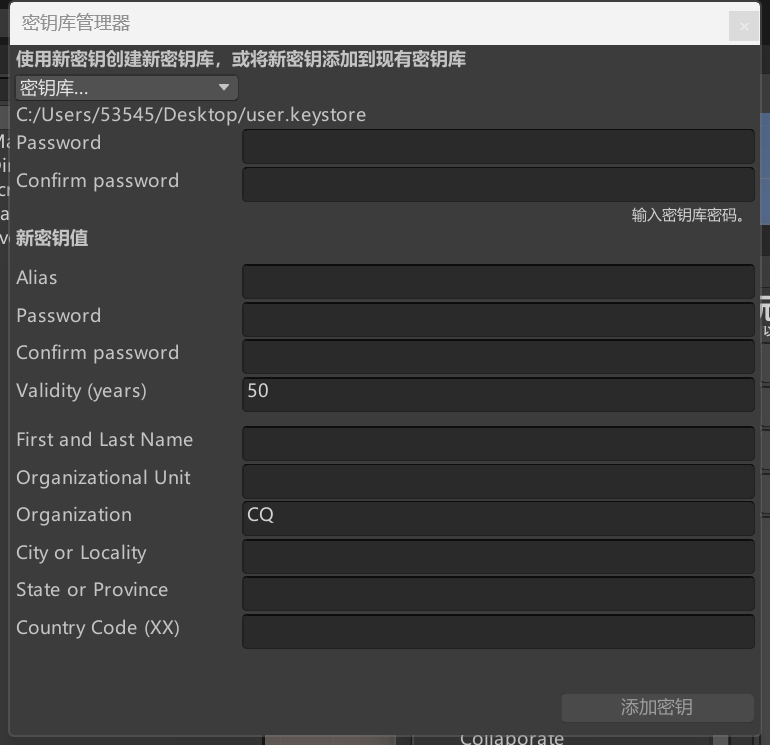
Alias 是给你新建的 key 起一个别名,password 和 Confirm password
输入相同的你想要设置的密码,Organization
填上你组织的名称,可以先随便起一个,之后点击右下角的 添加密钥。
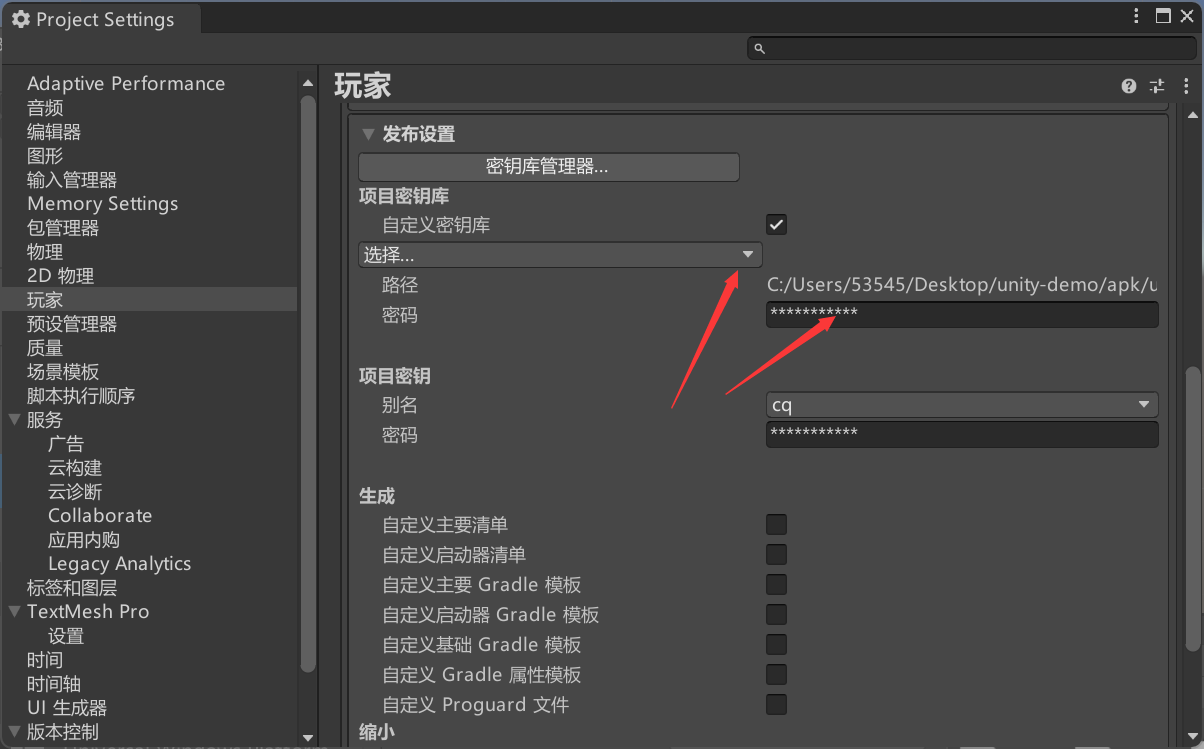
选择密钥
设置名称版本号
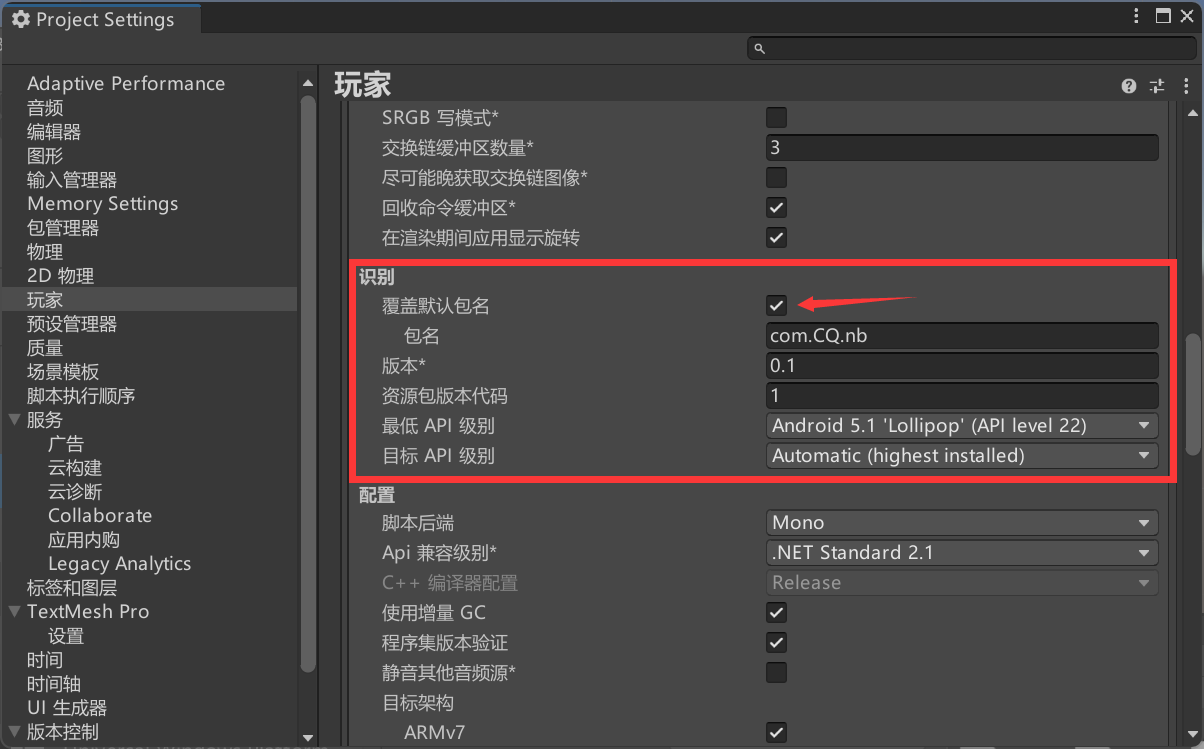
设置报名,格式为com.xxxxxxxx
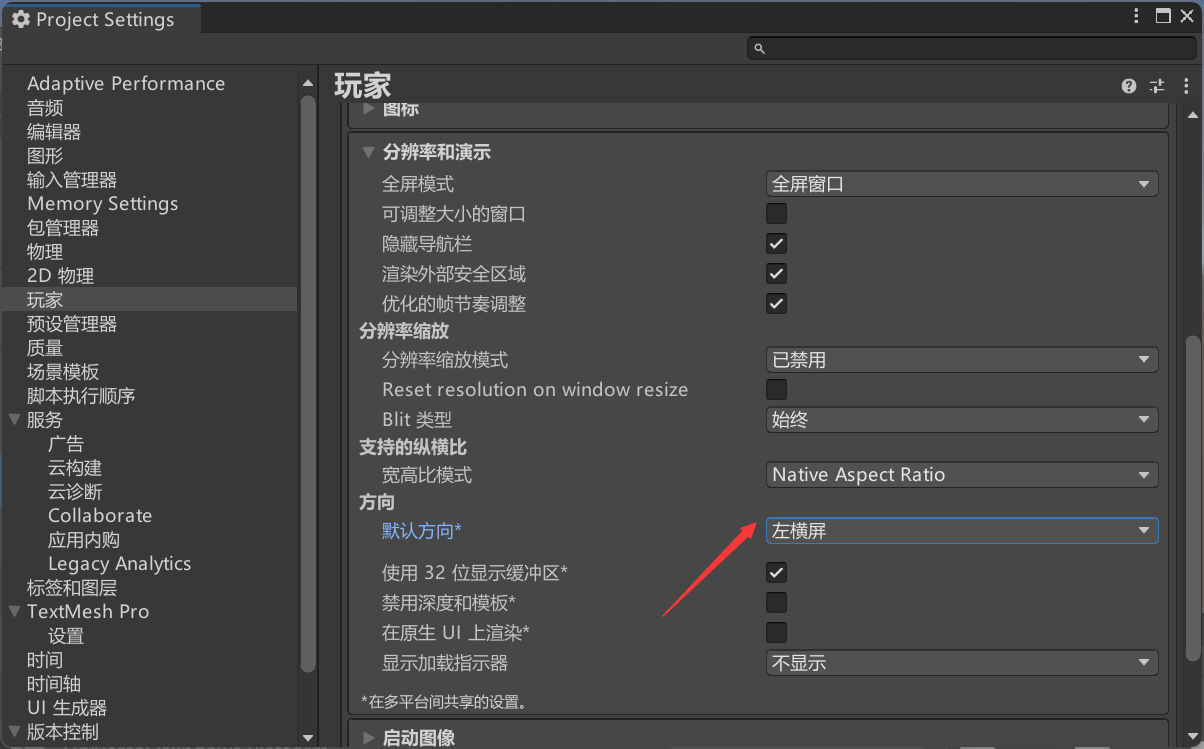
然后设置横屏模式
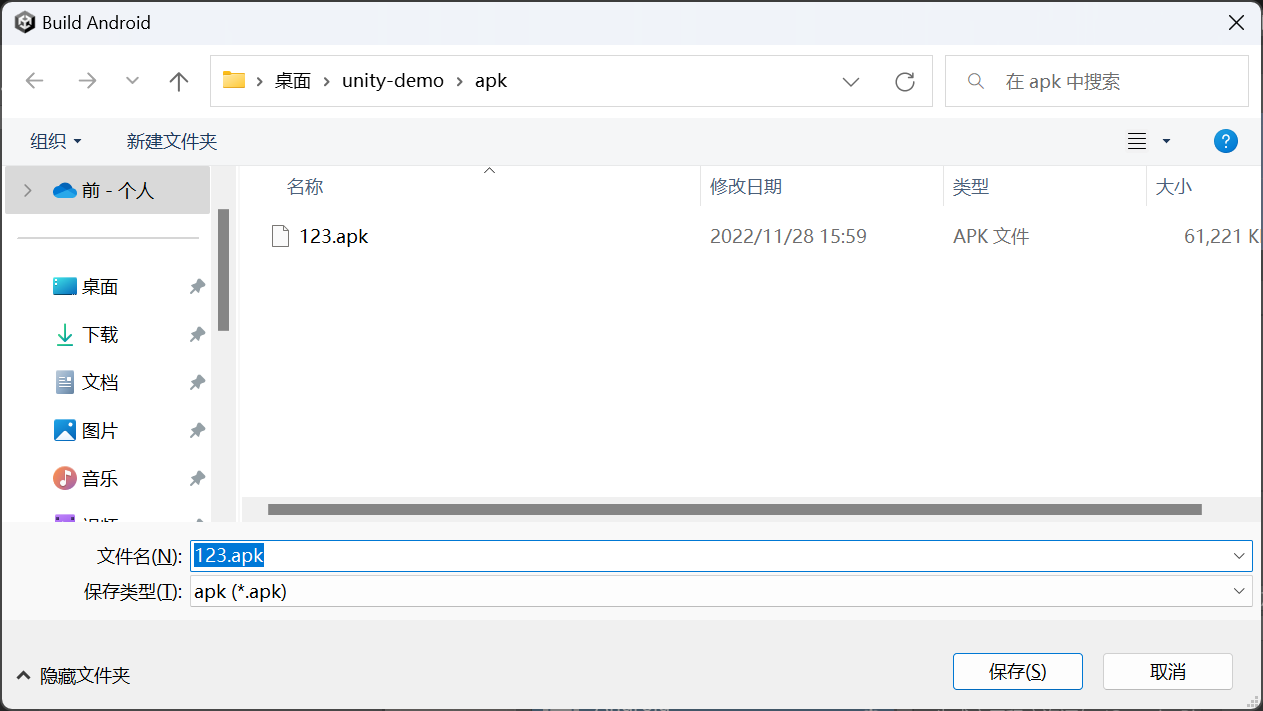
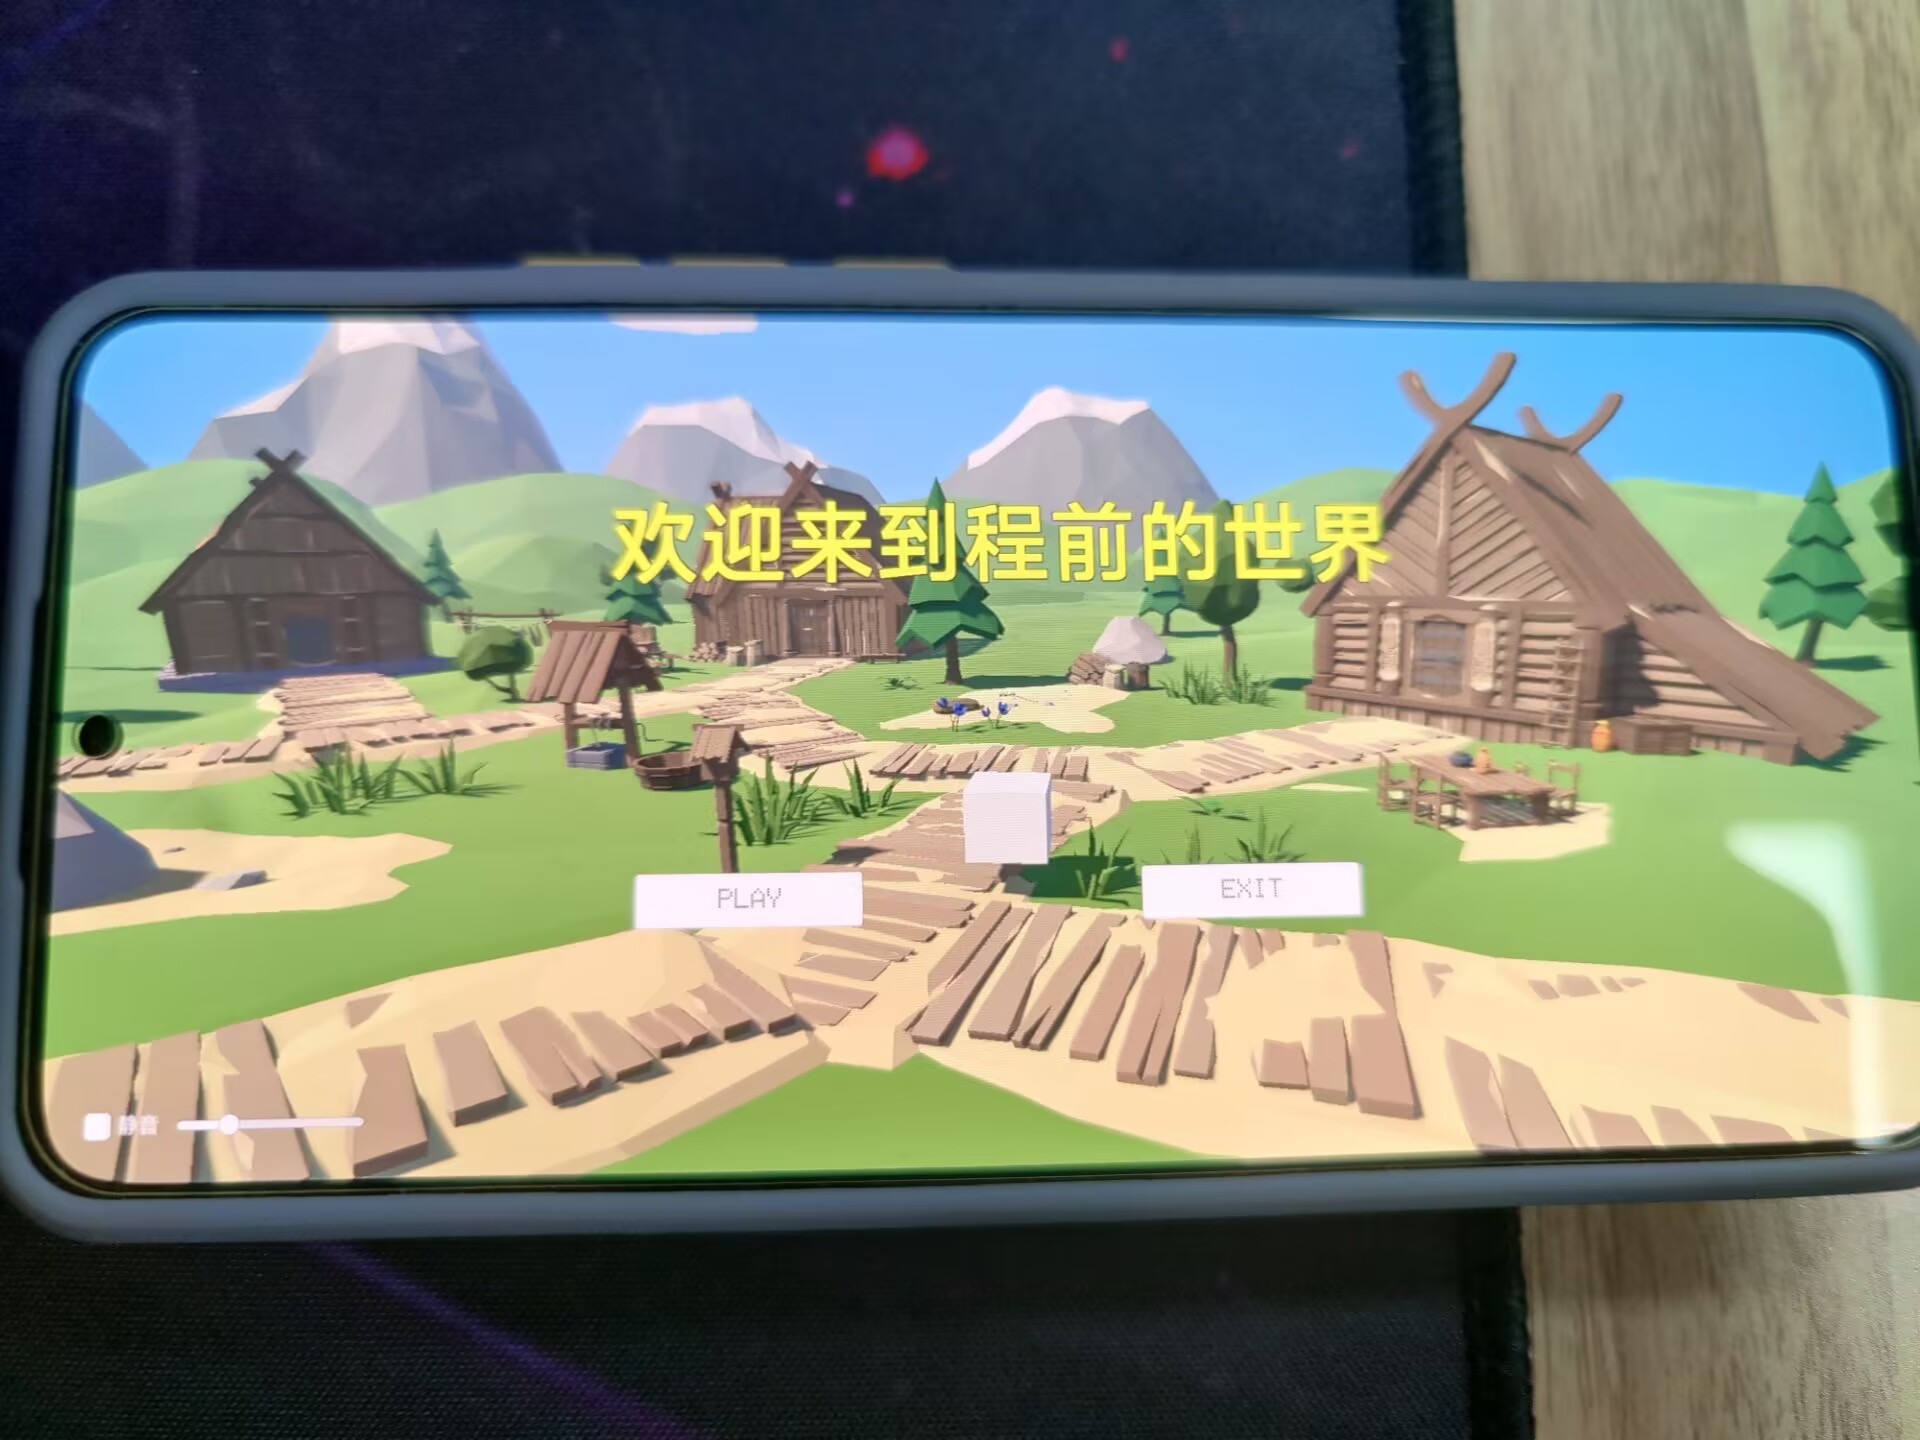
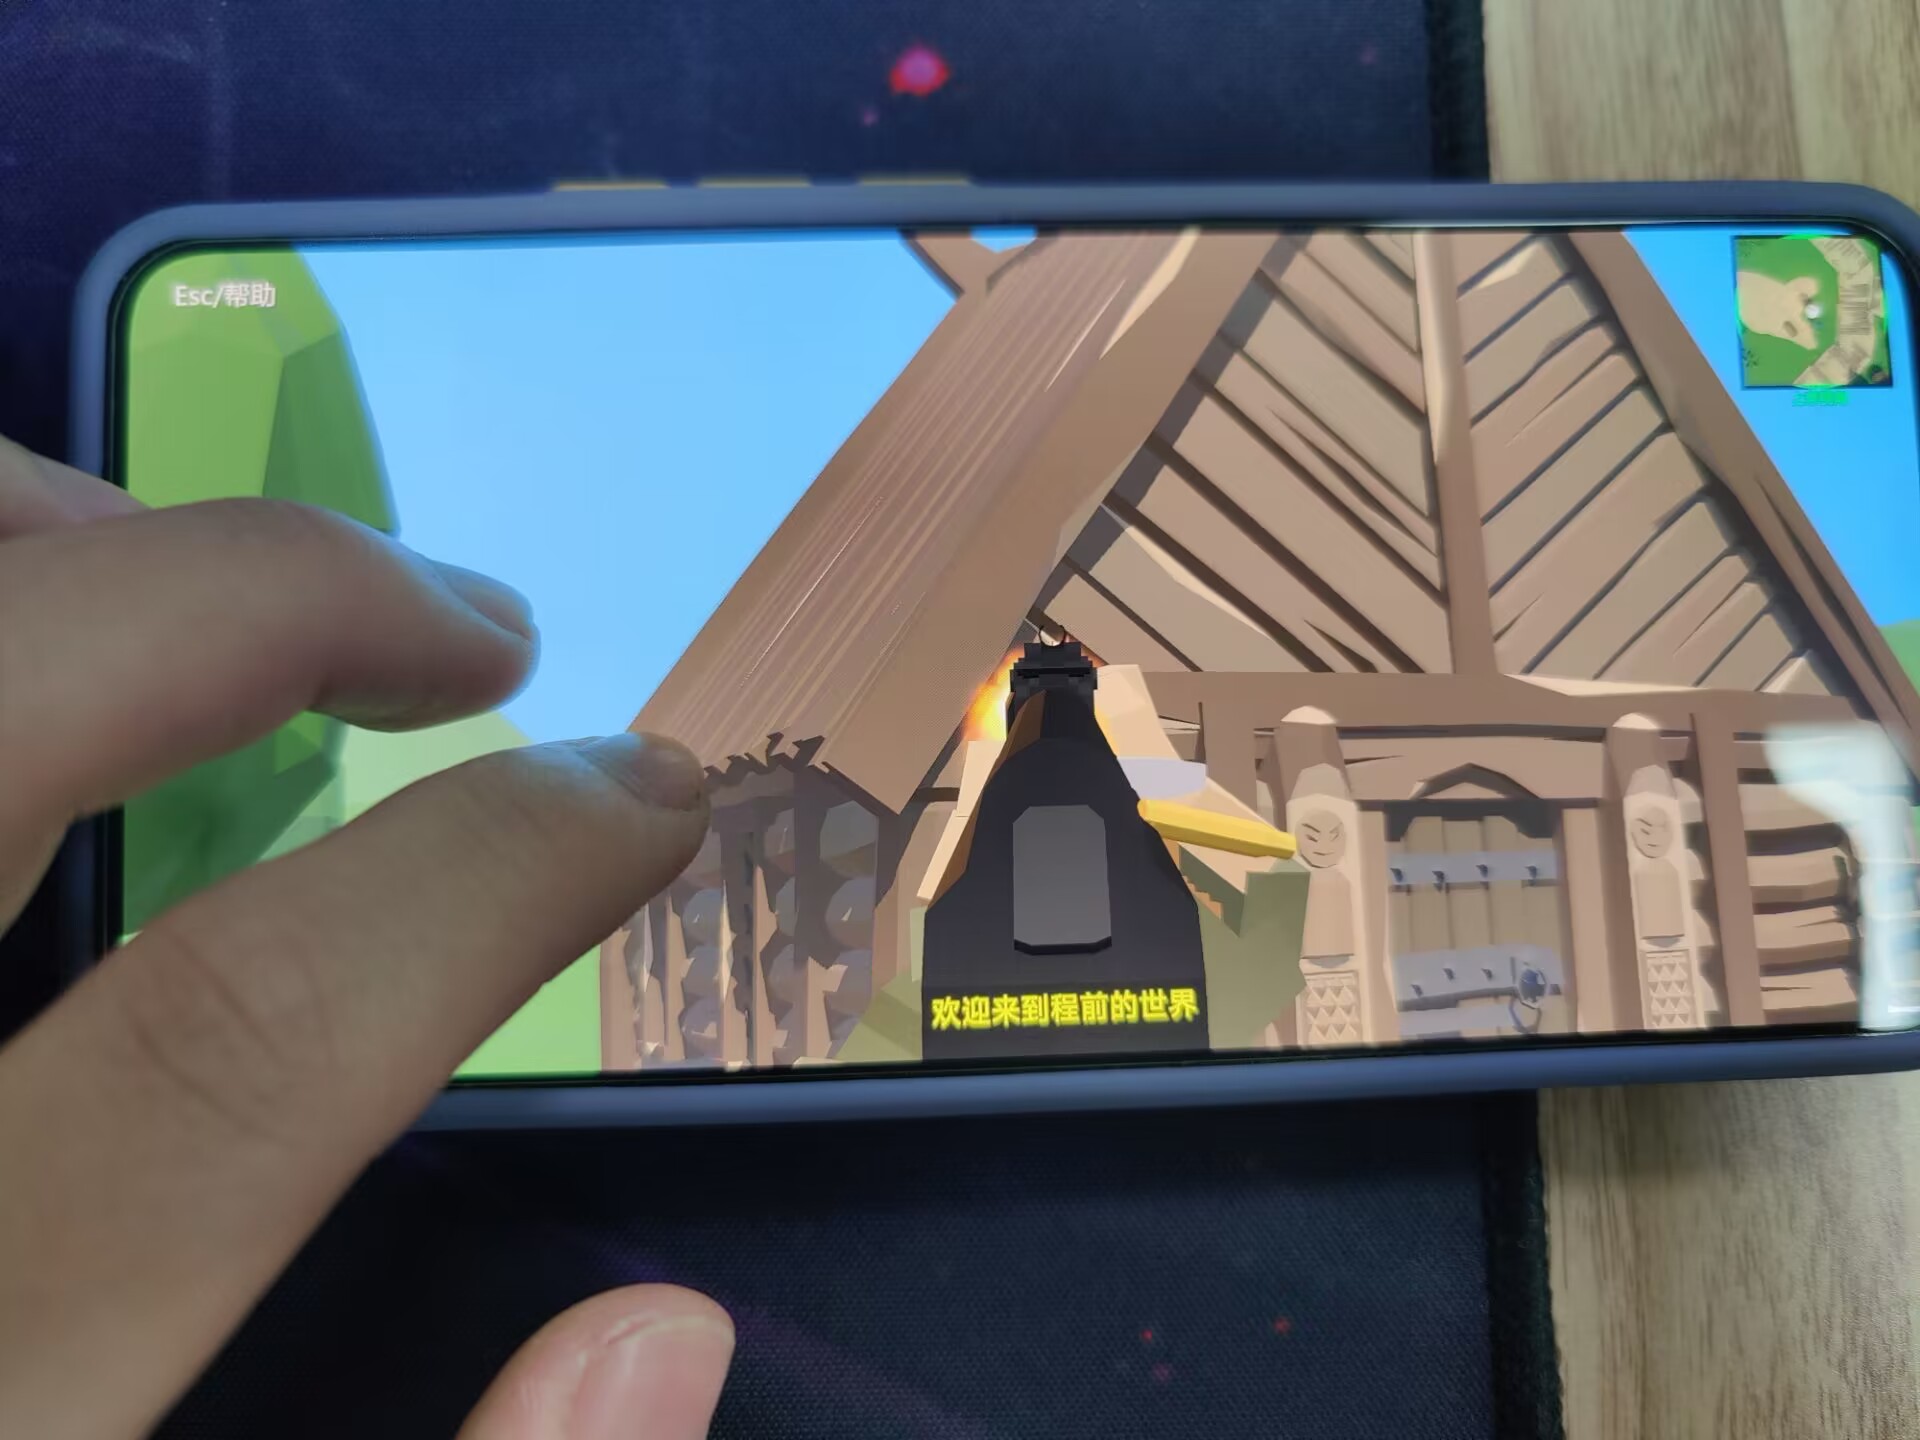
生成apk,安装即可
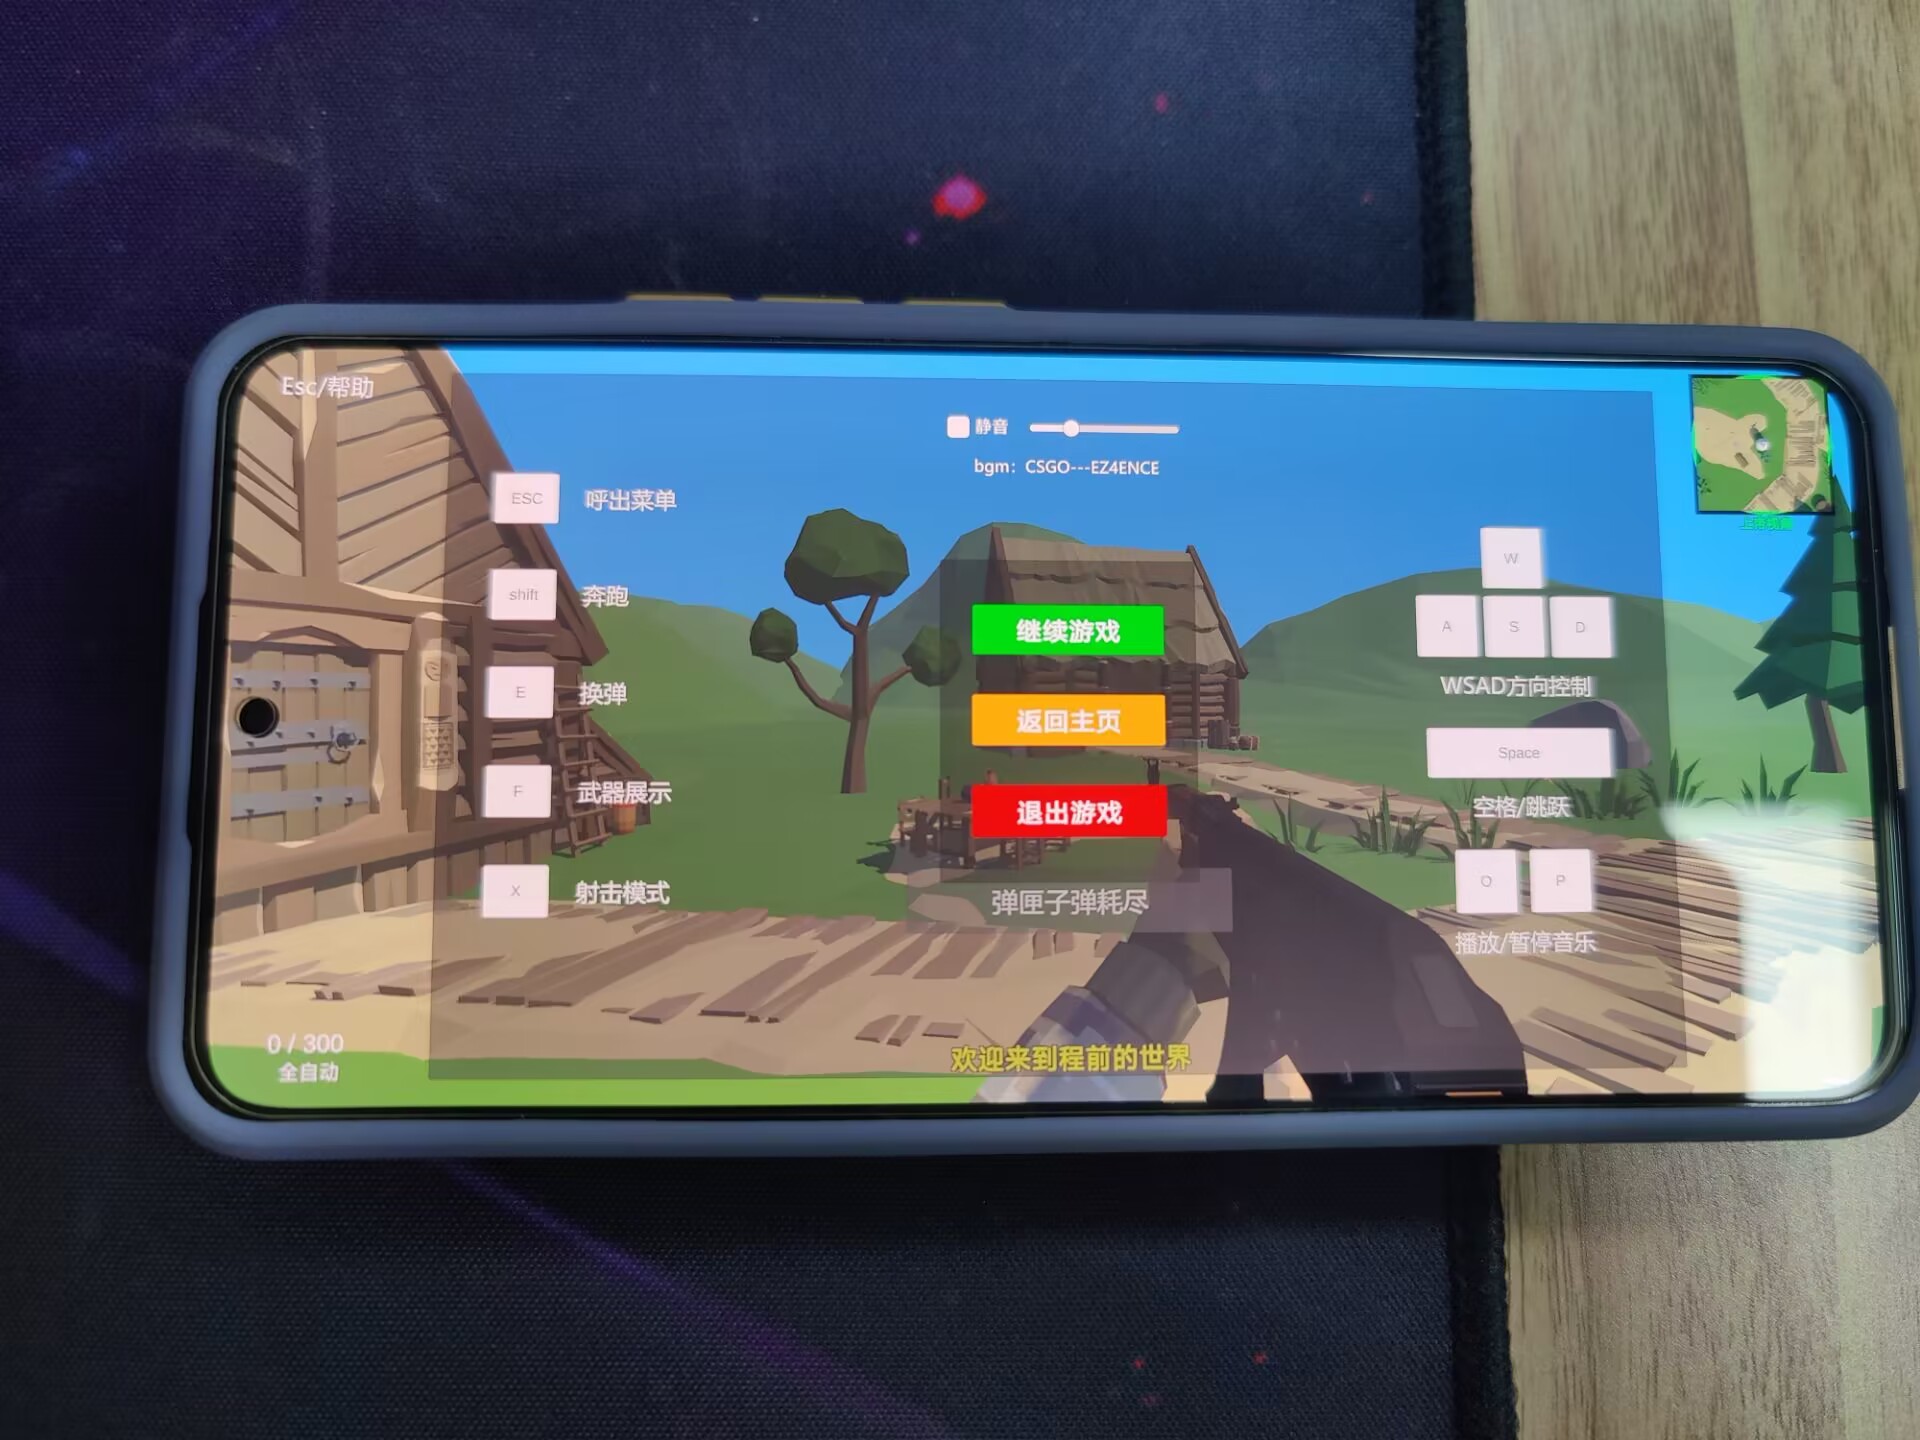
(6)心血来潮适配安卓版apk—添加摇杆
在网上搜了很多摇杆,逐一了解过后,选择官方发布的解决方案,别问,问就是官方yyds!
参考教程:
Unity3D 官方资源包Standard
Assets导入:https://blog.csdn.net/Sakuya__/article/details/113815974
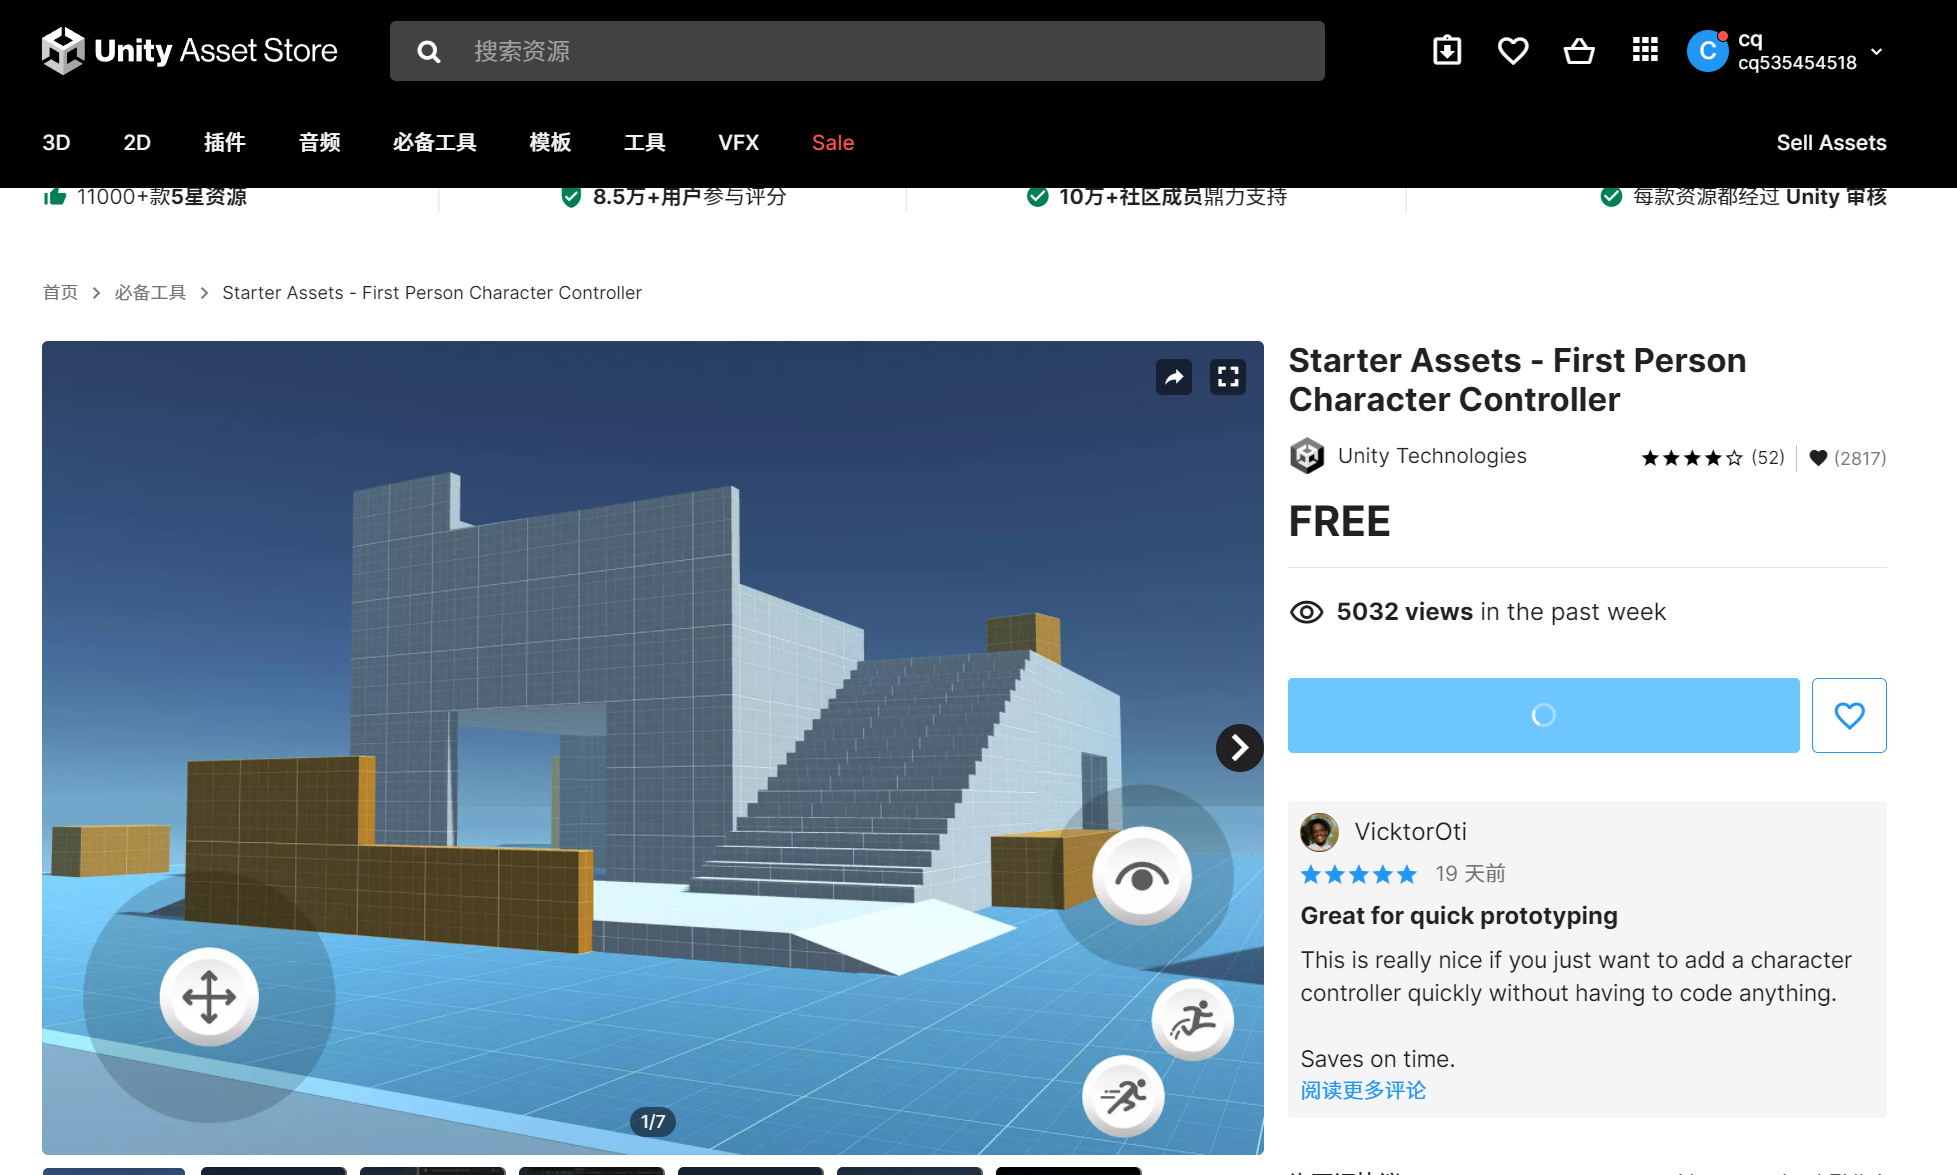
然后看了官方介绍教程:
Starter Assets 轻量的角色控制器:
https://www.bilibili.com/video/BV1oU4y137D6/
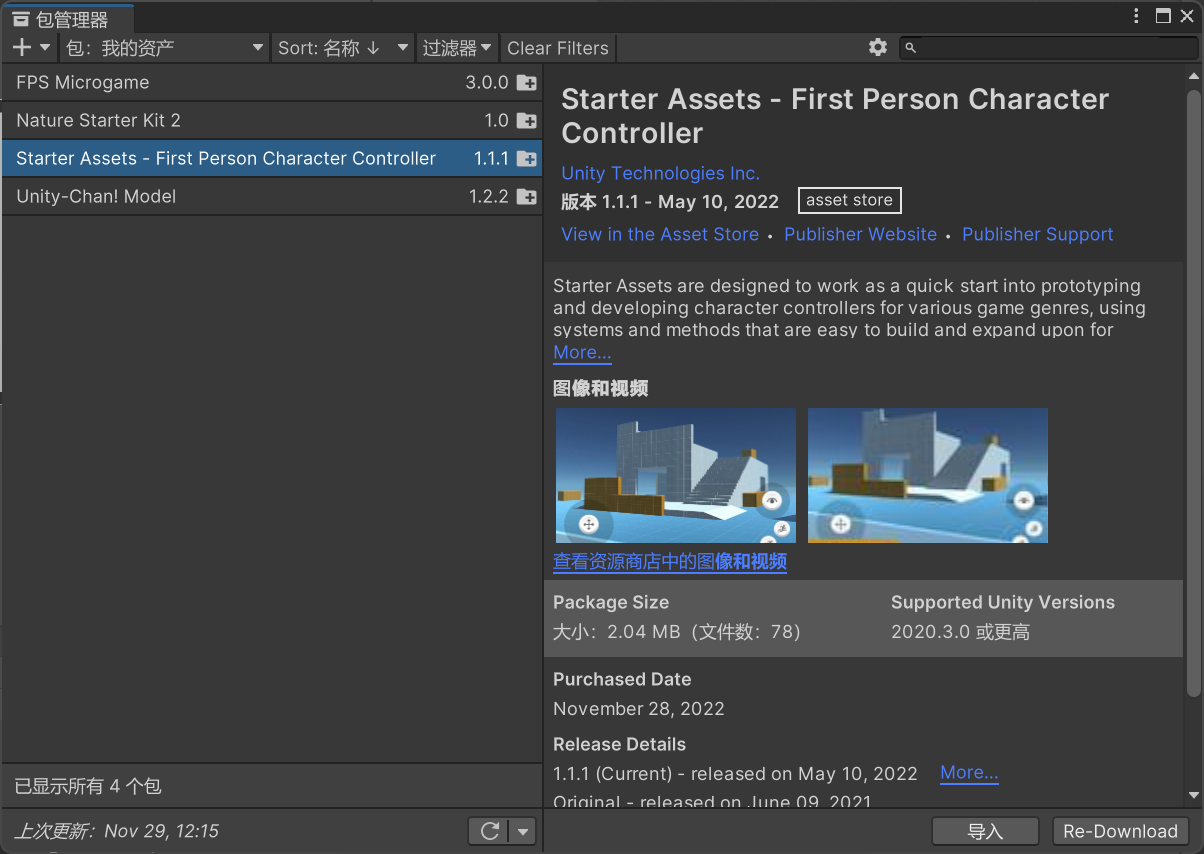
包管理器导入

这里我选择的是一键生成官方案例,然后在案例的基础上进行修改适配。
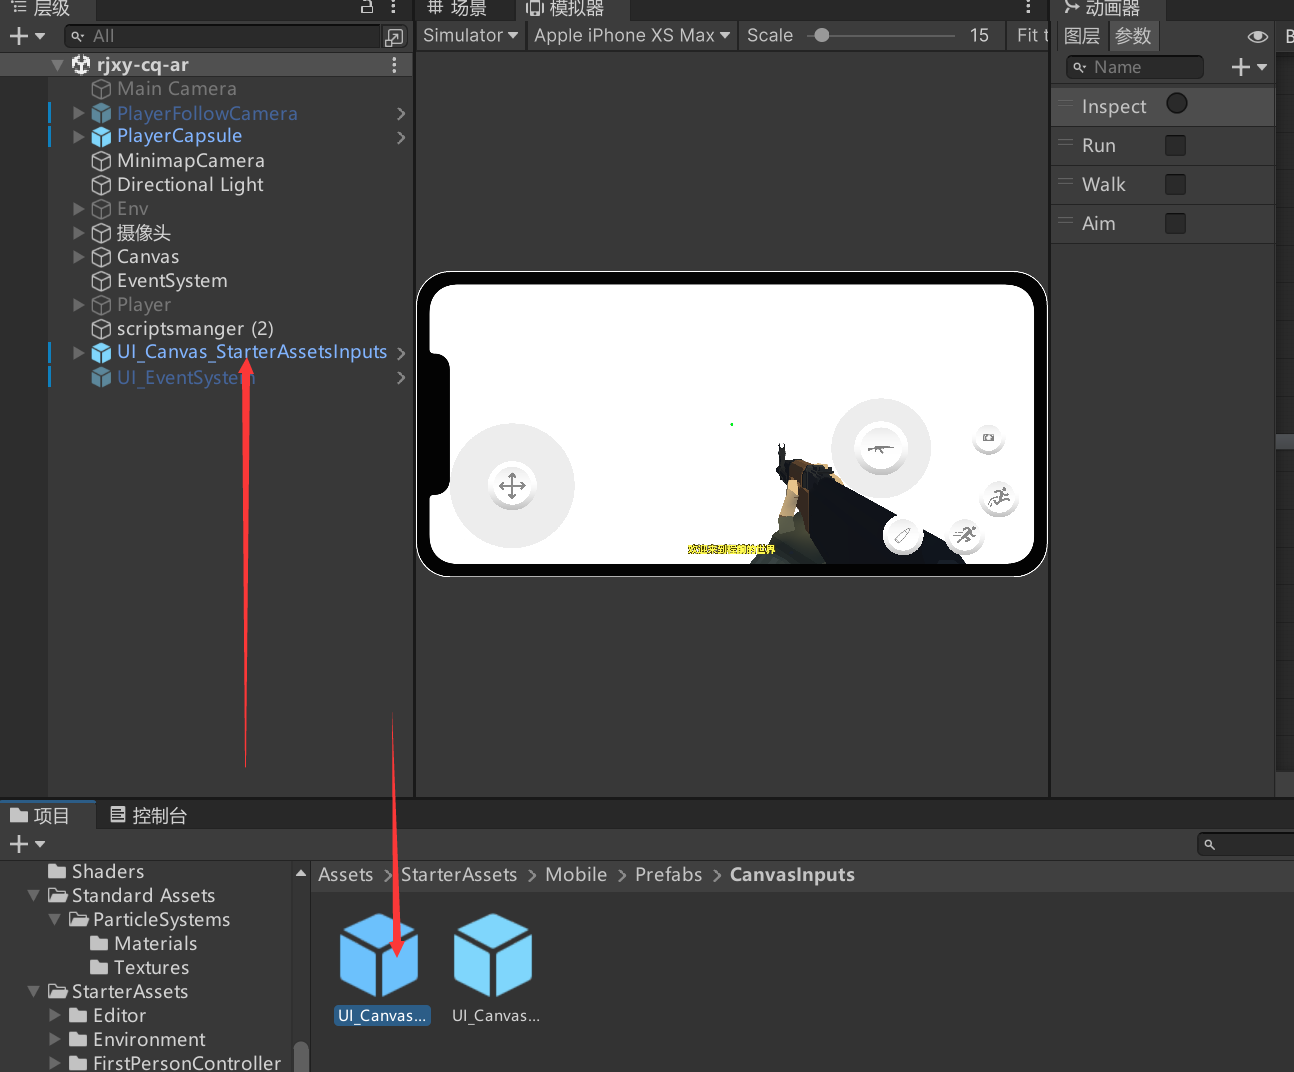
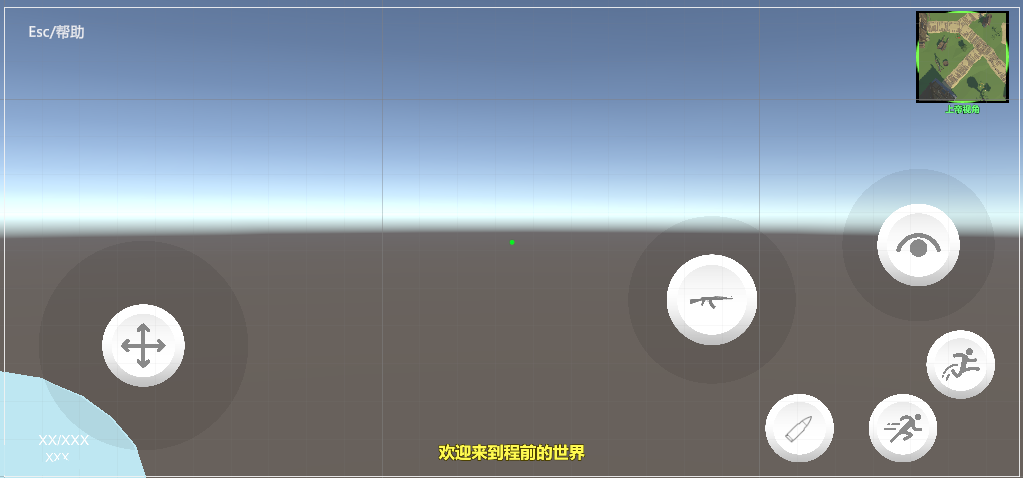
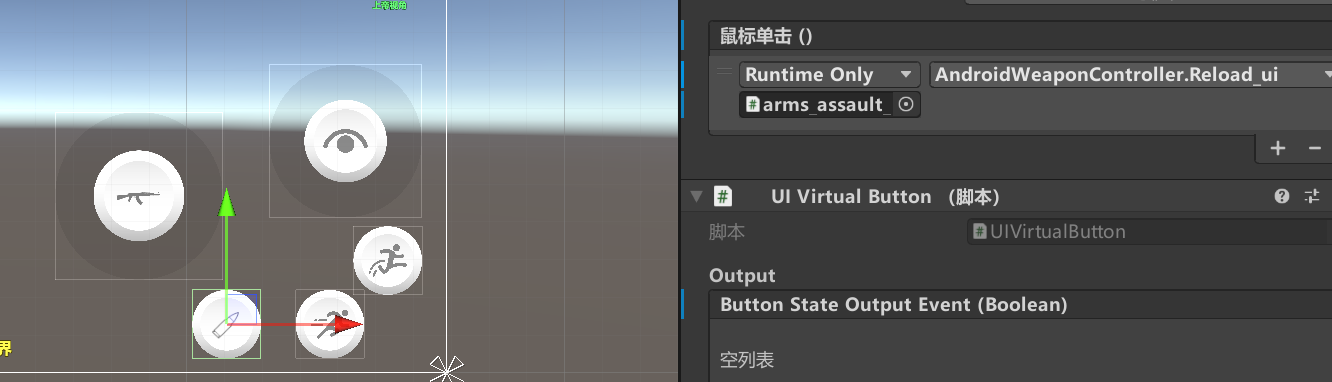
然后拖入对应的ui界面示例
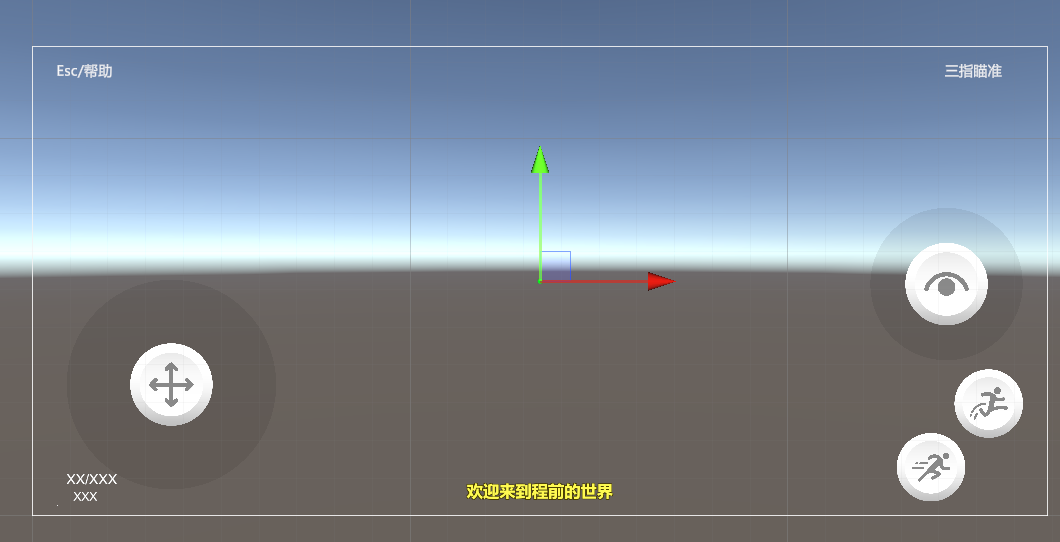
这是官方自带的ui界面,我们对他进行魔改,加入开火键和换弹键
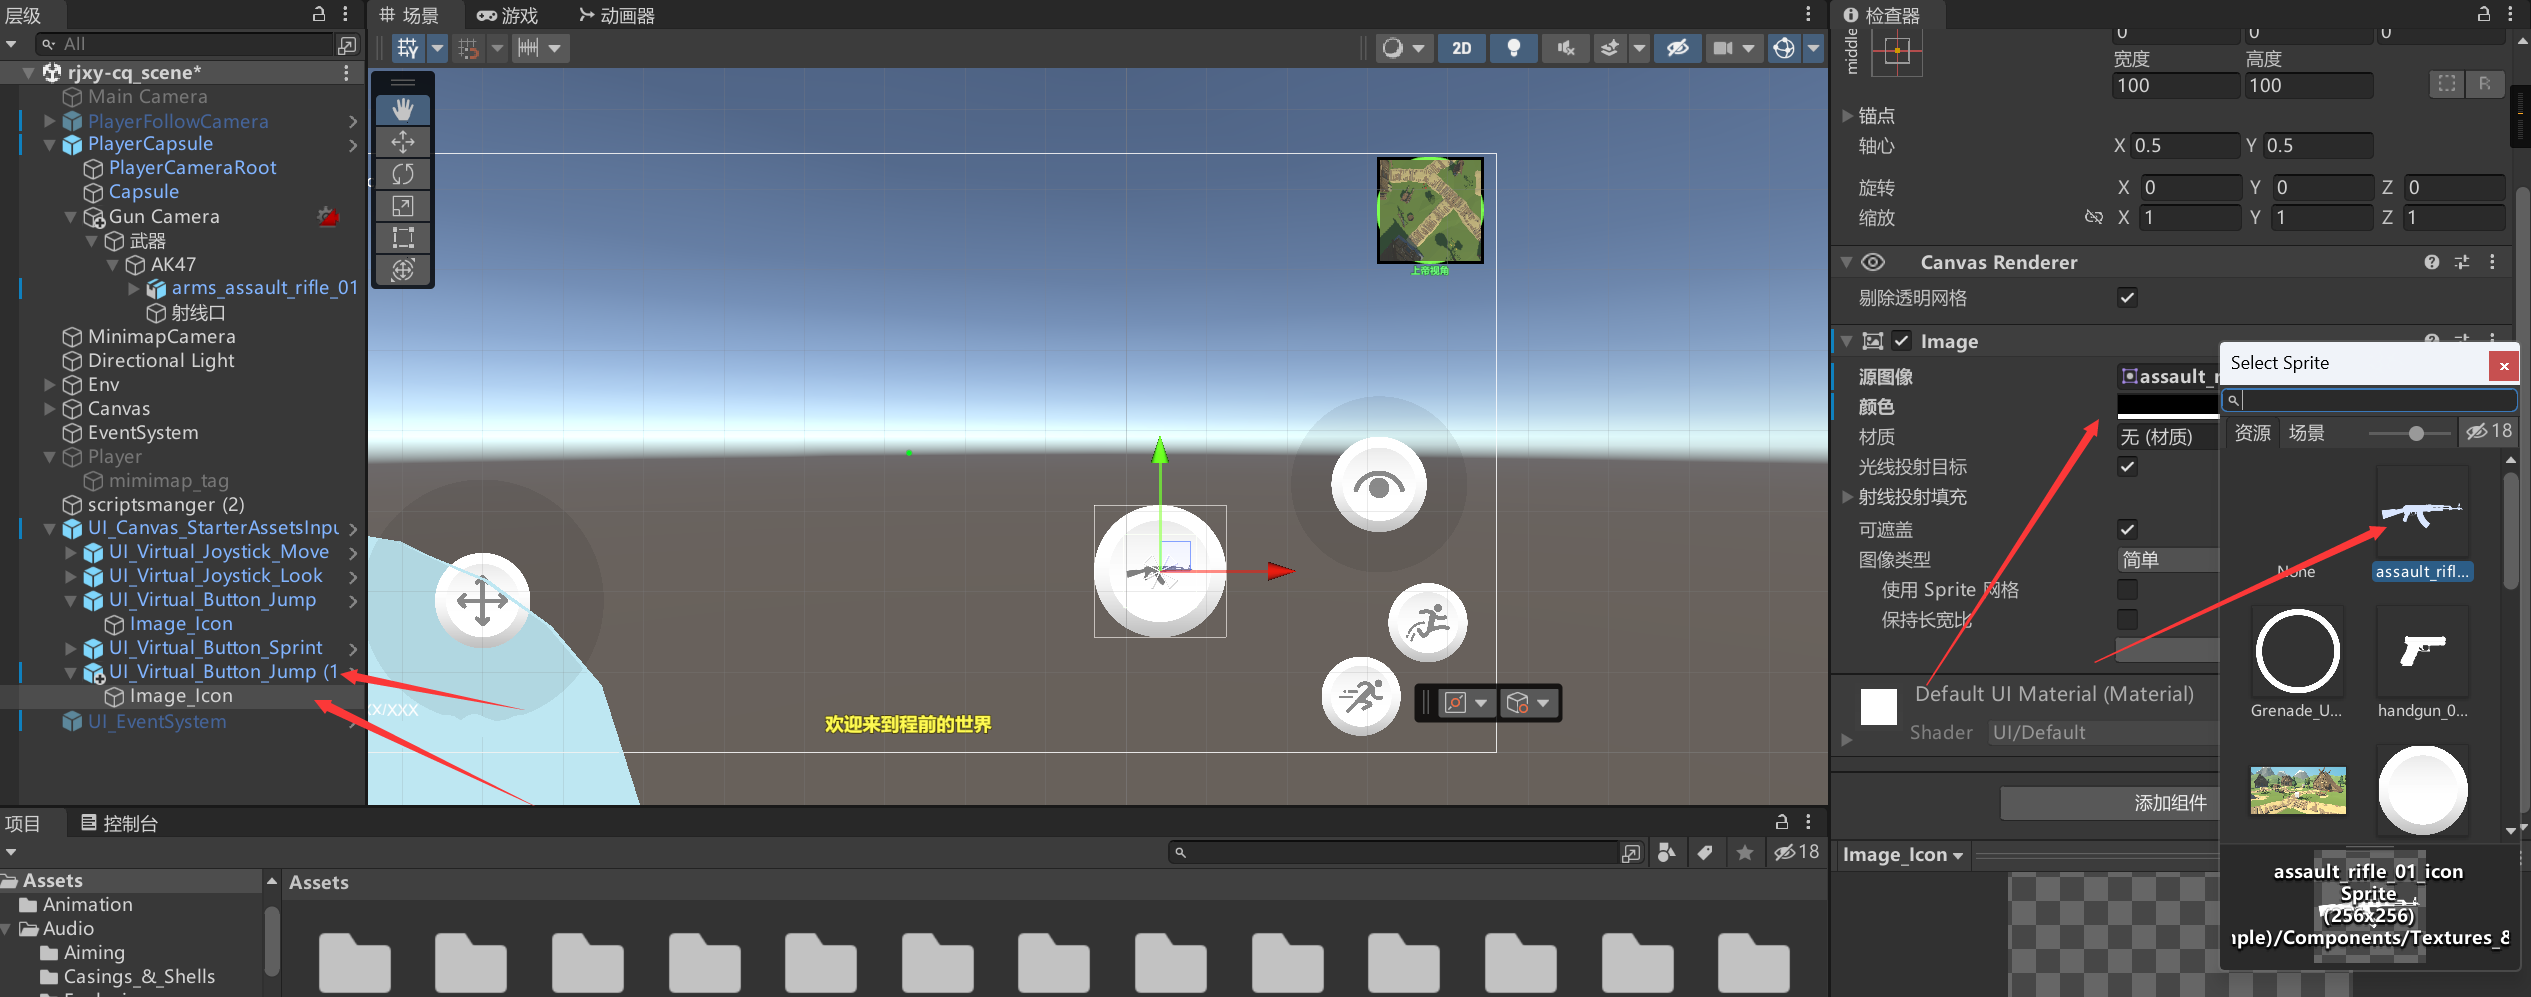
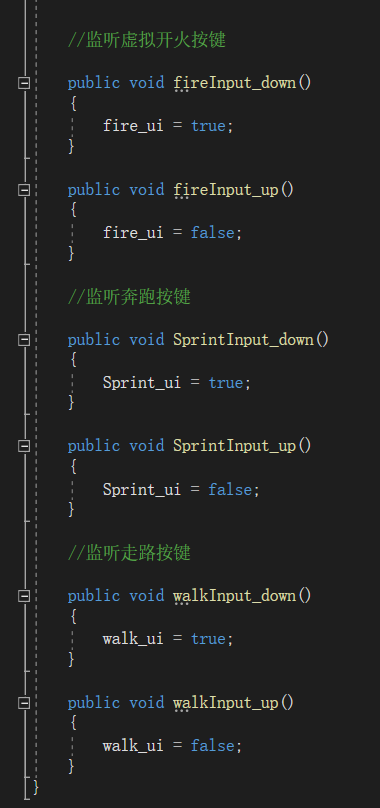
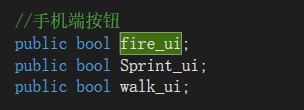
因为unity里的虚拟按键映射,实时监听我搞了半天没搞出来,不知道为什么,所以换个方式解决问题。我们监听按钮的按下和弹起,给我们的开火方法,传递参数。
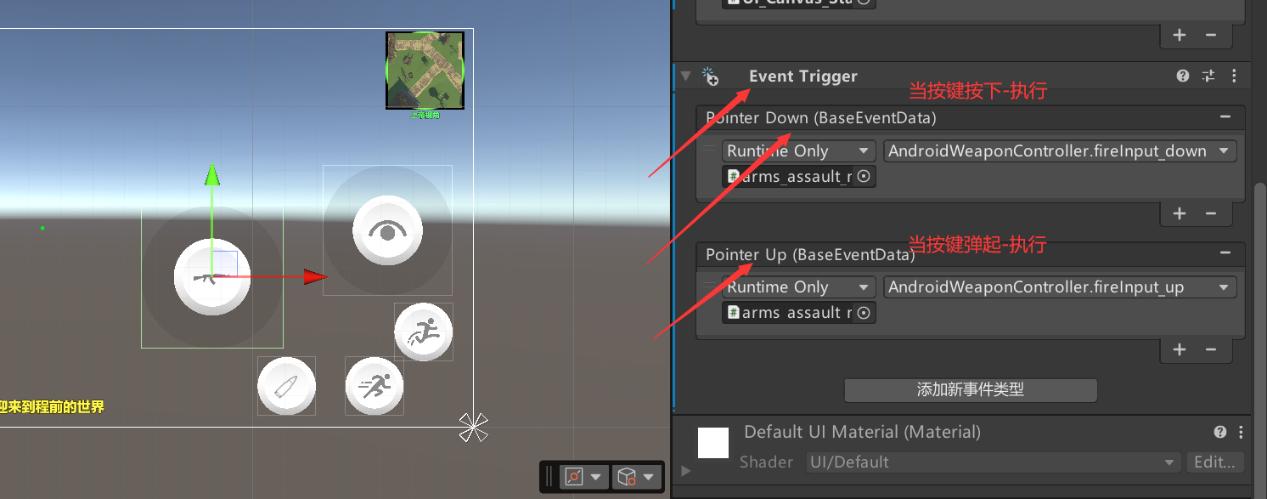
接下来原理都一样了,然后替换之前的判断条件。
Pc端:
移动端:
我们来一波对比。

换弹按键也绑定对应方法
其他的就是一些bug的修复,动作的微调。逻辑变化等等了。比较零碎这里不做展示。
(7)无意间看到unity做ar的例子,突发奇想—适配ar!
无意间看到了这个,哈哈。突然想到了之前自己玩过的ar游戏,那就做一个也算是圆梦了。
当然目前咱做的没有教程里的那么高级,虽然在python里使用过OpenCV,但是最近也有其他作业了。那就简单进行一下游戏适配吧。
参考教程:
Unity:从零开始搞AR|02】Unity中调用摄像头显示实时画面
https://zhuanlan.zhihu.com/p/468167770
【Unity:从零开始搞AR|06】创建3D物体并在Canvas之前显示
https://zhuanlan.zhihu.com/p/505141761
创建一个单独的画布
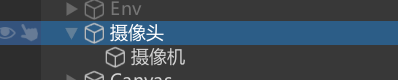

摄像机类型选择原始图像
创建脚本:
using System.Collections;
using System.Collections.Generic;
using UnityEngine;
using UnityEngine.UI;
public class CameraScript : MonoBehaviour
{
private int currentCamIndex = 0;
private WebCamTexture webCamTexture;
public RawImage rawImage;
public Text startStopText;
public void SwapCameraClicked()
{
if (WebCamTexture.devices.Length > 0)
{
currentCamIndex += 1;
currentCamIndex %= WebCamTexture.devices.Length;
if (webCamTexture != null)
{
StopCamera();
StartStopCameraClicked();
}
}
}
public void StartStopCameraClicked()
{
if (webCamTexture != null)
{
StopCamera();
}
else
{
WebCamDevice device = WebCamTexture.devices[currentCamIndex];
if (!device.Equals(null))
{
int width = 1920;
int height =1080;
webCamTexture = new WebCamTexture(device.name,width,height,24);
rawImage.texture = webCamTexture;
webCamTexture.Play();
startStopText.text = “Stop”;
}
}
}
private void StopCamera()
{
rawImage.texture = null;
webCamTexture.Stop();
webCamTexture = null;
startStopText.text = “Start”;
}
}
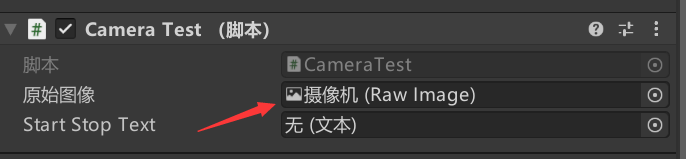
直接拖入添加。
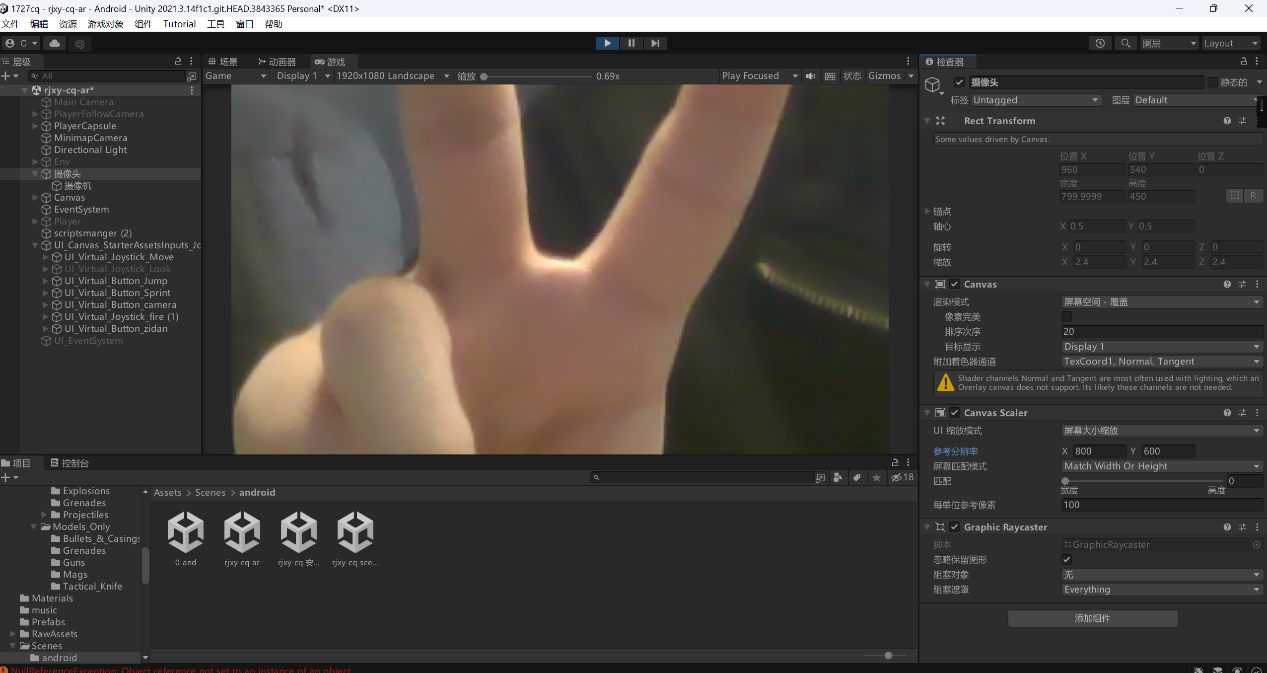
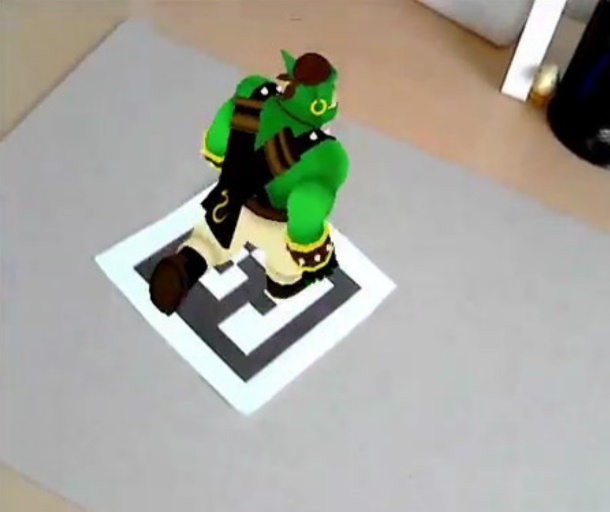
运行就可以看到已经可以显示画面了
但是明显看到画面大小不对,把咱们的物体和ui界面全部遮盖了
我们看第二个教程
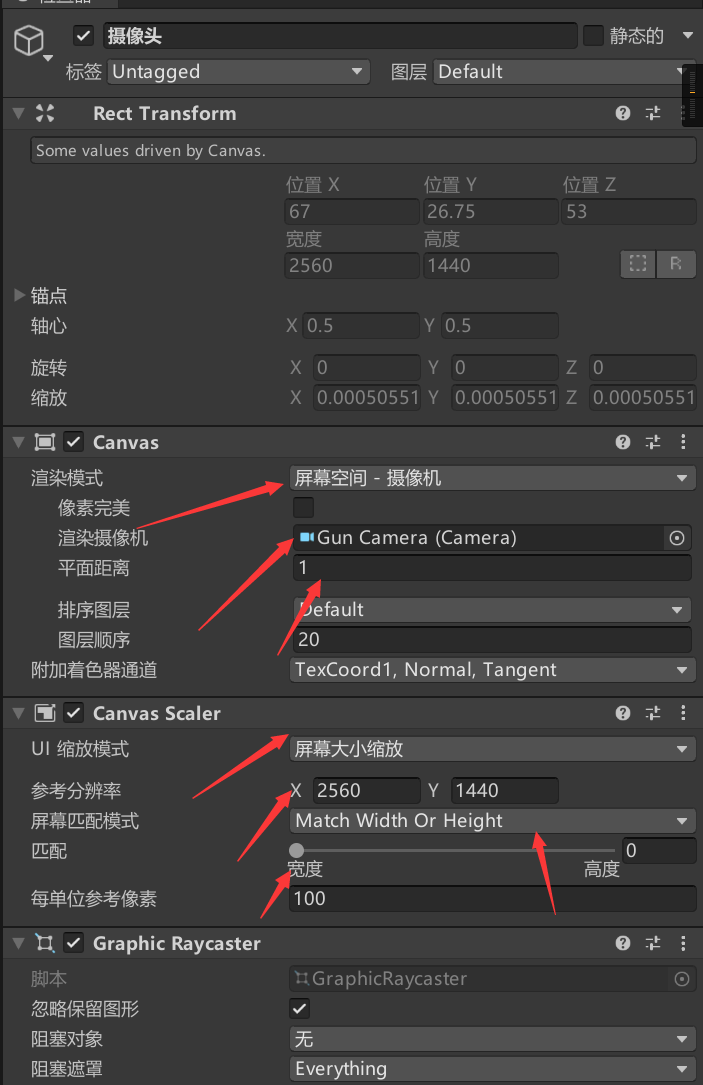
这里我放我调好的参数。
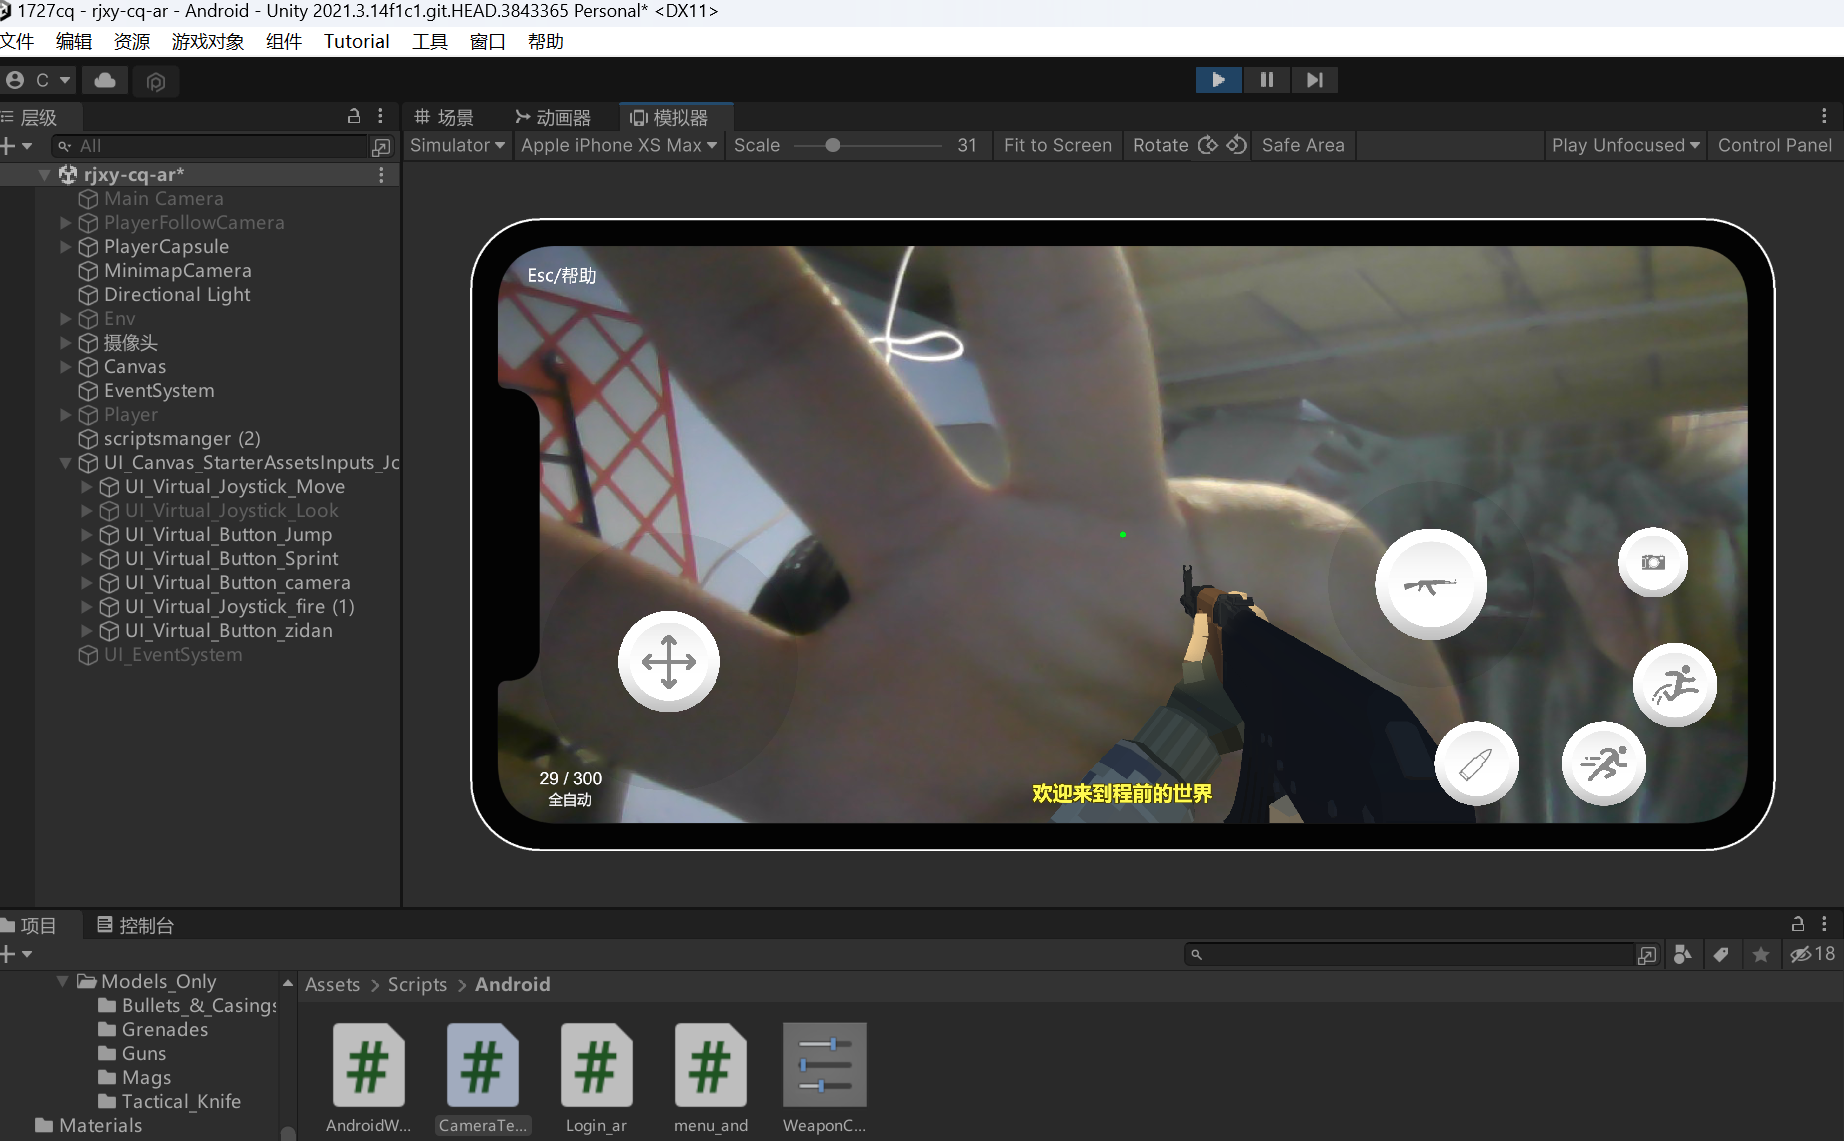
最终成功运行

然后在入口界面,添加新的ar入口(新的场景)
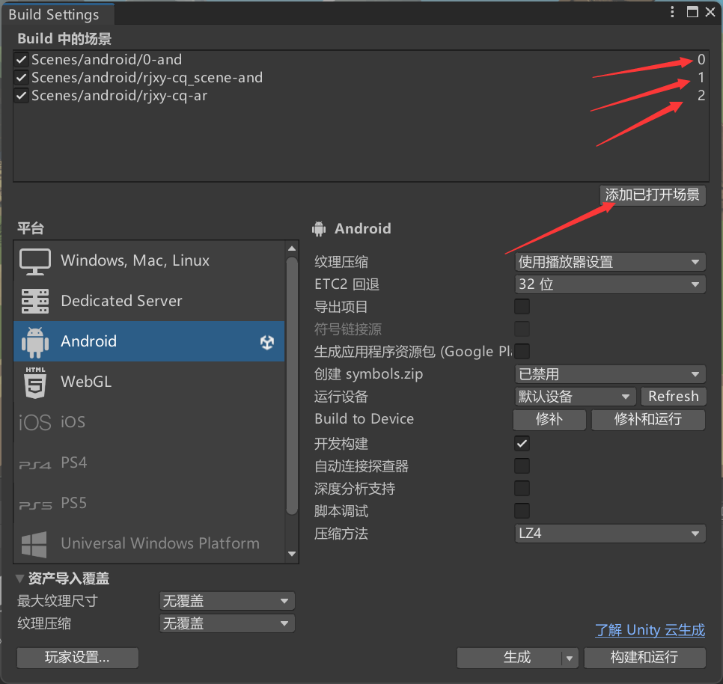
排好顺序,编号打包。
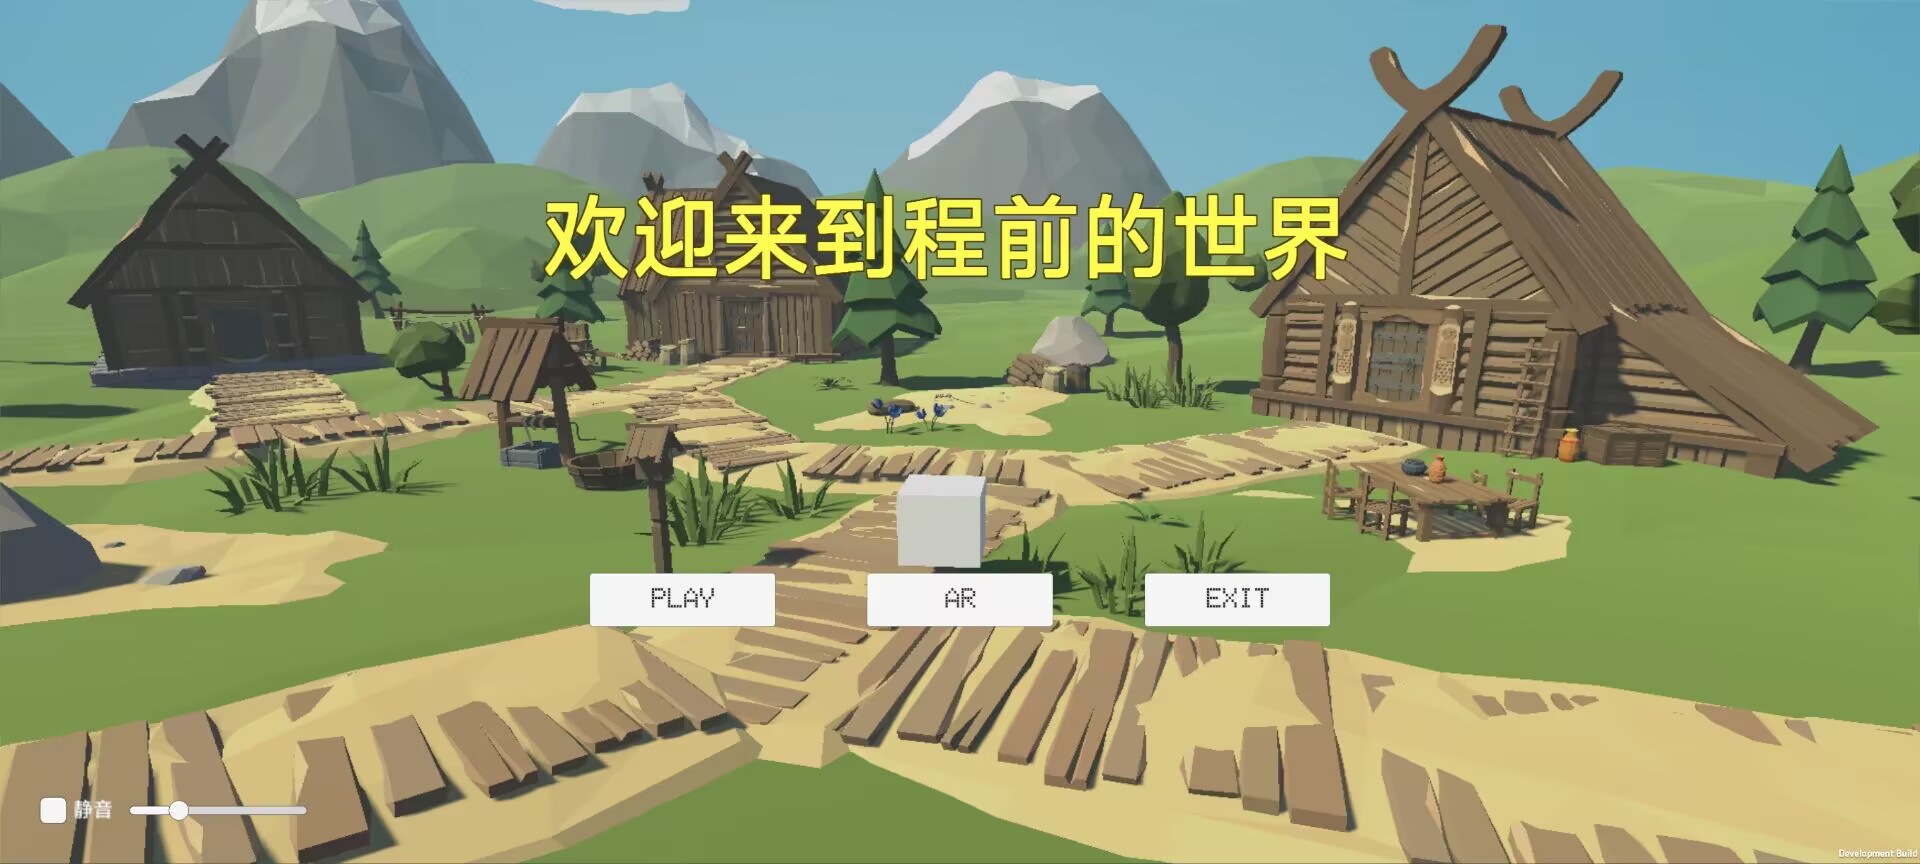
效果展示


(8)移动端小结
移动端的操作逻辑还有待优化,电脑端的是丝滑的。
以后要继续加油。
实验的结论
通过这次实验,我感触很深,简陋的完成了人生中第一款小游戏,收获还是很大的。同时通过做项目,也了解到了很多游戏的运行原理。比如unity中的update()方法,里面的代码在游戏的每一帧都要运行一次,所以代码的好坏也决定了这个游戏的整体性能。同时也还感触特别深的接触到动画这个东西,也突然理解到了之前打lol,或者王者荣耀中,什么什么皮肤手感好不好的问题,原来这个真的不是玄学,而是有游戏原理在里面的。
编译完apk端后,突然又联想到原神的一个特性,就是三端同步,原神就是unity制作的,他们的三端适配其实也仅仅只是适配了操作逻辑,身下的交给unity编译就好了。再一次感受到了unity的强大。
如果时间足够,我说不定可以加入自己的玩法,发布属于自己的人生第一款游戏,哈哈。顺便记录一下时间从零开始到PC端做出来花了3天时间,然后适配安卓,编译优化,制作ar花了1.5天
非常感谢学校提供这么一个机会,每个课件都有许多细节需要反复实践,也建立了属于自己的人生第一个游戏,受益很多。