深入分析 workflow 线程池
线程池是日常开发中很常用的一种管理线程的工具。它是池化技术中的一种。
池化技术的初衷就是将一些资源进行重复利用,以避免重复的构建来提高执行效率。类似的还有数据库连接池,字符串常量池,httpClient 连接池。
本文将分享一个好用的线程池,其来源于搜狗开源高性能网络框架workflow。
workflow 是搜狗公司近期开源发布的一款 C++ 服务器引擎,支撑搜狗几乎所有后端 C++ 在线服务,包括所有搜索服务,云输入法,在线广告等,每日处理超百亿请求。
下面就通过阅读源码的方式来深入了解workflow线程池的实现原理。
workflow线程池
workflow的项目地址位于https://github.com/sogou/workflow.git。
workflow的线程池主要分布在四个文件中,msgqueue.h/msgqueue.c/thrdpool.h/thrdpool.c。
首先我们分析msgqueue.h/msgqueue.c
msgqueue
从名字中得知,这个是一个消息队列。这个消息队列中盛放的就是需要在线程池中执行的任务。所谓任务就是一个执行函数和一个对应的入参。
在workflow中,任务的定义是thrdpool_task,有两个参数,第一个是一个函数指针routine,第二个参数是context上下文。
struct thrdpool_task
{


	void (*routine)(void *);
	void *context;
};
接下来看一下__msgqueue的定义。__msgqueue是消息队列的主体,其定义如下所示:

struct __msgqueue
{


	size_t msg_max;
	size_t msg_cnt;
	int linkoff;
	int nonblock;
	void *head1;
	void *head2;
	void **get_head;
	void **put_head;
	void **put_tail;
	pthread_mutex_t get_mutex;
	pthread_mutex_t put_mutex;
	pthread_cond_t get_cond;
	pthread_cond_t put_cond;
};
msgqueue设计的核心思想是使用两个队列。一个队列用于放置新任务,一个队列用于拿取新任务。当get的任务队列为空时,就将get队列和put队列进行切换。如果get和put共用一个队列,那么放置任务和取任务都需要加锁,而使用两个队列的好处是只有当get的任务队列为空时进行切换时,才需要进行加锁。
__msgqueue结构体的定义中,get_head就是读队列的队头,put_head是放置队列的队头,put_tail是放置队列的队尾。head1和head2是两个头指针,初始化时,get_head指向head1,put_head指向head2。
msg_max代表最大能够放置的任务数量。msg_cnt代表目前put队列中的消息数量。
nonblock表示消息队列的阻塞模式。如果是阻塞的,那么消息队列获取消息和放置消息就存在等待操作,例如当消息队列满时,就不能放置新消息。而如果是非阻塞模式,那么获取消息和放置消息都不存在等待操作。通常在线程池退出时会将线程池设置为non-block的。
linkoff代表link指针的偏移量。例如下面的msg,其linkoff值就是4。
typedef struct msg_t {


	int data;
	struct msg_t* link;
} msg_t;
有了上述的初步概念之后,我们看看msgqueue中会提供哪些方法。如下所示是msgqueue.h的源代码。
msgqueue.h
#ifndef _MSGQUEUE_H_
#define _MSGQUEUE_H_

#include <stddef.h>

typedef struct __msgqueue msgqueue_t;

#ifdef __cplusplus
extern "C"
{


#endif

msgqueue_t *msgqueue_create(size_t maxlen, int linkoff);
void msgqueue_put(void *msg, msgqueue_t *queue);
void *msgqueue_get(msgqueue_t *queue);
void msgqueue_set_nonblock(msgqueue_t *queue);
void msgqueue_set_block(msgqueue_t *queue);
void msgqueue_destroy(msgqueue_t *queue);

#ifdef __cplusplus
}
#endif

#endif
因为其是c语言编写的代码,为了使其可以被c和c++程序都调用,因此在代码中使用了extern "C"。
msgqueue的头文件中提供了6个方法,其作用总结如下:
- msgqueue_create:创建msgqueue。
- msgqueue_put:放置任务到msgqueue中。
- msgqueue_get:从msgqueue中取出任务。
- msgqueue_set_nonblock:将msgqueue设置为nonblock。
- msgqueue_set_block:将msgqueue设置为block。
- msgqueue_destroy:销毁msgqueu额。
上述接口做到了见文知意,值得学习。
下面看看这些接口是如何实现的。
msgqueue_create
第一眼看到这个代码,居然是这种梯形的代码,难以说是优美的,不知道是不是我没有领悟到其中的精髓?
msgqueue_t *msgqueue_create(size_t maxlen, int linkoff)
{


	msgqueue_t *queue = (msgqueue_t *)malloc(sizeof (msgqueue_t));
	int ret;

	if (!queue)
		return NULL;

	ret = pthread_mutex_init(&queue->get_mutex, NULL);
	if (ret == 0)
	{


		ret = pthread_mutex_init(&queue->put_mutex, NULL);
		if (ret == 0)
		{


			ret = pthread_cond_init(&queue->get_cond, NULL);
			if (ret == 0)
			{


				ret = pthread_cond_init(&queue->put_cond, NULL);
				if (ret == 0)
				{


					queue->msg_max = maxlen;
					queue->linkoff = linkoff;
					queue->head1 = NULL;
					queue->head2 = NULL;
					queue->get_head = &queue->head1;
					queue->put_head = &queue->head2;
					queue->put_tail = &queue->head2;
					queue->msg_cnt = 0;
					queue->nonblock = 0;
					return queue;
				}

				pthread_cond_destroy(&queue->get_cond);
			}

			pthread_mutex_destroy(&queue->put_mutex);
		}

		pthread_mutex_destroy(&queue->get_mutex);
	}

	errno = ret;
	free(queue);
	return NULL;
}
这个梯形的代码应该可以使用if-return进行优化。
	ret = pthread_mutex_init(&queue->get_mutex, NULL);
	if (ret != 0)
	{


		//...
	}
	ret = pthread_mutex_init(&queue->put_mutex, NULL);
	if (ret != 0)
	{


		//...
	}
msgqueue_create的实现并不难,主要就是对一些变量进行初始化。初始化了get_mutex/put_mutex/get_cond/put_cond。在这些互斥锁和条件变量创建成功后,初始化maxlen/linkoff/msg_cnt/nonblock,并将msgqueue中的队列指针设置为空。
msgqueue_put
msgqueue_put的源码如下:
void msgqueue_put(void *msg, msgqueue_t *queue)
{


	void **link = (void **)((char *)msg + queue->linkoff);//(1)

	*link = NULL; //(2)
	pthread_mutex_lock(&queue->put_mutex);//(3)
	while (queue->msg_cnt > queue->msg_max - 1 && !queue->nonblock)//(4)
		pthread_cond_wait(&queue->put_cond, &queue->put_mutex);//(5)

	*queue->put_tail = link;//(6)
	queue->put_tail = link;//(7)
	queue->msg_cnt++;//(8)
	pthread_mutex_unlock(&queue->put_mutex);//(9)
	pthread_cond_signal(&queue->get_cond);//(10)
}
msgqueue_put是一个相对较难理解的方法。尤其是下面这两行更是劝退了很多人。
	*queue->put_tail = link;
	queue->put_tail = link;
msgqueue_put的入参有两个,第一个是msg,第二个是queue,实际上作用就是将msg放入queue中。
这里的msg的类型是一个void*类型,是为了通用而考虑。下面以一个实际的msg类型取看下面的代码。
对于线程池而言, msg的类型是__thrdpool_task_entry,其拥有两个参数,第一个参数是link,其类似于一个next指针用于指向下一个task。第二个参数则是task的实际内容。
struct __thrdpool_task_entry
{


	void *link;
	struct thrdpool_task task;
};
下面开始一行一行的看代码。
第1-2行代码的目的其实就是取出了msg中link指针所在的位置。因为msg的类型是void*,而void*指针无法进行加减,因此首先将msg转换成char*。给其加上了queue->linkoff,linkoff其实就是msg的类型中link指针的偏移量,对于__thrdpool_task_entry而言,linkoff值为0。 所以第1行代码将msg中的linkoff指针的地址传给link。
第二行代码就比较好理解,就是将linkoff指针指向了NULL。如下图所示:
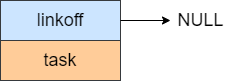
	void **link = (void **)((char *)msg + queue->linkoff);//(1)

	*link = NULL;//(2)
接着往下看,下面这块代码的作用是如果队列中的消息已经放满,并且是block模式,则将停止放消息,直到队列中的消息被消费。如果是non-block模式,则可以一直放消息,不会阻塞。
第3行代码使用put_mutex给临界区上锁,因为可能有多个线程同时put。
第4行和第5行是条件变量的常规写法,即循环判等,直到条件满足。
	pthread_mutex_lock(&queue->put_mutex); //(3)
	while (queue->msg_cnt > queue->msg_max - 1 && !queue->nonblock) //(4)
		pthread_cond_wait(&queue->put_cond, &queue->put_mutex); //(5)
下面两行是劝退代码。。。
	*queue->put_tail = link;// (6)
	queue->put_tail = link; //(7)
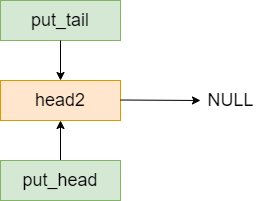
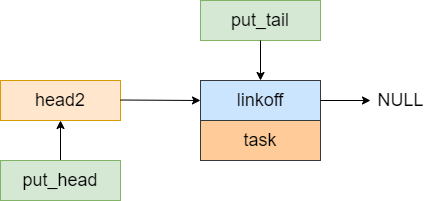
首先回顾一下在msgqueue_create方法中,queue->put_tail指向了head2。如下图所示:
因此第6行的作用就是让head2指向了msg中的link。其效果如下图所示。
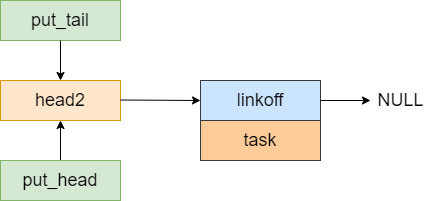
第7行的作用是将put_tail移动到消息队列的末尾,即link上。
其效果如下所示:
如果再有其他消息进来,过程也是类似的,例如此时再加入一条消息,队列的情况如下所示:
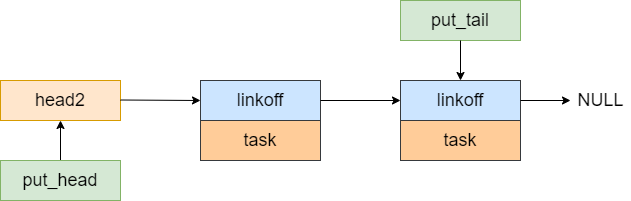
对照图形,这两行代码也就清晰可见了。
最后三行很简单,不在详细解析,参考注释。
	queue->msg_cnt++;//队列中的消息数量加1
	pthread_mutex_unlock(&queue->put_mutex);//将put_mutex解锁
	pthread_cond_signal(&queue->get_cond);//发送信号给消费线程
msgqueue_get
msgqueue_get的代码如下所示:
void *msgqueue_get(msgqueue_t *queue)
{


	void *msg;//(1)

	pthread_mutex_lock(&queue->get_mutex);//(2)
	if (*queue->get_head || __msgqueue_swap(queue) > 0) //(3)
	{


		msg = (char *)*queue->get_head - queue->linkoff;//(4)
		*queue->get_head = *(void **)*queue->get_head;//(5)
	}
	else
	{


		msg = NULL; //(6)
		errno = ENOENT; //(7)
	}

	pthread_mutex_unlock(&queue->get_mutex);//(8)
	return msg;//(9)
}
下面还是一行一行的进行解析。
第1行定义了msg指针,第2行使用get_mutex进行加锁,因为get的过程可能是并发的。
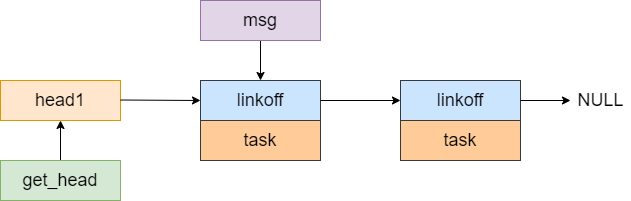
第3行,如果get_head为不为空,则意味着可以从中取出msg。第4行的目的是重新计算出msg消息的起始地址。第5行是让get_head指向了get队列的下一个msg。
如下图所示,是将msg指针指向了msg消息的地址:
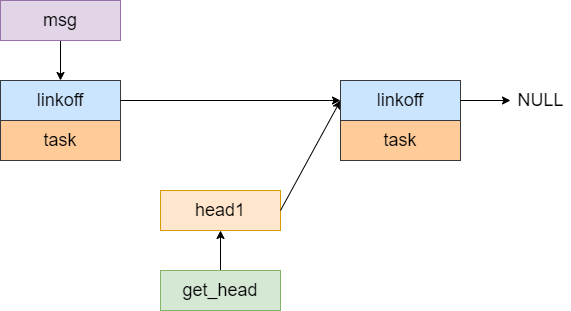
下面则是让get_head指向了队列中的下一个元素。
重新回到第3行,如果get_head为空,则意味着可能需要将put队列和get队列进行交换。这里参考__msgqueue_swap的解析。
第6行和第7行是处理如果put队列元素也为空的情况。元素为空的场景会出现在non-block的场景上。block的场景下,如果put队列为空,则会阻塞等待。
__msgqueue_swap
__msgqueue_swap的源码如下所示:
static size_t __msgqueue_swap(msgqueue_t *queue)
{


	void **get_head = queue->get_head; //(1)
	size_t cnt; //(2)

	queue->get_head = queue->put_head;//(3)
	pthread_mutex_lock(&queue->put_mutex);//(4)
	while (queue->msg_cnt == 0 && !queue->nonblock)//(5)
		pthread_cond_wait(&queue->get_cond, &queue->put_mutex);(6)

	cnt = queue->msg_cnt;//(7)
	if (cnt > queue->msg_max - 1)//(8)
		pthread_cond_broadcast(&queue->put_cond);//(9)

	queue->put_head = get_head;//(10)
	queue->put_tail = get_head;//(11)
	queue->msg_cnt = 0;//(12)
	pthread_mutex_unlock(&queue->put_mutex);//(13)
	return cnt;
}
第1-2行比较好理解,就是取出了队列的头部元素的地址。cnt代表put队列中的消息的数量。
第3行将get_head指向了put队列的头部。注意此时已经加上了get_mutex,所以不会有并发的问题。
第4行加上了put_mutex。
第5-6行当消息队列是block模式时,将判断put队列是否有元素,如果没有元素,则等待。如果是non-block模式,则跳过。
程序走到第7-9行是为了通知正在等待的生产者可以继续生产。这里虽然使用了pthread_cond_broadcast,但是生产者并不会立即被唤醒,因为此时queue->put_mutex被当前线程持有,生产者唤醒后自旋强锁一段时间失败后,将再次sleep,直到queue->put_mutex被释放。 所以个人觉得7-9行放置到12行后面可能更好一些。
10-12行代表则是将两个队列的指针进行切换。
第13行释放queue->put_mutex,生产者可以继续生产。
msgqueue_set_nonblock
msgqueue_set_nonblock代码较为简单,即设置队列的为non-block模式。
void msgqueue_set_nonblock(msgqueue_t *queue)
{


	queue->nonblock = 1;
	pthread_mutex_lock(&queue->put_mutex);
	pthread_cond_signal(&queue->get_cond);
	pthread_cond_broadcast(&queue->put_cond);
	pthread_mutex_unlock(&queue->put_mutex);
}
msgqueue_set_block
msgqueue_set_block代码较为简单,即设置队列的为block模式。
void msgqueue_set_block(msgqueue_t *queue)
{


	queue->nonblock = 0;
}
msgqueue_destroy
msgqueue_destroy方法主要就是为了销毁其中用到的互斥锁和条件变量。
	pthread_cond_destroy(&queue->put_cond);
	pthread_cond_destroy(&queue->get_cond);
	pthread_mutex_destroy(&queue->put_mutex);
	pthread_mutex_destroy(&queue->get_mutex);
	free(queue);
thrdpool
thrpool是线程池的核心代码,首先看一下其头文件thrdpool.h,如下所示:
#ifndef _THRDPOOL_H_
#define _THRDPOOL_H_

#include <stddef.h>

typedef struct __thrdpool thrdpool_t;

struct thrdpool_task
{


	void (*routine)(void *);
	void *context;
};

#ifdef __cplusplus
extern "C"
{


#endif

thrdpool_t *thrdpool_create(size_t nthreads, size_t stacksize);
int thrdpool_schedule(const struct thrdpool_task *task, thrdpool_t *pool);
int thrdpool_increase(thrdpool_t *pool);
int thrdpool_in_pool(thrdpool_t *pool);
void thrdpool_destroy(void (*pending)(const struct thrdpool_task *),
					  thrdpool_t *pool);

#ifdef __cplusplus
}
#endif

#endif
可以看到其中的方法不是很多,仅有5个,下面便一个一个的进行分析。
thrdpool_create
thrdpool_create的代码如下所示。
这里又使用了嵌套if的形式,不太美观。
thrdpool_t *thrdpool_create(size_t nthreads, size_t stacksize)
{


	thrdpool_t *pool;// (1)
	int ret;// (2)

	pool = (thrdpool_t *)malloc(sizeof (thrdpool_t));// (3)
	if (!pool)// (4)
		return NULL;// (5)

	pool->msgqueue = msgqueue_create((size_t)-1, 0);// (6)
	if (pool->msgqueue)// (7)
	{


		ret = pthread_mutex_init(&pool->mutex, NULL);// (8)
		if (ret == 0)// (9)
		{


			ret = pthread_key_create(&pool->key, NULL);// (9)
			if (ret == 0)// (10)
			{


				pool->stacksize = stacksize;// (11)
				pool->nthreads = 0;// (12)
				memset(&pool->tid, 0, sizeof (pthread_t));// (13)
				pool->terminate = NULL;// (14)
				if (__thrdpool_create_threads(nthreads, pool) >= 0)// (15)
					return pool;// (16)

				pthread_key_delete(pool->key);// (17)
			}

			pthread_mutex_destroy(&pool->mutex);// (18)
		}

		errno = ret;// (19)
		msgqueue_destroy(pool->msgqueue);// (20)
	}

	free(pool);
	return NULL;
}
thrdpool_create的入参是nthreads和stacksize,分别代表线程数量和线程栈的大小。
第1-2行声明了pool和ret变量。
第3-5行创建了pool对象。
第6行给pool创建了一个消息队列msgqueue。
第7-14行,当消息队列创建成功后,初始化pool中的mutex和线程key,这个key用于设置线程私有变量。并设置了线程池的线程数量和stack。
第15行调用了__thrdpool_create_threads进行实际的线程创建。后面将针对该方法讲解。如果创建成功,16行将pool变量进行返回。
第17-20行则是进行一些创建失败时的回滚操作。
__thrdpool_create_threads
__thrdpool_create_threads是实际创建线程的方法。
static int __thrdpool_create_threads(size_t nthreads, thrdpool_t *pool)
{


	pthread_attr_t attr;//(1)
	pthread_t tid;//(2)
	int ret;//(3)

	ret = pthread_attr_init(&attr);//(4)
	if (ret == 0)//(5)
	{


		if (pool->stacksize)//(6)
			pthread_attr_setstacksize(&attr, pool->stacksize);//(7)

		while (pool->nthreads < nthreads)//(8)
		{


			ret = pthread_create(&tid, &attr, __thrdpool_routine, pool);//(9)
			if (ret == 0)//(10)
				pool->nthreads++;//(11)
			else//(12)
				break;//(13)
		}

		pthread_attr_destroy(&attr);//(14)
		if (pool->nthreads == nthreads)//(15)
			return 0;//(16)

		__thrdpool_terminate(0, pool);//(17)
	}

	errno = ret;//(18)
	return -1;//(19)
}
第1-3行声明了三个参数attr/tid/ret。
第4行创建了attr。如果创建成功,则进行继续,如果创建失败,则返回错误。
第6-7行设置了线程栈的大小。
第8-13行循环地进行线程的创建。若创建成功,则将线程池中的线程数进行递增。线程的入口方法是__thrdpool_routine,将在下面进行讲解。
第14-16行当线程创建完毕后要对attr进行销毁。如果创建出的线程数量等于期望的数量,则返回,否则创建失败,销毁线程池。
__thrdpool_routine
__thrdpool_routine是线程的入口函数,一般线程池的入口函数都会有一个循环,不停的接受任务运行。
static void *__thrdpool_routine(void *arg)
{


	thrdpool_t *pool = (thrdpool_t *)arg;//(1)
	struct __thrdpool_task_entry *entry;//(2)
	void (*task_routine)(void *);//(3)
	void *task_context;//(4)
	pthread_t tid;//(5)

	pthread_setspecific(pool->key, pool);//(6)
	while (!pool->terminate)//(7)
	{


		entry = (struct __thrdpool_task_entry *)msgqueue_get(pool->msgqueue);//(8)
		if (!entry)//(9)
			break;//(10)

		task_routine = entry->task.routine;//(11)
		task_context = entry->task.context;//(12)
		free(entry);//(13)
		task_routine(task_context);//(14)

		if (pool->nthreads == 0)//(15)
		{


			free(pool);//(16)
			return NULL;//(17)
		}
	}

	/* One thread joins another. Don't need to keep all thread IDs. */
	pthread_mutex_lock(&pool->mutex);//(18)
	tid = pool->tid;//(19)
	pool->tid = pthread_self();//(20)
	if (--pool->nthreads == 0)//(21)
		pthread_cond_signal(pool->terminate);//(22)

	pthread_mutex_unlock(&pool->mutex);//(23)
	if (memcmp(&tid, &__zero_tid, sizeof (pthread_t)) != 0)//(24)
		pthread_join(tid, NULL);//(25)

	return NULL;//(23)
}
第1行,从arg中取出了参数,强转为thrdpool_t类型。第2-5行声明了一条参数。
第6行,向pool->key中设置了一个pool的地址值。这将用于后面判断一个线程是否属于某个线程池。
第7到17行,循环从消息队列中取出任务执行,如果取到的消息为空,则退出。因为线程池退出的时候会设置消息队列为non-block,因此取到的消息可能为空。第7行中,pool->terminate在线程池没有退出时其值为NULL,当线程池destroy时,会对其赋值。第15到17行的作用需要特别说明一下,这是在线程池内部线程调用destroy线程池会走到这里,调用destroy的线程将会等待线程池内其他线程退出,等运行到第15-17行时,就需要销毁线程池。workflow线程池销毁的原则是,谁调用destroy,谁销毁。外部线程调用destroy,就由外部线程destroy线程池。内部线程调用destroy,就由内部线程destroy线程池。
第18-23行,则代表线程已经退出了,这里会首先挂上pool->mutex。因为线程可能存在同时退出的场景。这里的设计思路是让线程逐一退出,让后一个线程去join前一个线程。后面在讲解destroy时,还会再提到这里。
thrdpool_schedule
thrdpool_schedule的作用实际就是向线程池中推送一个任务。内部将调用msgqueue_put向消息队列中塞上一个任务。该方法的实现比较简单,不做过多解析。
int thrdpool_schedule(const struct thrdpool_task *task, thrdpool_t *pool)
{


	void *buf = malloc(sizeof (struct __thrdpool_task_entry));

	if (buf)
	{


		__thrdpool_schedule(task, buf, pool);
		return 0;
	}

	return -1;
}

void __thrdpool_schedule(const struct thrdpool_task *task, void *buf,
						 thrdpool_t *pool)
{


	((struct __thrdpool_task_entry *)buf)->task = *task;
	msgqueue_put(buf, pool->msgqueue);
}
thrdpool_increase
thrdpool_increase的作用是增加一个线程。该函数的作用还是比较清晰的,这里不做太多解析。
int thrdpool_increase(thrdpool_t *pool)
{


	pthread_attr_t attr;
	pthread_t tid;
	int ret;

	ret = pthread_attr_init(&attr);
	if (ret == 0)
	{


		if (pool->stacksize)
			pthread_attr_setstacksize(&attr, pool->stacksize);

		pthread_mutex_lock(&pool->mutex);
		ret = pthread_create(&tid, &attr, __thrdpool_routine, pool);
		if (ret == 0)
			pool->nthreads++;

		pthread_mutex_unlock(&pool->mutex);
		pthread_attr_destroy(&attr);
		if (ret == 0)
			return 0;
	}

	errno = ret;
	return -1;
}
thrdpool_in_pool
该函数的作用是判断一个线程是否属于线程池。属于线程池的线程在启动时会给线程私有变量key塞上pool的地址,因此可以使用pthread_getspecific(pool->key) == pool进行判断。
int thrdpool_in_pool(thrdpool_t *pool)
{


	return pthread_getspecific(pool->key) == pool;
}
thrdpool_destroy
thrdpool_destroy的函数入参包含量部分,一个部分是一个pending函数,这个函数用于处理一些已经提交但是还没有被执行的任务。
void thrdpool_destroy(void (*pending)(const struct thrdpool_task *),
					  thrdpool_t *pool)
{


	int in_pool = thrdpool_in_pool(pool);//(1)
	struct __thrdpool_task_entry *entry;//(2)

	__thrdpool_terminate(in_pool, pool);//(3)
	while (1)//(4)
	{


		entry = (struct __thrdpool_task_entry *)msgqueue_get(pool->msgqueue);//(4)
		if (!entry)//(5)
			break;//(6)

		if (pending)//(7)
			pending(&entry->task);//(8)

		free(entry);//(9)
	}

	pthread_key_delete(pool->key);//(10)
	pthread_mutex_destroy(&pool->mutex);//(11)
	msgqueue_destroy(pool->msgqueue);//(12)
	if (!in_pool)//(13)
		free(pool);//(14)
}
第1行in_pool用于判断调用thrdpool_destroy的线程是否属于线程池中的线程。destroy线程可以是线程池中的线程,也可以是外部线程。二者的实现会有区别。
第3行将调用__thrdpool_terminate进行线程池的销毁,后续将对其讲解。
第4-13行则是处理消息队列中还没有处理的一些消息。
__thrdpool_terminate
__thrdpool_terminate的源码如下:
static void __thrdpool_terminate(int in_pool, thrdpool_t *pool)
{


	pthread_cond_t term = PTHREAD_COND_INITIALIZER;//(1)

	pthread_mutex_lock(&pool->mutex);//(2)
	msgqueue_set_nonblock(pool->msgqueue);//(3)
	pool->terminate = &term;//(4)

	if (in_pool)//(5)
	{


		pthread_detach(pthread_self());//(6)
		pool->nthreads--;//(7)
	}

	while (pool->nthreads > 0)//(8)
		pthread_cond_wait(&term, &pool->mutex);//(9)

	pthread_mutex_unlock(&pool->mutex);//(10)
	if (memcmp(&pool->tid, &__zero_tid, sizeof (pthread_t)) != 0)//(11)
		pthread_join(pool->tid, NULL);//(12)
}
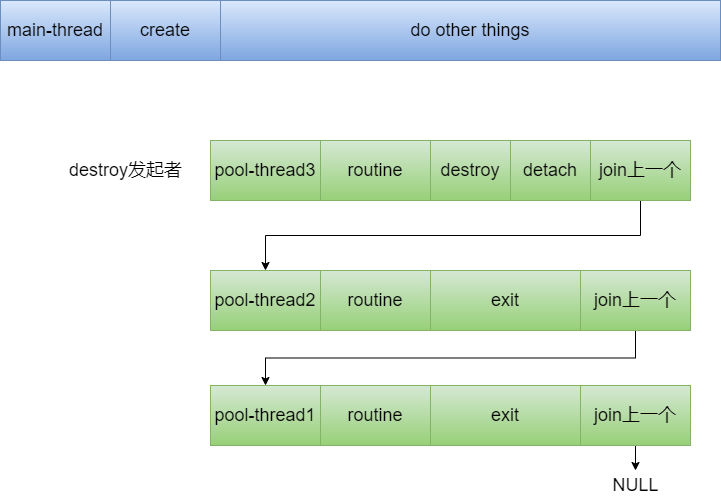
第1行和第4行对条件变量pool->termincate设置了初值。将消息队列设置为non-block,使得空等消息的线程迅速走入退出流程。如果是线程池中的线程发出了destory请求,则将自身设置为detach,同时将线程池的线程数量减去1。(注意这里是和__thrdpool_routine的第15-17行相呼应的)。
第8-9行则是等待所有的线程都退出。上面提到__thrdpool_routine会join前一个线程,并向pool->termincate发送信号。
最后如果是外部线程发起destroy,则还需要帮忙将线程池中的最后一个线程destroy。
如果是线程池中的线程发起destroy,因为上面已经设置为了detach,因此其自身无需join。
两种发起模式的区别可参考下面两张图:
发起者是外部线程:
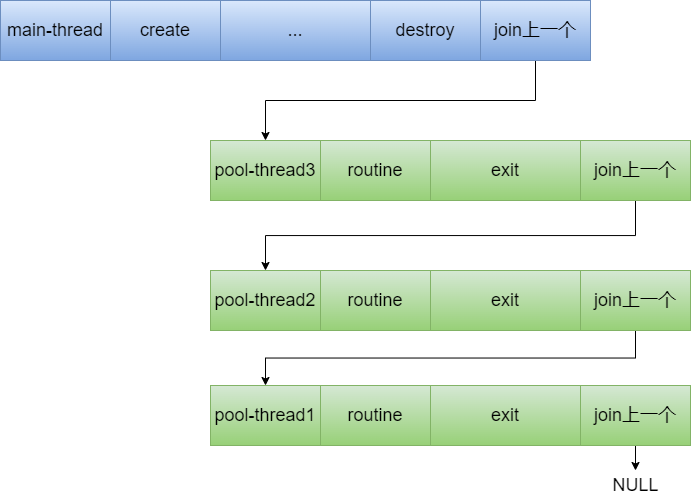
发起者是线程池内部线程:
demo
workflow的线程池做到基本的开箱即用,不依赖于其他的代码,仅需将masqueue.c/msgqueue.h/thrdpool.h/thrdpool.c包含进来,添加测试代码main.cpp即可。
demo的文件结构如下所示:
[root@localhost workflow-thread]# tree .
.
├── main.cpp
├── msgqueue.c
├── msgqueue.h
├── thrdpool.c
└── thrdpool.h
下面是main.cpp的内容:
//gcc -c msgqueue.c
//gcc -c thrdpool.c
//g++ main.cpp msgqueue.o thrdpool.o
#include <iostream>
#include <unistd.h>
#include "thrdpool.h"
#include "msgqueue.h"
struct Context{
int val;
};
void my_func(void *context) // 我们要执行的函数
{
printf("task-%d start.\n", ((Context*)context)->val);
sleep(1);
}
void my_pending(const struct thrdpool_task *task) // 线程池销毁后,没执行的任务会到这里
{
printf("pending task-%d.\n", ((Context*)task->context)->val);
}
int main()
{
thrdpool_t *thrd_pool = thrdpool_create(3, 1024); // 创建
struct thrdpool_task task;
int i;
Context *p_context[5];
for (i = 0; i < 5; i++)
{
p_context[i] = new Context();
p_context[i]->val = i;
task.routine = &my_func;
task.context = (void *)(p_context[i]);
thrdpool_schedule(&task, thrd_pool); // 调用
}
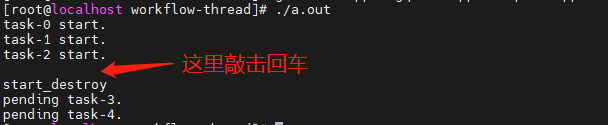
getchar();
std::cout << "start_destroy" << std::endl;
thrdpool_destroy(&my_pending, thrd_pool); // 结束
for (i = 0; i < 5; i++)
{
delete p_context[i];
}
return 0;
}
运行结果如下所示: