python构建web服务
flask内容参考:Flask框架入门教程(非常详细)
flask安装与运行测试
安装flask
pip install flask
创建一个webapp.py文件,内容如下
from flask import Flask

# 用当前脚本名称实例化Flask对象,方便flask从该脚本文件中获取需要的内容
app = Flask(__name__)

#程序实例需要知道每个url请求所对应的运行代码是谁。
#所以程序中必须要创建一个url请求地址到python运行函数的一个映射。
#处理url和视图函数之间的关系的程序就是"路由",在Flask中,路由是通过@app.route装饰器(以@开头)来表示的
@app.route("/")
#url映射的函数,要传参则在上述route(路由)中添加参数申明
def index():
    return "Hello World!"

# 直属的第一个作为视图函数被绑定,第二个就是普通函数
# 路由与视图函数需要一一对应
# def not():
#     return "Not Hello World!"

# 启动一个本地开发服务器,激活该网页
app.run()
运行代码
python webapp.py
终端输出如下:
& D:/ProgramData/Anaconda3/envs/py10/python.exe d:/zjdemo/webapp.py
 * Serving Flask app 'webapp'
 * Debug mode: off
WARNING: This is a development server. Do not use it in a production deployment. Use a production WSGI server instead.
 * Running on http://127.0.0.1:5000
Press CTRL+C to quit
127.0.0.1 - - [20/Nov/2023 08:20:47] "GET / HTTP/1.1" 200 -
127.0.0.1 - - [20/Nov/2023 08:20:47] "GET /favicon.ico HTTP/1.1" 404 -
在浏览器输入
http://127.0.0.1:5000
返回如下

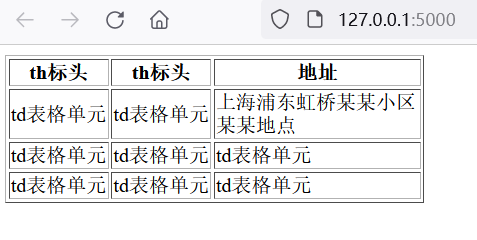
flask返回复杂的html字符串
创建webapp_html_str.py文件,代码如下:
from flask import Flask

# 用当前脚本名称实例化Flask对象,方便flask从该脚本文件中获取需要的内容
app = Flask(__name__)


html_str="""
<!DOCTYPE html>
<html lang="en">

<head>
    <meta charset="UTF-8">
    <meta name="viewport" content="width=device-width, initial-scale=1.0">
    <title>Document</title>
</head>
<body>
    <table id="g570b4" border="1">
        <tr id="g419fe">
            <th id="g16b02">th标头
            </th>
            <th id="gaae0b">th标头
            </th>
            <th id="gd78bc" class=" u5899e">地址
            </th>
        </tr>
        <tr id="g5af9b">
            <td id="g920bb">td表格单元
            </td>
            <td id="g9de93" class=" uab6e6">td表格单元
            </td>
            <td id="gea8dc">上海浦东虹桥某某小区某某地点
            </td>
        </tr>
        <tr id="cf47d6" class=" u0cbcd ">
            <td id="c913e3" class=" ud690a ">td表格单元
            </td>
            <td id="c452e0" class=" uab6e6 ">td表格单元
            </td>
            <td id="c917b3" class=" u7eb06 ">td表格单元
            </td>
        </tr>
        <tr id="cba81f" class=" u0cbcd ">
            <td id="c3dae7" class=" ud690a ">td表格单元
            </td>
            <td id="c7d0f9" class=" uab6e6 ">td表格单元
            </td>
            <td id="c9fe10" class=" u7eb06 ">td表格单元
            </td>
        </tr>
    </table>
    <style>
        .u5899e {
            width: 162px;
        }
    </style>
</body>

</html>

"""

#程序实例需要知道每个url请求所对应的运行代码是谁。
#所以程序中必须要创建一个url请求地址到python运行函数的一个映射。
#处理url和视图函数之间的关系的程序就是"路由",在Flask中,路由是通过@app.route装饰器(以@开头)来表示的
@app.route("/")
#url映射的函数,要传参则在上述route(路由)中添加参数申明
def index():
    return html_str

# 直属的第一个作为视图函数被绑定,第二个就是普通函数
# 路由与视图函数需要一一对应
# def not():
#     return "Not Hello World!"

# 启动一个本地开发服务器,激活该网页
app.run()
运行
运行代码
python webapp.py
在浏览器输入
http://127.0.0.1:5000
返回如下
flask返回html页面
返回一个静态html页面
在工程目录下,创建一个templates目录,在templates目录创建a.html文件,代码如下:
<!DOCTYPE html>
<html lang="en">

<head>
    <meta charset="UTF-8">
    <meta name="viewport" content="width=device-width, initial-scale=1.0">
    <title>Document</title>
</head>
<body>
    <table id="g570b4" border="1">
        <tr id="g419fe">
            <th id="g16b02">th标头
            </th>
            <th id="gaae0b">th标头
            </th>
            <th id="gd78bc" class=" u5899e">地址
            </th>
        </tr>
        <tr id="g5af9b">
            <td id="g920bb">td表格单元
            </td>
            <td id="g9de93" class=" uab6e6">td表格单元
            </td>
            <td id="gea8dc">上海浦东虹桥某某小区某某地点
            </td>
        </tr>
        <tr id="cf47d6" class=" u0cbcd ">
            <td id="c913e3" class=" ud690a ">td表格单元
            </td>
            <td id="c452e0" class=" uab6e6 ">td表格单元
            </td>
            <td id="c917b3" class=" u7eb06 ">td表格单元
            </td>
        </tr>
        <tr id="cba81f" class=" u0cbcd ">
            <td id="c3dae7" class=" ud690a ">td表格单元
            </td>
            <td id="c7d0f9" class=" uab6e6 ">td表格单元
            </td>
            <td id="c9fe10" class=" u7eb06 ">td表格单元
            </td>
        </tr>
    </table>
    <style>
        .u5899e {


            width: 162px;
        }
    </style>
</body>

</html>
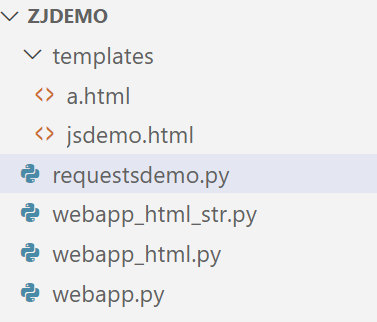
此时项目结构如下:
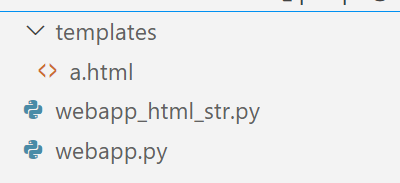
创建webapp_html.py文件,代码如下:
from flask import Flask, render_template

app = Flask(__name__)


# “show”与函数index对应
# 运行index函数返回templates目录下的index.html页面
@app.route("/show")
def index():
    return render_template("a.html")


if __name__ == '__main__':
    app.run()
运行代码
python webapp_html.py
输出如下:
(py10) PS D:\zjdemo> & D:/ProgramData/Anaconda3/envs/py10/python.exe d:/zjdemo/webapp_html.py
 * Serving Flask app 'webapp_html'
 * Debug mode: off
WARNING: This is a development server. Do not use it in a production deployment. Use a production WSGI server instead.
 * Running on http://127.0.0.1:5000
Press CTRL+C to quit
127.0.0.1 - - [20/Nov/2023 08:38:23] "GET / HTTP/1.1" 404 -
127.0.0.1 - - [20/Nov/2023 08:38:28] "GET /show HTTP/1.1" 200 -
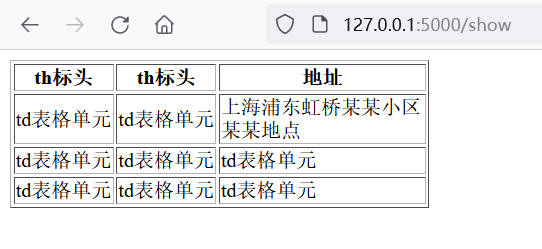
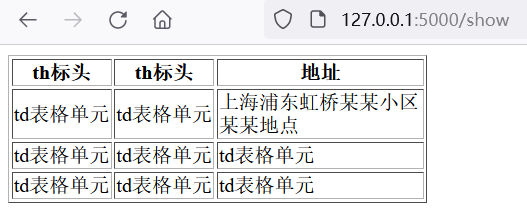
浏览器输入:
http://127.0.0.1:5000/show
返回如下:
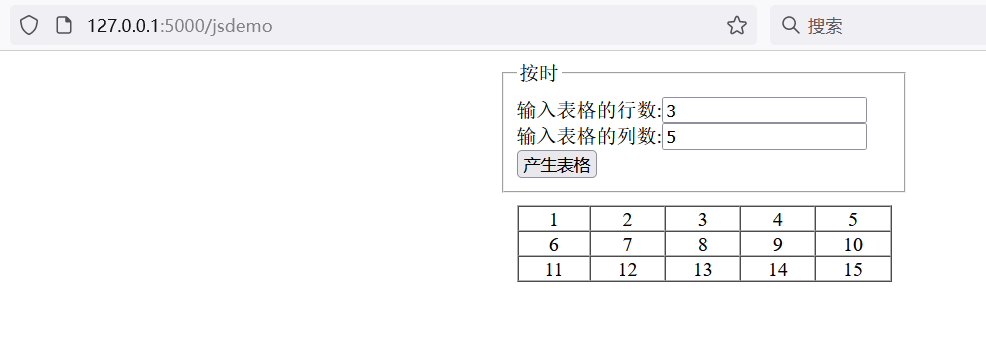
返回一个动态html页面
在templates目录下创建一个jsdemo.html,代码如下:
<!DOCTYPE html>
<html lang="en">
<head>
  <meta charset="UTF-8">
  <meta http-equiv="X-UA-Compatible" content="IE=edge">
  <meta name="viewport" content="width=device-width, initial-scale=1.0">
  <title>Document</title>
  <style>
    fieldset,#d1 {


      padding: 10px;
      width: 300px;
      margin: 0 auto;
    }
  </style>

</head>
<body>
  <form id="form1" name="form1" method="post" action="">
    <fieldset>
      <legend>按时</legend>

      输入表格的行数:<input type="text" id="row" value="3" placeholder="请输入表格的行数" required autofocus><br>
      输入表格的列数:<input type="text" id="col" value="5" placeholder="请输入表格的列数" required autofocus><br>
      <input type="button" id="ok" value="产生表格" onclick="createTable()"/>
    </fieldset>
  </form>
  <div id="d1"></div>
  <script type="text/javascript">
    function createTable(){


      n=1;
      var str="<table width='100%' border='1' cellspacing='0' cellpadding='0'><tbody>";
      var r1=document.getElementById("row").value;
      var c1=document.getElementById("col").value;
      for(i=0;i<r1;i++)
      {


        str=str+"<tr align='center'>";
        for(j=0;j<c1;j++)
        {


          str=str+"<td>"+(n++)+"</td>";
        }
        str=str+"</tr>";
      }
      var d1=document.getElementById("d1");
      d1.innerHTML=str+"</tbody></table>";
    }
    createTable()
  </script>
</body>
</html>
在webapp_html.py中添加如下代码
@app.route("/jsdemo")
def jsdemo():
    return render_template("jsdemo.html")
重新启动web服务,运行代码

```python
python webapp_html.py
输出如下:
(py10) PS D:\zjdemo> & D:/ProgramData/Anaconda3/envs/py10/python.exe d:/zjdemo/webapp_html.py
 * Serving Flask app 'webapp_html'
 * Debug mode: off
WARNING: This is a development server. Do not use it in a production deployment. Use a production WSGI server instead.
 * Running on http://127.0.0.1:5000
Press CTRL+C to quit
在浏览器中输入
http://127.0.0.1:5000/jsdemo
返回为:
在浏览器中输入
http://127.0.0.1:5000/show
返回为:
通过requests获取静态和动态html页面
创建requestsdemo.py
内容如下:
import requests

url_one = "http://127.0.0.1:5000/show"
url_two = "http://127.0.0.1:5000/jsdemo"

res_one = requests.get(url_one)
print(res_one.content.decode('utf-8'))
print("--------------------------")
res_two = requests.get(url_two)
print(res_two.content.decode('utf-8'))
运行代码,
python .\requestsdemo.py
输出如下
(py10) PS D:\zjdemo> python .\requestsdemo.py
<!DOCTYPE html>
<html lang="en">

<head>
    <meta charset="UTF-8">
    <meta name="viewport" content="width=device-width, initial-scale=1.0">
    <title>Document</title>
</head>
<body>
    <table id="g570b4" border="1">
        <tr id="g419fe">
            <th id="g16b02">th标头
            </th>
            <th id="gaae0b">th标头
            </th>
            <th id="gd78bc" class=" u5899e">地址
            </th>
        </tr>
        <tr id="g5af9b">
            <td id="g920bb">td表格单元
            </td>
            <td id="g9de93" class=" uab6e6">td表格单元
            </td>
            <td id="gea8dc">上海浦东虹桥某某小区某某地点
            </td>
        </tr>
        <tr id="cf47d6" class=" u0cbcd ">
            <td id="c913e3" class=" ud690a ">td表格单元
            </td>
            <td id="c452e0" class=" uab6e6 ">td表格单元
            </td>
            <td id="c917b3" class=" u7eb06 ">td表格单元
            </td>
        </tr>
        <tr id="cba81f" class=" u0cbcd ">
            <td id="c3dae7" class=" ud690a ">td表格单元
            </td>
            <td id="c7d0f9" class=" uab6e6 ">td表格单元
            </td>
            <td id="c9fe10" class=" u7eb06 ">td表格单元
            </td>
        </tr>
    </table>
    <style>
        .u5899e {


            width: 162px;
        }
    </style>
</body>

</html>
--------------------------
<!DOCTYPE html>
<html lang="en">
<head>
  <meta charset="UTF-8">
  <meta http-equiv="X-UA-Compatible" content="IE=edge">
  <meta name="viewport" content="width=device-width, initial-scale=1.0">
  <title>Document</title>
  <style>
    fieldset,#d1 {


      padding: 10px;
      width: 300px;
      margin: 0 auto;
    }
  </style>

</head>
<body>
  <form id="form1" name="form1" method="post" action="">
    <fieldset>
      <legend>按时</legend>

      输入表格的行数:<input type="text" id="row" value="3" placeholder="请输入表格的行数" required autofocus><br>
      输入表格的列数:<input type="text" id="col" value="5" placeholder="请输入表格的列数" required autofocus><br>
      <input type="button" id="ok" value="产生表格" onclick="createTable()"/>
    </fieldset>
  </form>
  <div id="d1"></div>
  <script type="text/javascript">
    function createTable(){


      n=1;
      var str="<table width='100%' border='1' cellspacing='0' cellpadding='0'><tbody>";
      var r1=document.getElementById("row").value;
      var c1=document.getElementById("col").value;
      for(i=0;i<r1;i++)
      {


        str=str+"<tr align='center'>";
        for(j=0;j<c1;j++)
        {


          str=str+"<td>"+(n++)+"</td>";
        }
        str=str+"</tr>";
      }
      var d1=document.getElementById("d1");
      d1.innerHTML=str+"</tbody></table>";
    }
    createTable()
  </script>
</body>
</html>
可以看见,静态页面的源代码和浏览器渲染后的效果相匹配,但动态页面捕获到的源代码和浏览器渲染后的效果差别较大,无法通过xpath等方法获取数据。
此时工程的完整目录如下:
备注:html渲染的过程
说说页面渲染的过程
浏览器渲染流程(精讲)
总结
本文主要描述了flask安装与返回静态页面和动态页面的过程,并通过requests库分布爬取静态/动态页面,通过比较可以更清晰的了解页面动态渲染的意义,以及引出selenium库的作用。