欢迎关注我的CSDN:https://spike.blog.csdn.net/
本文地址:https://spike.blog.csdn.net/article/details/134208615
Paper: Accurate prediction of nucleic acid and protein-nucleic acid complexes using RoseTTAFoldNA
- GitHub: RoseTTAFold2NA
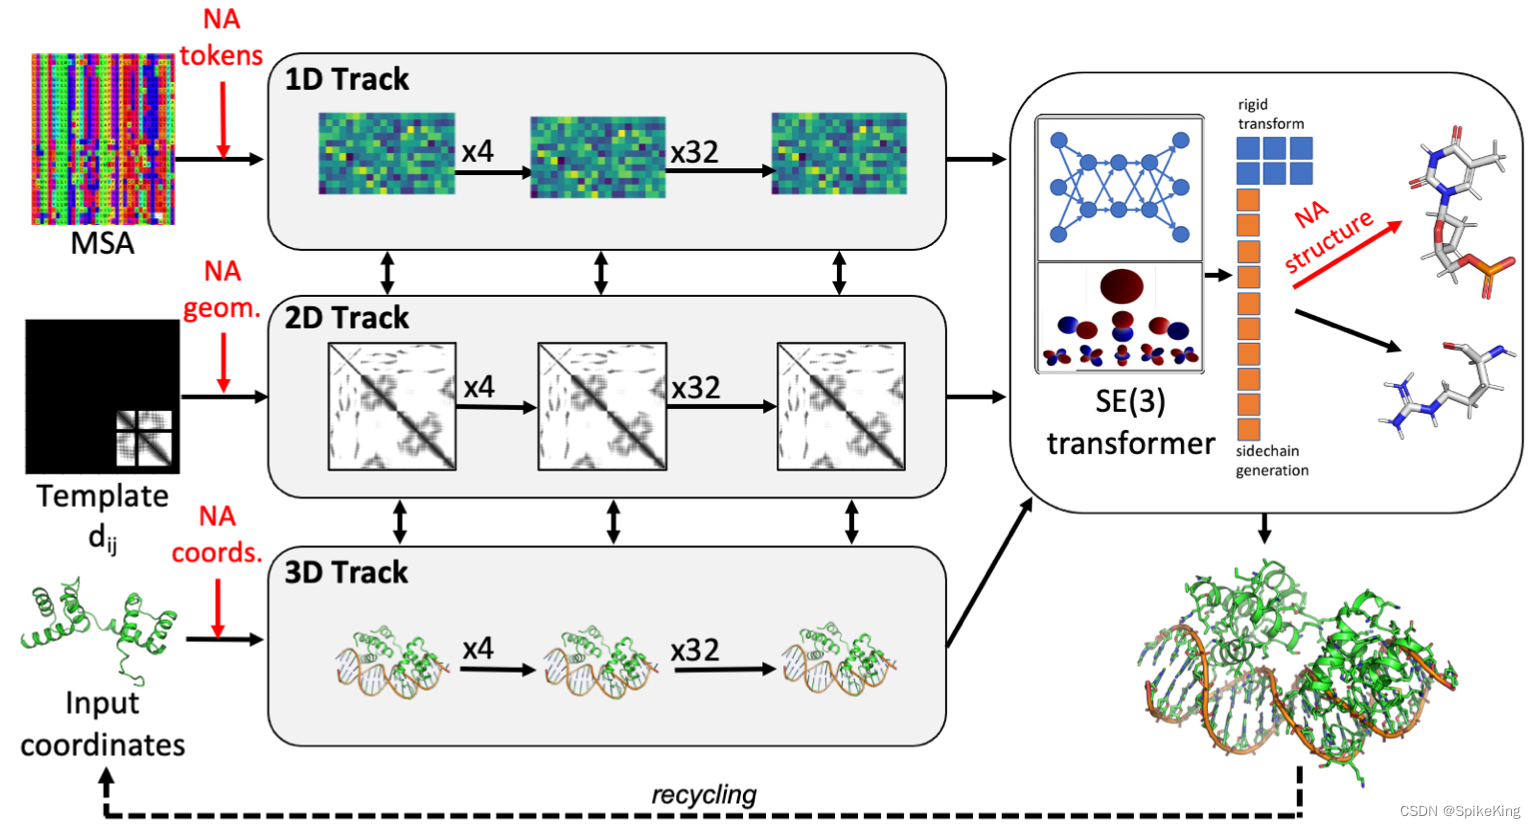
蛋白质-核酸复合物 (Protein - Nucleic Acid Complexes),在生物学中发挥着关键作用。 尽管蛋白质结构预测方面,最近取得了相当大的进展,但是,与已知复合物没有同源性的蛋白质-核酸复合物的结构预测,在很大程度上是一个尚未解决的问题。RoseTTAFold2NA 将 RoseTTAFold 端到端深度学习方法,扩展到核酸和蛋白质-核酸复合物的建模。 已训练的网络 RoseTTAFoldNA,可以快速生成 3D 结构模型,并且对 蛋白质-DNA 和 蛋白质-RNA 复合物以及 RNA 三级结构进行置信估计。 在这三种情况下,置信预测的准确性,都比当前最先进的方法高得多。 RoseTTAFoldNA 应广泛用于模拟天然存在的 蛋白质-核酸 复合物的结构,以及设计序列特异性 RNA 和 DNA 结合蛋白。
David Baker 组的工作,作者 Minkyung Baek
1. Docker 配置
Docker 环境:
# 下载 glm-nvidia-pytorch-1.11.0-cu116-py3.tar
docker image load -i glm-nvidia-pytorch-1.11.0-cu116-py3.tar

nvidia-docker run -it --name rfna-v1 --shm-size 72G -v [nfs]/[nfs] glm:nvidia-pytorch-1.11.0-cu116-py3
glm:nvidia-pytorch-1.11.0-cu116-py3,比较稳定的 docker image ,建议作为 base image。
准备 GitHub 工程:
git clone https://github.com/uw-ipd/RoseTTAFold2NA.git
cd RoseTTAFold2NA

cd /nfs_beijing_ai/chenlong/workspace/rosettafold2na-by-chenlong
GitHub 加速代理:
https://gitclone.com/
https://ghproxy.com/
https://toolwa.com/github/
配置 Docker 环境中的 conda 源,即:
vim ~/.condarc
conda 清华源,添加:
channels:
  - defaults
show_channel_urls: true
default_channels:
  - https://mirrors.tuna.tsinghua.edu.cn/anaconda/pkgs/main
  - https://mirrors.tuna.tsinghua.edu.cn/anaconda/pkgs/r
  - https://mirrors.tuna.tsinghua.edu.cn/anaconda/pkgs/msys2
  - https://mirrors.sustech.edu.cn/anaconda/pkgs/free
  - https://mirrors.sustech.edu.cn/anaconda/pkgs/pro
custom_channels:
  conda-forge: https://mirrors.tuna.tsinghua.edu.cn/anaconda/cloud
  msys2: https://mirrors.tuna.tsinghua.edu.cn/anaconda/cloud
  bioconda: https://mirrors.tuna.tsinghua.edu.cn/anaconda/cloud
  menpo: https://mirrors.tuna.tsinghua.edu.cn/anaconda/cloud
  pytorch: https://mirrors.tuna.tsinghua.edu.cn/anaconda/cloud
  simpleitk: https://mirrors.tuna.tsinghua.edu.cn/anaconda/cloud
  nvidia: https://mirrors.sustech.edu.cn/anaconda-extra/cloud
channel_priority: disabled
allow_conda_downgrades: true
conda 南方科技源 (速度很慢,建议与清华源合并使用),添加:
channels:
  - defaults
show_channel_urls: true
default_channels:
  - https://mirrors.sustech.edu.cn/anaconda/pkgs/main
  - https://mirrors.sustech.edu.cn/anaconda/pkgs/free
  - https://mirrors.sustech.edu.cn/anaconda/pkgs/r
  - https://mirrors.sustech.edu.cn/anaconda/pkgs/pro
  - https://mirrors.sustech.edu.cn/anaconda/pkgs/msys2
custom_channels:
  conda-forge: https://mirrors.sustech.edu.cn/anaconda/cloud
  msys2: https://mirrors.sustech.edu.cn/anaconda/cloud
  bioconda: https://mirrors.sustech.edu.cn/anaconda/cloud
  menpo: https://mirrors.sustech.edu.cn/anaconda/cloud
  pytorch: https://mirrors.sustech.edu.cn/anaconda/cloud
  simpleitk: https://mirrors.sustech.edu.cn/anaconda/cloud
  nvidia: https://mirrors.sustech.edu.cn/anaconda-extra/cloud
channel_priority: disabled
allow_conda_downgrades: true
显示全部 channels:
conda config --show
配置 pip 源:
rm /opt/conda/pip.conf
rm /root/.config/pip/pip.conf
vim ~/.pip/pip.conf

[global]
no-cache-dir = true
index-url = http://mirrors.aliyun.com/pypi/simple/
extra-index-url = https://pypi.ngc.nvidia.com
trusted-host = mirrors.aliyun.com pypi.ngc.nvidia.com
2. 安装 Python 库
使用 yaml 安装,适合网络较好。或逐步安装 python 库,解决问题。
2.1 yaml 安装
安装 conda 环境,需要耐心等待:
conda env create -f RF2na-linux.yml
其中 RF2na-linux.yml,如下:
name: RF2NA
channels:
  - pytorch
  - nvidia
  - defaults
  - conda-forge
dependencies:
  - python=3.10
  - pip
  - pytorch
  - requests
  - pytorch-cuda=11.7
  - dglteam/label/cu117::dgl
  - pyg::pyg
  - bioconda::mafft
  - bioconda::hhsuite
  - bioconda::blast
  - bioconda::hmmer>=3.3
  - bioconda::infernal
  - bioconda::cd-hit
  - bioconda::csblast
  - pip:
    - psutil
    - tqdm
2.2 逐步安装 (速度较快)
单步创建环境,注意安装顺序:
source ~/.bashrc
conda env list
conda create -y -n RF2NA python=3.10
conda activate RF2NA

conda install pip requests scipy
pip install psutil tqdm

# 优先安装 conda 的 python 库
conda install -y hmmer hhsuite==3.3.0 -c bioconda
conda install -y mafft blast infernal cd-hit csblast -c bioconda
# conda install dgl-cuda11.7 -c dglteam # 可选

# pip install torch==2.0.1 torchvision==0.15.2 torchaudio==2.0.2
# nvidia 下载较慢,建议使用 pip 安装 pytorch
conda install pytorch==2.0.1 torchvision==0.15.2 torchaudio==2.0.2 pytorch-cuda=11.7 -c pytorch -c nvidia --show-channel-urls
conda install pyg -c pyg
2.2.1 hhsuite 与 环境冲突
遇到冲突错误,即遇到 hhsuite==3.3.0 与环境冲突,无法安装,解决方法是使用不同的 docker image 即可,如下:
UnsatisfiableError: The following specifications were found to be incompatible with each other
建议使用 glm:nvidia-pytorch-1.11.0-cu116-py3 作为 docker 的 Base Image。
2.2.2 安装 dglteam (可选)
(可选) 安装 dgl 较慢,建议下载,再配置安装 dglteam,如下:
# dgl-cuda11.7       dglteam/linux-64::dgl-cuda11.7-0.9.1post1-py310_0
# dgl-cuda11.7-0.9.1post1-py310_0.tar.bz2, 约 220 M
# 下载链接:https://conda.anaconda.org/dglteam/linux-64
conda install ./dgl-cuda11.7-0.9.1post1-py310_0.tar.bz2
2.2.3 安装 PyTorch
使用 conda 安装 pytorch 较慢时,建议使用 pip 进行安装,速度较快。测试 PyTorch 是否可用:
conda install scipy
pip install psutil==5.8.0 tqdm
pip install torch==2.0.1 torchvision==0.15.2 torchaudio==2.0.2
即:
python

import torch
print(torch.__version__)  # 2.0.1+cu117
print(torch.cuda.is_available())  # True
2.2.4 安装 PyG
安装 pyg 包,也可以使用 pip 进行安装,参考 pytorch-geometric - Installation,即
pip install torch_geometric

# Optional dependencies:
pip install pyg_lib torch_scatter torch_sparse torch_cluster torch_spline_conv -f https://data.pyg.org/whl/torch-2.0.0+cu117.html
3. 测试
数据位置:[your folder]/RoseTTAFold2NA/RNA/
建立蛋白质序列库的软链接,建议使用之前的下载:
ln -s [your folder]/uniref30 uniref30
ln -s [your folder]/bfd bfd
ln -s [your folder]/pdb100_2021Mar03 pdb100_2021Mar03
RNA 库安装:
mkdir RNA
cd RNA

# Rfam
cp [your folder]/RoseTTAFold2NA/RNA/Rfam/Rfam.cm.gz .
cp [your folder]/RoseTTAFold2NA/RNA/Rfam/Rfam.full_region.gz .
gunzip Rfam.cm.gz
gunzip Rfam.full_region.gz
cmpress Rfam.cm

# RNAcentral
cp [your folder]/RoseTTAFold2NA/RNA/RNAcentral/rfam_annotations.tsv.gz .
cp [your folder]/RoseTTAFold2NA/RNA/RNAcentral/id_mapping.tsv.gz .
cp [your folder]/RoseTTAFold2NA/RNA/RNAcentral/rnacentral_species_specific_ids.fasta.gz .
../input_prep/reprocess_rnac.pl id_mapping.tsv.gz rfam_annotations.tsv.gz
gunzip -c rnacentral_species_specific_ids.fasta.gz | makeblastdb -in - -dbtype nucl  -parse_seqids -out rnacentral.fasta -title "RNACentral"

# nt
ln [your folder]/RoseTTAFold2NA/RNA/nt nt
模型权重:
cp [your folder]/RoseTTAFold2NA/RNA/network/RF2NA_apr23.tgz .
tar xvfz RF2NA_apr23.tgz
ll -h weights/
测试命令:
bash ../run_RF2NA.sh rna_pred rna_binding_protein.fa R:RNA.fa
# bash run_RF2NA.sh example/rna_pred example/rna_binding_protein.fa R:example/RNA.fa
执行步骤如下:
- 第1步执行:Running HHblits
- 第2步执行:Running hhsearch
- 第3步执行:Creating joint Protein/RNA MSA
- 第4步执行:Running RoseTTAFold2NA to predict structures
预测日志如下:
Running on GPU
           plddt    best
RECYCLE  0   0.799  -1.000
RECYCLE  1   0.858   0.799
RECYCLE  2   0.870   0.858
RECYCLE  3   0.875   0.870
RECYCLE  4   0.877   0.875
RECYCLE  5   0.879   0.877
RECYCLE  6   0.877   0.879
RECYCLE  7   0.880   0.879
RECYCLE  8   0.879   0.880
RECYCLE  9   0.881   0.880
Done
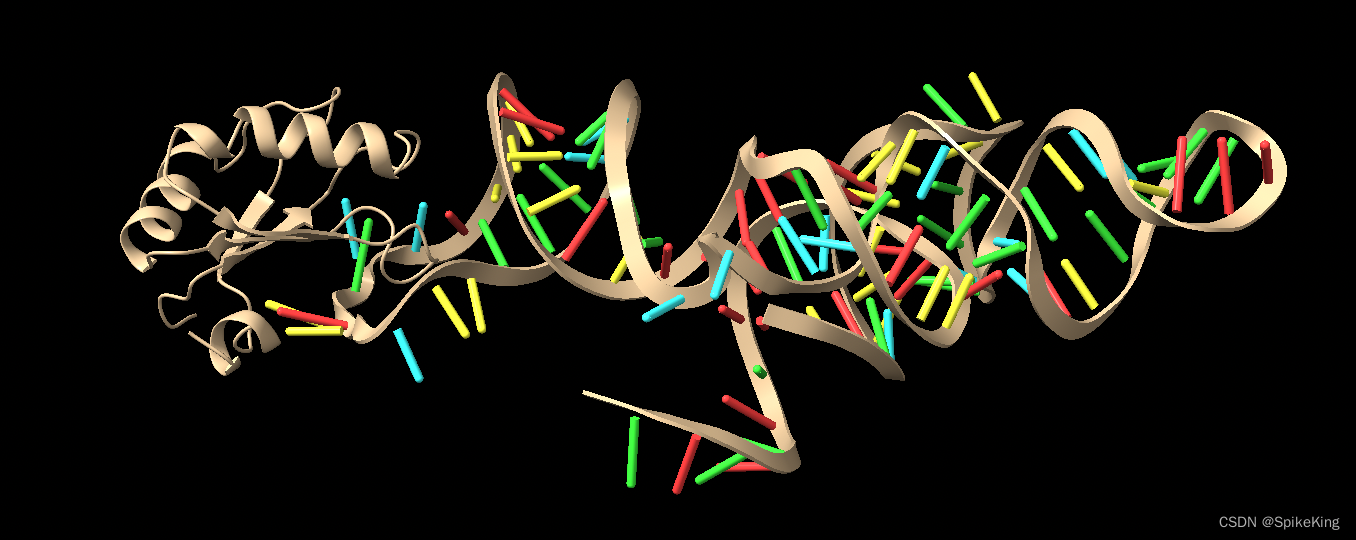
输出效果,包括 蛋白质部分与 RNA 部分,如下: