前言
在制作游戏时,可以遇到要对字体添加描边的需求,unity 的UGUI自带的OutLine组件,描边效果不好,宽度过大会出现穿帮,顶点数量也会增加,性能不好,如果对于有几百字,顶点数量会很多,而且无法扩展功能
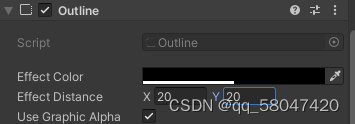
可以看出Outline创建了4个方向的文字
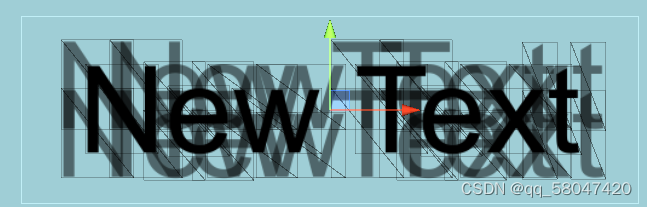
Unity5.2以前的版本要求,每一个Canvas下至多只能有2^16-1=65535个顶点(使用2个字节(16位)存储顶点索引),超过就会报错
以上的种种原因,让我们不得不自己编写文字图片的描边shader
在网上找了一圈资料后,发现一篇不错的文章,这个应该是自己实现文本shader最经典的文章
但是好像都没有对uv偏移进行说明(最难的地方)
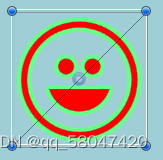
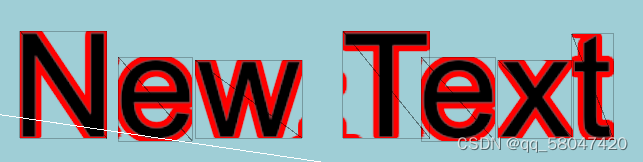
效果展示
Shader实现基础描边
基本思路,将uv在片元着色器进行偏移,比较a通道,偏移后的图片.a-原来的图片.a
这里只是用ase可视化演示一下,实际用shader代码实现
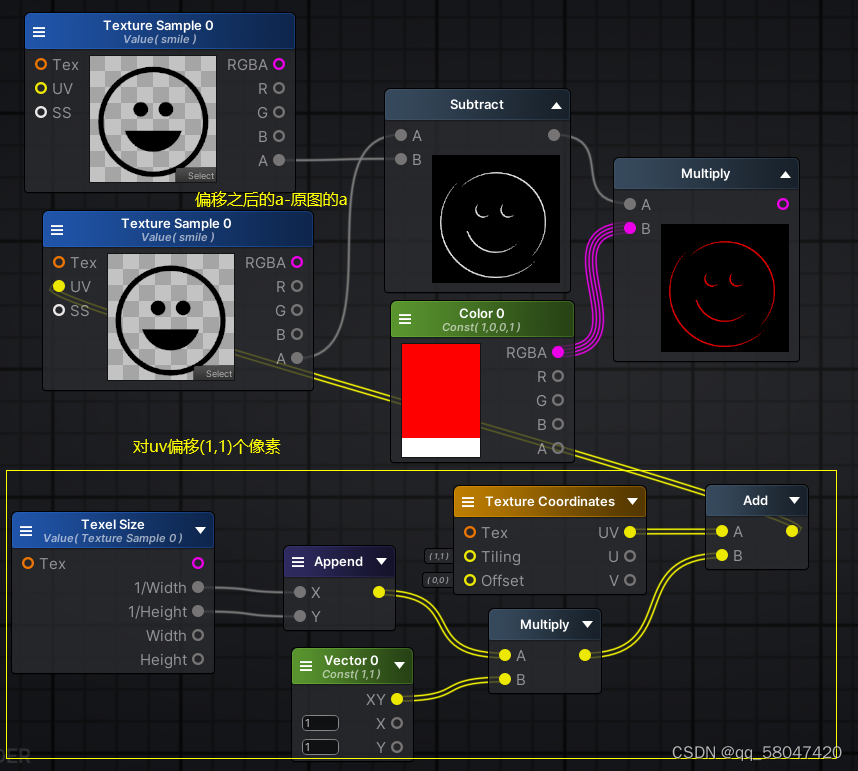
沿着8或12个方向进行偏移,偏移的方向越多,描边宽度大时不容易穿帮
在基础描边这里暂时声明其它变量
shader属性这里不声明其它的属性,在C#脚本中不使用material.SetColor(“_描边颜色”, _描边颜色);
因为这会导致材质不同,无法让unity动态批合并,会增加drawcall
Properties
{


//这个特性可以和Unity组件中的属性产生关联
//表示该属性是与每个渲染器相关的数据
//在Shader中使用此特性声明的属性会在每个渲染器实例中共享
    [PerRendererData]_MainTex ("Texture", 2D) = "white" {

    }
    _OutLineColor("OutLineColor",Color)=(1,0,0,0)
    _OutLineWidth("OutLineWidth",Float)=1
}
Tags设置透明渲染队列和透明渲染模式,开启透明Blend
SubShader
{


    Tags
    {


        "Queue"="Transparent" "IgnoreProjector"="true" "RenderType"="Transparent"
    }
    Lighting Off
    ZWrite Off
    Blend SrcAlpha OneMinusSrcAlpha
顶点着色器,基础普通的顶点着色器
v2f vert(appdata v)
{


    v2f o;
    o.vertex = UnityObjectToClipPos(v.vertex);
    o.uv = TRANSFORM_TEX(v.uv, _MainTex);
    return o;
}
片元着色器
在12个方向进行采样,OffsetX取cos值,OffsetY取sin值作为权重
fixed SampleTex(v2f i,fixed ii,fixed color_a)
{


    const fixed OffsetX[12] = {

    1, 0.866, 0.5, 0, -0.5, -0.866, -1, -0.866, -0.5, 0, 0.5, 0.866};
    const fixed OffsetY[12] = {

    0, 0.5, 0.866, 1, 0.866, 0.5, 0, -0.5, -0.866, -1, -0.866, -0.5};
    fixed2 offset_uv = i.uv + fixed2(OffsetX[ii], OffsetY[ii])* _MainTex_TexelSize.xy * _OutLineWidth;
    fixed sample_a = tex2D(_MainTex, offset_uv).a;
    fixed a = sample_a;//-color.a;不减去color.a,因为在文字边缘a=0-1的部分,会为0
    //比如向上偏移,下面边缘的a为0-1,减去1,负数,saturate后为0,这个值应该保留,否则边缘颜色由原来的片元决定,没有混合过渡
    return a;
}
fixed4 frag(v2f i) : SV_Target
{


    fixed4 col = tex2D(_MainTex, i.uv);
    fixed sum_a = 0;//叠加各个方向采样a的结果
    sum_a += SampleTex(i, 0, col.a);
    sum_a += SampleTex(i, 1, col.a);
    sum_a += SampleTex(i, 2, col.a);
    sum_a += SampleTex(i, 3, col.a);
    sum_a += SampleTex(i, 4, col.a);
    sum_a += SampleTex(i, 5, col.a);
    sum_a += SampleTex(i, 6, col.a);
    sum_a += SampleTex(i, 7, col.a);
    sum_a += SampleTex(i, 8, col.a);
    sum_a += SampleTex(i, 9, col.a);
    sum_a += SampleTex(i, 10, col.a);
    sum_a += SampleTex(i, 11, col.a);
    sum_a=saturate(sum_a);
    fixed4 outLineColor=fixed4(_OutLineColor.rgb,sum_a);
    fixed4 finalCol=lerp(outLineColor,col,col.a);//没有文字的地方a为0,由描边决定,文字边界a为0-1由文字颜色和描边共同决定
    return finalCol;
}
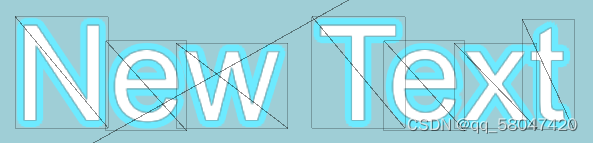
问题:
- 可以发现文字边缘有其它的文本,只是因为文本对于的纹理被打包到一个大的图集中,uv偏移后,会采样到临近的文本像素
- 观察N的左侧可以看出,描边的区域有一部分超出范围为裁剪了
解决方案:
- 要在C#里面得到偏移之前原来的uv范围,根据uv范围,将不在范围的片元a设置为即可
- 要对顶点进行扩展,让三角形范围变大,同时要等比例扩展uv,只扩展顶点,仅仅只是图片被放大了,还是会被裁剪,
,同时扩展顶点和uv,这样就不会被裁剪了
实现通用的shader
C#部分
在C#脚本要进行顶点的扩展,进行uv的扩展
使用C#脚本传递描边颜色和文本颜色
大致看一下BaseMeshEffect
- 在Canvas中要开启uv1和uv2
protected override void Start()
{


    UseUVChannels();
}
private void UseUVChannels()
{


    var shader = Shader.Find("DSShader/TextOutline");
    base.graphic.material = new Material(shader);
    AdditionalCanvasShaderChannels v1 = base.graphic.canvas.additionalShaderChannels;
    var v2 = AdditionalCanvasShaderChannels.TexCoord1;
    if ((v1 & v2) != v2)
    {


        base.graphic.canvas.additionalShaderChannels |= v2;
    }
    v2 = AdditionalCanvasShaderChannels.TexCoord2;
    if ((v1 & v2) != v2)
    {


        base.graphic.canvas.additionalShaderChannels |= v2;
    }
}
上面的 |=操作不明白可以学习一下|=位或操作
比如
int a = 5;  // 二进制表示: 0000 0101
int b = 3;  // 二进制表示: 0000 0011
a |= b;    // 执行位或运算,并赋值给 a,有1则1
Console.WriteLine(a);  // 输出: 7 (二进制表示: 0000 0111)
可以发现AdditionalCanvasShaderChannels枚举定义的数字刚好是2^n为了位或操作
public enum AdditionalCanvasShaderChannels
{


  None = 0,
  TexCoord1 = 1,
  TexCoord2 = 2,
  TexCoord3 = 4,
  Normal = 8,
  Tangent = 16, // 0x00000010
}
[ExecuteAlways]
public abstract class BaseMeshEffect : UIBehaviour, IMeshModifier
{


    [NonSerialized]
    private Graphic m_Graphic;

    /// <summary>
    /// The graphic component that the Mesh Effect will aplly to.
    /// </summary>
    protected Graphic graphic
    {


        get
        {


            if (m_Graphic == null)
                m_Graphic = GetComponent<Graphic>();

            return m_Graphic;
        }
    }
已经BaseMeshEffect 带有[ExecuteAlways],子类会在编辑器模式运行
我们要使用BaseMeshEffect , BaseMeshEffect 是一个抽象类,用于实现自定义的 Mesh 效果.用于扩展和修改 UI 元素的网格Mesh数据.通过继承 BaseMeshEffect 类并实现其中的方法,可以对 UI 元素的网格进行自定义的修改和效果应用.
2. 重载ModifyMesh,更改UIVertex数据
public class TextOutline : BaseMeshEffect
{


	List<UIVertex> _uiVertices = new List<UIVertex>();
	[Range(0, 6)]
	public float outLineWidth = 1;
	public Color EdgeColor = Color.red;
	public Color TextColor = Color.red;
	public override void ModifyMesh(VertexHelper vh)
	{


	    vh.GetUIVertexStream(_uiVertices);
	    ModifyUIVertexs(_uiVertices);//下面的函数
	    vh.Clear();
	    vh.AddUIVertexTriangleStream(_uiVertices);
    }
}
ModifyUIVertexs遍历UIVertex,每次拿到3个顶点数据
偏移顶点pos的思路,判断顶点是否大于三角形的中心点,x或y大于则向上或向右偏移,加上描边宽度outLineWidth
void ModifyUIVertexs(List<UIVertex> uiVertices)
{


    for (int i = 0; i <= uiVertices.Count - 3; i += 3)
    {


        UIVertex uiVertex1 = uiVertices[i];
        UIVertex uiVertex2 = uiVertices[i + 1];
        UIVertex uiVertex3 = uiVertices[i + 2];
        Vector3 pos1 = uiVertex1.position;
        Vector3 pos2 = uiVertex2.position;
        Vector3 pos3 = uiVertex3.position;

        Vector2 uv1 = uiVertex1.uv0;
        Vector2 uv2 = uiVertex2.uv0;
        Vector2 uv3 = uiVertex3.uv0;
        //得到三角形的中心点,用于顶点的偏移
        Vector3 pos_center = (pos1 + pos2 + pos3) / 3;
        Vector2 uv_min = new Vector2(Mathf.Min(uv1.x, uv2.x, uv3.x), Mathf.Min(uv1.y, uv2.y, uv3.y));
        Vector2 uv_max = new Vector2(Mathf.Max(uv1.x, uv2.x, uv3.x), Mathf.Max(uv1.y, uv2.y, uv3.y));
        Vector4 uv_border = new Vector4(uv_min.x, uv_min.y, uv_max.x, uv_max.y);
        //得到uv的范围,传递给shader判断
        //以pos和uv都以pos2或uv2为原点
        Vector2 pos_base1 = pos1 - pos2;
        Vector2 pos_base2 = pos3 - pos2;

        Vector2 uv_base1 = uv1 - uv2;
        Vector2 uv_base2 = uv3 - uv2;

        uiVertices[i] = ModifyPosUV(uiVertex1, pos_center, pos_base1, pos_base2, uv_base1, uv_base2, uv_border);
        uiVertices[i + 1] = ModifyPosUV(uiVertex2, pos_center, pos_base1, pos_base2, uv_base1, uv_base2, uv_border);
        uiVertices[i + 2] = ModifyPosUV(uiVertex3, pos_center, pos_base1, pos_base2, uv_base1, uv_base2, uv_border);
    }
}
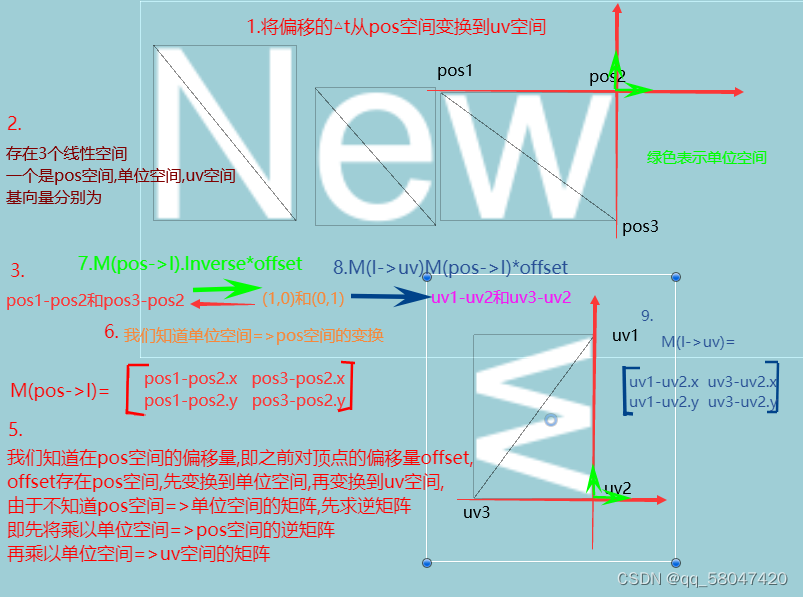
计算pos顶点的偏移很好理解,但是uv的计算比较复杂,要使用线性代数的知识,对旋转缩放矩阵有一定的理解
UIVertex ModifyPosUV(UIVertex uiVertex, Vector3 pos_centor,
    Vector2 pos_base1, Vector2 pos_base2,
    Vector2 uv_base1, Vector2 uv_base2, Vector4 uv_border)
{


    //偏移pos
    Vector3 pos = uiVertex.position;
    float offsetX = pos.x > pos_centor.x ? outLineWidth : -outLineWidth;
    float offsetY = pos.y > pos_centor.y ? outLineWidth : -outLineWidth;
    pos.x += offsetX;
    pos.y += offsetY;
    uiVertex.position = pos;
    Vector2 offset = new Vector2(offsetX, offsetY);
    //uv偏移
    Vector2 uv = uiVertex.uv0;
    Matrix2x2 pos_m = new Matrix2x2(pos_base1.x,pos_base2.x,pos_base1.y,pos_base2.y);
     pos_m=pos_m.Inverse();
    Matrix2x2 uv_m = new Matrix2x2(uv_base1.x, uv_base2.x, uv_base1.y, uv_base2.y);
    Vector2 uv_offset = uv_m * pos_m * offset;
    uv += uv_offset;
    //设置偏移后的uv,uv0.z设置为描边宽度
    uiVertex.uv0 = new Vector4(uv.x, uv.y, outLineWidth, 0);
    //设置原始uv范围
    uiVertex.uv1 = uv_border;
    //设置文本颜色
    uiVertex.uv2 = new Vector4(EdgeColor.r,EdgeColor.g,EdgeColor.b,EdgeColor.a);
    //Color=>Color32,UIVertex的color类型是Color32
    Color32 color32 = (Color32)TextColor;
    uiVertex.color =color32;
    return uiVertex;
}
下面重点讲解uv偏移部分
这里要自己实现Matrix2x2类,实现矩阵×矩阵,矩阵×向量,矩阵取逆
	//uv偏移
    Vector2 uv = uiVertex.uv0;
    Matrix2x2 pos_m = new Matrix2x2(pos_base1.x,pos_base2.x,pos_base1.y,pos_base2.y);
     pos_m=pos_m.Inverse();
    Matrix2x2 uv_m = new Matrix2x2(uv_base1.x, uv_base2.x, uv_base1.y, uv_base2.y);
    Vector2 uv_offset = uv_m * pos_m * offset;
    uv += uv_offset;
对于uv映射
Matrix2×2类
public class Matrix2x2
{


    private float[,] matrix = new float[2, 2];

    public Matrix2x2(float a, float b, float c, float d)
    {


        matrix[0, 0] = a;
        matrix[0, 1] = b;
        matrix[1, 0] = c;
        matrix[1, 1] = d;
    }

    public float Determinant()
    {


        return matrix[0, 0] * matrix[1, 1] - matrix[0, 1] * matrix[1, 0];
    }

    public Matrix2x2 Inverse()
    {


        float det = Determinant();
        float invDet = 1 / det;
        float a = matrix[1, 1] * invDet;
        float b = -matrix[0, 1] * invDet;
        float c = -matrix[1, 0] * invDet;
        float d = matrix[0, 0] * invDet;

        return new Matrix2x2(a, b, c, d);
    }

    public static Matrix2x2 operator *(Matrix2x2 m1, Matrix2x2 m2)
    {


        float a = m1.matrix[0, 0] * m2.matrix[0, 0] + m1.matrix[0, 1] * m2.matrix[1, 0];
        float b = m1.matrix[0, 0] * m2.matrix[0, 1] + m1.matrix[0, 1] * m2.matrix[1, 1];
        float c = m1.matrix[1, 0] * m2.matrix[0, 0] + m1.matrix[1, 1] * m2.matrix[1, 0];
        float d = m1.matrix[1, 0] * m2.matrix[0, 1] + m1.matrix[1, 1] * m2.matrix[1, 1];

        return new Matrix2x2(a, b, c, d);
    }

    public static Vector2 operator *(Matrix2x2 m, Vector2 v)
    {


        float x = m.matrix[0, 0] * v.x + m.matrix[0, 1] * v.y;
        float y = m.matrix[1, 0] * v.x + m.matrix[1, 1] * v.y;

        return new Vector2(x, y);
    }
}
Shader部分
在Properties只说明_MainTex ,其它参数由C#传入
Properties
    {


        [PerRendererData]_MainTex ("Texture", 2D) = "white" {

    }
    }
    SubShader
    {


        Tags
        {


            "Queue"="Transparent" "IgnoreProjector"="true" "RenderType"="Transparent"
        }
        Cull Off
        Lighting Off
        ZWrite Off
        Blend SrcAlpha OneMinusSrcAlpha
顶点和片元结构体
struct appdata {


    float4 vertex : POSITION;
    float4 uv : TEXCOORD0;
    float4 uv1 : TEXCOORD1;
    float4 uv2 : TEXCOORD2;
    float4 color:COLOR;
};

struct v2f {


    float2 uv : TEXCOORD0;
    float4 vertex : SV_POSITION;
    float4 border : TEXCOORD1;
    float4 color:COLOR;
    float width: TEXCOORD2;
    float4 edgeColor: TEXCOORD3;
};
顶点z着色器
v2f vert(appdata v)
{


    v2f o;
    o.vertex = UnityObjectToClipPos(v.vertex);
    o.uv = TRANSFORM_TEX(v.uv, _MainTex);
    o.width = v.uv.z;//得到描边宽度
    o.color = v.color;//得到文本颜色
    o.border = v.uv1;//得到原始uv范围
    o.edgeColor=v.uv2;//得到描边颜色
    return o;
}
采样偏移uv对纹理采样
fixed SampleTex(v2f i,fixed ii,fixed color_a)
 {


     const fixed OffsetX[12] = {

    1, 0.866, 0.5, 0, -0.5, -0.866, -1, -0.866, -0.5, 0, 0.5, 0.866};
     const fixed OffsetY[12] = {

    0, 0.5, 0.866, 1, 0.866, 0.5, 0, -0.5, -0.866, -1, -0.866, -0.5};
     float2 offset_uv = i.uv + float2(OffsetX[ii], OffsetY[ii]) * _MainTex_TexelSize.xy * i.width;
     fixed sample_a = (tex2D(_MainTex, offset_uv)).a;
     fixed a = sample_a;
     a *= isInRange(i.border.xy, i.border.zw, offset_uv);
     return a;
 }
判断uv是否在原始uv范围
fixed isInRange(fixed2 uv_min,fixed2 uv_max,fixed2 uv)
{


    fixed2 rs = step(uv_min, uv) * step(uv, uv_max);
    return rs.x * rs.y;
}
片元着色器
fixed4 frag(v2f i) : SV_Target
{


    fixed4 col = tex2D(_MainTex, i.uv).a*i.color;
    col.a *= isInRange(i.border.xy, i.border.zw, i.uv);
    fixed sum_a = 0;
    sum_a += SampleTex(i, 0, col.a);
    sum_a += SampleTex(i, 1, col.a);
    sum_a += SampleTex(i, 2, col.a);
    sum_a += SampleTex(i, 3, col.a);
    sum_a += SampleTex(i, 4, col.a);
    sum_a += SampleTex(i, 5, col.a);
    sum_a += SampleTex(i, 6, col.a);
    sum_a += SampleTex(i, 7, col.a);
    sum_a += SampleTex(i, 8, col.a);
    sum_a += SampleTex(i, 9, col.a);
    sum_a += SampleTex(i, 10, col.a);
    sum_a += SampleTex(i, 11, col.a);
    sum_a = saturate(sum_a);
    fixed4 outLineColor = fixed4(i.edgeColor.rgb,sum_a);
    fixed a=step(i.width,0.001);//宽度为0时,a为1,颜色由原来颜色决定
    fixed4 finalCol = lerp(outLineColor, col, saturate(a+col.a));
    return finalCol;
}
完整的C#代码
using System;
using System.Collections;
using System.Collections.Generic;
using UnityEngine;
using UnityEngine.UI;

public class TextOutline : BaseMeshEffect
{


    List<UIVertex> _uiVertices = new List<UIVertex>();
    [Range(0, 6)]
    public float outLineWidth = 1;
    public Color EdgeColor = Color.red;
    public Color TextColor = Color.white;
    public override void ModifyMesh(VertexHelper vh)
    {


        vh.GetUIVertexStream(_uiVertices);
        ModifyUIVertexs(_uiVertices);
        vh.Clear();
        vh.AddUIVertexTriangleStream(_uiVertices);
    }
    protected override void Start()
    {


        UseUVChannels();
    }
    private void UseUVChannels()
    {


        var shader = Shader.Find("DSShader/TextOutline");
        base.graphic.material = new Material(shader);
        AdditionalCanvasShaderChannels v1 = base.graphic.canvas.additionalShaderChannels;
        var v2 = AdditionalCanvasShaderChannels.TexCoord1;
        if ((v1 & v2) != v2)
        {


            base.graphic.canvas.additionalShaderChannels |= v2;
        }
        v2 = AdditionalCanvasShaderChannels.TexCoord2;
        if ((v1 & v2) != v2)
        {


            base.graphic.canvas.additionalShaderChannels |= v2;
        }
    }
    void ModifyUIVertexs(List<UIVertex> uiVertices)
    {


        for (int i = 0; i <= uiVertices.Count - 3; i += 3)
        {


            UIVertex uiVertex1 = uiVertices[i];
            UIVertex uiVertex2 = uiVertices[i + 1];
            UIVertex uiVertex3 = uiVertices[i + 2];
            Vector3 pos1 = uiVertex1.position;
            Vector3 pos2 = uiVertex2.position;
            Vector3 pos3 = uiVertex3.position;

            Vector2 uv1 = uiVertex1.uv0;
            Vector2 uv2 = uiVertex2.uv0;
            Vector2 uv3 = uiVertex3.uv0;

            Vector3 pos_center = (pos1 + pos2 + pos3) / 3;
            Vector2 uv_min = new Vector2(Mathf.Min(uv1.x, uv2.x, uv3.x), Mathf.Min(uv1.y, uv2.y, uv3.y));
            Vector2 uv_max = new Vector2(Mathf.Max(uv1.x, uv2.x, uv3.x), Mathf.Max(uv1.y, uv2.y, uv3.y));
            Vector4 uv_border = new Vector4(uv_min.x, uv_min.y, uv_max.x, uv_max.y);

            Vector2 pos_base1 = pos1 - pos2;
            Vector2 pos_base2 = pos3 - pos2;

            Vector2 uv_base1 = uv1 - uv2;
            Vector2 uv_base2 = uv3 - uv2;

            uiVertices[i] = ModifyPosUV(uiVertex1, pos_center, pos_base1, pos_base2, uv_base1, uv_base2, uv_border);
            uiVertices[i + 1] = ModifyPosUV(uiVertex2, pos_center, pos_base1, pos_base2, uv_base1, uv_base2, uv_border);
            uiVertices[i + 2] = ModifyPosUV(uiVertex3, pos_center, pos_base1, pos_base2, uv_base1, uv_base2, uv_border);
        }
    }
    UIVertex ModifyPosUV(UIVertex uiVertex, Vector3 pos_centor,
        Vector2 pos_base1, Vector2 pos_base2,
        Vector2 uv_base1, Vector2 uv_base2, Vector4 uv_border)
    {


        //偏移pos
        Vector3 pos = uiVertex.position;
        float offsetX = pos.x > pos_centor.x ? outLineWidth : -outLineWidth;
        float offsetY = pos.y > pos_centor.y ? outLineWidth : -outLineWidth;
        pos.x += offsetX;
        pos.y += offsetY;
        uiVertex.position = pos;
        Vector2 offset = new Vector2(offsetX, offsetY);
        //uv偏移
        Vector2 uv = uiVertex.uv0;
        Matrix2x2 pos_m = new Matrix2x2(pos_base1.x,pos_base2.x,pos_base1.y,pos_base2.y);
         pos_m=pos_m.Inverse();
        Matrix2x2 uv_m = new Matrix2x2(uv_base1.x, uv_base2.x, uv_base1.y, uv_base2.y);
        Vector2 uv_offset = uv_m * pos_m * offset;
        uv += uv_offset;
        //设置偏移后的uv,uv0.z设置为描边宽度
        uiVertex.uv0 = new Vector4(uv.x, uv.y, outLineWidth, 0);
        //设置原始uv范围
        uiVertex.uv1 = uv_border;
        //设置文本颜色
        uiVertex.uv2 = new Vector4(EdgeColor.r,EdgeColor.g,EdgeColor.b,EdgeColor.a);
        //Color=>Color32,UIVertex的color类型是Color32
        Color32 color32 = (Color32)TextColor;
        uiVertex.color =color32;
        return uiVertex;
    }


}

public class Matrix2x2
{


    private float[,] matrix = new float[2, 2];

    public Matrix2x2(float a, float b, float c, float d)
    {


        matrix[0, 0] = a;
        matrix[0, 1] = b;
        matrix[1, 0] = c;
        matrix[1, 1] = d;
    }

    public float Determinant()
    {


        return matrix[0, 0] * matrix[1, 1] - matrix[0, 1] * matrix[1, 0];
    }

    public Matrix2x2 Inverse()
    {


        float det = Determinant();
        float invDet = 1 / det;

        float a = matrix[1, 1] * invDet;
        float b = -matrix[0, 1] * invDet;
        float c = -matrix[1, 0] * invDet;
        float d = matrix[0, 0] * invDet;

        return new Matrix2x2(a, b, c, d);
    }

    public static Matrix2x2 operator *(Matrix2x2 m1, Matrix2x2 m2)
    {


        float a = m1.matrix[0, 0] * m2.matrix[0, 0] + m1.matrix[0, 1] * m2.matrix[1, 0];
        float b = m1.matrix[0, 0] * m2.matrix[0, 1] + m1.matrix[0, 1] * m2.matrix[1, 1];
        float c = m1.matrix[1, 0] * m2.matrix[0, 0] + m1.matrix[1, 1] * m2.matrix[1, 0];
        float d = m1.matrix[1, 0] * m2.matrix[0, 1] + m1.matrix[1, 1] * m2.matrix[1, 1];

        return new Matrix2x2(a, b, c, d);
    }

    public static Vector2 operator *(Matrix2x2 m, Vector2 v)
    {


        float x = m.matrix[0, 0] * v.x + m.matrix[0, 1] * v.y;
        float y = m.matrix[1, 0] * v.x + m.matrix[1, 1] * v.y;

        return new Vector2(x, y);
    }
}
完整的Shader代码
Shader "DSShader/TextOutline"
{


    Properties
    {


        [PerRendererData]_MainTex ("Texture", 2D) = "white" {

    }
    }
    SubShader
    {


        Tags
        {


            "Queue"="Transparent" "IgnoreProjector"="true" "RenderType"="Transparent"
        }
        Cull Off
        Lighting Off
        ZWrite Off
        Blend SrcAlpha OneMinusSrcAlpha
        Pass
        {


            CGPROGRAM
            #pragma vertex vert
            #pragma fragment frag

            #include "UnityCG.cginc"

            struct appdata {


                float4 vertex : POSITION;
                float4 uv : TEXCOORD0;
                float4 uv1 : TEXCOORD1;
                float4 uv2 : TEXCOORD2;
                float4 color:COLOR;
            };

            struct v2f {


                float2 uv : TEXCOORD0;
                float4 vertex : SV_POSITION;
                float4 border : TEXCOORD1;
                float4 color:COLOR;
                float width: TEXCOORD2;
                float4 edgeColor: TEXCOORD3;
            };

            sampler2D _MainTex;
            float4 _MainTex_ST;
            float4 _MainTex_TexelSize;

            v2f vert(appdata v)
            {


                v2f o;
                o.vertex = UnityObjectToClipPos(v.vertex);
                o.uv = TRANSFORM_TEX(v.uv, _MainTex);
                o.width = v.uv.z;
                o.color = v.color;
                o.border = v.uv1;
                o.edgeColor=v.uv2;
                return o;
            }

            fixed isInRange(fixed2 uv_min,fixed2 uv_max,fixed2 uv)
            {


                fixed2 rs = step(uv_min, uv) * step(uv, uv_max);
                return rs.x * rs.y;
            }

            fixed SampleTex(v2f i,fixed ii,fixed color_a)
            {


                const fixed OffsetX[12] = {

    1, 0.866, 0.5, 0, -0.5, -0.866, -1, -0.866, -0.5, 0, 0.5, 0.866};
                const fixed OffsetY[12] = {

    0, 0.5, 0.866, 1, 0.866, 0.5, 0, -0.5, -0.866, -1, -0.866, -0.5};
                float2 offset_uv = i.uv + float2(OffsetX[ii], OffsetY[ii]) * _MainTex_TexelSize.xy * i.width;
                fixed sample_a = (tex2D(_MainTex, offset_uv)).a;
                fixed a = sample_a ;
                a *= isInRange(i.border.xy, i.border.zw, offset_uv);
                return a;
            }

            fixed4 frag(v2f i) : SV_Target
            {


                fixed4 col = tex2D(_MainTex, i.uv).a*i.color;
                col.a *= isInRange(i.border.xy, i.border.zw, i.uv);
                fixed sum_a = 0;
                sum_a += SampleTex(i, 0, col.a);
                sum_a += SampleTex(i, 1, col.a);
                sum_a += SampleTex(i, 2, col.a);
                sum_a += SampleTex(i, 3, col.a);
                sum_a += SampleTex(i, 4, col.a);
                sum_a += SampleTex(i, 5, col.a);
                sum_a += SampleTex(i, 6, col.a);
                sum_a += SampleTex(i, 7, col.a);
                sum_a += SampleTex(i, 8, col.a);
                sum_a += SampleTex(i, 9, col.a);
                sum_a += SampleTex(i, 10, col.a);
                sum_a += SampleTex(i, 11, col.a);
                sum_a = saturate(sum_a);
                fixed4 outLineColor = fixed4(i.edgeColor.rgb,sum_a);
                fixed a=step(i.width,0.001);
                fixed4 finalCol = lerp(outLineColor, col, saturate(a+col.a));
                return finalCol;
            }
            ENDCG
        }
    }
}