前言
想必大家工作中或多或少会遇到下图样式的UI需求吧
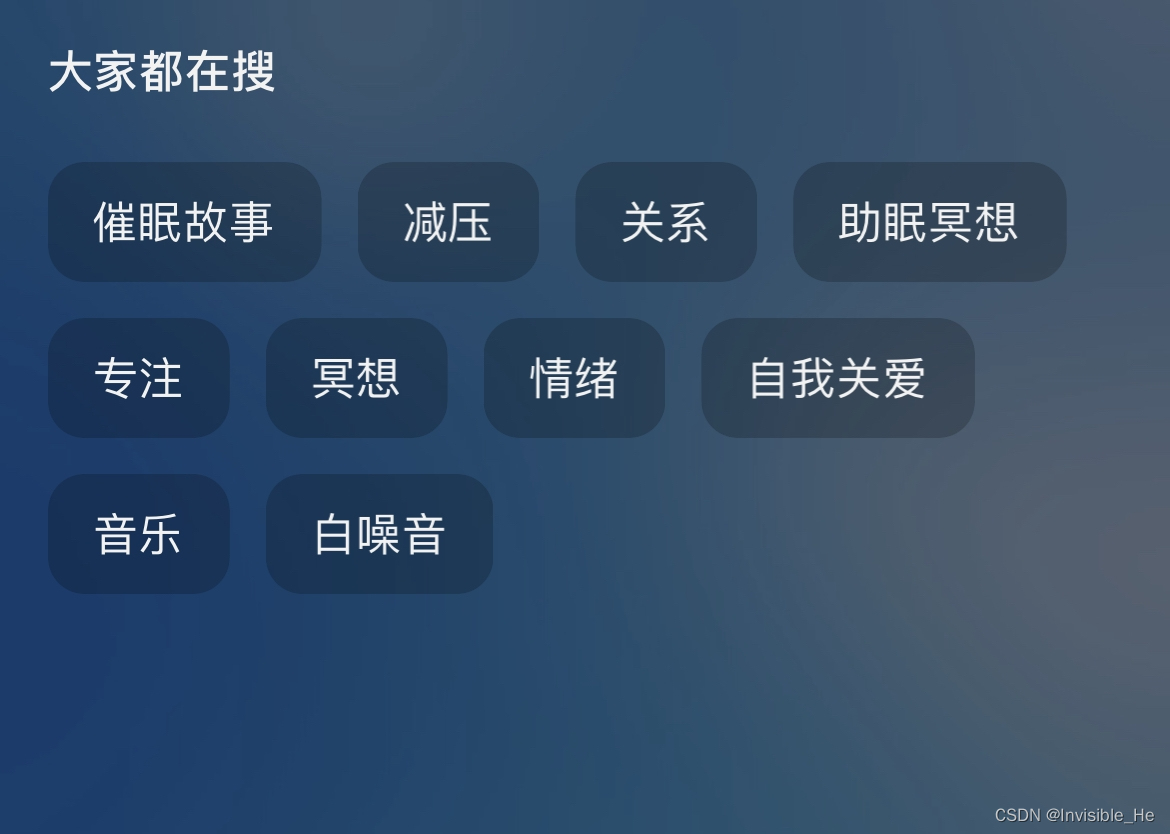
像这种cell长度不固定,以此向右对齐排列的样式UI可以说是很常见的
实现方式
一般的实现可能主要是分一下两种:
- 1、一种是用button依次排列实现,动态计算text宽度,记录之前一个button的位置,和当前button的宽度,看是否最终会超出屏幕的右边,一旦超出右边,就换行到下一行
- 缺点
- 当数据量多的时候,生成很多的button,不能对button进行重用
- 每次生成一个button的时候都要计算位置,相对较麻烦
- 优点
- 适合数据少的情况
- 缺点
- 2、采用collection view,依次从左到右进行布局排列cell
- 优点
- 数据量大的时候,能重用cell,减少cell数量,增高渲染性能
- 省去每次cell布局的位置计算
- 代码复用,实现一个UICollectionViewFlowLayout的子类,拿到哪儿都能用
- 优点
实现
我们这里实现主要采用第二种方式,实现的方式是自定义一个UICollectionViewFlowLayout的子类,在这个类里对cell布局进行排列
主要代码如下:
/// main method for layout cell
/// - Parameter indexPath: indexpath
/// - Returns: layouted UICollectionViewLayoutAttributes
override func layoutAttributesForItem(at indexPath: IndexPath) -> UICollectionViewLayoutAttributes? {


    if let attr = calculatedAttrs[indexPath] {

     return attr }

    guard let curAttr = super.layoutAttributesForItem(at: indexPath) else {

     return nil }

    if isHorizontal {


      	// 如果滚动方向是水平的话,就直接返回。这里的水平布局主要适合不换行的那种
        calculatedAttrs[indexPath] = curAttr
        return curAttr
    }

  	// 下面主要针对滚动方式是垂直方向的进行布局,因为实际开发中,绝大部分情况也是垂直滚动方向
    let sectionInset = calculateSectionInsetForItem(at: indexPath.section)
    let layoutWidth = collectionView?.frame.width ?? 0 - sectionInset.left - sectionInset.right

    if indexPath.item == 0 {


      	// 如果是当前section的第一个元素,就直接设置x为sectionInset.left
        curAttr.frame.origin.x = sectionInset.left
        calculatedAttrs[indexPath] = curAttr
        return curAttr
    }

  	// 计算非第一个元素的frame布局
    let prevIP = IndexPath(item: indexPath.item - 1, section: indexPath.section)
    let prevRect = layoutAttributesForItem(at: prevIP)?.frame ?? .zero
    let prevRectRightPoint = prevRect.origin.x + prevRect.size.width
    let stretchedCurRect = CGRect(x: sectionInset.left,
                                  y: curAttr.frame.origin.y,
                                  width: layoutWidth,
                                  height: curAttr.frame.size.height)

    if !prevRect.intersects(stretchedCurRect) {


        curAttr.frame.origin.x = sectionInset.left
        calculatedAttrs[indexPath] = curAttr
        return curAttr
    }

    curAttr.frame.origin.x = prevRectRightPoint + calculateMinimumInteritemSpacingForSection(at: indexPath.section)
    calculatedAttrs[indexPath] = curAttr
    return curAttr
}
- 这里我对水平滚动方向也进行了适配,不过水平滚动方向主要适用于不换行的那种从左到右依次排列的样式,比如如下示例图:

- 由于每次重用cell的时候,会再次重复计算cell的frame,为了减少重复冗余的计算,我进行了如下的性能优化:
- 这是常见的以空间换时间的解决方式
- 经测试,这样子优化后,性能提升了将近90%
/// 用字典存储已经计算过的cell item,常见的以空间换时间方式
private lazy var calculatedAttrs = [IndexPath: UICollectionViewLayoutAttributes]()
- 在使用的时候,只需要将collection.collectionViewLayout的属性设置为我们自定义的layout对象即可,具体代码如下面的示例代码:
private lazy var collectionView: UICollectionView = {


  // instance ZLCollectionLeftAlignLayout
  let defaultLayout = ZLCollectionLeftLayout()
  defaultLayout.minimumLineSpacing = 10.0
  defaultLayout.minimumInteritemSpacing = 10.0
  defaultLayout.scrollDirection = .vertical
  defaultLayout.sectionInset = UIEdgeInsets(top: 10.0, left: 10.0, bottom: 20.0, right: 10.0)
  // set collectionViewLayout to a instance of ZLCollectionLeftLayout
  let collectionView = UICollectionView(frame: .zero, collectionViewLayout: defaultLayout)
  collectionView.backgroundColor = .magenta
  collectionView.showsVerticalScrollIndicator = false
  return collectionView
}()
- 之后就是在collection view的代理方法中设置每个cell的size就行了,具体示例代码如下:
func collectionView(_ collectionView: UICollectionView, layout collectionViewLayout: UICollectionViewLayout, sizeForItemAt indexPath: IndexPath) -> CGSize {


  let w = CGFloat.random(in: 20.0 ... 50.0)
  return CGSize(width: 30.0 + w, height: 25.0)
}
开源代码地址
代码开源到github上了,可以直接拿来使用