上一篇:yolo v7 转rknn
本文:
1.是对detect模型的转换,对于classify、pose、segment后续再写,估计是差不多的;
2.☆支持量化。对于置信度量化后会全为0已经解决;
3.解决转换过程中出现的一些错误提示。主要是数组轴的大小超出限制的问题。
一、训练
1.切换版本
ultralytics-8.0.186
git clone https://github.com/ultralytics/ultralytics
cd ultralytics
git checkout eb976f5ad20d7779e82f733af4ebe592beaa89b5
2.训练
v8的训练可以参考:xxx(还没写,手动滑稽)。
官网介绍也很详细,这里贴一个
二、pt2onnx
注意一下,opset_version=12
imgsz=(h, w) 注意一下h、w顺序 。
from ultralytics import YOLO

def yolov8_export():
    # Load a model
    model = YOLO(model="./runs/detect/bbb2/weights/best.pt")
    model.export(format='onnx', imgsz=(608, 608), opset=12, simplify=True)
三、onnx2rknn
1.RK3588虚拟环境配置
rknn-toolkit2 1.5.0
git clone https://github.com/rockchip-linux/rknn-toolkit2
cd rknn-toolkit2
conda create -n rknn-toolkit2 python=3.6
conda activate rknn-toolkit2
pip install doc/requirements_cp36-*.txt
pip install packages/rknn_toolkit2-*-cp36-*.whl
如果要用最新的whl,https://eyun.baidu.com/s/3eTDMk6Y 提取密码:rknn
RK_NPU_SDK -> RK_NPU_SDK_1.5.0 -> develop -> rknn-toolkit2-1.5.1b24 -> packages
把最新的whl下载下来安装即可。
2.转换+测试单张图片
完整代码如下:
# -*- coding: utf-8 -*-
"""
@Time   : 2023/8/17 13:44:51
@Author : tm1
@IDE    : PyCharm
@Project: onnx2rknn_YOLOv8
@Disc   : 手动选择onnx的输出节点。
          区别:1.被舍弃的部分onnx后处理需要手动实现;
               2.可以量化。
"""

import cv2
import numpy as np
import yaml
from rknn.api import RKNN

ONNX_MODEL = './onnx_model/VisDrone2019/best.onnx'
RKNN_MODEL = './onnx_model/VisDrone2019/best.rknn'
DATASET = './onnx_model/VisDrone2019/quantize.txt'
dataset = './onnx_model/VisDrone2019/VisDrone2019.yaml'

QUANTIZE_ON = True

# CLASSES = {0: "hogcote"}  # 训练时的类别

CLASSES = {

    }  # 训练时的类别
if CLASSES == {

    }:
    with open(dataset, 'r') as f:
        CLASSES = yaml.safe_load(f)['names']

nmsThresh = 0.45  # 值越大,代表允许重叠的面积越大。
objectThresh = 0.5

# 注意调整为onnx模型的大小。
model_h = 608
model_w = 608

color_palette = np.random.uniform(0, 255, size=(len(CLASSES), 3))


def letterbox(im, new_shape=(640, 640), color=(114, 114, 114)):
    # Resize and pad image while meeting stride-multiple constraints
    shape = im.shape[:2]  # current shape [height, width]
    if isinstance(new_shape, int):
        new_shape = (new_shape, new_shape)

    # Scale ratio (new / old)
    r = min(new_shape[0] / shape[0], new_shape[1] / shape[1])

    # Compute padding
    ratio = r, r  # width, height ratios
    new_unpad = int(round(shape[1] * r)), int(round(shape[0] * r))
    dw, dh = new_shape[1] - new_unpad[0], new_shape[0] - new_unpad[1]  # wh padding

    dw /= 2  # divide padding into 2 sides
    dh /= 2

    if shape[::-1] != new_unpad:  # resize
        im = cv2.resize(im, new_unpad, interpolation=cv2.INTER_LINEAR)
    top, bottom = int(round(dh - 0.1)), int(round(dh + 0.1))
    left, right = int(round(dw - 0.1)), int(round(dw + 0.1))
    im = cv2.copyMakeBorder(im, top, bottom, left, right, cv2.BORDER_CONSTANT, value=color)  # add border
    return im, ratio, (dw, dh)


def draw_detections(img, box, score, class_id):
    """
    Draws bounding boxes and labels on the input image based on the detected objects.

    Args:
        img: The input image to draw detections on.
        box: Detected bounding box.
        score: Corresponding detection score.
        class_id: Class ID for the detected object.

    Returns:
        None
    """

    # Extract the coordinates of the bounding box
    x1, y1, w, h = box

    # Retrieve the color for the class ID
    color = color_palette[class_id]

    # Draw the bounding box on the image
    cv2.rectangle(img, (int(x1), int(y1)), (int(x1 + w), int(y1 + h)), color, 2)

    # Create the label text with class name and score
    label = f'{

      CLASSES[class_id]}: {

      score:.2f}'

    # Calculate the dimensions of the label text
    (label_width, label_height), _ = cv2.getTextSize(label, cv2.FONT_HERSHEY_SIMPLEX, 0.5, 1)

    # Calculate the position of the label text
    label_x = x1
    label_y = y1 - 10 if y1 - 10 > label_height else y1 + 10

    # Draw a filled rectangle as the background for the label text
    cv2.rectangle(img, (label_x, label_y - label_height), (label_x + label_width, label_y + label_height), color,
                  cv2.FILLED)

    # Draw the label text on the image
    cv2.putText(img, label, (label_x, label_y), cv2.FONT_HERSHEY_SIMPLEX, 0.5, (0, 0, 0), 1, cv2.LINE_AA)


def sigmoid(x):
    return 1 / (1 + np.exp(-x))


def postprocess(input_image, outputs):
    img_h, img_w = input_image.shape[:2]
    boxes0 = np.transpose(np.squeeze(outputs[0]))
    scores0 = np.transpose(np.squeeze(outputs[1]))

    if len(scores0.shape) == 1:
        scores0 = np.expand_dims(scores0, axis=1)
    scores = sigmoid(scores0)
    max_scores = np.max(scores, axis=1)  # 多个类别时,最大的分数。
    max_indices = np.argmax(scores, axis=1)

    t = np.where(max_scores >= objectThresh)[0]  # 元组

    boxes = boxes0[t]
    scores = max_scores[t]
    class_ids = max_indices[t]

    # 根据分数从高到低排序
    sorted_indices = np.argsort(scores)[::-1]
    boxes = boxes[sorted_indices]
    scores = scores[sorted_indices]
    class_ids = class_ids[sorted_indices]

    print(boxes)
    print(scores)
    print(class_ids)

    # Get the number of rows in the outputs array
    rows = boxes.shape[0]

    # Lists to store the bounding boxes, scores, and class IDs of the detections
    boxes_ = []
    scores_ = []
    class_ids_ = []

    # Calculate the scaling factors for the bounding box coordinates
    x_factor = img_w / model_w
    y_factor = img_h / model_h

    # Iterate over each row in the outputs array
    for i in range(rows):
        # Extract the class scores from the current row
        classes_scores = scores[i]

        # Find the maximum score among the class scores
        max_score = np.amax(classes_scores)

        # If the maximum score is above the confidence threshold
        if max_score >= objectThresh:
            # Get the class ID with the highest score
            class_id = np.argmax(classes_scores)

            # Extract the bounding box coordinates from the current row
            x, y, w, h = boxes[i]

            # Calculate the scaled coordinates of the bounding box
            left = int((x - w / 2) * x_factor)
            top = int((y - h / 2) * y_factor)
            width = int(w * x_factor)
            height = int(h * y_factor)

            # Add the class ID, score, and box coordinates to the respective lists
            class_ids_.append(class_id)
            scores_.append(max_score)
            boxes_.append([left, top, width, height])

    print(boxes_)
    print(scores_)
    print(class_ids_)

    # Apply non-maximum suppression to filter out overlapping bounding boxes
    indices = cv2.dnn.NMSBoxes(boxes_, scores_, score_threshold=objectThresh, nms_threshold=nmsThresh)

    # Iterate over the selected indices after non-maximum suppression
    for i in indices:
        # Get the box, score, and class ID corresponding to the index
        box = boxes_[i]
        score = scores_[i]
        class_id = class_ids_[i]

        # Draw the detection on the input image
        draw_detections(input_image, box, score, class_id)
    return input_image


def export_rknn():
    rknn = RKNN(verbose=True)

    rknn.config(
        # see:ultralytics/yolo/data/utils.py
        mean_values=[[0, 0, 0]],
        std_values=[[255, 255, 255]],
        # TODO:使用下面均值、方差后,效果更差:
        # mean_values=[[123.675, 116.28, 103.53]],  # IMAGENET_MEAN = 0.485, 0.456, 0.406
        # std_values=[[58.395, 57.12, 57.375]],  # IMAGENET_STD = 0.229, 0.224, 0.225
        quantized_algorithm='normal',
        quantized_method='channel',
        # optimization_level=2,
        compress_weight=False,  # 压缩模型的权值,可以减小rknn模型的大小。默认值为False。
        # single_core_mode=True,
        # model_pruning=False,  # 修剪模型以减小模型大小,默认值为False。
        target_platform='rk3588'
    )
    rknn.load_onnx(
        model=ONNX_MODEL,
        outputs=[
            '/model.22/Mul_2_output_0', '/model.22/Split_output_1',
        ]
    )
    rknn.build(do_quantization=QUANTIZE_ON, dataset=DATASET, rknn_batch_size=1)
    rknn.export_rknn(RKNN_MODEL)

    # # 精度分析
    # rknn.accuracy_analysis(
    #     inputs=['/home/tm1/D/workspace/onnx2rknn_YOLOv8/onnx_model/official/zidane.jpg'],
    #     output_dir="./snapshot",
    #     target=None
    # )

    rknn.init_runtime()
    return rknn


if __name__ == '__main__':
    # 数据准备
    img_path = 'onnx_model/VisDrone2019/img.png'
    orig_img = cv2.imread(img_path)
    # img = cv2.cvtColor(orig_img, cv2.COLOR_BGR2RGB)
    img = orig_img
    img_h, img_w = img.shape[:2]
    resized_img, ratio, (dw, dh) = letterbox(img, new_shape=(model_h, model_w))  # padding resize
    # resized_img = cv2.resize(img, (model_w, model_h), interpolation=cv2.INTER_LINEAR) # direct resize
    input = np.expand_dims(resized_img, axis=0)

    # 转换模型
    rknn = export_rknn()

    # 推理
    outputs = rknn.inference(inputs=[input], data_format="nhwc")

    # 后处理
    result_img = postprocess(resized_img, outputs)

    # 保存结果
    cv2.imwrite('./onnx_model/VisDrone2019/img_result.jpg', result_img)

    # 释放
    rknn.release()
3.代码关键部分的解释
3.1 export_rknn()函数中
    rknn.load_onnx(
        model=ONNX_MODEL,
        outputs=[
            '/model.22/Mul_2_output_0', '/model.22/Split_output_1',
        ]
    )
节点/model.22/Mul_2_output_0 和 /model.22/Split_output_1的由来:
用这个网站打开转换的onnx模型
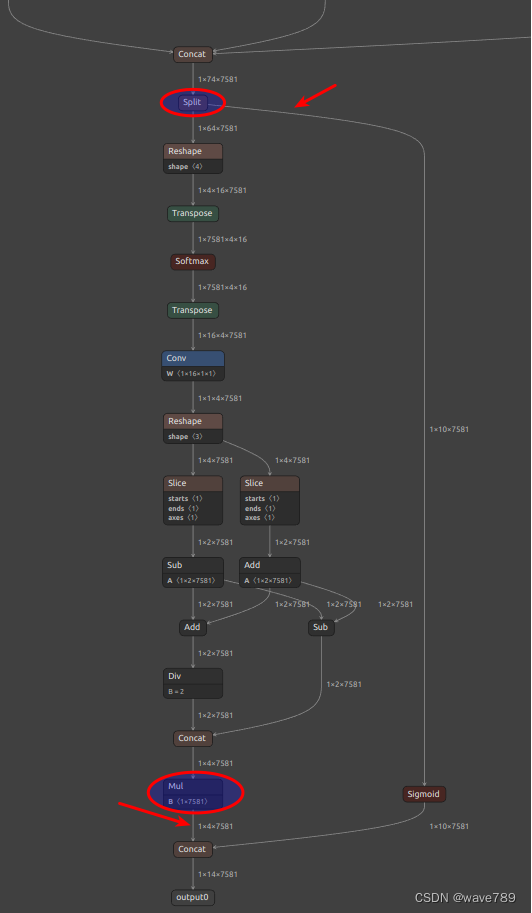
然后拉到最下面:
3.2 postprocess()函数中
从上图可以看到,节点/model.22/Split_output_1后面的sigmoid被去掉了。
为什么置信度量化后全为0?sigmoid的值域(0,1),int8量化后就为0了。所以去掉sigmoid。
参考1、参考2
3.3 数组轴的大小超出限制的问题
从上图可以看到,Reshape、Softmax、Transpose这些op的轴大小为7581(=7676+3838+19*19)。我的输入图片为608x608,如果图片再大一些,就会超过rk的限制。
rk限制如下:
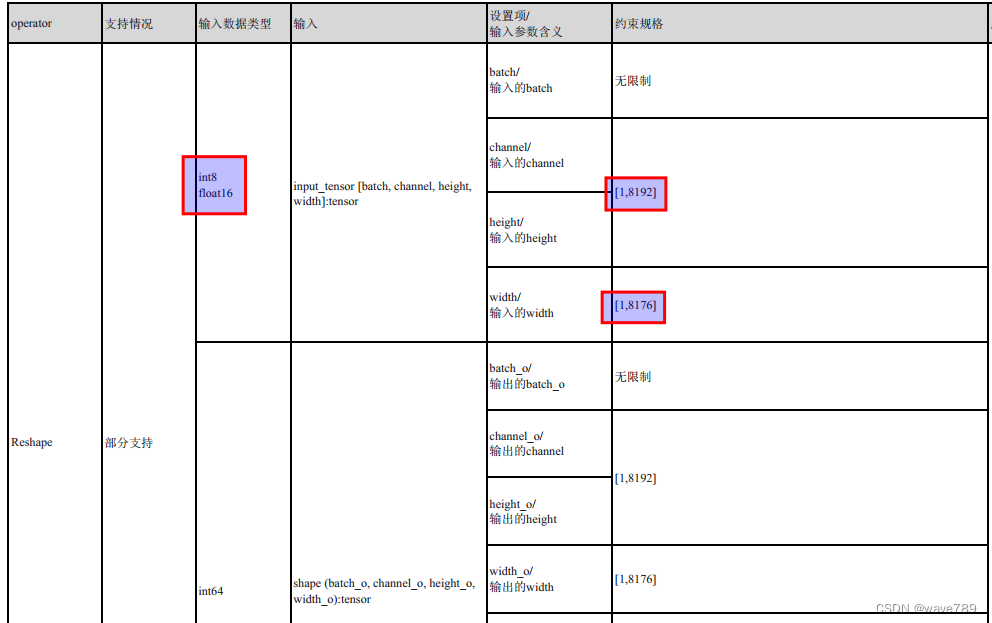
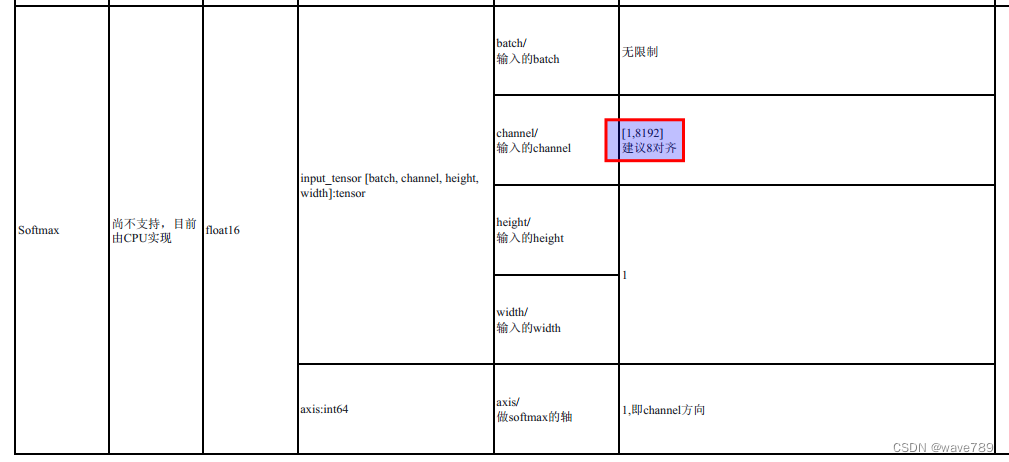
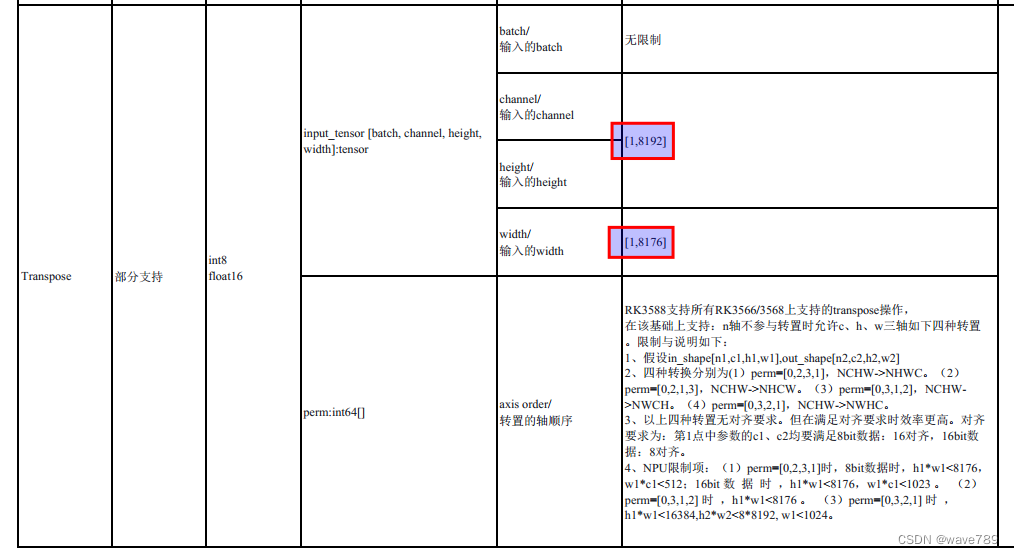
详细内容见rknn-toolkit2/doc/RKNN_Compiler_Support_Operator_List_v1.5.0.pdf