目录
一、搭建好4台MySQL数据库服务器,安装好MySQL系统,并且安装好半同步的插件
让ansible和所有的MySQL节点服务器之间建立免密通道
将master上的二进制日志复制到本地,拿到基础数据后,传输至每台slave上
在master上新建一个授权用户,用于给slave来复制二进制日志
四、配置一台延迟备份服务器,从MySQL-slave1上读取二进制文件
五、使用rsync+sersync实现文件实时同步,将master上的数据远程同步到ansible服务器(相当于一台异地备份服务器)上
在备份服务器--ansible服务器上配置rsync,备份服务器上的rsync是一个守护进程监听873端口
安装sersync工具,实时触发rsync进行同步--安装在数据源服务器上
七、安装keepalived实现高可用,配置2个vrrp实例实现双vip的高可用功能
八、使用sysbench压力测试工具测试整个MySQL集群的性能
九、搭建基于prometheus+grafana的监控系统,对数据库集群进行监控
在各mysql服务器上同步解压,并移动至/usr/local/mysqld_exporter目录下
将mysqld_exporter命令加入环境变量,并设置后台启动
添加Dashboards模板(使用14057--出图效果好)
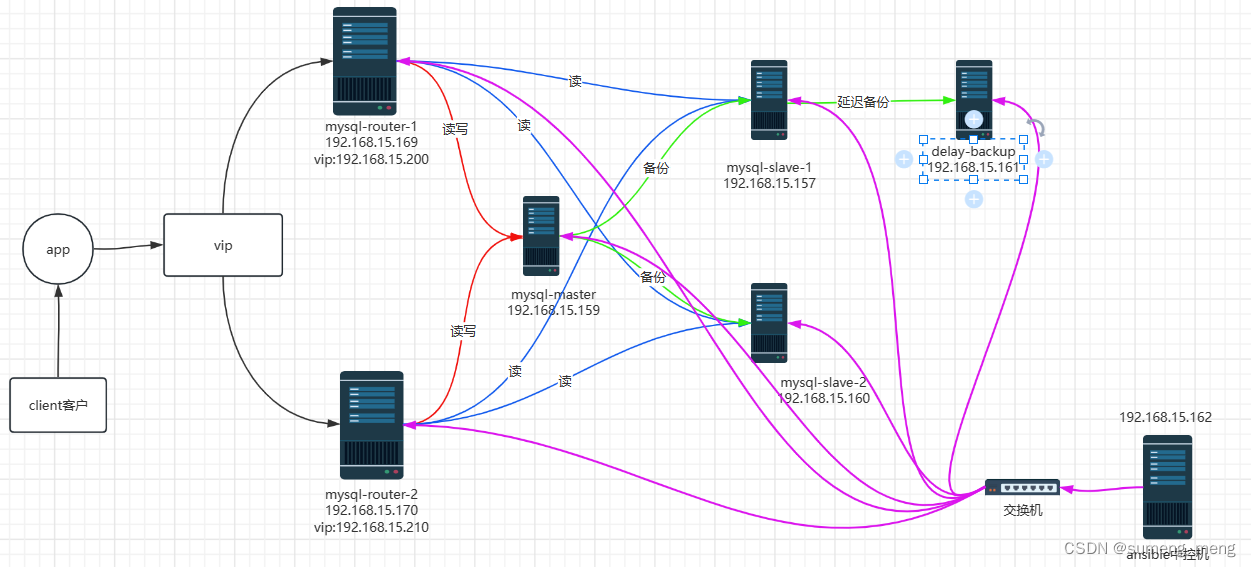
项目所需的服务器
4台MySQL服务器:搭建主从复制的集群,一个master服务器(MySQL-master),两个slave服务器(MySQL-slave1、MySQL-slave2),一个延迟备份服务器(delay-backup)--将备份操作在一定延迟时间内执行,以解决备份对源数据库服务器性能的影响
2台mysqlrouter服务器:安装keepalived软件,实现高可用的读写分离服务
1台ansible中控服务器:实现对MySQL整个集群里的服务器进行批量管理
项目所需服务器的ip地址
mysql-master 192.168.15.159
mysql-slave-1 192.168.15.157
mysql-slave-2 192.168.15.160
delay-backup 192.168.15.161
ansible中控机 192.168.15.162
mysql-router-1 192.168.15.169 vip:192.168.15.200
mysql-router-2 192.168.15.170 vip:192.168.15.210
项目架构图
项目步骤:
一、搭建好4台MySQL数据库服务器,安装好MySQL系统,并且安装好半同步的插件
从mysql官方下载好mysql二进制安装包:mysql-5.7.41-linux-glibc2.12-x86_64.tar.gz
linux系统中一键安装mysql脚本:
#解决软件的依赖关系并且安装需要的工具
yum  install cmake ncurses-devel gcc  gcc-c++  vim  lsof bzip2 openssl-devel ncurses-compat-libs net-tools -y

#解压mysql二进制安装包
tar xf mysql-5.7.41-linux-glibc2.12-x86_64.tar.gz

#移动mysql解压后的文件到/usr/local下改名叫mysql
#/usr/local/mysql是mysql的安装目录
mv mysql-5.7.41-linux-glibc2.12-x86_64 /usr/local/mysql

#新建组和用户 mysql
groupadd mysql
#mysql这个用户的shell是/bin/false 属于mysql组,-r表示为系统用户
useradd -r -g mysql -s /bin/false mysql

#关闭firewalld防火墙服务,并且设置开机不要启动
service firewalld stop
systemctl  disable  firewalld

#临时关闭selinux
setenforce 0
#永久关闭selinux
sed -i '/^SELINUX=/ s/enforcing/disabled/'  /etc/selinux/config

#新建存放数据的目录
mkdir /data/mysql -p

#修改/data/mysql目录的权限归mysql用户和mysql组所有,这样mysql用户启动的mysql进程可以对这个文件夹进行读写了
chown mysql:mysql /data/mysql/
#只是允许mysql这个用户和mysql组可以访问,其他人都不能访问
chmod 750 /data/mysql/

#进入/usr/local/mysql/bin目录
cd /usr/local/mysql/bin/

#初始化mysql
./mysqld  --initialize --user=mysql --basedir=/usr/local/mysql/  --datadir=/data/mysql

#让mysql支持ssl方式登录的设置
./mysql_ssl_rsa_setup --datadir=/data/mysql/

#修改PATH变量,加入mysql bin目录的路径
#临时修改PATH变量的值
export PATH=/usr/local/mysql/bin/:$PATH
#重新启动linux系统后也生效,永久修改
echo  'PATH=/usr/local/mysql/bin:$PATH' >>/root/.bashrc

#复制support-files里的mysql.server文件到/etc/init.d/目录下叫mysqld
cp  ../support-files/mysql.server   /etc/init.d/mysqld

#修改/etc/init.d/mysqld脚本文件里的datadir目录的值
sed  -i '70c  datadir=/data/mysql'  /etc/init.d/mysqld

#生成/etc/my.cnf配置文件
cat  >/etc/my.cnf  <<EOF
[mysqld_safe]

[client]
socket=/data/mysql/mysql.sock

[mysqld]
socket=/data/mysql/mysql.sock
port = 3306
open_files_limit = 8192
innodb_buffer_pool_size = 512M
character-set-server=utf8

[mysql]
auto-rehash
prompt=\\u@\\d \\R:\\m  mysql>
EOF

#临时修改:修改内核的open file(允许1个进程打开的文件)的数量 默认情况下是1024
ulimit -n 1000000
#永久修改:设置开机启动的时候也配置生效
echo "ulimit -n 1000000" >>/etc/rc.local
chmod +x /etc/rc.d/rc.local

#老式的设置mysql服务开机启动
#将mysqld添加到linux系统里服务管理名单里
/sbin/chkconfig --add mysqld
#设置mysqld服务开机启动
/sbin/chkconfig mysqld on

#启动mysqld进程
service mysqld start

#初次修改密码-p后面接的是系统自动生成的临时密码
#初次修改密码需要使用--connect-expired-password 选项
#-e 后面接的表示是在mysql里需要执行命令  execute 执行
#set password='Sanchuang123#';  修改root用户的密码为Sanchuang123#
mysql -uroot -p'FJjh7(li2sdu#' --connect-expired-password   -e  "set password='Sanchuang123#';"

#检验上一步修改密码是否成功,如果有输出能看到mysql里的数据库,说明成功。
mysql -uroot -p'Sanchuang123#'  -e "show databases;"
在服务器上开启二进制日志功能
在配置文件中加入一下配置:
log_bin
server_id = 1 	#服务器的编号
在master上配置半同步
root@(none) 20:04  mysql>install plugin rpl_semi_sync_master soname 'semisync_master.so';
root@(none) 20:07  mysql>set global rpl_semi_sync_master_timeout = 1; 	#临时修改变量
root@(none) 20:10  mysql>set global rpl_semi_sync_master_enabled = 1;
修改配置文件
[root@sumeng-master ~]# vim /etc/my.cnf
[mysqld]
...
rpl_semi_sync_master_enabled=1
rpl_semi_sync_master_timeout=1000  #1 second 超时时间设置为1s
修改配置文件后刷新master的mysqld服务
[root@sumeng-master ~]# service mysqld restart
Shutting down MySQL............. SUCCESS!
Starting MySQL.. SUCCESS!
在slave服务器上配置半同步
root@(none) 20:06  mysql>install plugin rpl_semi_sync_slave soname 'semisync_slave.so';
root@(none) 20:16  mysql> set global rpl_semi_sync_slave_enabled=1;
修改从服务器上的配置文件
[root@sumeng-slave ~]# vim /etc/my.cnf
[mysqld]
...
rpl_semi_sync_slave_enabled=1
刷新slave上的mysqld服务
[root@sumeng-slave ~]# service mysqld restart
Shutting down MySQL.. SUCCESS!
Starting MySQL.. SUCCESS!
二、搭建好ansible服务器
安装ansible
[root@localhost ~]# yum install epel-release -y
[root@localhost ~]# yum install ansible -y
编辑配置,建立主机清单:
master服务器ip:192.168.15.159
slave服务器ip:192.168.15.157、192.168.15.160、192.168.15.161
[root@localhost ~]# vim /etc/ansible/hosts
[db]
192.168.15.159
192.168.15.157
192.168.15.160
192.168.15.161
[dbslaves]
192.168.15.161
192.168.15.157
192.168.15.160
让ansible和所有的MySQL节点服务器之间建立免密通道
[root@localhost ~]# ssh-keygen -t rsa 	#生成秘钥
[root@localhost ~]# ssh-copy-id -i /root/.ssh/id_rsa.pub [email protected] 	#将本地生成的ssh公钥信息复制到远程主机上
[root@localhost ~]# ssh-copy-id -i /root/.ssh/id_rsa.pub [email protected]
[root@localhost ~]# ssh-copy-id -i /root/.ssh/id_rsa.pub [email protected]
[root@localhost ~]# ssh-copy-id -i /root/.ssh/id_rsa.pub [email protected]
依次测试免密通道是否建立成功
[root@localhost ~]# ssh '[email protected]'
[root@localhost ~]# ssh '[email protected]'
[root@localhost ~]# ssh '[email protected]'
[root@localhost ~]# ssh '[email protected]'
将master上的二进制日志复制到本地,拿到基础数据后,传输至每台slave上
[root@localhost ~]# scp [email protected]:/root/all_db.SQL .
[root@localhost ~]# ansible -m copy -a "src=/root/all_db.SQL dest=/root" dbslaves
在所有的slave机器上导入基础数据
mysql -uroot -p'Sanchuang123#' <all_db.SQL三、开启GTID功能,启动主从复制
在slave与master的配置文件中添加配置:
gtid-mode=ON 	#开启GTID功能
enforce-gtid-consistency=ON
在master上新建一个授权用户,用于给slave来复制二进制日志
grant replication slave on *.* to 'zhouzhou'@'192.168.15.%' identified by 'Sanchuang123#';在slave上配置master info信息
为了防止环境不纯洁,在开启slave前进行以下操作:
root@(none) 16:32  mysql>reset master;
Query OK, 0 rows affected (0.01 sec)

root@(none) 16:39  mysql>show master status;
+--------------------------+----------+--------------+------------------+-------------------+
| File                     | Position | Binlog_Do_DB | Binlog_Ignore_DB | Executed_Gtid_Set |
+--------------------------+----------+--------------+------------------+-------------------+
| sumeng-master-bin.000001 |      154 |              |                  |                   |
+--------------------------+----------+--------------+------------------+-------------------+
1 row in set (0.00 sec)

root@(none) 16:39  mysql>stop slave;
Query OK, 0 rows affected, 1 warning (0.00 sec)

root@(none) 16:40  mysql>reset slave all;
Query OK, 0 rows affected (0.01 sec)
在slave上均配置master信息
root@(none) 16:47  mysql>CHANGE MASTER TO MASTER_HOST='192.168.15.159',
    -> MASTER_USER='zhouzhou',
    -> MASTER_PASSWORD='Sanchuang123#',
    -> MASTER_PORT=3306,
    -> MASTER_AUTO_POSITION=1;
Query OK, 0 rows affected, 2 warnings (0.01 sec)

root@(none) 16:47  mysql>start slave;
Query OK, 0 rows affected (0.01 sec)
查看slave是否配置成功,Slave_IO_Running和Slave_SQL_Running都是yes说明IO线程和SQL线程都启动了
root@(none) 16:57  mysql>show slave status\G;
*************************** 1. row ***************************
               Slave_IO_State: Waiting for master to send event
                  Master_Host: 192.168.15.159
                  Master_User: zhouzhou
                  Master_Port: 3306
                Connect_Retry: 60
              Master_Log_File: sumeng-master-bin.000002
          Read_Master_Log_Pos: 154
               Relay_Log_File: localhost-relay-bin.000002
                Relay_Log_Pos: 383
        Relay_Master_Log_File: sumeng-master-bin.000002
             Slave_IO_Running: Yes
            Slave_SQL_Running: Yes
              Replicate_Do_DB:
          Replicate_Ignore_DB:
           Replicate_Do_Table:
       Replicate_Ignore_Table:
      Replicate_Wild_Do_Table:
  Replicate_Wild_Ignore_Table:
                   Last_Errno: 0
                   Last_Error:
                 Skip_Counter: 0
          Exec_Master_Log_Pos: 154
              Relay_Log_Space: 594
              Until_Condition: None
               Until_Log_File:
                Until_Log_Pos: 0
           Master_SSL_Allowed: No
           Master_SSL_CA_File:
           Master_SSL_CA_Path:
              Master_SSL_Cert:
            Master_SSL_Cipher:
               Master_SSL_Key:
        Seconds_Behind_Master: 0
Master_SSL_Verify_Server_Cert: No
                Last_IO_Errno: 0
                Last_IO_Error:
               Last_SQL_Errno: 0
               Last_SQL_Error:
  Replicate_Ignore_Server_Ids:
             Master_Server_Id: 1
                  Master_UUID: b53f58ce-2a25-11ee-b708-000c29cf54b0
             Master_Info_File: /data/mysql/master.info
                    SQL_Delay: 0
          SQL_Remaining_Delay: NULL
      Slave_SQL_Running_State: Slave has read all relay log; waiting for more updates
           Master_Retry_Count: 86400
                  Master_Bind:
      Last_IO_Error_Timestamp:
     Last_SQL_Error_Timestamp:
               Master_SSL_Crl:
           Master_SSL_Crlpath:
           Retrieved_Gtid_Set:
            Executed_Gtid_Set:
                Auto_Position: 1
         Replicate_Rewrite_DB:
                 Channel_Name:
           Master_TLS_Version:
1 row in set (0.00 sec)
配置时可能会出现的问题:slave的io线程起不来,原因是slave上的GTID编号比master上的还大,这就意味着slave上的数据比master上的还新,导致io线程启动不成功,解决的办法是在所有slave上清除master信息和salve信息,然后重新配置启动。
四、配置一台延迟备份服务器,从MySQL-slave1上读取二进制文件
root@(none) 16:54  mysql>stop slave;
Query OK, 0 rows affected, 1 warning (0.00 sec)

root@(none) 17:10  mysql>reset master;
Query OK, 0 rows affected (0.01 sec)

root@(none) 17:10  mysql>reset slave all;
Query OK, 0 rows affected (0.01 sec)

root@(none) 17:10  mysql>CHANGE MASTER TO MASTER_HOST='192.168.15.157',
    -> MASTER_USER='zhouzhou',
    -> MASTER_PASSWORD='Sanchuang123#',
    -> MASTER_PORT=3306,
    -> MASTER_AUTO_POSITION=1;
Query OK, 0 rows affected, 2 warnings (0.01 sec)

root@(none) 17:10  mysql>change master to master_delay = 10;
Query OK, 0 rows affected (0.01 sec)

root@(none) 17:11  mysql>start slave;
Query OK, 0 rows affected (0.00 sec)
其中设置延迟备份时,默认情况下的单位是秒
五、使用rsync+sersync实现文件实时同步,将master上的数据远程同步到ansible服务器(相当于一台异地备份服务器)上
在备份服务器--ansible服务器上配置rsync,备份服务器上的rsync是一个守护进程监听873端口
1.永久关闭selinux和防火墙
[root@localhost ~]# service firewalld stop
Redirecting to /bin/systemctl stop firewalld.service
[root@localhost ~]# setenforce 0     #临时关闭
[root@localhost ~]# vim /etc/selinux/config    #永久关闭,修改SELINUX=disabled
# This file controls the state of SELinux on the system.
# SELINUX= can take one of these three values:
#     enforcing - SELinux security policy is enforced.
#     permissive - SELinux prints warnings instead of enforcing.
#     disabled - No SELinux policy is loaded.
SELINUX=disabled
# SELINUXTYPE= can take one of three values:
#     targeted - Targeted processes are protected,
#     minimum - Modification of targeted policy. Only selected processes are protected.
#     mls - Multi Level Security protection.
SELINUXTYPE=targeted
2.安装rsync服务端软件
[root@localhost ~]# yum install rsync xinetd -y3.设置rsync开机启动,并启动xinetd进程--提供保姆服务的进程,rsync就是它照顾的进程
[root@localhost ~]# vim /etc/rc.d/rc.local
...
/usr/bin/rsync --daemon --config=/etc/rsyncd.conf
[root@localhost ~]# chmod +x /etc/rc.d/rc.local
[root@localhost ~]# systemctl start xinetd
4.创建rsync.conf配置文件
[root@localhost ~]# vim /etc/rsyncd.conf
uid = root
gid = root
use chroot = yes
max connections = 0
log file = /var/log/rsyncd.log
pid file = /var/run/rsyncd.pid
lock file = /var/run/rsync.lock
secrets file = /etc/rsync.pass
motd file = /etc/rsyncd.Motd
[back_data]
    path = /backup
    comment = A directory in which data is stored
    ignore errors = yes
    read only = no
    hosts allow = 192.168.15.159
5.创建用户认证的文件
添加允许传输的用户和密码,格式:用户名:密码,可以设置多个
[root@localhost ~]# vim /etc/rsync.pass
sumeng:sumeng123456
6.设置文件权限--设置文件所有者读取、写入权限
[root@localhost ~]# chmod 600 /etc/rsyncd.conf
[root@localhost ~]# chmod 600 /etc/rsync.pass
7.启动rsync和xinetd
[root@localhost ~]# /usr/bin/rsync --daemon --config=/etc/rsyncd.conf
[root@localhost ~]# systemctl start xinetd
8.查看rsync监听的端口号
[root@localhost ~]# netstat -anplut|grep rsync
tcp        0      0 0.0.0.0:873             0.0.0.0:*               LISTEN      20313/rsync
tcp6       0      0 :::873                  :::*                    LISTEN      20313/rsync
在数据源服务器上配置rsync
1.永久关闭selinux以及防火墙
[root@sumeng-master ~]# service firewalld stop
Redirecting to /bin/systemctl stop firewalld.service
[root@sumeng-master ~]# setenforce 0
[root@sumeng-master ~]# vim /etc/selinux/config
...
SELINUX=disabled
...
2.安装rsync服务端软件
[root@sumeng-master ~]# yum install rsync xinetd -y
[root@sumeng-master ~]# vim /etc/rc.d/rc.local
...
/usr/bin/rsync --daemon     #添加该行
[root@sumeng-master ~]# chmod +x /etc/rc.d/rc.local
[root@sumeng-master ~]# vim /etc/rsyncd.conf
log file = /var/log/rsyncd.log
pid file = /var/run/rsyncd.pid
lock file = /var/run/rsync.lock
motd file = /etc/rsyncd.Motd
[Sync]
comment = Sync
uid = root
gid = root
port= 873
[root@sumeng-master ~]# systemctl start xinetd
3.创建认证密码文件
[root@sumeng-master ~]# vim /etc/passwd.txt
[root@sumeng-master ~]# cat /etc/passwd.txt
sumeng123456
[root@sumeng-master ~]# chmod 600 /etc/passwd.txt     #设置文件权限
4.测试数据同步
数据源服务器192.168.15.159到备份服务器192.168.15.162之间的数据同步
[root@sumeng-master ~]# rsync -avH --port=873 --progress --delete /backup [email protected]::back_data --password-file=/etc/passwd.txt

sending incremental file list
backup/

sent 60 bytes  received 16 bytes  152.00 bytes/sec
total size is 0  speedup is 0.00
注意:两边的服务器没有新建/backup目录会报错,导致不能备份过去
安装sersync工具,实时触发rsync进行同步--安装在数据源服务器上
1.修改inotify默认参数--默认内核参数太小
[root@sumeng-master ~]# sysctl -w fs.inotify.max_queued_events="99999999"
fs.inotify.max_queued_events = 99999999
[root@sumeng-master ~]# sysctl -w fs.inotify.max_user_watches="99999999"
fs.inotify.max_user_watches = 99999999
[root@sumeng-master ~]# sysctl -w fs.inotify.max_user_instances="65535"
fs.inotify.max_user_instances = 65535
[root@sumeng-master ~]# vim /etc/sysctl.conf    #永久修改参数
fs.inotify.max_queued_events=99999999
fs.inotify.max_user_watches=99999999
fs.inotify.max_user_instances=65535
2.安装sersync
#wget用于从指定网址下载网络文件
[root@sumeng-master ~]# wget http://down.whsir.com/downloads/sersync2.5.4_64bit_binary_stable_final.tar.gz
[root@sumeng-master ~]# tar xf sersync2.5.4_64bit_binary_stable_final.tar.gz
[root@sumeng-master ~]# mv GNU-Linux-x86/ /usr/local/sersync
3.创建rsync
[root@sumeng-master ~]# cd /usr/local/sersync/
[root@sumeng-master sersync]# cp confxml.xml confxml.xml-bak    #备份配置文件,防止修改出错,便于还原
[root@sumeng-master sersync]# cp confxml.xml data_configxml.xml     #复制用于同步data目录的文件,data_configxml.xml是后面需要使用的配置文件
4.修改配置文件data_configxml.xml
[root@sumeng-master sersync]# vim data_configxml.xml
<sersync>
        <localpath watch="/backup">
            <remote ip="192.168.15.162" name="back_data"/>
            <!--<remote ip="192.168.8.39" name="tongbu"/>-->
            <!--<remote ip="192.168.8.40" name="tongbu"/>-->
        </localpath>
        <rsync>
            <commonParams params="-artuz"/>
            <auth start="false" users="root" passwordfile="/etc/passwd.txt"/>
            <userDefinedPort start="false" port="874"/><!-- port=874 -->
            <timeout start="false" time="100"/><!-- timeout=100 -->
            <ssh start="false"/>
        </rsync>
        <failLog path="/tmp/rsync_fail_log.sh" timeToExecute="60"/><!--default every 60mins execute once-->
        <crontab start="false" schedule="600"><!--600mins-->
            <crontabfilter start="false">
                <exclude expression="*.php"></exclude>
                <exclude expression="info/*"></exclude>
            </crontabfilter>
        </crontab>
        <plugin start="false" name="command"/>
</sersync>
5.启动服务
#修改环境变量,可以直接使用文件名执行
[root@sumeng-master sersync]# PATH=/usr/local/sersync:$PATH
[root@sumeng-master sersync]# echo 'PATH=/usr/local/sersync:$PATH' >>/root/.bashrc
[root@sumeng-master sersync]# sersync2 -d -r -o  /usr/local/sersync/data_configxml.xml
set the system param
execute:echo 50000000 > /proc/sys/fs/inotify/max_user_watches
execute:echo 327679 > /proc/sys/fs/inotify/max_queued_events
parse the command param
option: -d 	run as a daemon
option: -r 	rsync all the local files to the remote servers before the sersync work
option: -o 	config xml name:  /usr/local/sersync/data_configxml.xml
daemon thread num: 10
parse xml config file
host ip : localhost	host port: 8008
daemon start,sersync run behind the console
config xml parse success
please set /etc/rsyncd.conf max connections=0 Manually
sersync working thread 12  = 1(primary thread) + 1(fail retry thread) + 10(daemon sub threads)
Max threads numbers is: 22 = 12(Thread pool nums) + 10(Sub threads)
please according your cpu ,use -n param to adjust the cpu rate
------------------------------------------
rsync the directory recursivly to the remote servers once
working please wait...
execute command: cd /backup && rsync -artuz -R --delete ./ 192.168.15.162::back_data >/dev/null 2>&1
run the sersync:
watch path is: /backup
6.设置sersync监控开机自动执行
[root@sumeng-master sersync]# vim /etc/rc.d/rc.local
...
/usr/local/sersync/sersync2 -d -r -o  /usr/local/sersync/data_configxml.xml    #添加此行
验证:去/backup目录下新建一些文件或者文件夹,测试是否在备份服务器上可以看到
在master上编写备份脚本,并设置计划任务定时备份
[root@sumeng-master backup]# vim backup_alldb.sh
[root@sumeng-master backup]# cat backup_alldb.sh
#!/bin/bash

mkdir -p /backup
mysqldump -uroot -p"Sanchuang123#" --all-databases --triggers --routines --events >/backup/$(date +%Y%m%d%H%M%S)_all_db.SQL
[root@sumeng-master backup]# crontab -e
no crontab for root - using an empty one
crontab: installing new crontab
[root@sumeng-master backup]# crontab -l
30 2 * * * bash /backup/backup_alldb.sh
六、安装部署mysqlrouter中间件软件,实现读写分离
开启两台安装部署了mysqlrouter中间件软件的服务器,可以实现高可用
读写分离:将对数据库的增删改查等操作进行分离,读操作往slave上进行,读写操作都可以在master上进行,本质上起到了负载均衡的作用。
mysqlrouter是MySQL官方给我们提供的一个读写分离的软件,是一个轻量级MySQL中间件,只能通过不同的端口来实现简单的读/写分离,mysqlrouter的前提是后端实现了MySQL的主从复制。
1.下载mysqlrouter
https://dev.mysql.com/get/Downloads/MySQL-Router/mysql-router-community-8.0.23-1.el7.x86_64.rpm
2.将下载好的rpm文件远程传输到虚拟机上,然后直接安装
[root@mysql-router-1 ~]# rpm -ivh mysql-router-community-8.0.23-1.el7.x86_64.rpm
警告:mysql-router-community-8.0.23-1.el7.x86_64.rpm: 头V3 DSA/SHA1 Signature, 密钥 ID 5072e1f5: NOKEY
准备中...                          ################################# [100%]
正在升级/安装...
   1:mysql-router-community-8.0.23-1.e################################# [100%]
3.修改配置文件/etc/mysqlrouter.conf
cd /etc/mysqlrouter #进入存放配置文件的目录
添加以下代码
#read
[routing:slaves]
bind_address = 192.168.15.169:7001
destinations = 192.168.15.157:3306,192.168.15.160:3306
mode = read-only        #只读模式
connect_timeout = 1

#write and read
[routing:masters]
bind_address = 192.168.15.169:7002
destinations = 192.168.15.159:3306
mode = read-write         #可读可写
connect_timeout = 1
4.启动mysqlrouter服务
[root@mysql-router-1 mysqlrouter]# service mysqlrouter restart
Redirecting to /bin/systemctl restart mysqlrouter.service
[root@mysql-router-1 mysqlrouter]# netstat -anplut|grep mysqlrouter     #检查端口
tcp        0      0 192.168.15.169:7001     0.0.0.0:*               LISTEN      8808/mysqlrouter
tcp        0      0 192.168.15.169:7002     0.0.0.0:*               LISTEN      8808/mysqlrouter
5.在master上创建2个测试账号,一个可读,一个可写
root@(none) 09:56  mysql>grant all on *.* to 'scwrite'@'%' identified by 'Sanchuang123#';
Query OK, 0 rows affected, 1 warning (0.00 sec)

root@(none) 09:56  mysql>grant select on *.* to 'scread'@'%' identified by 'Sanchuang123#';
Query OK, 0 rows affected, 1 warning (0.01 sec)
6.在客户机上测试读写分离效果
#只读用户无法对数据库进行更改
[root@sc-docker ~]# mysql -h 192.168.15.169 -P 7001 -uscread -p"Sanchuang123#"
mysql: [Warning] Using a password on the command line interface can be insecure.
Welcome to the MySQL monitor.  Commands end with ; or \g.
Your MySQL connection id is 9
Server version: 5.7.41-log MySQL Community Server (GPL)

Copyright (c) 2000, 2023, Oracle and/or its affiliates.

Oracle is a registered trademark of Oracle Corporation and/or its
affiliates. Other names may be trademarks of their respective
owners.

Type 'help;' or '\h' for help. Type '\c' to clear the current input statement.

scread@(none) 10:30  mysql>create database sumeng;
ERROR 1044 (42000): Access denied for user 'scread'@'%' to database 'sumeng'

[root@sc-docker ~]# mysql -h 192.168.15.169 -P 7002 -uscwrite -p"Sanchuang123#"
mysql: [Warning] Using a password on the command line interface can be insecure.
Welcome to the MySQL monitor.  Commands end with ; or \g.
Your MySQL connection id is 9
Server version: 5.7.41-log MySQL Community Server (GPL)

Copyright (c) 2000, 2023, Oracle and/or its affiliates.

Oracle is a registered trademark of Oracle Corporation and/or its
affiliates. Other names may be trademarks of their respective
owners.

Type 'help;' or '\h' for help. Type '\c' to clear the current input statement.

scwrite@(none) 10:35  mysql>create database Tuesday;
Query OK, 1 row affected (0.00 sec)
读写分离的关键点是用户的权限,让不同的用户连接不同的端口,最后仍然要到后端的mysql服务器里去验证是否有读写的权限,mysqlrouter只是做了读写分流,让应用程序去连接不同的端口
七、安装keepalived实现高可用,配置2个vrrp实例实现双vip的高可用功能
高可用HA:不会出现单点故障,一个坏了,另外的能够顶替,不影响工作,有备份
keepalived是一个用c语言编写的路由软件,主要目标是为linux系统和基于linux的基础设施提供简单而强大的负载均衡和高可用性功能。vip:虚拟IP地址,会绑定在优先级高的机器上
1.修改mysqlrouter机器配置文件
将2台mysqlrouter机器配置文件/etc/mysqlrouter/mysqlrouter.conf中的bind_address配置修改为0.0.0.0:[port],这样可以使得机器能够绑定vip。改完配置文件后记得刷新mysqlrouter服务
2.安装keepalived
[root@mysql-router-1 ~]# yum install keepalived -y3.修改配置文件
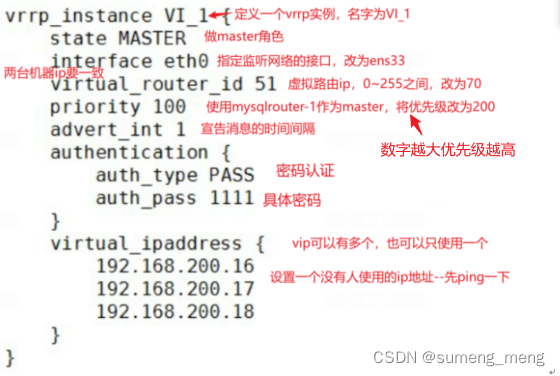
keepalived配置文件存放路径为:/etc/keepalived/keepalived.conf
实现双vip的思路:创建2个vrrp实例,2个vip,2个实例互为主备
配置文件中每项配置的含义:
mysql-router-1配置:
[root@mysql-router-1 ~]# cat /etc/keepalived/keepalived.conf
! Configuration File for keepalived

global_defs {
   notification_email {
     [email protected]
     [email protected]
     [email protected]
   }
   notification_email_from [email protected]
   smtp_server 192.168.200.1
   smtp_connect_timeout 30
   router_id LVS_DEVEL
   vrrp_skip_check_adv_addr
  #vrrp_strict
   vrrp_garp_interval 0
   vrrp_gna_interval 0
}

vrrp_instance VI_1 {
    state MASTER
    interface ens33
    virtual_router_id 99
    priority 200
    advert_int 1
    authentication {
        auth_type PASS
        auth_pass 1111
    }
    virtual_ipaddress {
        192.168.15.200
    }
}

vrrp_instance VI_2 {
    state backup
    interface ens33
    virtual_router_id 66
    priority 100
    advert_int 1
    authentication {
        auth_type PASS
        auth_pass 1111
    }
    virtual_ipaddress {
        192.168.15.210
    }
}
mysql-router-2配置:
[root@mysql-router-2 ~]# cat /etc/keepalived/keepalived.conf
! Configuration File for keepalived

global_defs {
   notification_email {
     [email protected]
     [email protected]
     [email protected]
   }
   notification_email_from [email protected]
   smtp_server 192.168.200.1
   smtp_connect_timeout 30
   router_id LVS_DEVEL
   vrrp_skip_check_adv_addr
  #vrrp_strict
   vrrp_garp_interval 0
   vrrp_gna_interval 0
}

vrrp_instance VI_1 {
    state backup
    interface ens33
    virtual_router_id 99
    priority 100
    advert_int 1
    authentication {
        auth_type PASS
        auth_pass 1111
    }
    virtual_ipaddress {
        192.168.15.200
    }
}

vrrp_instance VI_2 {
    state MASTER
    interface ens33
    virtual_router_id 66
    priority 200
    advert_int 1
    authentication {
        auth_type PASS
        auth_pass 1111
    }
    virtual_ipaddress {
        192.168.15.210
    }
}
4.查看vip是否出现
mysql-router-1,vip为192.168.15.200:
[root@mysql-router-1 ~]# ip add
1: lo: <LOOPBACK,UP,LOWER_UP> mtu 65536 qdisc noqueue state UNKNOWN group default qlen 1000
    link/loopback 00:00:00:00:00:00 brd 00:00:00:00:00:00
    inet 127.0.0.1/8 scope host lo
       valid_lft forever preferred_lft forever
    inet6 ::1/128 scope host
       valid_lft forever preferred_lft forever
2: ens33: <BROADCAST,MULTICAST,UP,LOWER_UP> mtu 1500 qdisc pfifo_fast state UP group default qlen 1000
    link/ether 00:0c:29:74:8a:2a brd ff:ff:ff:ff:ff:ff
    inet 192.168.15.169/24 brd 192.168.15.255 scope global noprefixroute ens33
       valid_lft forever preferred_lft forever
    inet 192.168.15.200/32 scope global ens33
       valid_lft forever preferred_lft forever
    inet6 fe80::20c:29ff:fe74:8a2a/64 scope link
       valid_lft forever preferred_lft forever
mysql-router-2,vip为192.168.15.210:
[root@mysql-router-2 ~]# ip add
1: lo: <LOOPBACK,UP,LOWER_UP> mtu 65536 qdisc noqueue state UNKNOWN group default qlen 1000
    link/loopback 00:00:00:00:00:00 brd 00:00:00:00:00:00
    inet 127.0.0.1/8 scope host lo
       valid_lft forever preferred_lft forever
    inet6 ::1/128 scope host
       valid_lft forever preferred_lft forever
2: ens33: <BROADCAST,MULTICAST,UP,LOWER_UP> mtu 1500 qdisc pfifo_fast state UP group default qlen 1000
    link/ether 00:0c:29:f4:23:bc brd ff:ff:ff:ff:ff:ff
    inet 192.168.15.170/24 brd 192.168.15.255 scope global noprefixroute ens33
       valid_lft forever preferred_lft forever
    inet 192.168.15.210/32 scope global ens33
       valid_lft forever preferred_lft forever
    inet6 fe80::20c:29ff:fef4:23bc/64 scope link
       valid_lft forever preferred_lft forever
在dns域名里添加同一个域名对应2个vip,就可以实现dns的负载均衡
八、使用sysbench压力测试工具测试整个MySQL集群的性能
1.在客户机上安装sysbench
[root@sc-docker ~]# yum install epel-release -y
[root@sc-docker ~]# yum install sysbench -y
2.在master上库供测试使用
root@mysql 14:56  mysql>create database test_db;
Query OK, 1 row affected (0.01 sec)
3.构造测试表和测试数据
使用客户机远程构建测试表和测试数据时记得关闭防火墙,以免出现连接不成功的情况
[root@localhost ~]# sysbench --db-driver=mysql --time=300 --threads=10 --report-interval=1 --mysql-host=192.168.15.200 --mysql-port=7002 --mysql-user=scwrite --mysql-password=Sanchuang123# --mysql-db=test_db --tables=10 --table_size=1000 oltp_read_write prepare
sysbench 1.0.17 (using system LuaJIT 2.0.4)

Initializing worker threads...

Creating table 'sbtest1'...
Creating table 'sbtest10'...
Creating table 'sbtest7'...
Creating table 'sbtest3'...
Creating table 'sbtest4'...
Creating table 'sbtest6'...
Creating table 'sbtest8'...
Creating table 'sbtest5'...
Creating table 'sbtest9'...
Creating table 'sbtest2'...
Inserting 1000 records into 'sbtest4'
Inserting 1000 records into 'sbtest7'
Inserting 1000 records into 'sbtest5'
Inserting 1000 records into 'sbtest10'
Inserting 1000 records into 'sbtest6'
Inserting 1000 records into 'sbtest9'
Inserting 1000 records into 'sbtest8'
Inserting 1000 records into 'sbtest1'
Inserting 1000 records into 'sbtest2'
Inserting 1000 records into 'sbtest3'
Creating a secondary index on 'sbtest8'...
Creating a secondary index on 'sbtest7'...
Creating a secondary index on 'sbtest5'...
Creating a secondary index on 'sbtest4'...
Creating a secondary index on 'sbtest1'...
Creating a secondary index on 'sbtest10'...
Creating a secondary index on 'sbtest9'...
Creating a secondary index on 'sbtest6'...
Creating a secondary index on 'sbtest2'...
Creating a secondary index on 'sbtest3'...
构建时使用的参数说明:
--db-driver=mysql:数据库驱动
--time=300:连续访问300秒
--threads=10:用10个线程模拟并发访问
--report-interval=1:每隔一秒输出一次测试进度报告,0表示仅输出最终报告结果,默认为0
--mysql-host=192.168.15.200 --mysql-port=7002 --mysql-user=scwrite --mysql-password=Sanchuang123# --mysql-db=test_db:表示连接数据库的信息,这里连接的是mysqlrouter机器配置的vip和端口
--tables=10 --table_size=1000:在测试库中构造10个测试表,每个测试表中构造1000条测试数据,测试数据太大可能会导致mysql集群的磁盘耗尽,集群崩盘
oltp_read_write:表示进行读写测试
prepare:准备阶段,创建测试用的表,并往其中填写数据
4.测试数据库读写性能
将prepare阶段切换为run阶段,进行压力测试
每秒的测试结果:
[root@localhost ~]# sysbench --db-driver=mysql --time=300 --threads=10 --report-interval=1 --mysql-host=192.168.15.200 --mysql-port=7002 --mysql-user=scwrite --mysql-password=Sanchuang123# --mysql-db=test_db --tables=10 --table_size=1000 oltp_read_write run
sysbench 1.0.17 (using system LuaJIT 2.0.4)

Running the test with following options:
Number of threads: 10
Report intermediate results every 1 second(s)
Initializing random number generator from current time


Initializing worker threads...

Threads started!

[ 1s ] thds: 10 tps: 286.27 qps: 5828.84 (r/w/o: 4095.29/1151.06/582.49) lat (ms,95%): 43.39 err/s: 0.00 reconn/s: 0.00
[ 2s ] thds: 10 tps: 279.17 qps: 5609.51 (r/w/o: 3932.48/1118.69/558.34) lat (ms,95%): 52.89 err/s: 0.00 reconn/s: 0.00
[ 3s ] thds: 10 tps: 234.86 qps: 4661.30 (r/w/o: 3253.11/939.46/468.73) lat (ms,95%): 59.99 err/s: 0.00 reconn/s: 0.00
[ 4s ] thds: 10 tps: 178.46 qps: 3574.26 (r/w/o: 2506.47/710.86/356.93) lat (ms,95%): 68.05 err/s: 0.00 reconn/s: 0.00
[ 5s ] thds: 10 tps: 174.15 qps: 3470.99 (r/w/o: 2425.09/696.60/349.30) lat (ms,95%): 71.83 err/s: 0.00 reconn/s: 0.00
[ 6s ] thds: 10 tps: 164.90 qps: 3334.96 (r/w/o: 2334.57/671.59/328.80) lat (ms,95%): 81.48 err/s: 0.00 reconn/s: 0.00
[ 7s ] thds: 10 tps: 118.21 qps: 2336.07 (r/w/o: 1637.85/461.80/236.41) lat (ms,95%): 112.67 err/s: 0.00 reconn/s: 0.00
[ 8s ] thds: 10 tps: 135.99 qps: 2729.87 (r/w/o: 1914.91/541.97/272.99) lat (ms,95%): 97.55 err/s: 0.00 reconn/s: 0.00
[ 9s ] thds: 10 tps: 156.04 qps: 3147.90 (r/w/o: 2201.63/634.18/312.09) lat (ms,95%): 104.84 err/s: 0.00 reconn/s: 0.00
[ 10s ] thds: 10 tps: 179.90 qps: 3597.09 (r/w/o: 2522.66/713.62/360.81) lat (ms,95%): 69.29 err/s: 1.00 reconn/s: 0.00
测试结果参数说明:
thds: 10:表示有10个线程在进行压力测试
tps:表示每秒执行了多少个事务
qps:表示每秒执行了多少个请求
(r/w/o: 4095.29/1151.06/582.49):每秒有4095.29个读请求,1151.06个写请求,582.49个其他请求,其实本质就是对qps的请求进行了拆解
lat (ms,95%): 43.39:表示95%的请求延迟都在43.39毫秒以下
err/s: 0.00 reconn/s: 0.00:表示每秒有0请求失败,发生0次网络重连
总测试结果:
[root@localhost ~]# sysbench --db-driver=mysql --time=60 --threads=10 --mysql-host=192.168.15.200 --mysql-port=7002 --mysql-user=scwrite --mysql-password=Sanchuang123# --mysql-db=test_db --tables=10 --table_size=1000 oltp_read_write run
sysbench 1.0.17 (using system LuaJIT 2.0.4)

Running the test with following options:
Number of threads: 10
Initializing random number generator from current time


Initializing worker threads...

Threads started!

SQL statistics:
    queries performed:
        read:                            126266
        write:                           36073
        other:                           18037
        total:                           180376
    transactions:                        9018   (150.03 per sec.)
    queries:                             180376 (3000.88 per sec.)
    ignored errors:                      1      (0.02 per sec.)
    reconnects:                          0      (0.00 per sec.)

General statistics:
    total time:                          60.1034s
    total number of events:              9018

Latency (ms):
         min:                                   21.10
         avg:                                   66.58
         max:                                  262.32
         95th percentile:                      108.68
         sum:                               600417.67

Threads fairness:
    events (avg/stddev):           901.8000/13.27
    execution time (avg/stddev):   60.0418/0.03
测试结果分析:
SQL statistics 数据库语句统计
General statistics 综合统计,一共执行了9018次,实际执行时间为60.1034s
Latency (ms) 统计线程真正执行的时间,单位为毫秒,单次最少执行21.10ms,最多262.32ms,平均66.58ms,95%次执行时间在108.68ms,总执行600417.67ms
Threads fairness 总结统计执行事务与执行时间
5.进行完压力测试之后,清除数据
cleanup阶段:测试后删除测试数据
[root@localhost ~]# sysbench --db-driver=mysql --time=300 --threads=10 --report-interval=1 --mysql-host=192.168.15.200 --mysql-port=7002 --mysql-user=scwrite --mysql-password=Sanchuang123# --mysql-db=test_db --tables=10 --table_size=1000 oltp_read_write cleanup
sysbench 1.0.17 (using system LuaJIT 2.0.4)

Dropping table 'sbtest1'...
Dropping table 'sbtest2'...
Dropping table 'sbtest3'...
Dropping table 'sbtest4'...
Dropping table 'sbtest5'...
Dropping table 'sbtest6'...
Dropping table 'sbtest7'...
Dropping table 'sbtest8'...
Dropping table 'sbtest9'...
Dropping table 'sbtest10'...
九、搭建基于prometheus+grafana的监控系统,对数据库集群进行监控
在新的一台服务器上安装部署prometheus+grafana,监控master、slave1、slave2、delay_backup服务器的性能
1.安装部署mysqld_exporter组件
在Prometheus架构中,exporter是负责收集数据并将信息汇报给Prometheus Server的组件,mysqld_exporter是常用的数据库监控工具
下载
下载地址:https://prometheus.io/download/
上传mysqld_exporter软件包至各mysql节点
先上传软件包至ansible服务器,然后批量下发至master及各slave服务器
[root@localhost ~]# ls
2_all_db.SQL  3_all_db.SQL  all_db.SQL  anaconda-ks.cfg  mysqld_exporter-0.15.0.linux-amd64.tar.gz
[root@localhost ~]# ansible -m copy -a "src=/root/mysqld_exporter-0.15.0.linux-amd64.tar.gz dest=/root" db
在各mysql服务器上同步解压,并移动至/usr/local/mysqld_exporter目录下
[root@sumeng-master ~]# tar -zxvf mysqld_exporter-0.15.0.linux-amd64.tar.gz
mysqld_exporter-0.15.0.linux-amd64/
mysqld_exporter-0.15.0.linux-amd64/mysqld_exporter
mysqld_exporter-0.15.0.linux-amd64/NOTICE
mysqld_exporter-0.15.0.linux-amd64/LICENSE
[root@sumeng-master ~]# mv mysqld_exporter-0.15.0.linux-amd64 /usr/local/mysqld_exporter
[root@sumeng-master ~]# cd /usr/local/mysqld_exporter/
[root@sumeng-master mysqld_exporter]# ls
LICENSE  mysqld_exporter  NOTICE
编辑配置文件
先在数据库中创建好连接本机数据库的用户
root@mysql 10:37  mysql>create user 'sumeng'@'%' identified by '123456';
Query OK, 0 rows affected (0.00 sec)

root@mysql 10:38  mysql>grant all on *.* to 'sumeng'@'%';
Query OK, 0 rows affected (0.00 sec)
然后去各服务器上同步编辑配置文件--在/usr/local/mysqld_exporter目录下编辑
[root@sumeng-master mysqld_exporter]# vim my.cnf
[root@sumeng-master mysqld_exporter]# cat my.cnf
[client]
user=sumeng
password=123456
将mysqld_exporter命令加入环境变量,并设置后台启动
各mysql服务器上同步进行
[root@sumeng-master mysqld_exporter]# PATH=/usr/local/mysqld_exporter/:$PATH
[root@sumeng-master mysqld_exporter]# echo "PATH=/usr/local/mysqld_exporter/:$PATH" >>/root/.bashrc
[root@sumeng-master mysqld_exporter]# nohup mysqld_exporter --config.my-cnf=/usr/local/mysqld_exporter/my.cnf &
[1] 5877
查看进程和端口,检查是否开启
[root@sumeng-master mysqld_exporter]# ps aux|grep exporter
root 5877 0.0 0.4 719816 7984 pts/0 Sl 10:48 0:00 mysqld_exporter --config.my-cnf=/usr/local/mysqld_exporter/my.cnf
root 5883 0.0 0.0 112824 984 pts/0 S+ 10:50 0:00 grep --color=auto exporter
[root@sumeng-master mysqld_exporter]# netstat -anplut|grep mysqld
tcp6 0 0 :::3306 :::* LISTEN 4501/mysqld
tcp6 0 0 :::9104 :::* LISTEN 5877/mysqld_exporte
tcp6 0 0 192.168.15.159:3306 192.168.15.157:44850 ESTABLISHED 4501/mysqld
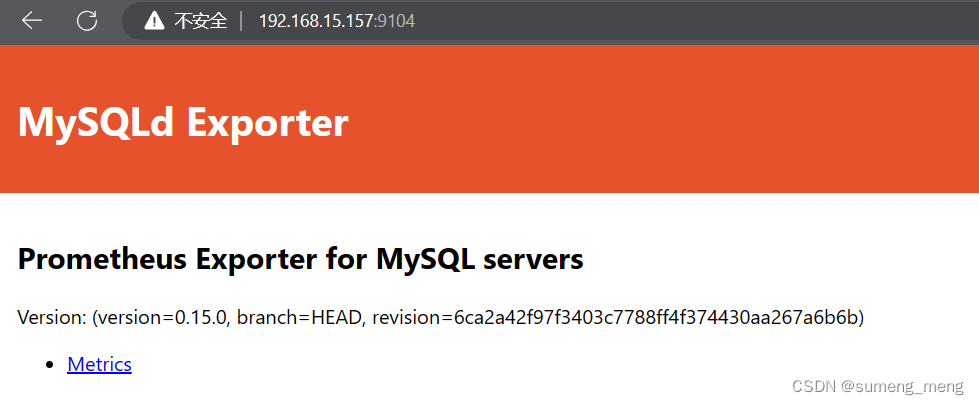
tcp6 0 0 192.168.15.159:3306 192.168.15.160:60524 ESTABLISHED 4501/mysqld网页访问测试:ip + 9140(端口号)
2.安装部署prometheus
新建一台虚拟机,在上面安装部署prometheus+grafana
上传安装包、解压并移动至/prometheus
[root@prometheus_grafana ~]# ls
anaconda-ks.cfg  prometheus-2.43.0.linux-amd64.tar.gz
[root@prometheus_grafana ~]# tar -zvxf prometheus-2.43.0.linux-amd64.tar.gz
prometheus-2.43.0.linux-amd64/
prometheus-2.43.0.linux-amd64/LICENSE
prometheus-2.43.0.linux-amd64/consoles/
prometheus-2.43.0.linux-amd64/consoles/prometheus.html
prometheus-2.43.0.linux-amd64/consoles/node-disk.html
prometheus-2.43.0.linux-amd64/consoles/node-overview.html
prometheus-2.43.0.linux-amd64/consoles/prometheus-overview.html
prometheus-2.43.0.linux-amd64/consoles/index.html.example
prometheus-2.43.0.linux-amd64/consoles/node-cpu.html
prometheus-2.43.0.linux-amd64/consoles/node.html
prometheus-2.43.0.linux-amd64/prometheus
prometheus-2.43.0.linux-amd64/promtool
prometheus-2.43.0.linux-amd64/NOTICE
prometheus-2.43.0.linux-amd64/console_libraries/
prometheus-2.43.0.linux-amd64/console_libraries/prom.lib
prometheus-2.43.0.linux-amd64/console_libraries/menu.lib
prometheus-2.43.0.linux-amd64/prometheus.yml
[root@prometheus_grafana ~]# mv prometheus-2.43.0.linux-amd64 /prometheus
[root@prometheus_grafana ~]# cd /prometheus/
[root@prometheus_grafana prometheus]# ls
console_libraries  consoles  LICENSE  NOTICE  prometheus  prometheus.yml  promtool
将prometheus配置成service服务
[root@prometheus_grafana prometheus]# vim /usr/lib/systemd/system/prometheus.service
[root@prometheus_grafana prometheus]# cat /usr/lib/systemd/system/prometheus.service
[Unit]
Description=prometheus

[Service]
ExecStart=/prometheus/prometheus --config.file=/prometheus/prometheus.yml
ExecReload=/bin/kill -HUP $MAINPID
KillMode=process
Restart=on-failure

[Install]
WantedBy=multi-user.target
[root@prometheus_grafana prometheus]# systemctl daemon-reload     #重新加载systemd相关服务
[root@prometheus_grafana prometheus]# service prometheus restart
Redirecting to /bin/systemctl restart prometheus.service
[root@prometheus_grafana prometheus]# ps aux|grep prometheus     #检查prometheus进程是否存在
root      22447  1.0  2.0 798956 38004 ?        Ssl  11:50   0:00 /prometheus/prometheus --config.file=/prometheus/prometheus.yml
root      22456  0.0  0.0 112824   992 pts/1    S+   11:50   0:00 grep --color=auto prometheus
[root@prometheus_grafana prometheus]# netstat -anplut|grep prometheus     #查看端口
tcp6       0      0 :::9090                 :::*                    LISTEN      22447/prometheus
tcp6       0      0 ::1:58730               ::1:9090                ESTABLISHED 22447/prometheus
tcp6       0      0 ::1:9090                ::1:58730               ESTABLISHED 22447/prometheus
访问prometheus服务页面
访问ip+端口号(9090),可以看到如下页面

添加prometheus节点node,刷新服务
[root@prometheus_grafana ~]# cd /prometheus/
[root@prometheus_grafana prometheus]# ls
console_libraries consoles LICENSE NOTICE prometheus prometheus.yml promtool
[root@prometheus_grafana prometheus]# vim prometheus.yml
[root@prometheus_grafana prometheus]# cat prometheus.yml
# my global config
global:
scrape_interval: 15s # Set the scrape interval to every 15 seconds. Default is every 1 minute.
evaluation_interval: 15s # Evaluate rules every 15 seconds. The default is every 1 minute.
# scrape_timeout is set to the global default (10s).
# Alertmanager configuration
alerting:
alertmanagers:
- static_configs:
- targets:
# - alertmanager:9093
# Load rules once and periodically evaluate them according to the global 'evaluation_interval'.
rule_files:
# - "first_rules.yml"
# - "second_rules.yml"
# A scrape configuration containing exactly one endpoint to scrape:
# Here it's Prometheus itself.
scrape_configs:
# The job name is added as a label `job=<job_name>` to any timeseries scraped from this config.
- job_name: "prometheus"
# metrics_path defaults to '/metrics'
# scheme defaults to 'http'.
static_configs:
- targets: ["localhost:9090"]
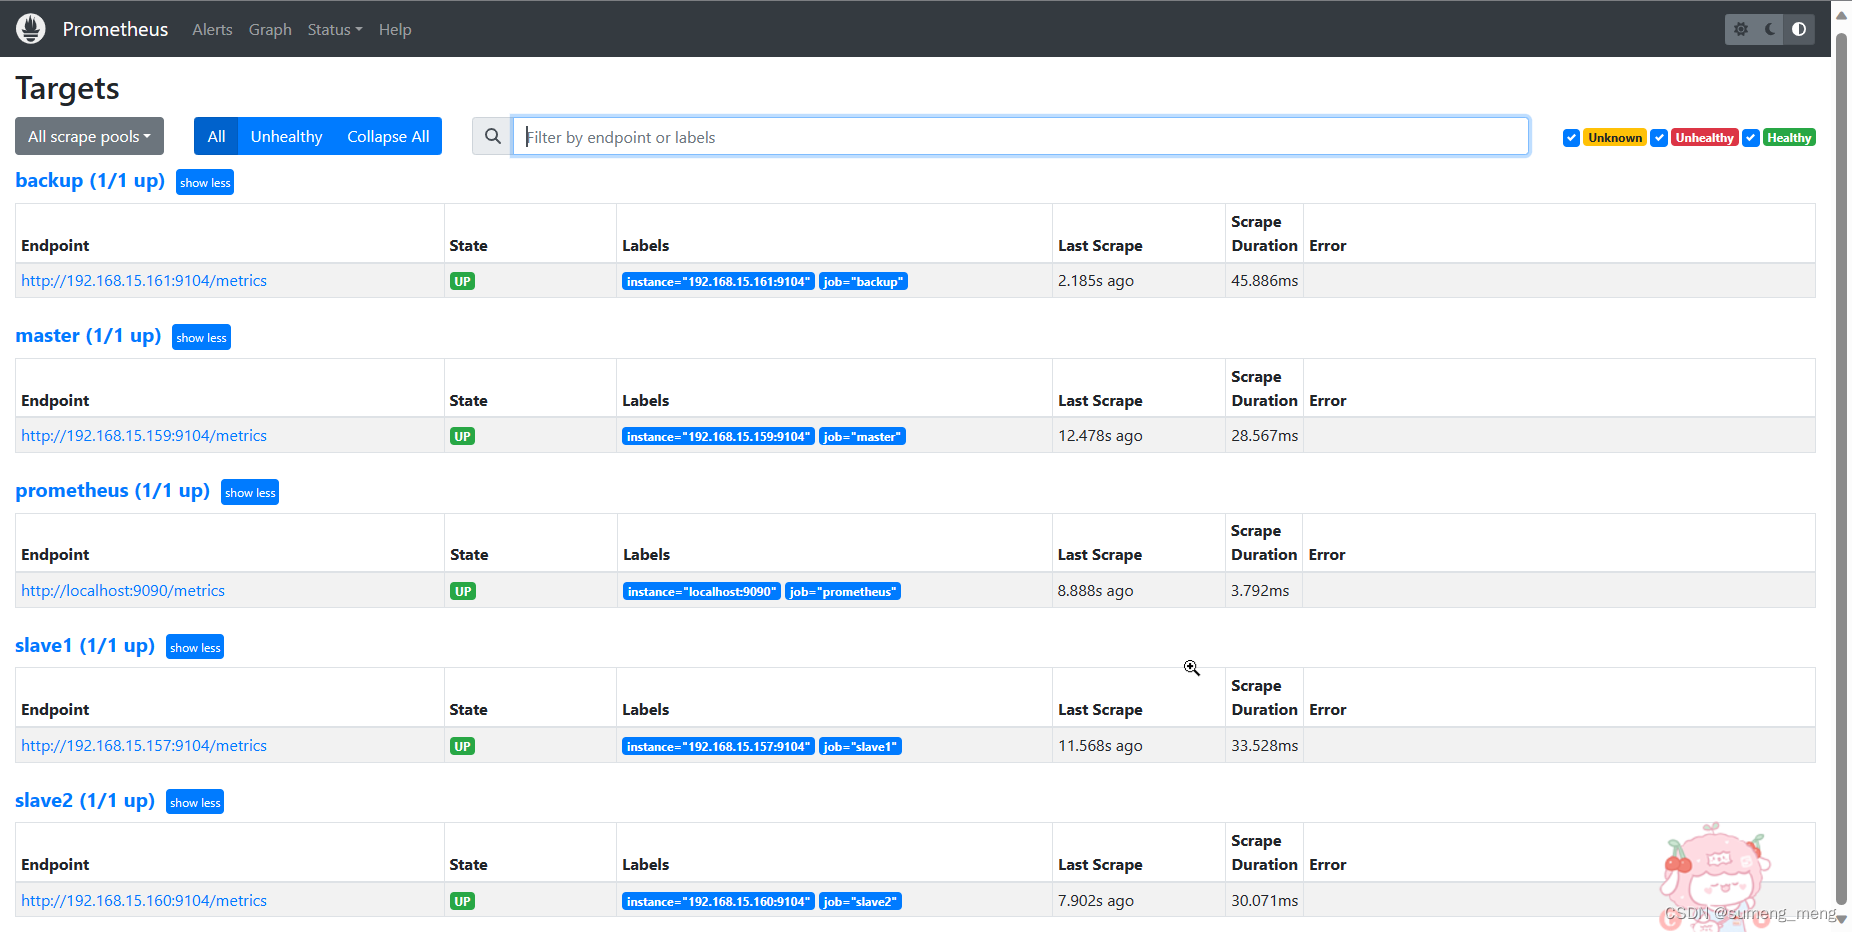
- job_name: "master"
static_configs:
- targets: ["192.168.15.159:9104"]
- job_name: "slave1"
static_configs:
- targets: ["192.168.15.157:9104"]
- job_name: "slave2"
static_configs:
- targets: ["192.168.15.160:9104"]
- job_name: "backup"
static_configs:
- targets: ["192.168.15.161:9104"]
[root@prometheus_grafana prometheus]# service prometheus restart
Redirecting to /bin/systemctl restart prometheus.service访问prometheus服务页面查看节点是否添加成功
3.安装grafana
上传grafana的安装包,并安装
[root@prometheus_grafana ~]# ls
anaconda-ks.cfg    prometheus-2.43.0.linux-amd64.tar.gz
grafana-enterprise-9.4.7-1.x86_64.rpm
[root@prometheus_grafana ~]# yum install grafana-enterprise-9.4.7-1.x86_64.rpm -y
启动grafana
[root@prometheus_grafana ~]# service grafana-server start
Starting grafana-server (via systemctl):                   [  确定  ]
[root@prometheus_grafana ~]# netstat -anplut|grep grafana     #查看端口
tcp        0      0 192.168.15.178:49718    34.120.177.193:443      ESTABLISHED 23204/grafana
tcp6       0      0 :::3000                 :::*                    LISTEN      23204/grafana
访问grafana
页面访问的初始账号和密码均为admin

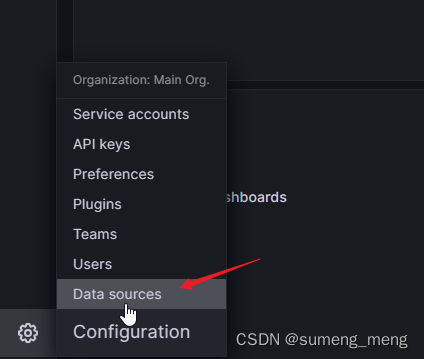
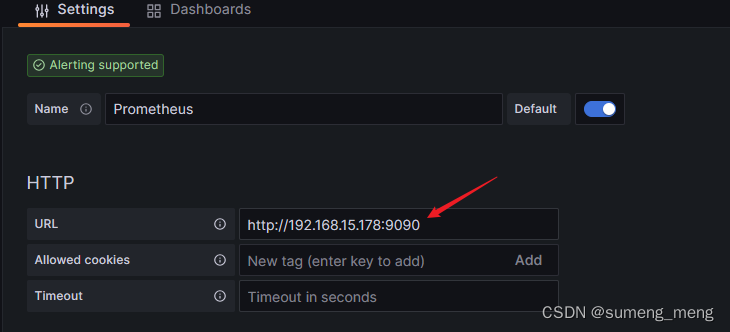
在grafana中添加prometheus数据源
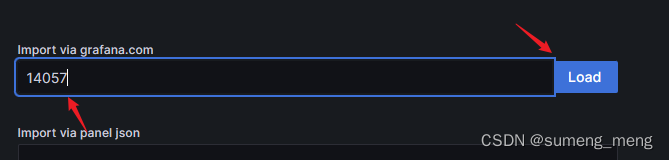
添加Dashboards模板(使用14057--出图效果好)


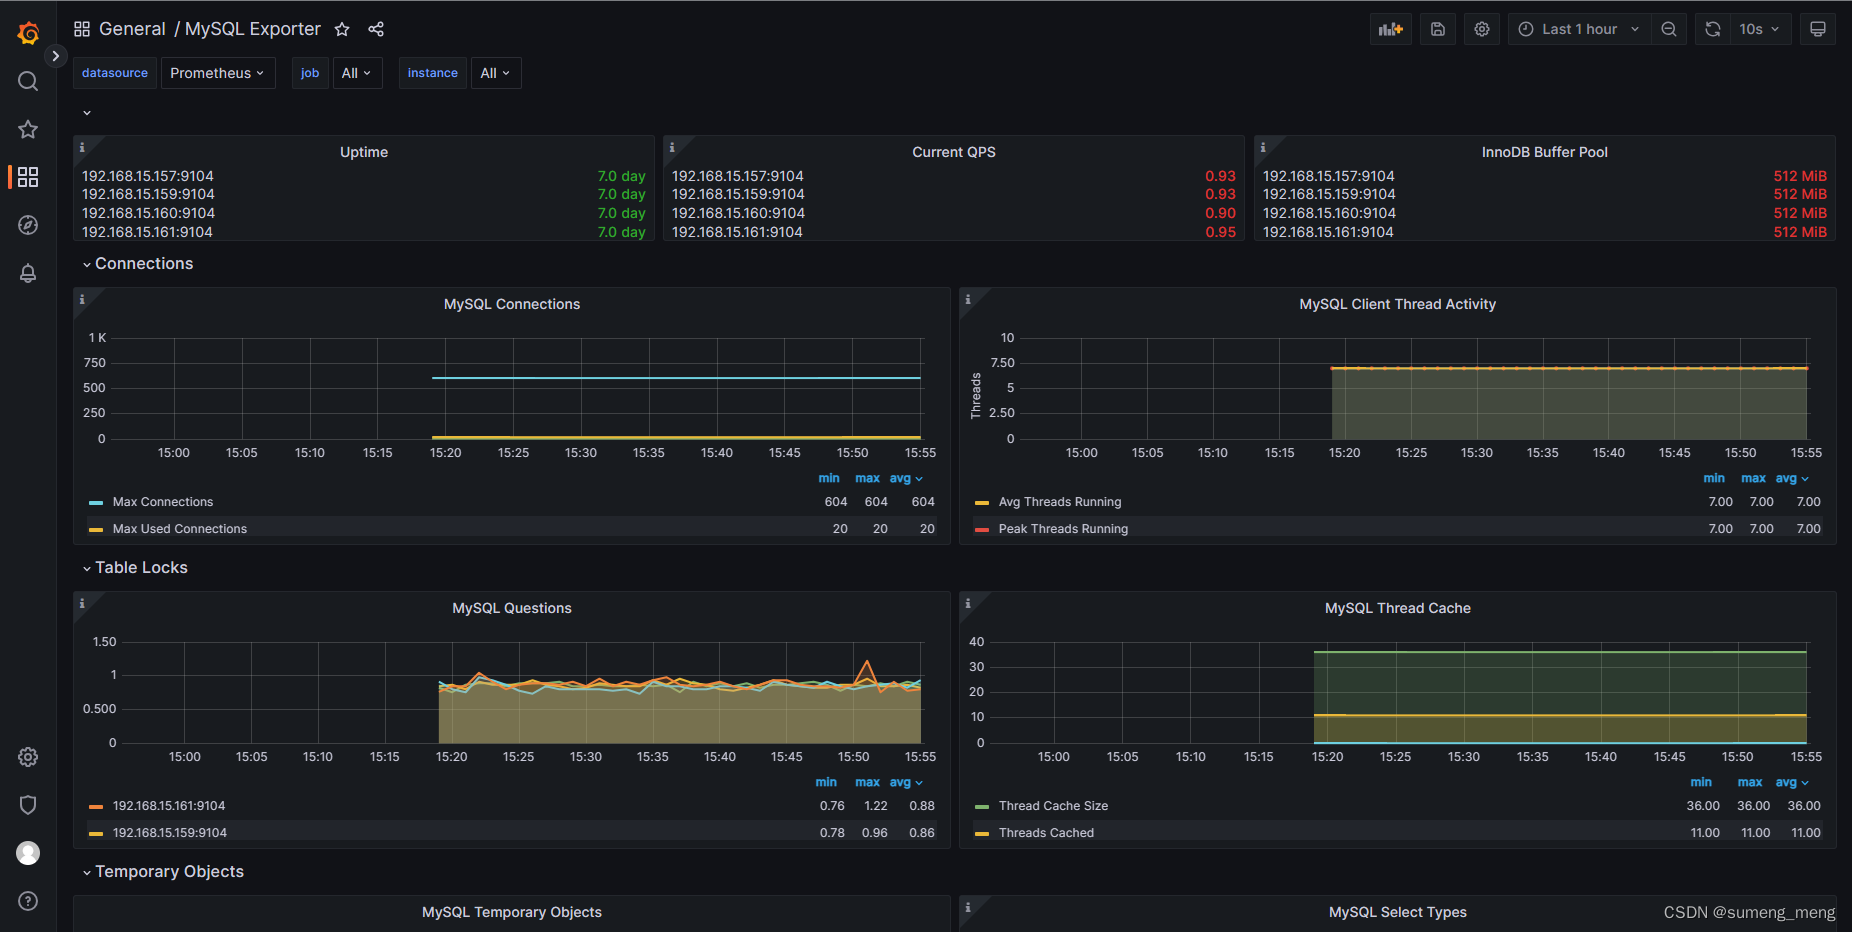
grafana效果展示