复制功能:
数据分布:负载均衡(读)
备份:高可用和故障切换
复制方式:
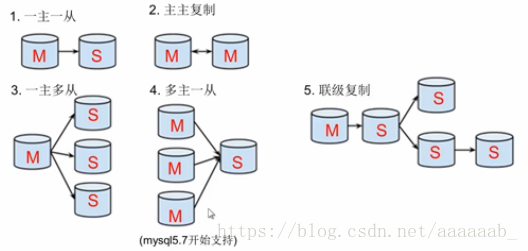
主–从复制(A-B一主一从或者A-BC一主多从)
基于GTID复制
异步复制
半同步复制
复制原理:
Mysql中有一种日志叫做bin日志(二进制日志)。
这个日志会记录下所有修改了数据库的SQL语句
(insert,update,delete,ALTER TABLE,grant等等)。
主从复制的原理其实就是把主服务器上的bin日志复制到从服务器上
执行一遍,这样从服务器上的数据就和主服务器上的数据相同了。
Mysql复制特点:
异步复制:主节点中一个用户请求一个写操作时,主接点不需要把写的
数据在本地操作完成同时就响应用户。但是,从节点中的数据有可能会
落后主服务,可以使用(很多软件来检查是否落后)
主从数据不一致
主从复制:
mysql主从复制原理:
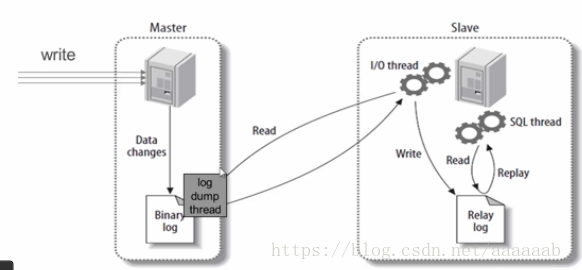
从库生成两个线程,一个I/O线程,一个SQL线程;
i/o线程去请求主库 的binlog,并将得到的binlog日志写到
relay log(中继日志) 文件中;
主库会生成一个 log dump 线程,用来给从库 i/o线程传binlog;
SQL 线程,会读取relay log文件中的日志,并解析成具体操作,来实现
主从的操作一致,而最终数据一致;
AB机的主从复制:
如果想要配置一主多从,从节点配置相同,server-id不同即可
**主节点:**
    启用二进制日志。
    为当前节点设置一个全局唯一的server_id。
    创建有复制权限的用户账号 REPLIACTION SLAVE ,REPLIATION CLIENT。

**从节点:**
    启动中继日志。
    为当前节点设置一个全局唯一的server_id。
    使用有复制权限的用户账号连接至主节点,并启动复制线程。
实验环境:
主端:172.25.254.1  server1
从端:172.25.254.2  server2
主端:
[root@server1 ~]# ls
mysql-community-client-5.7.17-1.el6.x86_64.rpm
mysql-community-common-5.7.17-1.el6.x86_64.rpm
mysql-community-libs-5.7.17-1.el6.x86_64.rpm
mysql-community-libs-compat-5.7.17-1.el6.x86_64.rpm
mysql-community-server-5.7.17-1.el6.x86_64.rpm
[root@server1 ~]# yum install -y *  安装服务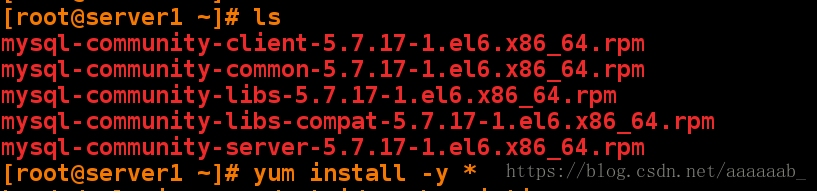
[root@server1 ~]# /etc/init.d/mysqld start  开启服务
Initializing MySQL database:                               [  OK  ]
Installing validate password plugin:                       [  OK  ]
Starting mysqld:                                           [  OK  ]
[root@server1 ~]# vim /etc/my.cnf  编辑my.cnf常用参数配置
[root@server1 ~]# cat /etc/my.cnf | tail -n 2
启用二进制日志文件
    添加:log-bin = mysql-bin
    添加 :server-id =1
server-id=1
log-bin=mysql-bin
[root@server1 ~]# /etc/init.d/mysqld restart  重启服务文件内容生效
Stopping mysqld:                                           [  OK  ]
Starting mysqld:                                           [  OK  ]
[root@server1 ~]# grep password /var/log/mysqld.log   查看日志会看到出是密码
2018-08-08T12:25:20.167210Z 1 [Note] A temporary password is generated for root@localhost: jdomj?l:W2yp
root@localhost:后面的就是密码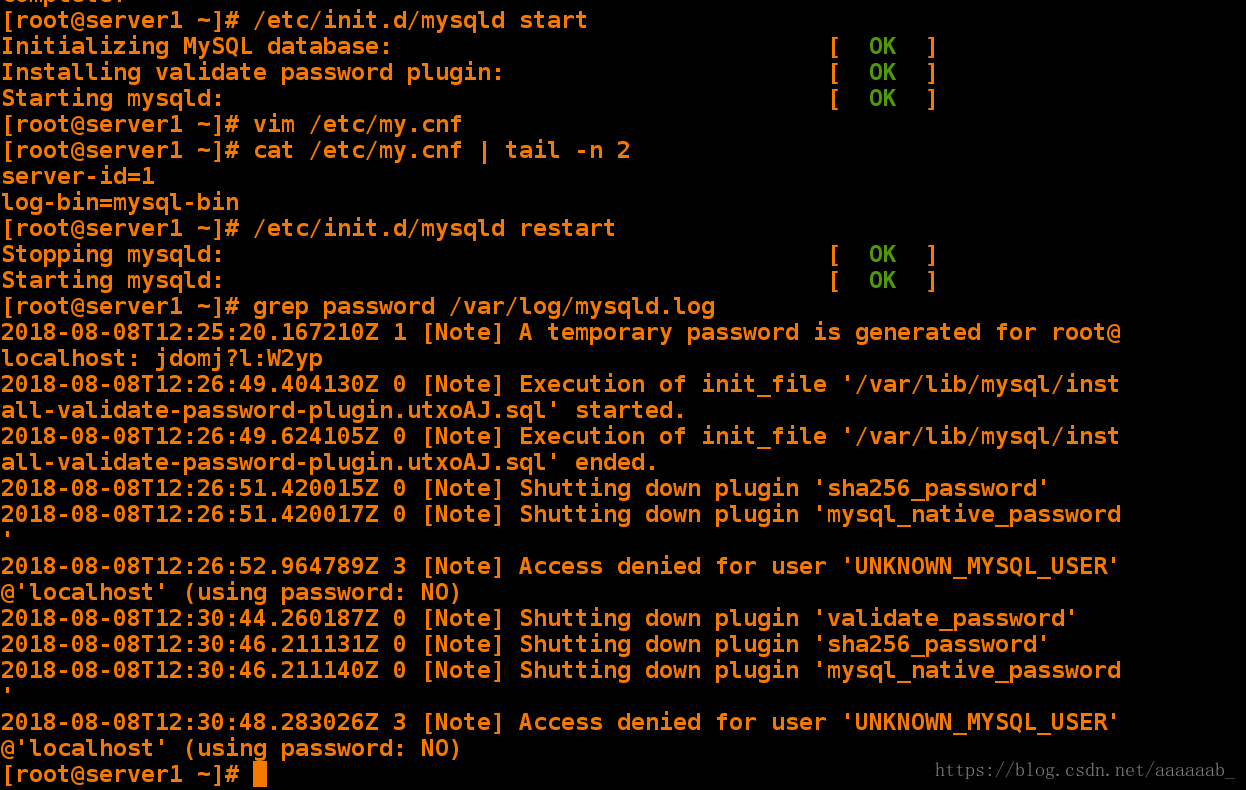
从端:
[root@server2 ~]# ls
mysql-community-client-5.7.17-1.el6.x86_64.rpm
mysql-community-common-5.7.17-1.el6.x86_64.rpm
mysql-community-libs-5.7.17-1.el6.x86_64.rpm
mysql-community-libs-compat-5.7.17-1.el6.x86_64.rpm
mysql-community-server-5.7.17-1.el6.x86_64.rpm
[root@server2 ~]# yum install -y *  安装服务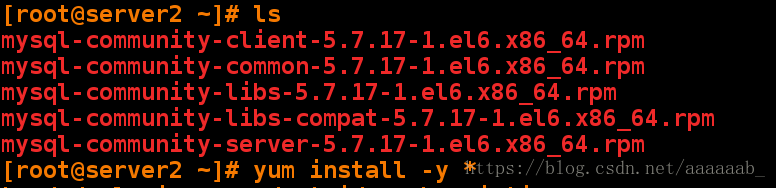
[root@server2 ~]# vim /etc/my.cnf   编辑my.cnf常用参数配置
[root@server2 ~]# cat /etc/my.cnf | tail -n 1
server-id=2   填写server-id和主端不同即可
[root@server2 ~]# /etc/init.d/mysqld start  开启服务
Initializing MySQL database:                               [  OK  ]
Installing validate password plugin:                       [  OK  ]
Starting mysqld:                                           [  OK  ]
[root@server2 ~]# grep password /var/log/mysqld.log  过滤密码
2018-08-08T12:27:29.954223Z 1 [Note] A temporary password is generated for root@localhost: srpy%>EUr5rA
root@localhost:后面的就是密码
主端初始化完成:
[root@server1 ~]# mysql_secure_installation  进入初始化安装

Securing the MySQL server deployment.

Enter password for user root:   输入默认的初始化密码

The existing password for the user account root has expired. Please set a new password.

New password:   输入新密码:要求大小写字母数字和字符

Password updated successfully!  密码配置成功
Reloading privilege tables..
 ... Success!
Remove anonymous users? [Y/n]   询问是否不允许匿名用户登录
Disallow root login remotely? [Y/n]   询问是否不允许远程连接
Remove test database and access to it? [Y/n]  询问是否删除测试数据库并访问它
Reload privilege tables now? [Y/n]   询问是否重新加载权限表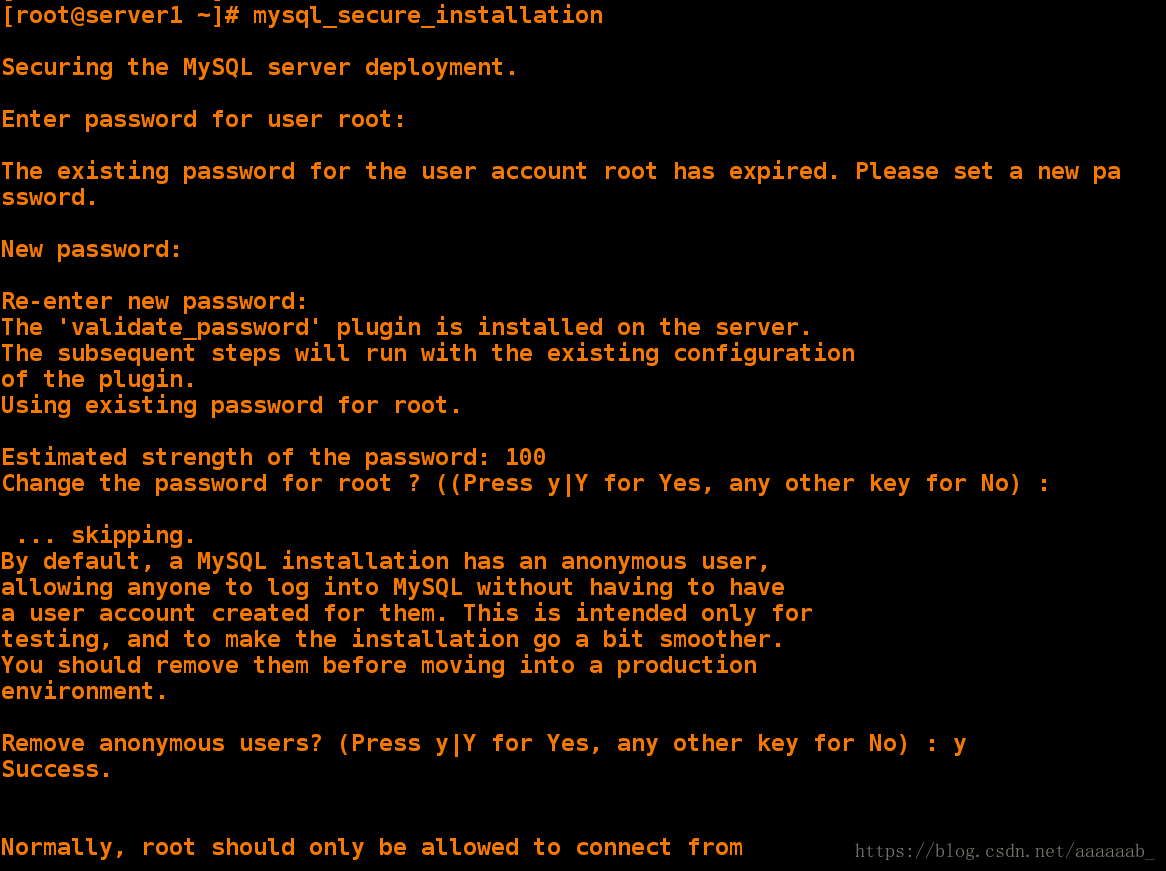
主端添加授权:
mysql> show databases;  显示所有数据库
+--------------------+
| Database           |
+--------------------+
| information_schema |
| mysql              |
| performance_schema |
| sys                |
+--------------------+
4 rows in set (0.00 sec)
mysql> grant replication slave on *.* to repl@'172.25.254.%' identified by 'Yakexi+007';  在主节点上创建有复制权限的用户,网段为另外一台虚拟机的IP
Query OK, 0 rows affected, 1 warning (0.17 sec)

mysql> show master status;  查看状态
+------------------+----------+--------------+------------------+-------------------+
| File             | Position | Binlog_Do_DB | Binlog_Ignore_DB | Executed_Gtid_Set |
+------------------+----------+--------------+------------------+-------------------+
| mysql-bin.000001 |     1428 |              |                  |                   |
+------------------+----------+--------------+------------------+-------------------+
1 row in set (0.00 sec)
图文Position应该是一致的,因为每次作会有变化。

从端可以登陆主端
[root@server2 ~]# mysql -u repl -p -h 172.25.254.1  登陆主端输入主端设置的密码即可登陆
Enter password:
Welcome to the MySQL monitor.  Commands end with ; or \g.
Your MySQL connection id is 11
Server version: 5.7.17-log MySQL Community Server (GPL)

Copyright (c) 2000, 2016, Oracle and/or its affiliates. All rights reserved.

Oracle is a registered trademark of Oracle Corporation and/or its
affiliates. Other names may be trademarks of their respective
owners.

Type 'help;' or '\h' for help. Type '\c' to clear the current input statement.

mysql> quit
Bye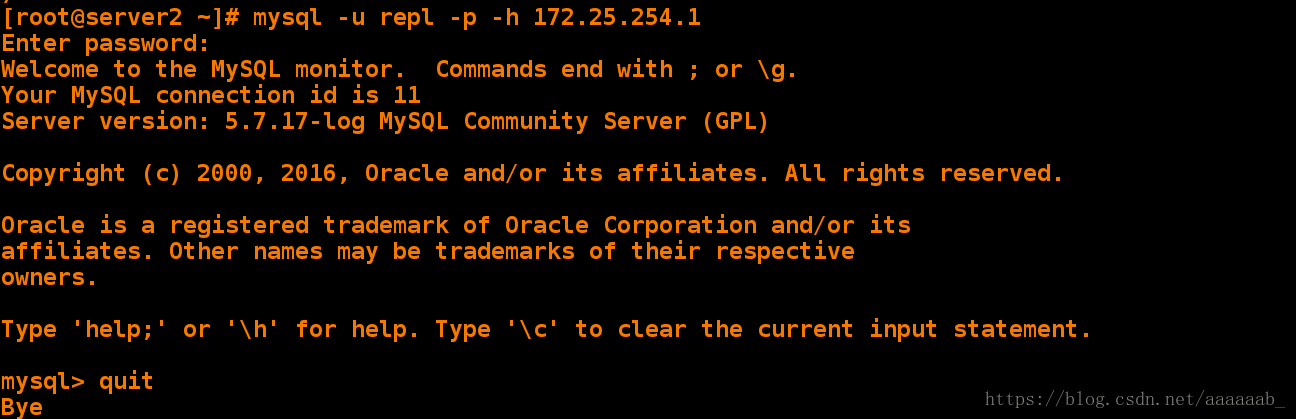
从端初始化:
[root@server2 ~]# mysql_secure_installation
Securing the MySQL server deployment.

Enter password for user root:   输入默认的初始化密码

The existing password for the user account root has expired. Please set a new password.

New password:   输入新密码:要求大小写字母数字和字符

Password updated successfully!  密码配置成功
Reloading privilege tables..
 ... Success!
Remove anonymous users? [Y/n]   询问是否不允许匿名用户登录
Disallow root login remotely? [Y/n]   询问是否不允许远程连接
Remove test database and access to it? [Y/n]  询问是否删除测试数据库并访问它
Reload privilege tables now? [Y/n]   询问是否重新加载权限表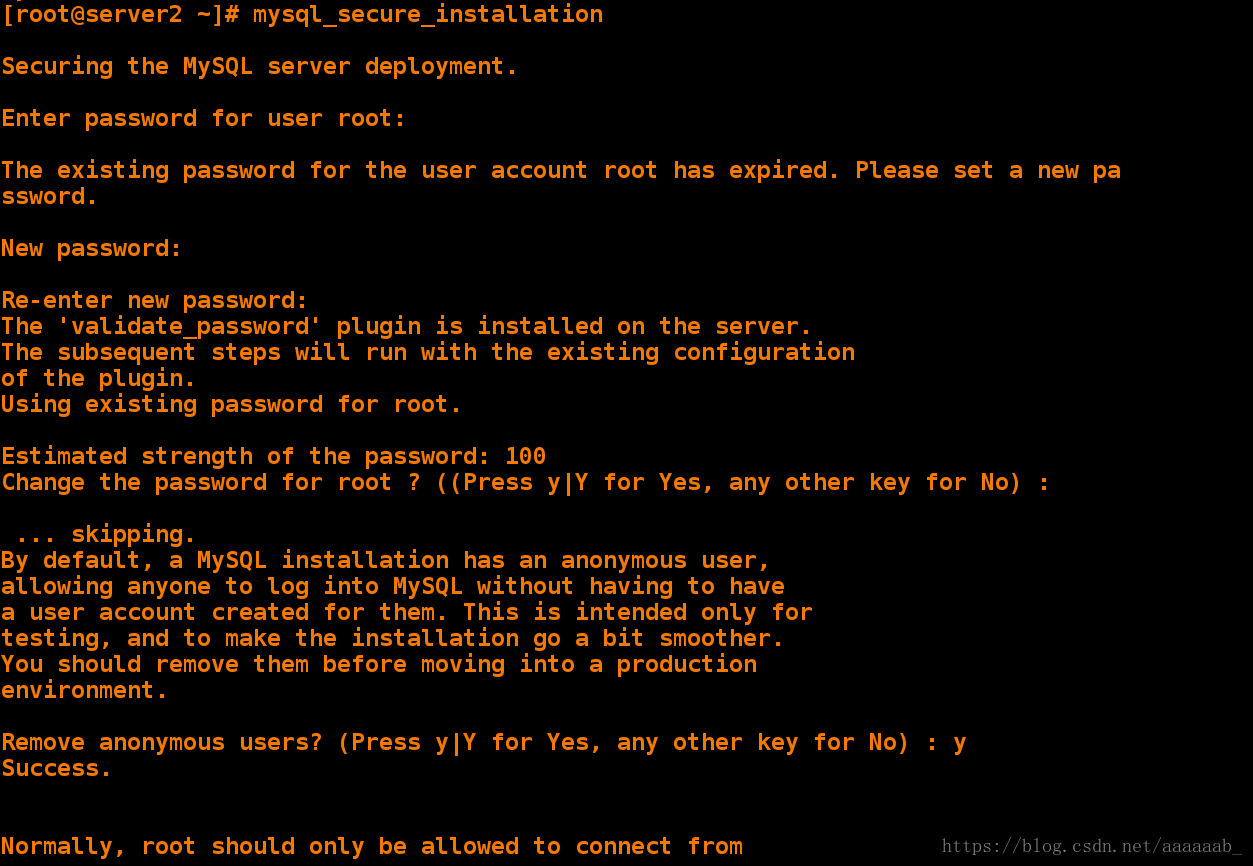
从端可以连接并查看slave信息:
mysql> show databases;
+--------------------+
| Database           |
+--------------------+
| information_schema |
| mysql              |
| performance_schema |
| sys                |
+--------------------+
4 rows in set (0.00 sec)

mysql> change master to master_host='172.25.254.1',master_user='repl',master_password='Yakexi+007',master_log_file='mysql-bin.000001',master_log_pos=1428;   在从节点配置访问主节点的参数信息,对应写即可
Query OK, 0 rows affected, 2 warnings (1.38 sec)

mysql> start slave;
Query OK, 0 rows affected (0.15 sec)

mysql> show slave status\G   查看从节点的状态信息看是否连接成功
*************************** 1. row ***************************
               Slave_IO_State: Waiting for master to send event
                  Master_Host: 172.25.254.1
                  Master_User: repl
                  Master_Port: 3306
                Connect_Retry: 60
              Master_Log_File: mysql-bin.000001
          Read_Master_Log_Pos: 1428
               Relay_Log_File: server2-relay-bin.000002
                Relay_Log_Pos: 320
        Relay_Master_Log_File: mysql-bin.000001
             Slave_IO_Running: Yes     ##这两个参数变为yes即可
            Slave_SQL_Running: Yes     ##
              Replicate_Do_DB:
          Replicate_Ignore_DB:
           Replicate_Do_Table:
       Replicate_Ignore_Table:
      Replicate_Wild_Do_Table:
  Replicate_Wild_Ignore_Table:
                   Last_Errno: 0
                   Last_Error:
                 Skip_Counter: 0
          Exec_Master_Log_Pos: 1428
              Relay_Log_Space: 529
              Until_Condition: None
               Until_Log_File:
                Until_Log_Pos: 0
           Master_SSL_Allowed: No
           Master_SSL_CA_File:
           Master_SSL_CA_Path:
              Master_SSL_Cert:
            Master_SSL_Cipher:
               Master_SSL_Key:
        Seconds_Behind_Master: 0
Master_SSL_Verify_Server_Cert: No
                Last_IO_Errno: 0
                Last_IO_Error:
               Last_SQL_Errno: 0
               Last_SQL_Error:
  Replicate_Ignore_Server_Ids:
             Master_Server_Id: 1
                  Master_UUID: 1d70d2c8-9b06-11e8-ac6a-525400f867b2
             Master_Info_File: /var/lib/mysql/master.info
                    SQL_Delay: 0
          SQL_Remaining_Delay: NULL
      Slave_SQL_Running_State: Slave has read all relay log; waiting for more updates
           Master_Retry_Count: 86400
                  Master_Bind:
      Last_IO_Error_Timestamp:
     Last_SQL_Error_Timestamp:
               Master_SSL_Crl:
           Master_SSL_Crlpath:
           Retrieved_Gtid_Set:
            Executed_Gtid_Set:
                Auto_Position: 0
         Replicate_Rewrite_DB:
                 Channel_Name:
           Master_TLS_Version:
1 row in set (0.00 sec)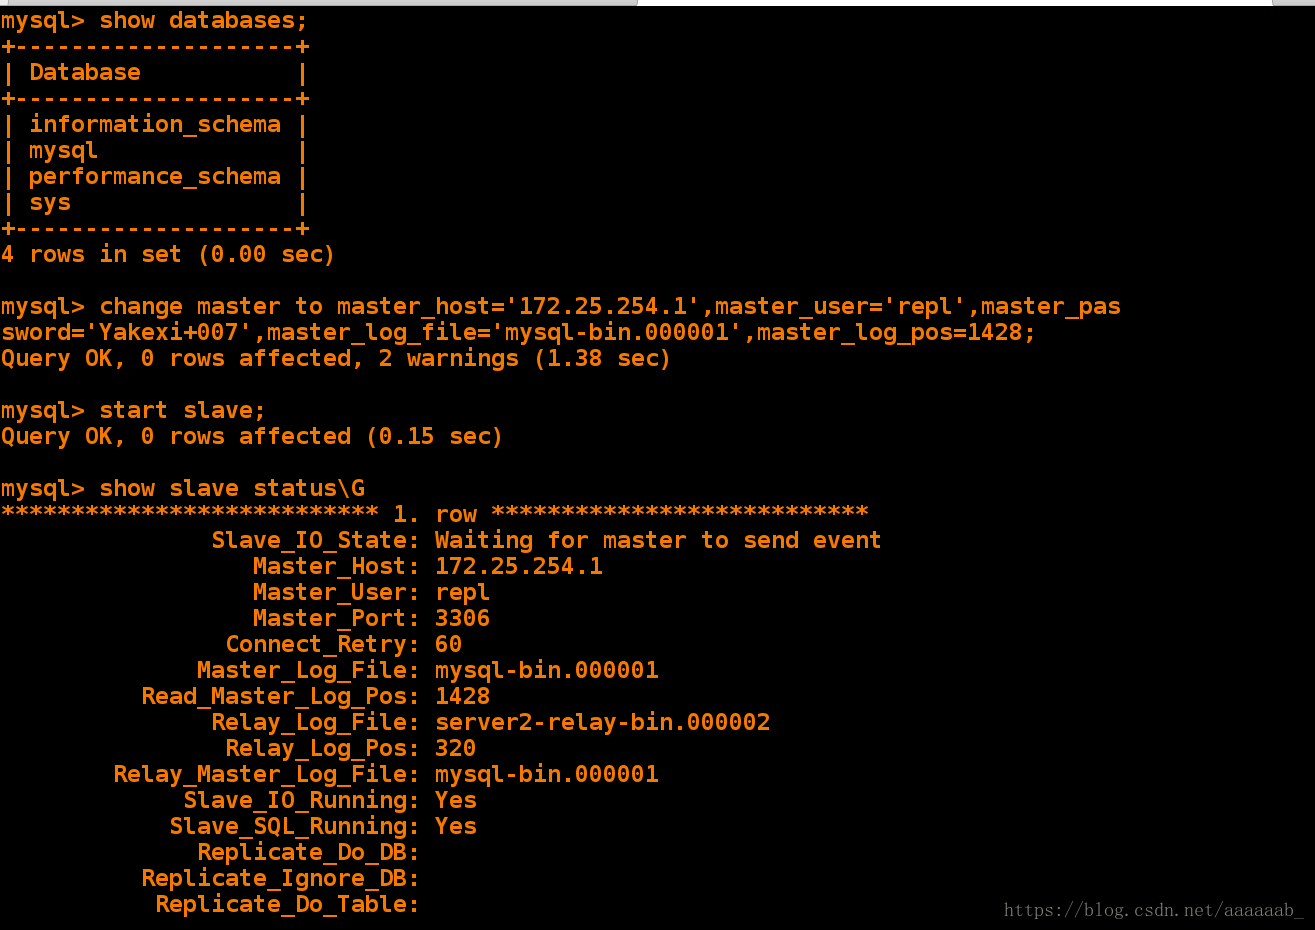
主端建立数据库数据表插入字段用于测试 :
mysql> create database love;  创建数据库
Query OK, 1 row affected (0.21 sec)

mysql> use love;
Database changed
mysql> create table ours(
    -> username varchar(10) not null,
    -> password varchar(10) not null);  创建数据表
Query OK, 0 rows affected (1.21 sec)

mysql> desc ours;  查看数据表结构
+----------+-------------+------+-----+---------+-------+
| Field    | Type        | Null | Key | Default | Extra |
+----------+-------------+------+-----+---------+-------+
| username | varchar(10) | NO   |     | NULL    |       |
| password | varchar(10) | NO   |     | NULL    |       |
+----------+-------------+------+-----+---------+-------+
2 rows in set (0.00 sec)

mysql> insert into ours values('xfl','123');  插入字段
Query OK, 1 row affected (0.30 sec)

mysql> insert into ours values('xyy','456');  插入字段
Query OK, 1 row affected (0.26 sec)

mysql> select * from ours;  显示字段信息
+----------+----------+
| username | password |
+----------+----------+
| xfl      | 123      |
| xyy      | 456      |
+----------+----------+
2 rows in set (0.00 sec)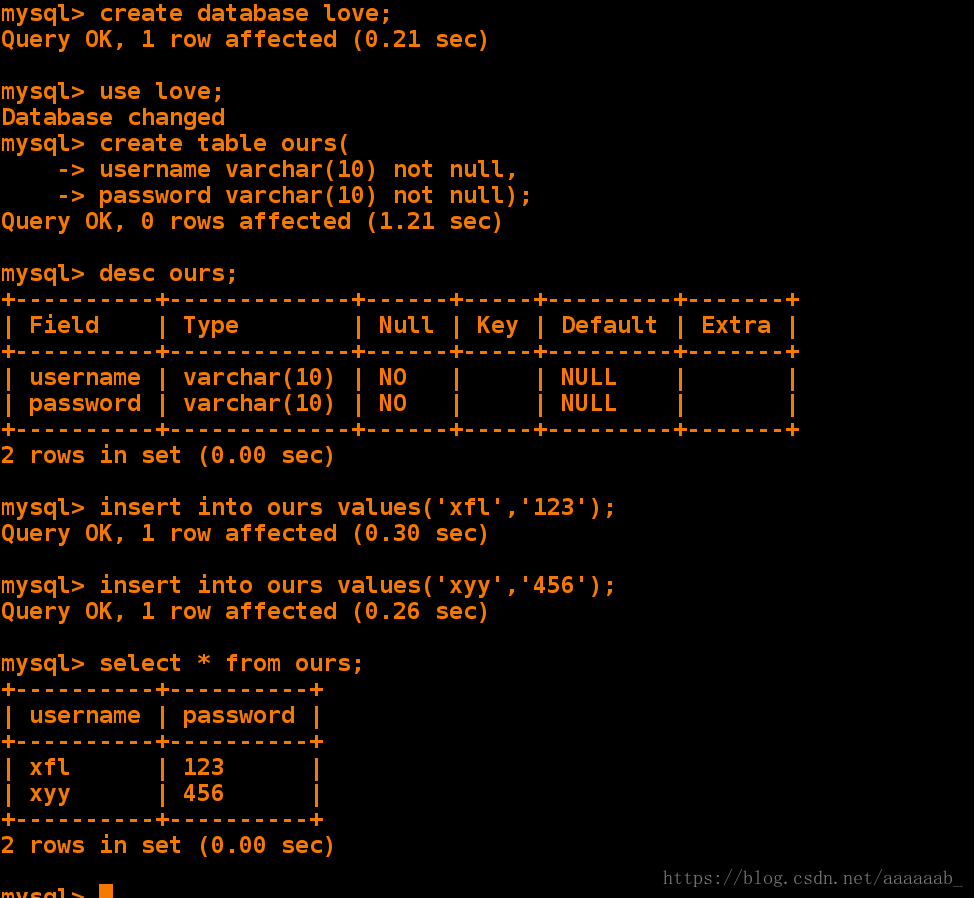
从端可以查看数据表字段信息:
mysql> use love;  使用数据库
Reading table information for completion of table and column names
You can turn off this feature to get a quicker startup with -A

Database changed
mysql> select * from ours;  查看字段信息已经复制成功
+----------+----------+
| username | password |
+----------+----------+
| xfl      | 123      |
| xyy      | 456      |
+----------+----------+
2 rows in set (0.00 sec)
Mysql-5.7 基于GTID的主从复制
从 MySQL 5.6.5 开始新增了一种基于 GTID 的复制方式。通过 GTID 保证了
每个在主库上提交的事务在集群中有一个唯一的ID。这种方式强化了数据库的主备
一致性,故障恢复以及容错能力。
实验环境在上一个实验基础上进行配置:
从端修改my.cnf文件并停止slave:
[root@server2 ~]# vim /etc/my.cnf
[root@server2 ~]# cat /etc/my.cnf | tail -n 4
server-id=2

gtid_mode=ON  开启gtid模式
enforce-gtid-consistency=true   强制gtid一直性,用于保证启动gitd后事务的安全;
[root@server2 ~]# /etc/init.d/mysqld restart  重启服务
Stopping mysqld:                                           [  OK  ]
Starting mysqld:                                           [  OK  ]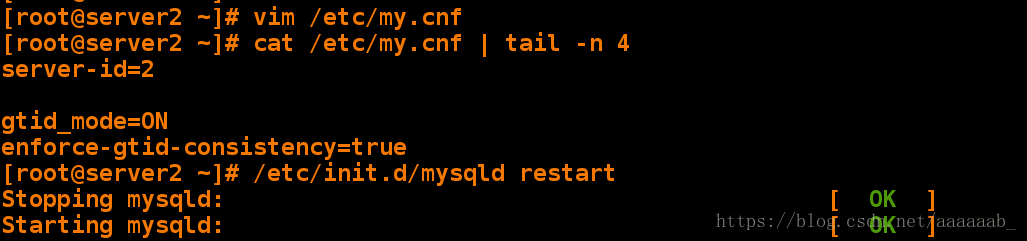
主端修改配置文件重启服务:
[root@server1 ~]# cat /etc/my.cnf |tail -n 5
server-id=1
log-bin=mysql-bin

gtid_mode=ON
enforce-gtid-consistency=true
[root@server1 ~]# /etc/init.d/mysqld restart
Stopping mysqld:                                           [  OK  ]
Starting mysqld:                                           [  OK  ]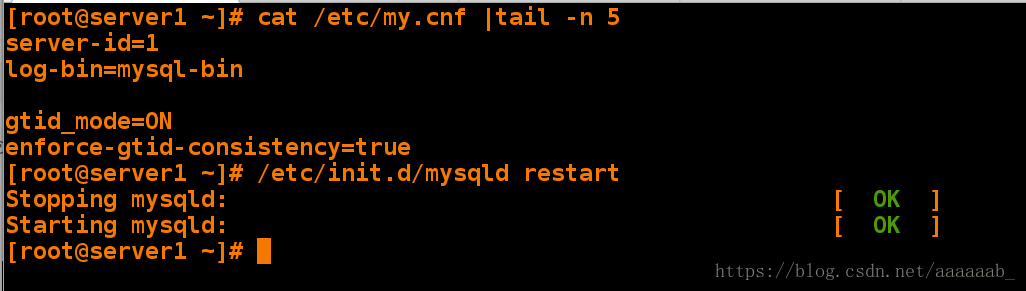
[root@server2 ~]# mysql -p  登陆数据库
mysql> show slave status\G  查看slave状态信息
*************************** 1. row ***************************
               Slave_IO_State: Waiting for master to send event
                  Master_Host: 172.25.254.1
                  Master_User: repl
                  Master_Port: 3306
                Connect_Retry: 60
              Master_Log_File: mysql-bin.000002
          Read_Master_Log_Pos: 154
               Relay_Log_File: server2-relay-bin.000005
                Relay_Log_Pos: 367
        Relay_Master_Log_File: mysql-bin.000002
             Slave_IO_Running: Yes   ##这两行为yes代表连接成功
            Slave_SQL_Running: Yes   ##
              Replicate_Do_DB:
          Replicate_Ignore_DB:
           Replicate_Do_Table:
       Replicate_Ignore_Table:
      Replicate_Wild_Do_Table:
  Replicate_Wild_Ignore_Table:
                   Last_Errno: 0
                   Last_Error:
                 Skip_Counter: 0
          Exec_Master_Log_Pos: 154
              Relay_Log_Space: 742
              Until_Condition: None
               Until_Log_File:
                Until_Log_Pos: 0
           Master_SSL_Allowed: No
           Master_SSL_CA_File:
           Master_SSL_CA_Path:
              Master_SSL_Cert:
            Master_SSL_Cipher:
               Master_SSL_Key:
        Seconds_Behind_Master: 0
Master_SSL_Verify_Server_Cert: No
                Last_IO_Errno: 0
                Last_IO_Error:
               Last_SQL_Errno: 0
               Last_SQL_Error:
  Replicate_Ignore_Server_Ids:
             Master_Server_Id: 1
                  Master_UUID: 1d70d2c8-9b06-11e8-ac6a-525400f867b2
             Master_Info_File: /var/lib/mysql/master.info
                    SQL_Delay: 0
          SQL_Remaining_Delay: NULL
      Slave_SQL_Running_State: Slave has read all relay log; waiting for more updates
           Master_Retry_Count: 86400
                  Master_Bind:
      Last_IO_Error_Timestamp:
     Last_SQL_Error_Timestamp:
               Master_SSL_Crl:
           Master_SSL_Crlpath:
           Retrieved_Gtid_Set:
            Executed_Gtid_Set:
                Auto_Position: 0
         Replicate_Rewrite_DB:
                 Channel_Name:
           Master_TLS_Version:
1 row in set (0.00 sec)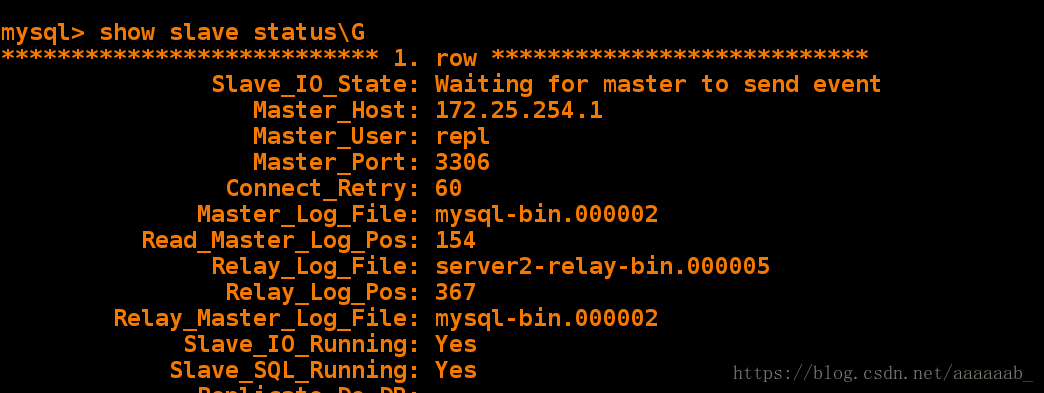
mysql> stop slave;  停止slave
Query OK, 0 rows affected (0.17 sec)
主端查看状态:
[root@server1 ~]# /etc/init.d/mysqld restart  重启服务
Stopping mysqld:                                           [  OK  ]
Starting mysqld:                                           [  OK  ]
[root@server1 ~]# mysql -p

mysql> show master status;  查看master状态
+------------------+----------+--------------+------------------+-------------------+
| File             | Position | Binlog_Do_DB | Binlog_Ignore_DB | Executed_Gtid_Set |
+------------------+----------+--------------+------------------+-------------------+
| mysql-bin.000002 |      154 |              |                  |                   |
+------------------+----------+--------------+------------------+-------------------+
1 row in set (0.00 sec)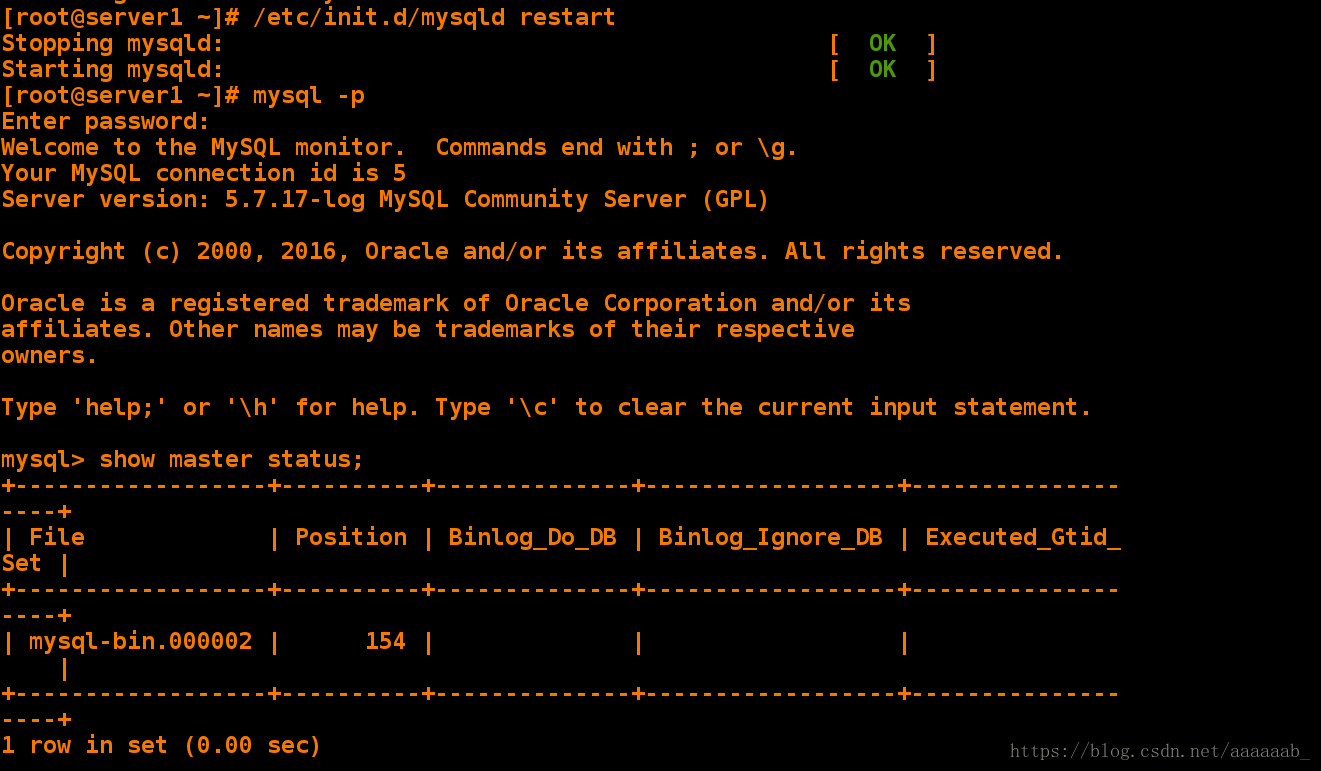
从端重新建立连接:
MASTER_AUTO_POSITION:参数意思
该参数在mysql5.6.5版本引入,如果进行change master to时使用MASTER_AUTO_POSITION = 1,
slave连接master将使用基于GTID的复制协议。
使用基于GTID协议的复制,slave会告诉master它已经接收到或执行了哪些事务。
使用基于GTID的复制时(MASTER_AUTO_POSITION = 1),首先要开启gtid_mode(在my.cnf中设置gtid-mode = ON),mysql> change master to master_host='172.25.254.1',master_user='repl',master_password='Yakexi+007',MASTER_AUTO_POSITION = 1;
Query OK, 0 rows affected, 2 warnings (0.37 sec)
mysql> start slave;
Query OK, 0 rows affected (0.11 sec)
主端在表中插入字段:
mysql> use love;
Reading table information for completion of table and column names
You can turn off this feature to get a quicker startup with -A

Database changed
mysql> show tables;
+----------------+
| Tables_in_love |
+----------------+
| ours           |
+----------------+
1 row in set (0.00 sec)

mysql> insert into ours values('xxx','789');  插入字段
Query OK, 1 row affected (0.12 sec)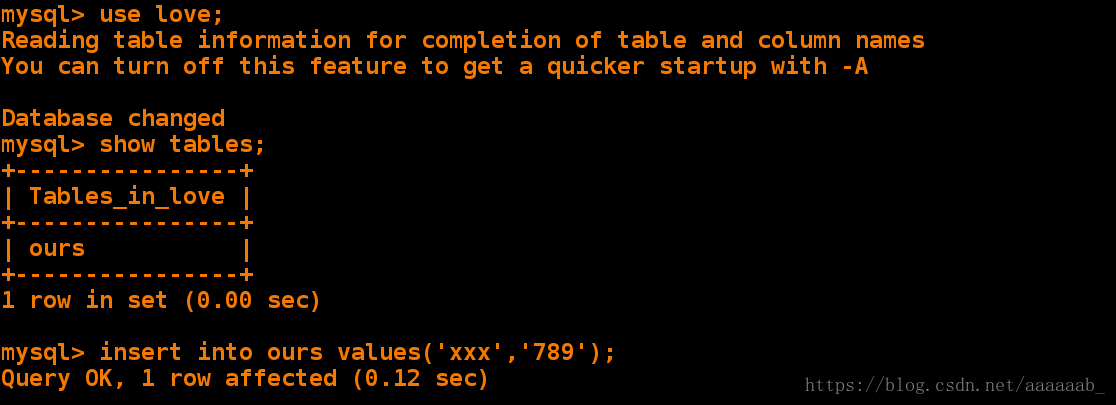
从端可以复制字段信息实时查看:
mysql> use love;
Reading table information for completion of table and column names
You can turn off this feature to get a quicker startup with -A

Database changed
mysql> select * from ours;
+----------+----------+
| username | password |
+----------+----------+
| xfl      | 123      |
| xyy      | 456      |
| xxx      | 789      |
+----------+----------+
3 rows in set (0.00 sec)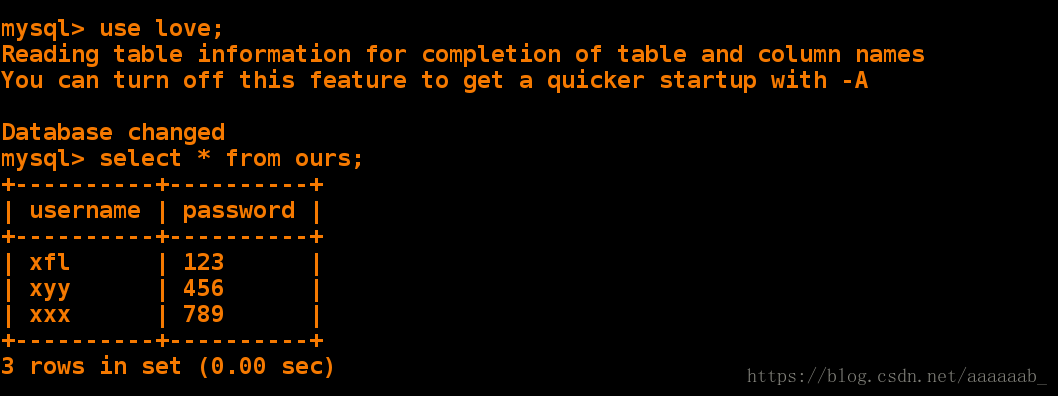
mysql主从复制存在的问题:
主库宕机后,数据可能丢失
从库只有一个sql Thread,主库写压力大,复制很可能延时
解决方法:
半同步复制---解决数据丢失的问题
并行复制----解决从库复制延迟的问题
并行复制:
MySQL从5.6开始有了SQL Thread多个的概念,可以并发还原数据,
即并行复制技术。MySQL 5.6中,设置参数slave_parallel_workers = 4(>1),
即可有4个SQL Thread(coordinator线程)来进行并行复制,其状态为:
Waiting for an evant from Coordinator。
在MySQL 5.7中,引入了基于组提交的并行复制(Enhanced Multi-threaded Slaves),
设置参数slave_parallel_workers>0并且global.slave_parallel_type=‘LOGICAL_CLOCK’,
即可支持一个schema下,slave_parallel_workers个的worker线程
并发执行relay log中主库提交的事务。其核心思想:一个组提交的事务
都是可以并行回放(配合binary log group commit);
slave机器的relay log中 last_committed相同的事务(sequence_num不同)
可以并发执行。
其中,变量slave-parallel-type可以有两个值:DATABASE 默认值,
基于库的并行复制方式;LOGICAL_CLOCK:基于组提交的并行复制方式
MySQL 5.7开启Enhanced Multi-Threaded Slave配置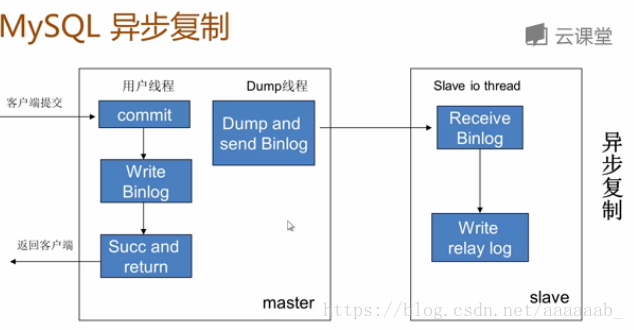
添加参数永久生效:
[root@server2 ~]# cat /etc/my.cnf | tail -n 10
log-slave-updates

gtid_mode=ON
enforce-gtid-consistency=true

slave-parallel-type=LOGICAL_CLOCK

slave-parallel-workers=16

若将slave_parallel_workers设置为0,则MySQL 5.7退化为原单线程复制,
但将slave_parallel_workers设置为1,则SQL线程功能转化为coordinator线程,
但是只有1个worker线程进行回放,也是单线程复制。然而,这两种性能却又有一些
的区别,因为多了一次coordinator线程的转发,因此slave_parallel_workers=1
的性能反而比0还要差

**master_info_repository=TABLE**

开启MTS功能后,务必将参数master_info_repostitory设置为TABLE,
这样性能可以有50%~80%的提升。这是因为并行复制开启后对于元master.info
这个文件的更新将会大幅提升,资源的竞争也会变大。在之前InnoSQL的版本中,
添加了参数来控制刷新master.info这个文件的频率,甚至可以不刷新这个文件。
因为刷新这个文件是没有必要的,即根据master-info.log这个文件恢复本身就是
不可靠的。在MySQL 5.7中,Inside君推荐将master_info_repository设置为
TABLE,来减小这部分的开销。
relay_log_info_repository=TABLE
relay_log_recovery=ON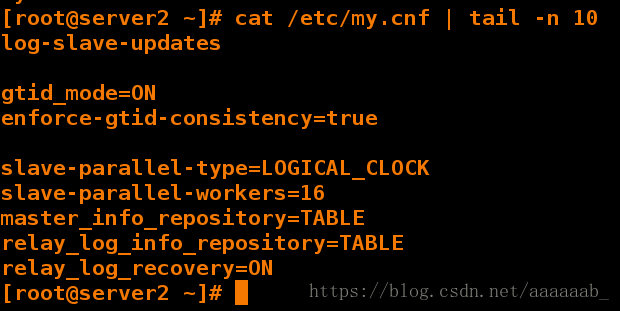
显示哪些线程正在运行
mysql> show processlist;
+----+-------------+-----------+------+---------+------+--------------------------------------------------------+------------------+
| Id | User        | Host      | db   | Command | Time | State                                                  | Info             |
+----+-------------+-----------+------+---------+------+--------------------------------------------------------+------------------+
| 28 | root        | localhost | test | Query   |    0 | starting                                               | show processlist |
| 30 | system user |           | NULL | Connect | 1301 | Slave has read all relay log; waiting for more updates | NULL             |
+----+-------------+-----------+------+---------+------+--------------------------------------------------------+------------------+
2 rows in set (0.00 sec)
参数
id       #ID标识,要kill一个语句的时候很有用
use      #当前连接用户
host     #显示这个连接从哪个ip的哪个端口上发出
db       #数据库名
command  #连接状态,一般是休眠(sleep),查询(query),连接(connect)
time     #连接持续时间,单位是秒
state    #显示当前sql语句的状态
info     #显示这个sql语句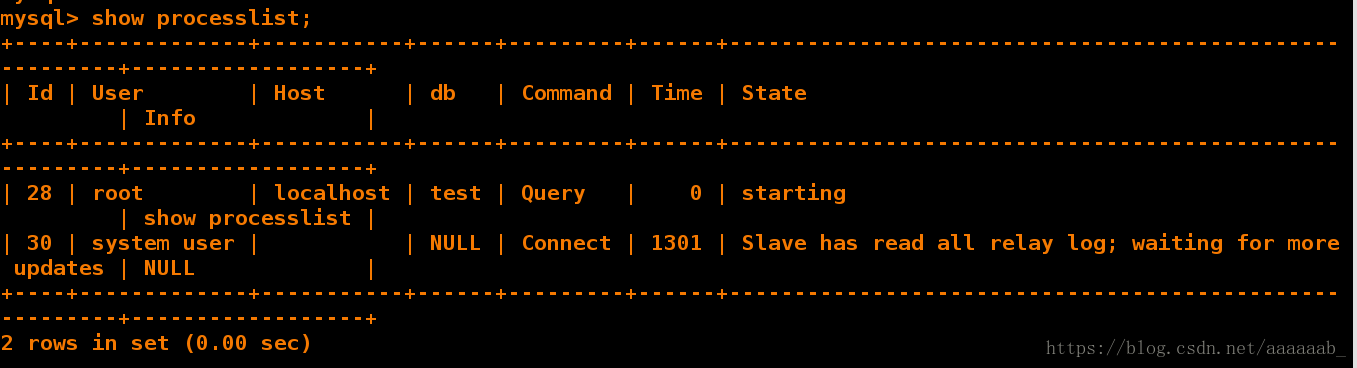
当打开16个线程再次查看哪些线程正在运行:
mysql> show processlist;  设置了16个线程的结果
+----+-------------+-----------+------+---------+------+--------------------------------------------------------+------------------+
| Id | User        | Host      | db   | Command | Time | State                                                  | Info             |
+----+-------------+-----------+------+---------+------+--------------------------------------------------------+------------------+
|  1 | system user |           | NULL | Connect | 3748 | Slave has read all relay log; waiting for more updates | NULL             |
|  3 | system user |           | NULL | Connect | 3988 | Waiting for an event from Coordinator                  | NULL             |
|  4 | system user |           | NULL | Connect | 3988 | Waiting for an event from Coordinator                  | NULL             |
|  5 | system user |           | NULL | Connect | 3988 | Waiting for an event from Coordinator                  | NULL             |
|  6 | system user |           | NULL | Connect | 3988 | Waiting for an event from Coordinator                  | NULL             |
|  7 | system user |           | NULL | Connect | 3988 | Waiting for an event from Coordinator                  | NULL             |
|  8 | system user |           | NULL | Connect | 3988 | Waiting for an event from Coordinator                  | NULL             |
|  9 | system user |           | NULL | Connect | 3988 | Waiting for an event from Coordinator                  | NULL             |
| 10 | system user |           | NULL | Connect | 3988 | Waiting for an event from Coordinator                  | NULL             |
| 12 | system user |           | NULL | Connect | 3988 | Waiting for an event from Coordinator                  | NULL             |
| 13 | system user |           | NULL | Connect | 3988 | Waiting for an event from Coordinator                  | NULL             |
| 14 | system user |           | NULL | Connect | 3988 | Waiting for an event from Coordinator                  | NULL             |
| 15 | system user |           | NULL | Connect | 3988 | Waiting for an event from Coordinator                  | NULL             |
| 16 | system user |           | NULL | Connect | 3988 | Waiting for an event from Coordinator                  | NULL             |
| 17 | system user |           | NULL | Connect | 3987 | Waiting for an event from Coordinator                  | NULL             |
| 18 | system user |           | NULL | Connect | 3987 | Waiting for an event from Coordinator                  | NULL             |
| 19 | system user |           | NULL | Connect | 3987 | Waiting for an event from Coordinator                  | NULL             |
| 23 | system user |           | NULL | Connect | 3749 | Waiting for master to send event                       | NULL             |
| 24 | root        | localhost | NULL | Query   |    0 | starting                                               | show processlist |
+----+-------------+-----------+------+---------+------+--------------------------------------------------------+------------------+
19 rows in set (0.00 sec)
半同步复制:
默认情况下,MySQL的复制功能是异步的,异步复制可以提供最佳的性能,
主库把binlog日志发送给从库,这一动作就结束了,并不会验证从库是
否接收完毕,这一过程,也就意味着有可能出现当主服务器或从服务
器端发生故障的时候,有可能从服务器没有接收到主服务器发送过来的
binlog日志,这就会造成主服务器和从服务器的数据不一致,甚至在恢
复时造成数据的丢失。注意:半同步复制模式必须在主服务器和从服务器
端同时开启,否则主服务器默认使用异步复制模式。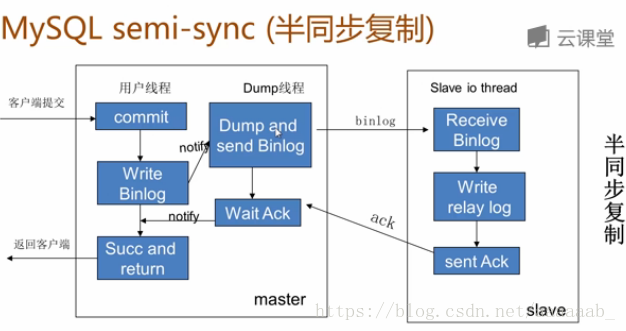
在主端:
mysql> show global variables like 'have_dynamic_loading';
+----------------------+-------+
| Variable_name        | Value |
+----------------------+-------+
| have_dynamic_loading | YES   |
+----------------------+-------+
1 row in set (0.00 sec)

mysql> show global variables like 'plugin_dir';
+---------------+--------------------------+
| Variable_name | Value                    |
+---------------+--------------------------+
| plugin_dir    | /usr/lib64/mysql/plugin/ |
+---------------+--------------------------+
1 row in set (0.00 sec)

mysql> install plugin rpl_semi_sync_master soname 'semisync_master.so';  安装服务插件
Query OK, 0 rows affected (0.11 sec)
rpl_semi_sync_master_enabled 参数控制主节点是否开启半同步复制;rpl_semi_sync_master_timeout
参数控制主节点等待备节点返回确认信息的超时时间,单位为毫秒,超过这个时间后半同步复制转变成异步复制,
mysql> set global rpl_semi_sync_master_enabled = 1;
Query OK, 0 rows affected (0.00 sec)

mysql> set global rpl_semi_sync_master_enabled = ON;
Query OK, 0 rows affected (0.00 sec)
在从端:
mysql> install plugin rpl_semi_sync_slave soname 'semisync_slave.so';  安装插件
Query OK, 0 rows affected (0.14 sec)

mysql> set global rpl_semi_sync_slave_enabled=ON;  rpl_semi_sync_master_enabled 参数控制主节点是否开启半同步复制
Query OK, 0 rows affected (0.00 sec)

mysql> show variables like '%semi%';
+---------------------------------+-------+
| Variable_name                   | Value |
+---------------------------------+-------+
| rpl_semi_sync_slave_enabled     | ON    |
| rpl_semi_sync_slave_trace_level | 32    |
+---------------------------------+-------+
2 rows in set (0.00 sec)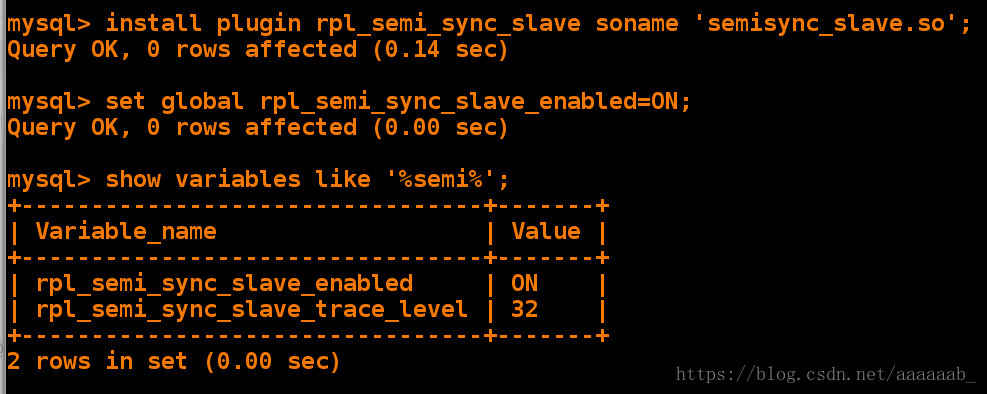
主端查看参数:
mysql> show status like '%rpl_semi_sync%';
+--------------------------------------------+-------+
| Variable_name                              | Value |
+--------------------------------------------+-------+
| Rpl_semi_sync_master_clients               | 0     |
| Rpl_semi_sync_master_net_avg_wait_time     | 0     |
| Rpl_semi_sync_master_net_wait_time         | 0     |
| Rpl_semi_sync_master_net_waits             | 0     |
| Rpl_semi_sync_master_no_times              | 0     |
| Rpl_semi_sync_master_no_tx                 | 0     |
| Rpl_semi_sync_master_status                | ON    |
| Rpl_semi_sync_master_timefunc_failures     | 0     |
| Rpl_semi_sync_master_tx_avg_wait_time      | 0     |
| Rpl_semi_sync_master_tx_wait_time          | 0     |
| Rpl_semi_sync_master_tx_waits              | 0     |
| Rpl_semi_sync_master_wait_pos_backtraverse | 0     |
| Rpl_semi_sync_master_wait_sessions         | 0     |
| Rpl_semi_sync_master_yes_tx                | 0     |
+--------------------------------------------+-------+
14 rows in set (0.00 sec)
从端关闭io_thread:
mysql> stop slave io_thread;
Query OK, 0 rows affected (0.06 sec)
主端修改数据表字段:
mysql> use love;
Database changed
mysql> insert into ours values('ss','3');  插入字段会有卡顿默认时间是10s,10s过后会自动变成异步复制
Query OK, 1 row affected (10.83 sec)

mysql> show status like '%rpl_semi_sync%';  一些参数的值也会变化
+--------------------------------------------+-------+
| Variable_name                              | Value |
+--------------------------------------------+-------+
| Rpl_semi_sync_master_clients               | 0     |
| Rpl_semi_sync_master_net_avg_wait_time     | 0     |
| Rpl_semi_sync_master_net_wait_time         | 0     |
| Rpl_semi_sync_master_net_waits             | 0     |
| Rpl_semi_sync_master_no_times              | 1     |
| Rpl_semi_sync_master_no_tx                 | 1     |
| Rpl_semi_sync_master_status                | OFF   |
| Rpl_semi_sync_master_timefunc_failures     | 0     |
| Rpl_semi_sync_master_tx_avg_wait_time      | 0     |
| Rpl_semi_sync_master_tx_wait_time          | 0     |
| Rpl_semi_sync_master_tx_waits              | 0     |
| Rpl_semi_sync_master_wait_pos_backtraverse | 0     |
| Rpl_semi_sync_master_wait_sessions         | 0     |
| Rpl_semi_sync_master_yes_tx                | 0     |
+--------------------------------------------+-------+
14 rows in set (0.00 sec)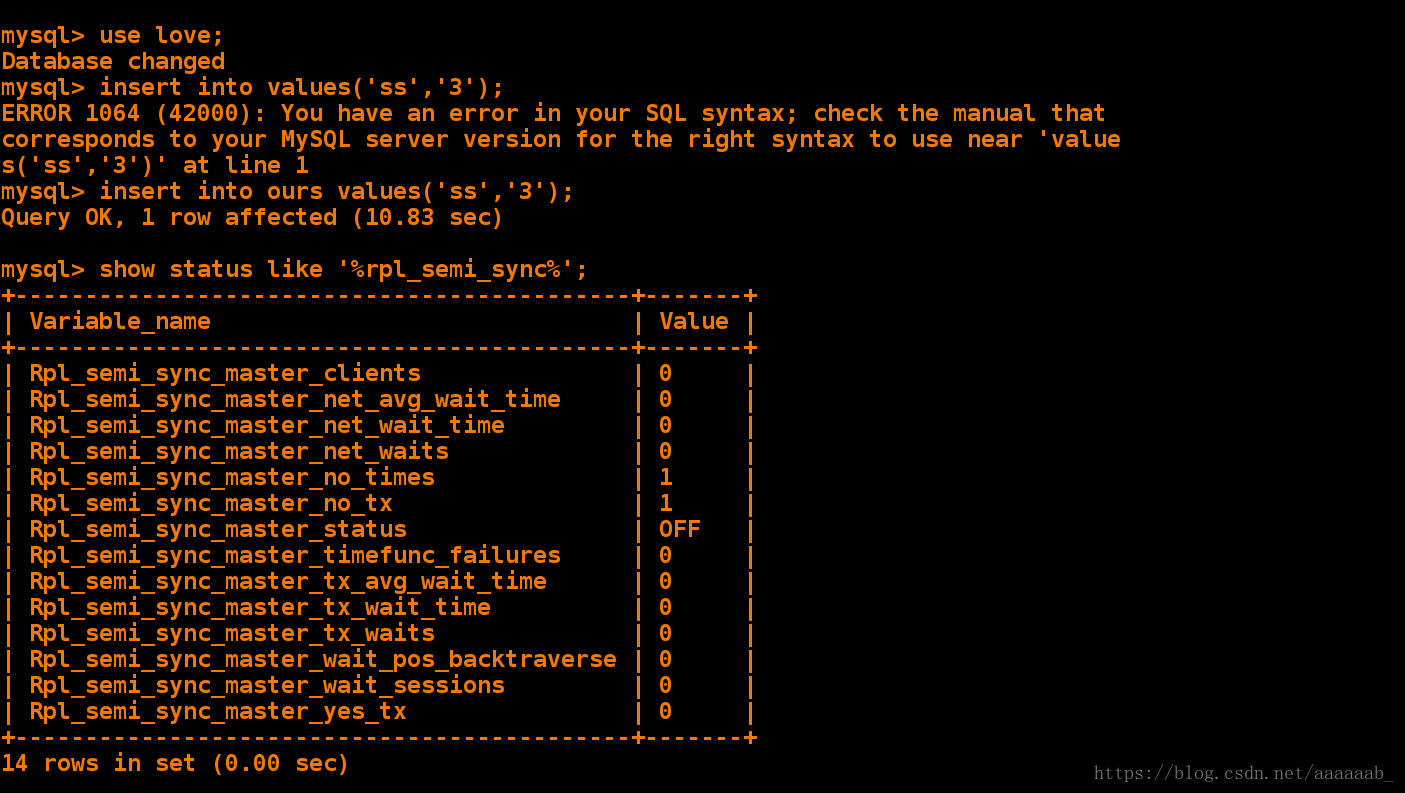
从端打开查看io_thread
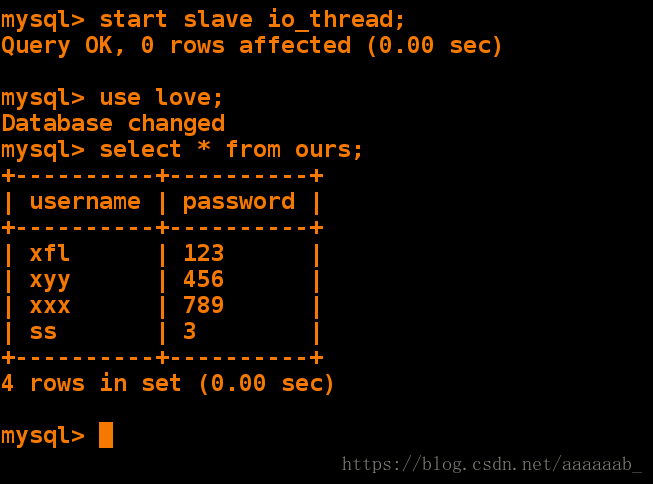
mysql> start slave io_thread;  打开slave io_thread
Query OK, 0 rows affected (0.00 sec)

mysql> use love;
Database changed
mysql> select * from ours;  数据已经同步
+----------+----------+
| username | password |
+----------+----------+
| xfl      | 123      |
| xyy      | 456      |
| xxx      | 789      |
| ss       | 3        |
+----------+----------+
4 rows in set (0.00 sec)