Android相机调用有原生的Camera和Camera2,我觉得调用代码都太复杂了,CameraX调用代码简洁很多。
说明文档:https://developer.android.com/jetpack/androidx/releases/camera?hl=zh-cn
现有查到的调用资料都不够新,对于外接摄像头(USB摄像头)这类非前置也非后置摄像头的设备调用,都说是没有实现。旧版本的库可能更多目标用户是基于手机的,1.3.0-alpha03版本针对外接摄像头有增加配置项(CameraSelector.LENS_FACING_EXTERNAL),使用该配置项可以实现外接摄像头的调用。
0,摄像头选择可用值
    /** A camera on the devices that its lens facing is resolved. */
    public static final int LENS_FACING_UNKNOWN = -1;
    /** A camera on the device facing the same direction as the device's screen. */
    public static final int LENS_FACING_FRONT = 0;
    /** A camera on the device facing the opposite direction as the device's screen. */
    public static final int LENS_FACING_BACK = 1;
    /**
     * An external camera that has no fixed facing relative to the device's screen.
     *
     * <p>The behavior of an external camera highly depends on the manufacturer. Currently it's
     * treated similar to a front facing camera with little verification. So it's considered
     * experimental and should be used with caution.
     */
    @ExperimentalLensFacing
    public static final int LENS_FACING_EXTERNAL = 2;
1,在AndroidManifest.xml添加权限
    <uses-permission android:name="android.permission.CAMERA" />
    <uses-feature android:name="android.hardware.camera.any" />
2,在settings.gradle或build.gradle添加maven
    repositories {
        google()
        mavenCentral()
        maven { url 'https://jitpack.io' }
    }
3,在build.gradle添加依赖库
    //摄像头预览库
    implementation "androidx.camera:camera-core:1.3.0-alpha04"
    // CameraX Camera2 extensions[可选]拓展库可实现人像、HDR、夜间和美颜、滤镜但依赖于OEM
    implementation "androidx.camera:camera-camera2:1.3.0-alpha04"
    // CameraX Lifecycle library[可选]避免手动在生命周期释放和销毁数据
    implementation "androidx.camera:camera-lifecycle:1.3.0-alpha04"
    // CameraX View class[可选]最佳实践,最好用里面的PreviewView,它会自行判断用SurfaceView还是TextureView来实现
    implementation 'androidx.camera:camera-view:1.3.0-alpha04'
4,开启预览代码
    private ListenableFuture<ProcessCameraProvider> cameraProviderFuture;
    private PreviewView previewView;
    private ProcessCameraProvider cameraProvider;
    ImageView picture = null;

    @Override
    protected void onCreate(Bundle savedInstanceState) {
        super.onCreate(savedInstanceState);
        setContentView(R.layout.activity_main);
        picture = (ImageView) findViewById(R.id.picture);
        previewView=findViewById(R.id.previewView);//初始化

        //高版本系统动态权限申请
        if (ContextCompat.checkSelfPermission(this, Manifest.permission.CAMERA) == PackageManager.PERMISSION_DENIED) {
            if (Build.VERSION.SDK_INT >= Build.VERSION_CODES.M) {
                requestPermissions(new String[]{
                        Manifest.permission.CAMERA,
                }, 11);
            }
        } else {
            //启动相机
            startCamera();
        }
        takePhoto.setOnClickListener(new View.OnClickListener() {
            @Override
            public void onClick(View view) {
                takePhoto(picture);//取图识别
            }
        });
    }

    @Override
    public void onRequestPermissionsResult(int requestCode, @NonNull String[] permissions, @NonNull int[] grantResults) {
        super.onRequestPermissionsResult(requestCode, permissions, grantResults);
        if (requestCode==11){//获取权限后,开启摄像头
            //启动相机
            startCamera();
        }
    }


    private void startCamera() {
        // 请求 CameraProvider
        cameraProviderFuture = ProcessCameraProvider.getInstance(this);
        //检查 CameraProvider 可用性,验证它能否在视图创建后成功初始化
        cameraProviderFuture.addListener(() -> {
            try {
                ProcessCameraProvider cameraProvider = cameraProviderFuture.get();
                bindPreview(cameraProvider);
            } catch (ExecutionException | InterruptedException e) {
                // No errors need to be handled for this Future.
                // This should never be reached.
            }
        }, ContextCompat.getMainExecutor(this));
    }

    //选择相机并绑定生命周期和用例
    private void bindPreview(@NonNull ProcessCameraProvider cp) {
        this.cameraProvider=cp;
        Preview preview = new Preview.Builder()
                .build();

        @SuppressLint("UnsafeOptInUsageError")
        CameraSelector cameraSelector = new CameraSelector.Builder()
                .requireLensFacing(CameraSelector.LENS_FACING_BACK)//CameraSelector.LENS_FACING_EXTERNAL
                .build();

        preview.setSurfaceProvider(previewView.getSurfaceProvider());
        cameraProvider.unbindAll();//解绑组件
        cameraProvider.bindToLifecycle((LifecycleOwner) this, cameraSelector, preview);
    }

    //拍照,这里偷懒了,直接取了预览控件的图片,需要拍照的再去看看官方文档吧
    public void takePhoto(View view)
    {
        Log.e("OCR", "takePhoto");

        Bitmap bitmap = previewView.getBitmap();
        view.setBackground(new BitmapDrawable(getApplicationContext().getResources(),bitmap)); //show picture

    }

    @Override
    protected void onDestroy() {
        super.onDestroy();
        cameraProvider.unbindAll();
    }
5,界面布局
<?xml version="1.0" encoding="utf-8"?>
<androidx.coordinatorlayout.widget.CoordinatorLayout xmlns:android="http://schemas.android.com/apk/res/android"
    xmlns:app="http://schemas.android.com/apk/res-auto"
    xmlns:tools="http://schemas.android.com/tools"
    android:layout_width="match_parent"
    android:layout_height="match_parent"
    tools:context=".MainActivity">

    <LinearLayout
        android:layout_width="match_parent"
        android:layout_height="wrap_content"
        android:layout_margin="5dp"
        android:orientation="vertical">

        <androidx.camera.view.PreviewView
            android:id="@+id/previewView"
            android:layout_width="300dp"
            android:layout_height="300dp"
            android:layout_gravity="center"
            />

        <Button
            android:id="@+id/take_photo"
            android:layout_width="match_parent"
            android:layout_height="wrap_content"
            android:layout_margin="5dp"
            android:text="取图"/>

        <ImageView
            android:id="@+id/picture"
            android:layout_width="300dp"
            android:layout_height="300dp"
            android:layout_gravity="center"
            />


    </LinearLayout>


</androidx.coordinatorlayout.widget.CoordinatorLayout>
6,测试效果(文字识别部分请忽略)
s
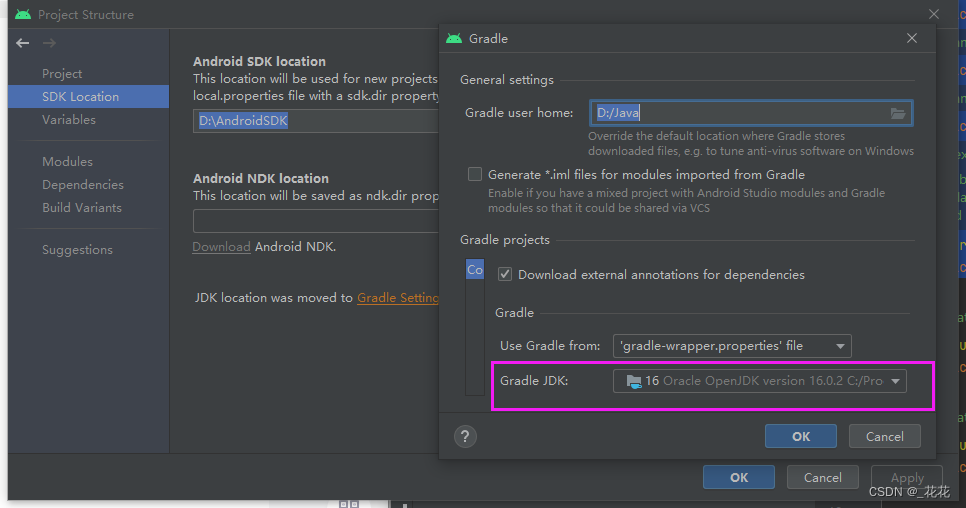
7,库的调用版本是比较新的,建议JDK版本不要太低,我使用的是16.0.2
新人入行,经验分享,如有所误,欢迎指出~
版权归属:深圳市琪智科技有限公司-花花