目录
前言
前面我们讲过普通的二叉搜索树以及特殊的二叉搜索树 --- AVL树,今天,我们也要实现一种特殊的二叉搜索树,该树被广泛使用在STL库中的map与set的封装,这就是我们的 红黑树 ,怎么样,听名字就知道很霸气吧;本文就带着大家实现一个简单版本的红黑树以及用这个版本的红黑树对map与set进行封装;
一、红黑树
1、红黑树的基本概念
红黑树是二叉搜索树的一种,它与普通二叉搜索树不同之处是它有一些规则对其进行了限制,使其最长路径结点个数不会超出最短路径结点个数的两倍,下面我们就来看看红黑树相关特性;
2、红黑树相关特性
1、每个结点不是红色就是黑色
2、根节点是黑色的
3、如果一个节点是红色的,则它的两个孩子结点是黑色的(不会有连续的红色结点)
4、对于每个结点,从该结点到其所有后代叶结点的简单路径上,均 、包含相同数目的黑色结点(每条路径上的黑色结点数量相同)
5、每个叶子结点都是黑色的(此处的叶子结点指的是空结点
思考:为什么满足以上特性,最长路径的结点个数不会超出最短路径节点个数的两倍呢?
根据上述5个条件,假设每条路径的黑色结点个数为3,那么最短路径应就是全是黑色结点,最长是黑红将间的路径结点;
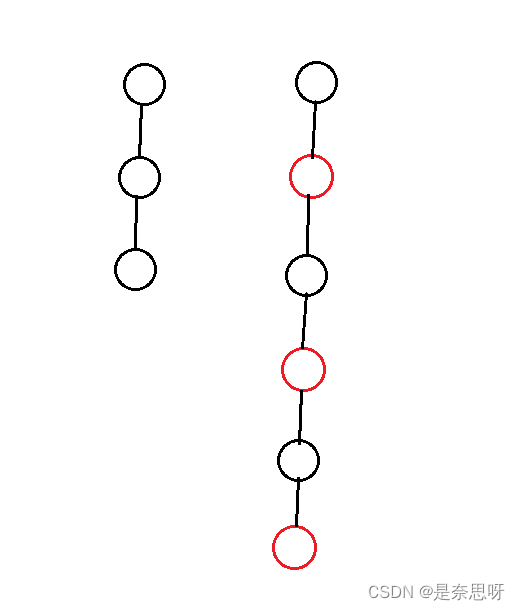
既然最长路径与最短路径我们都可以得到,根据上述,我们不难求证出最长路径的结点个数不会超出最短路径节点个数的两倍;
3、红黑树结点的定义
我们首先枚举出颜色,然后我们的红黑树结点用三叉链的方式进行连接,方便后续旋转调整;这里,其实有一个问题,我们构造的结点默认是红色还是黑色呢?
其实这个问题本质就是,对于新插入的结点,你更愿意违反规则3来进行调整,还是愿意违法规则4来进行后续的调整呢?答案是肯定的,当然愿意违反规则3,如果出现了连续的红色结点,我们可能仅仅只需要调整该红色结点所在子树;而违反规则4,我们需要调整整棵树,因为一颗树的黑色节点增多了,其他该所在路径也会增多,调整更麻烦;因此构造函数我们更愿意默认将结点置为红色;
	enum Color
	{
		RED,
		BLACK
	};
	template<class K, class V>
	struct RBTreeNode
	{
		RBTreeNode(const std::pair<K, V> kv)
			:_left(nullptr)
			, _right(nullptr)
			, _parent(nullptr)
			, _color(RED)
			, _kv(kv)
		{}

		RBTreeNode<K, V>* _left;
		RBTreeNode<K, V>* _right;
		RBTreeNode<K, V>* _parent;
		Color _color;
		std::pair<K, V> _kv;
	};
4、红黑树的查找
红黑树的查找方式与普通二叉搜索树并无二异,这里就不做过多介绍了;此处顺便将红黑树的框架写出来了;
	template<class K, class V>
	class RBTree
	{
	public:
		typedef RBTreeNode<K, V> Node;
		// 查找
		bool find(const K& key)
		{
			if (_root == nullptr)
			{
				return false;
			}
			Node* cur = _root;
			while (cur)
			{
				if (key < cur->_kv.first)
				{
					cur = cur->_left;
				}
				else if (key > cur->_kv.first)
				{
					cur->_right;
				}
				else
				{
					// 找到了
					return true;
				}
			}
			return false;
		}
	private:
		Node* _root = nullptr;
	};
5、红黑树的插入
红黑树的插入操作才是关键,也是本文讲解红黑树的核心;红黑树插入数据与以前的二叉搜索树插入数据的代码相同,主要是后面的调整操作,调整主要分为三种情况,我们先将插入逻辑的框架搭建起来,框架如下所示;
// 插入
bool insert(const std::pair<K, V> kv)
{
// 首次插入
if (_root == nullptr)
{
_root = new Node(kv);
_root->_color = BLACK;
return true;
}
Node* parent = nullptr;
Node* cur = _root;
while (cur)
{
if (kv.first < cur->_kv.first)
{
parent = cur;
cur = cur->_left;
}
else if (kv.first > cur->_kv.first)
{
parent = cur;
cur = cur->_right;
}
else
{
//有对应的key,返回false
return false;
}
}
// 找到插入位置了,插入数据
cur = new Node(kv);
if (kv.first < parent->_kv.first)
{
parent->_left = cur;
}
else
{
parent->_right = cur;
}
cur->_parent = parent;
// 以下为调整代码......暂未填充
// .......
return true;
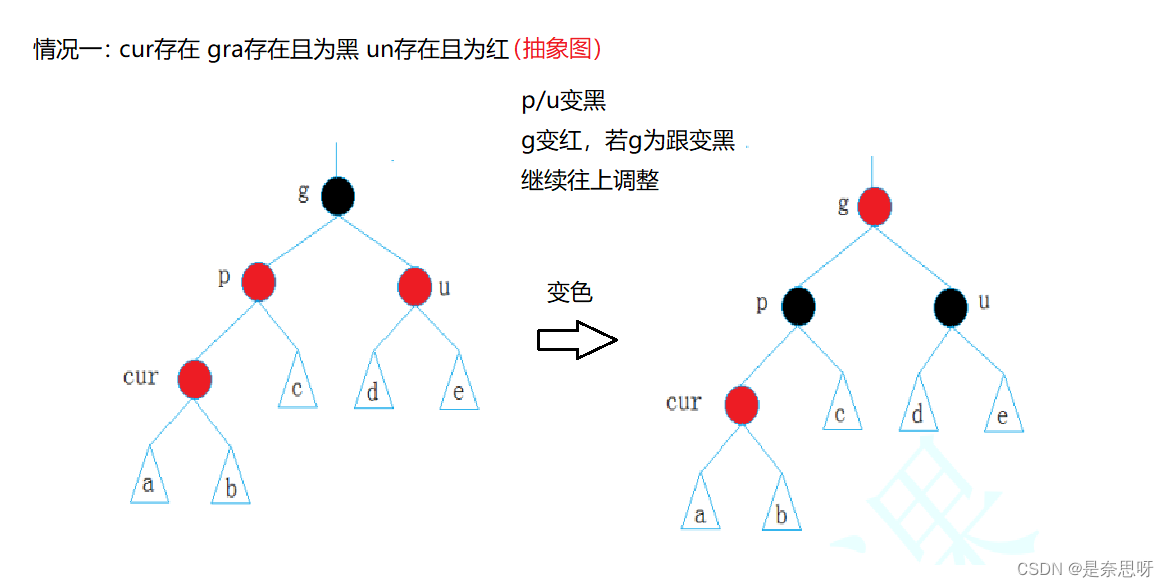
}接下来我带着大家逐步分析以下的三种情况;情况一是cur为红,parent为红,grandfather为黑,uncle为红,以下分别简称为c、p、g、u;
注意:我们举例三种情况均为parent为grandfather的左孩子,右孩子的情况与左孩子类似;
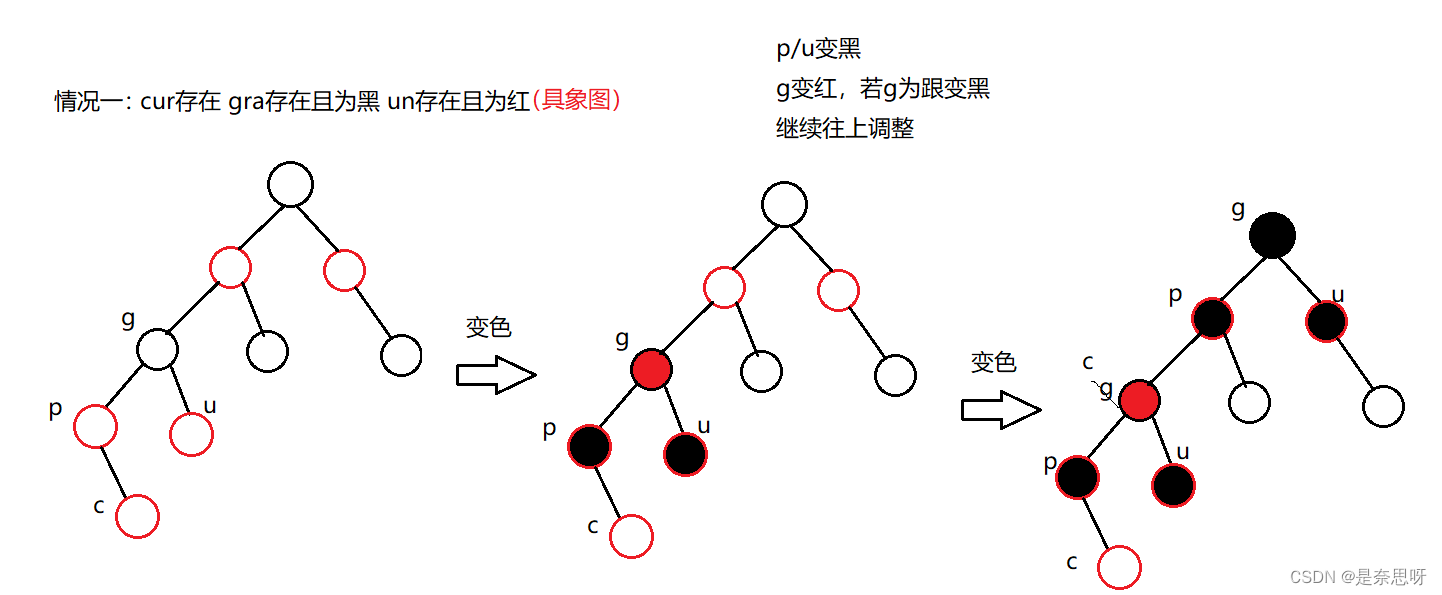
以下为具象图,这种情况可以一只沿着祖父往上调整,可能会调整几次,如下就调整了两次;
接着就是情况二,情况二看起来分为两种,实际就是一种情况,以下分别情况二的两种具象图;
注意:情况二调整完以后直接退出循环,无需继续往上调整;
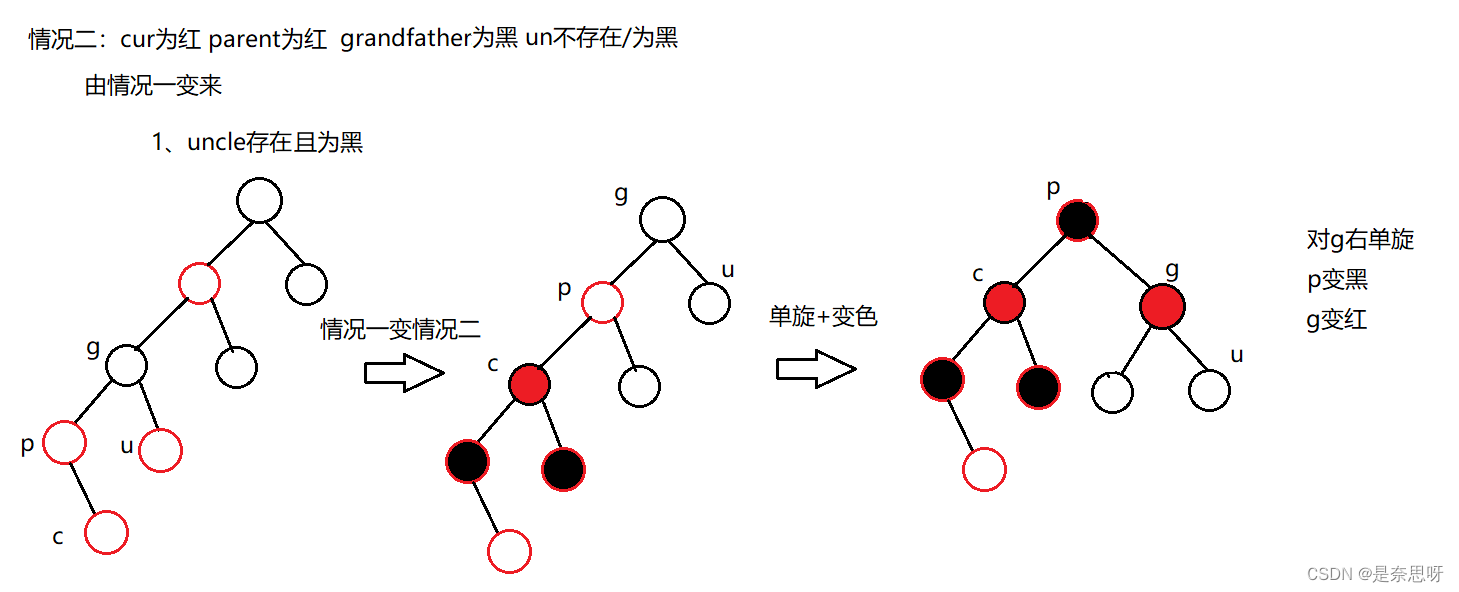

这里的右单旋就是我们前面AVL树的右单旋,代码也一模一样;如果parent是grandfather的左边就是左单旋,所以上面说我们进分析一边即可;
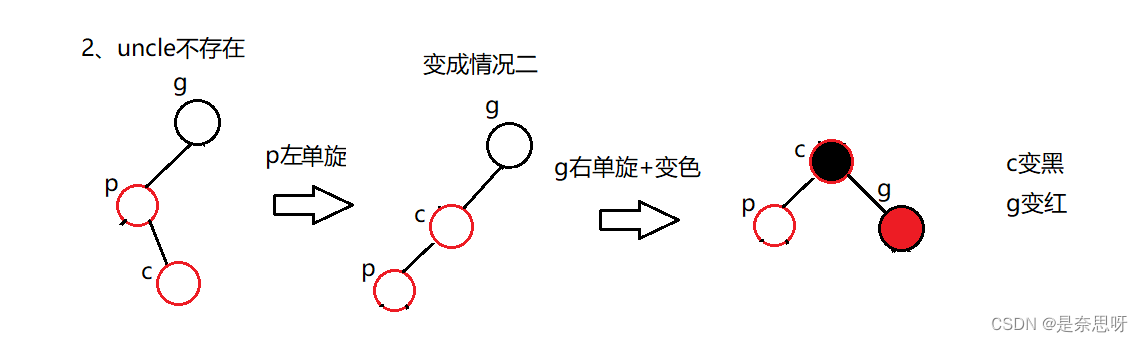
情况三实则是由情况一变成的,我们可以把情况三变成情况二,进行处理,因为cur的位置不同,而必须进行双旋;
注意:情况三调整完以后直接退出循环,无需继续往上调整;

上述就是三种调整方式,我们根据上图可写出如下代码;
		// 插入
		bool insert(const std::pair<K, V> kv)
		{
			// 首次插入
			if (_root == nullptr)
			{
				_root = new Node(kv);
				_root->_color = BLACK;
				return true;
			}
			Node* parent = nullptr;
			Node* cur = _root;
			while (cur)
			{
				if (kv.first < cur->_kv.first)
				{
					parent = cur;
					cur = cur->_left;
				}
				else if (kv.first > cur->_kv.first)
				{
					parent = cur;
					cur = cur->_right;
				}
				else
				{
					//有对应的key,返回false
					return false;
				}
			}
			// 找到插入位置了,插入数据
			cur = new Node(kv);
			if (kv.first < parent->_kv.first)
			{
				parent->_left = cur;
			}
			else
			{
				parent->_right = cur;
			}
			cur->_parent = parent;
			// 调整
			while (parent && parent->_color == RED)
			{
				// grandfather必然存在,不用判空,因为parent为红,不可能为根
				Node* grandfather = parent->_parent;
				if (grandfather->_left == parent)
				{
					// 情况一 uncle 存在且为红
					Node* uncle = grandfather->_right;
					if (uncle && uncle->_color == RED)
					{
						// 直接变色
						grandfather->_color = RED;
						parent->_color = BLACK;
						uncle->_color = BLACK;
						// 继续向上调整
						cur = grandfather;
						parent = cur->_parent;
					}
					else // 情况二 + 情况三
					{
						// 情况二
						if (parent->_left == cur)
						{
							rotateR(grandfather);
							parent->_color = BLACK;
							grandfather->_color = RED;
						}
						else // 情况三
						{
							rotateL(parent);
							rotateR(grandfather);
							cur->_color = BLACK;
							grandfather->_color = RED;
						}
						break;
					}
				}
				else // grandfather->right == parent
				{
					Node* uncle = grandfather->_left;
					// 情况一
					if (uncle && uncle->_color == RED)
					{
						// 变色
						parent->_color = BLACK;
						uncle->_color = BLACK;
						grandfather->_color = RED;
						// 继续像上调整
						cur = grandfather;
						parent = cur->_parent;
					}
					else // 情况二 + 情况三
					{
						// 情况二
						if (parent->_right == cur)
						{
							rotateL(grandfather);
							grandfather->_color = RED;
							parent->_color = BLACK;
						}
						else
						{
							rotateR(parent);
							rotateL(grandfather);
							cur->_color = BLACK;
							grandfather->_color = RED;
						}
						break;
					}
				}
				// 上面可能会将root改为红色
				_root->_color = BLACK;
			}
			return true;
		}
补充一下我们的旋转代码;
		void rotateL(Node* parent)
		{
			Node* subR = parent->_right;
			Node* subRL = subR->_left;
			// subRL挂在parent的右边
			parent->_right = subRL;
			if (subRL)
				subRL->_parent = parent;

			// 提前保存parent的父亲结点
			Node* pparent = parent->_parent;

			// parent挂到subR的左边
			subR->_left = parent;
			parent->_parent = subR;

			// 将subR与上层链接
			if (_root == parent)
			{
				_root = subR;
				subR->_parent = nullptr;
			}
			else
			{
				if (pparent->_left == parent)
				{
					pparent->_left = subR;
					subR->_parent = pparent;
				}
				else
				{
					pparent->_right = subR;
					subR->_parent = pparent;
				}
			}
		}

		void rotateR(Node* parent)
		{
			Node* subL = parent->_left;
			Node* subLR = subL->_right;
			// 将subLR挂到parent的左边
			parent->_left = subLR;
			if (subLR)
				subLR->_parent = parent;

			// 提前保存parent的父亲结点
			Node* pparent = parent->_parent;

			// 将parent挂到subL的右边
			subL->_right = parent;
			parent->_parent = subL;

			// 将这颗子树的根结点与上面结点链接
			if (parent == _root)
			{
				_root = subL;
				subL->_parent = nullptr;
			}
			else
			{
				if (pparent->_left == parent)
				{
					pparent->_left = subL;
					subL->_parent = pparent;
				}
				else
				{
					pparent->_right = subL;
					subL->_parent = pparent;
				}
			}
		}
6、二叉树的拷贝构造与析构
二叉树的拷贝构造我们通过先序的方式进行拷贝构造;
		RBTree(const RBTree& rbt)
		{
			if (this != &rbt)
			{
				_root = _construction(rbt._root, nullptr);
			}
		}
		Node* _construction(Node* root, Node* parent)
		{
			if (root == nullptr)
				return nullptr;

			Node* newroot = new Node(root->_val);
			newroot->_color = root->_color;
			newroot->_parent = parent;
			parent = newroot;
			newroot->_left = _construction(root->_left, parent);
			newroot->_right = _construction(root->_right, parent);
			return newroot;
		}
二叉树的析构我们则需用类似后序遍历的方式进行逐个结点析构;
		~RBTree()
		{
			destruction(_root);
		}
		void destruction(Node* root)
		{
			if (root == nullptr)
				return;
			destruction(root->_left);
			destruction(root->_right);
			delete root;
		}
7、红黑树的检测
前面代码我们完成了对红黑树的各种操作,现在我们来检测一下我们的红黑树是否为正确的红黑树;具体代码如下;
		void inorder()
		{
			_inorder(_root);
			std::cout << std::endl;
		}

		bool is_balance()
		{
			if (_root->_color == RED)
				return false;
			int maxBlackNode = -1;
			return _is_balance(_root, 0, maxBlackNode);
		}

		int height()
		{
			return _height(_root);
		}

		int _height(Node* root)
		{
			if (root == nullptr)
			{
				return 0;
			}
			int left_height = _height(root->_left);
			int right_height = _height(root->_right);
			return left_height > right_height ? left_height + 1 : right_height + 1;
		}

		bool _is_balance(Node* root, int curBlackNode, int& maxBlackNode)
		{
			if (root == nullptr)
			{
				// 首次进入更新最大黑节点数量
				if (maxBlackNode == -1)
				{
					maxBlackNode = curBlackNode;
					//cout << "黑色结点个数:" << maxBlackNode << endl;
				}

				if (curBlackNode != maxBlackNode)
				{
					cout << "路径上的黑色结点数量不一致" << endl;
					return false;
				}
				//cout << curBlackNode << endl;
				return true;
			}

			if (root->_color == BLACK)
			{
				curBlackNode++;
			}

			if (root->_color == RED && root->_parent->_color == RED)
			{
				//cout << root->_parent->_kv.first << "颜色异常" << endl;
				return false;
			}
			return _is_balance(root->_left, curBlackNode, maxBlackNode)
                && _is_balance(root->_right, curBlackNode, maxBlackNode);
		}

		void _inorder(Node* root)
		{
			if (root == nullptr)
				return;
			_inorder(root->_left);
			cout << KeyOfT()(root->_val) << " ";
			_inorder(root->_right);
		}
我们可以通过如上的is_balance函数检测红黑树是否有误,如果还不放心我们可以通过如下代码进行测试;同时也对比了与AVL树的差别;
void test_RBTree2()
{
	srand((unsigned int)time(nullptr));
	const int N = 1000000;
	MySpace::RBTree<int, int> rb1;
	MySpace::AVLTree<int, int> avl1;
	for (int i = 0; i < N; i++)
	{
		int num = rand() + i;
		rb1.insert(make_pair(num, num));
		avl1.insert(make_pair(num, num));
	}
	cout << "RB max height :" << rb1.height() << endl;
	cout << "RB is balance :" << rb1.is_balance() << endl;

	cout << "AVL max height :" << avl1.height() << endl;
	cout << "AVL is balance :" << avl1.is_balance() << endl;
}
8、红黑树总结
有人发现我们红黑树并没有AVL树那样完全平衡,那么红黑树的意义是什么呢?实际上,我们的map与set都是使用红黑树来进行封装的,那么有的小伙伴就疑惑了,那么为什么不用AVL树进行封装呢?AVL树不是更加平衡,搜索效率更高么?实际上的确如此,搜索效率,有时候红黑树确实不如AVL树,可是我们不能但从查找来评判一棵树的好坏,我们的红黑树总体效率实际上要比我们的AVL树高的,因为我们的红黑树不是绝对平衡的,因此我们旋转的次数并不会有AVL树那么频繁,总体效率是比AVL树高的;
二、map与set的封装
实际上,我们的map与set仅仅只是套了一层红黑树的外壳接下来,我们稍稍修改上述的红黑树,对map与set完成封装;
1、红黑树的结点
这里的模板参数变成了T,当我们的set来的时候,传入的是Key,当我们的map来的时候传入的是pair<Key, Value>;
	template<class T>
	struct RBTreeNode
	{
		RBTreeNode(const T& val)
			:_left(nullptr)
			, _right(nullptr)
			, _parent(nullptr)
			, _color(RED)
			, _val(val)
		{}

		RBTreeNode<T>* _left;
		RBTreeNode<T>* _right;
		RBTreeNode<T>* _parent;
		Color _color;
		T _val;
	};
2、红黑树迭代器
我们要实现map与set的迭代器,就得先实现红黑树的迭代器;
	template<class T, class Ref, class Ptr>
	struct RBTree_iterator
	{
		typedef RBTreeNode<T> Node;
		typedef RBTree_iterator<T, Ref, Ptr> Self;
		typedef RBTree_iterator<T, T&, T*> iterator;
		RBTree_iterator(Node* node)
			:_node(node)
		{}
		// 1、如果该类是普通迭代器,则作用为拷贝构造
		// 2、如果该类是const迭代器,则作用为用普通迭代器取构造const迭代器
		RBTree_iterator(const iterator& it)
			:_node(it._node)
		{}

		Ref operator*()
		{
			return _node->_val;
		}

		Ptr operator->()
		{
			return &_node->_val;
		}

		bool operator!=(const Self& it)
		{
			return _node != it._node;
		}

		Self& operator++()
		{
			Node* cur = _node;
			if(cur)
			{
				if (cur->_right != nullptr)
				{
					// 右子树的最左节点
					cur = cur->_right;
					while (cur->_left)
					{
						cur = cur->_left;
					}
					_node = cur;
				}
				else
				{
					// 找当前结点是父亲左结点的父亲
					Node* parent = cur->_parent;
					while (parent && parent->_right == cur)
					{
						cur = parent;
						parent = parent->_parent;
					}
					_node = parent;
				}
			}
			return *this;
		}
		Self& operator--()
		{
			Node* cur = _node;
			if (cur)
			{
				if (cur->_left != nullptr)
				{
					// 左子树的最右结点
					Node* subR = cur->_left;
					while (subR->_right)
					{
						subR = subR->_right;
					}
					_node = subR;
				}
				else
				{
					// 找当前结点是父亲的右节点的父亲
					Node* parent = cur->_parent;
					while (parent && parent->_left)
					{
						parent = parent->_parent;
					}
					_node = parent;
				}
			}
			return *this;
		}

		Node* _node;
	};
3、set的封装
接下来我们仅仅只需要将红黑树封装成set即可,直接套一层外壳;
	template<class Key, class Value>
	struct SetKeyOfT
	{
		const Key& operator()(const Value& val)
		{
			return val;
		}
	};

	template<class Key>
	class set
	{
	public:
		typedef Key key_type;
		typedef Key value_type;
		typedef RBTree<key_type, value_type, SetKeyOfT<key_type, value_type>> Tree;

		typedef typename RBTree<key_type, value_type, SetKeyOfT<key_type, value_type>>::const_iterator iterator;
		typedef typename RBTree<key_type, value_type, SetKeyOfT<key_type, value_type>>::const_iterator const_iterator;

		pair<iterator, bool> insert(const value_type& val)
		{
			return _t.insert(val);
		}

		iterator begin()
		{
			return _t.begin();
		}
		iterator end()
		{
			return _t.end();
		}

		const_iterator begin() const
		{
			return _t.begin();
		}
		const_iterator end() const
		{
			return _t.end();
		}

	private:
		Tree _t;
	};
解释一下这里的KeyOfT,这里只是一个仿函数,我们仅仅想通过这个取出Key值,因为红黑树的T也不确定是Key还是KeyValue模型;
注意:由于set的结点中的Key在树中不能被修改,因此这里set的普通迭代器和const迭代器都是红黑树的const迭代器;
4、map的封装
map的封装同样如此,我们仅仅只是套了一层红黑树的外壳;
	template<class Key, class T>
	struct MapKeyOfT
	{
		const Key& operator()(const T& val)
		{
			return val.first;
		}
	};

	template<class Key, class Value>
	class map
	{
	public:
		typedef Key key_type;
		typedef std::pair<Key, Value> value_type;
		typedef RBTree<const Key, value_type, MapKeyOfT<key_type, value_type>> Tree;

		typedef typename RBTree<const key_type, value_type, MapKeyOfT<key_type, value_type>>::iterator iterator;
		typedef typename RBTree<const key_type, value_type, MapKeyOfT<key_type, value_type>>::const_iterator const_iterator;

		iterator begin()
		{
			return _t.begin();
		}
		iterator end()
		{
			return _t.end();
		}

		const_iterator begin() const
		{
			return _t.begin();
		}
		const_iterator end() const
		{
			return _t.end();
		}

		std::pair<iterator, bool> insert(const value_type& val)
		{
			return _t.insert(val);
		}


	private:
		Tree _t;
	};
三、源码仓库
关于红黑树、map与set的所有源码小编都放进代码仓库中供大家参考;以下为源码仓库;