目录
PS:纯粹为学习分享经验,不参与商用价值运作,若有侵权请及时联系!!!
前言:
OpenVINO工具套件全称是Open Visual Inference & Neural Network Optimization,是Intel于2018年发布的,开源、商用免费、主要应用于计算机视觉、实现神经网络模型优化和推理计算(Inference)加速的软件工具套件。由于其商用免费,且可以把深度学习模型部署在英尔特CPU和集成GPU上,大大节约了显卡费用,所以越来越多的深度学习应用都使用OpenVINO工具套件做深度学习模型部署。
OpenVINO是一个开源工具包,可优化和部署深度学习模型。其支持流行框架如TensorFlow、PyTorch等。

其最大特点:可以优化几乎任何框架的深度学习模型,并在各种英特尔处理器和其他硬件平台上以最佳性能进行部署。OpenVINO Runtime可以自动使用激进的图形融合、内存重用、负载平衡和跨CPU、GPU、VPU等进行集成并行处理,以优化深度学习流水线。
对于AI工作负载来说,OpenVINO提供了深度学习推理套件(DLDT),该套件可以将各种开源框架训练好的模型进行线上部署,除此之外,还包含了图片处理工具包OpenCV,视频处理工具包Media SDK,用于处理图像视频解码,前处理和推理结果后处理等。
OpenVino目前支持Linux、Windows、macOS、Raspbian等系统平台。
一、安装OpenVINO
参考链接:
(264条消息) 【OpenVINO】OpenVINO 2022.1 安装教程(Windows)openvino安装椒颜皮皮虾྅的博客-CSDN博客
(264条消息) OpenVINO 2022.3之三:Linux安装OpenVINO_linux 安装openvino_mingo_敏的博客-CSDN博客
二、OpenVINO 核心组件和运行流程
OpenVINO工具套件主要包括:Model Optimizer(模型优化器)——用于优化神经网络模型的工具,Inference Engine(推理引擎)——用于加速推理计算的软件包。

mo是Intel OpenVINO工具包中的一个命令行工具,全称为Model Optimizer。它用于将训练好的深度学习模型转换为OpenVINO推理引擎可用的中间表示形式,以便在目标设备上进行推理。Model Optimizer支持多种深度学习框架,包括TensorFlow、Caffe、MXNet、ONNX等,并提供了多种优化选项,如量化、剪枝、融合等,以提高推理性能和减小模型大小。
推理引擎是一个支持C\C++和python的一套API接口,需要开发人员自己实现推理过程的开发,开发流程其实非常的简单,核心流程如下:

整个开发流程可以分为数据处理模块定义、前处理任务、推理任务、后处理任务四部分组成。
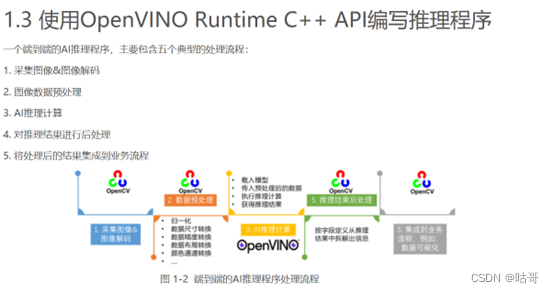
具体而言,开发流程其实非常的简单,核心流程如下:
1.装载处理器的插件库
2.读取网络结构和权重
3.配置前后处理操作
4.装载模型到设备
5.创建推理请求
6.准备输入Data
7.推理
8.结果处理
三、OpenVINO 部署案例
主要步骤有:
- 初始化Core类
- 编译模型
- 创建推理请求infer_request
- 读取图像数据并做预处理
- 将预处理后的blob数据传入模型输入节点
- 调用infer()方法执行推理计算
- 获得推理结果
以下分别提供模板框架:
Python 实现:
import cv2
import numpy as np
from openvino.inference_engine import IENetwork, IECore

# 定义模型和权重路径
model_xml = "path/to/model.xml"
model_bin = "path/to/model.bin"

# 初始化IECore对象
ie = IECore()

# 读取IR模型
net = IENetwork(model=model_xml, weights=model_bin)

# 获取输入和输出的节点名称
input_blob = next(iter(net.inputs))
out_blob = next(iter(net.outputs))

# 加载IR模型到设备上
exec_net = ie.load_network(network=net, device_name="CPU")

# 读取输入图像
image = cv2.imread("path/to/image.jpg")

# 对输入图像进行预处理
n, c, h, w = net.inputs[input_blob].shape
image = cv2.resize(image, (w, h))
image = image.transpose((2, 0, 1))
image = image.reshape((n, c, h, w))

# 执行推理
res = exec_net.infer(inputs={input_blob: image})

# 解析输出结果
boxes = res[out_blob][0][0]
for box in boxes:
    if box[2] > 0.5:
        x_min = int(box[3] * image.shape[3])
        y_min = int(box[4] * image.shape[2])
        x_max = int(box[5] * image.shape[3])
        y_max = int(box[6] * image.shape[2])
        cv2.rectangle(image, (x_min, y_min), (x_max, y_max), (0, 255, 0), 2)

# 显示结果图像
cv2.imshow("Result", image)
cv2.waitKey(0)
cv2.destroyAllWindows()
C++ 代码实现:
#include <iostream>
#include <opencv2/opencv.hpp>
#include <inference_engine.hpp>

using namespace std;
using namespace cv;
using namespace InferenceEngine;

int main() {
    // 定义模型和权重路径
    string model_xml = "path/to/model.xml";
    string model_bin = "path/to/model.bin";

    // 初始化InferenceEngine对象
    Core ie;

    // 读取IR模型
    CNNNetwork network = ie.ReadNetwork(model_xml, model_bin);

    // 获取输入和输出的节点名称
    InputsDataMap input_info(network.getInputsInfo());
    InputInfo::Ptr& input = input_info.begin()->second;
    string input_name = input_info.begin()->first;

    OutputsDataMap output_info(network.getOutputsInfo());
    DataPtr& output = output_info.begin()->second;
    string output_name = output_info.begin()->first;

    // 加载IR模型到设备上
    ExecutableNetwork executable_network = ie.LoadNetwork(network, "CPU");

    // 读取输入图像
    Mat image = imread("path/to/image.jpg");

    // 对输入图像进行预处理
    Size input_size = input->getTensorDesc().getDims()[3], input->getTensorDesc().getDims()[2];
    Mat input_blob = blobFromImage(image, 1.0, input_size, Scalar(0, 0, 0), false, false);

    Blob::Ptr input_data = make_shared<TBlob<uint8_t>>(input->getTensorDesc(), input_blob.data, input_blob.total() * sizeof(uint8_t));

    // 执行推理
    InferRequest infer_request = executable_network.CreateInferRequest();
    infer_request.SetInput(input_name, input_data);
    infer_request.Infer();

    // 解析输出结果
    Blob::Ptr output_data = infer_request.GetBlob(output_name);
    const float* detection = static_cast<PrecisionTrait<Precision::FP32>::value_type*>(output_data->buffer());

    for (int i = 0; i < output_data->size(); i += 7) {
        float confidence = detection[i + 2];
        if (confidence > 0.5) {
            int x_min = static_cast<int>(detection[i + 3] * image.cols);
            int y_min = static_cast<int>(detection[i + 4] * image.rows);
            int x_max = static_cast<int>(detection[i + 5] * image.cols);
            int y_max = static_cast<int>(detection[i + 6] * image.rows);
            rectangle(image, Point(x_min, y_min), Point(x_max, y_max), Scalar(0, 255, 0), 2);
        }
    }

    // 显示结果图像
    imshow("Result", image);
    waitKey(0);
    destroyAllWindows();

    return 0;
}
根据上述流程可以进行实操,使用OpenVINO部署一个深度学习目标检测模型。
使用 OpenVINO™ Runtime API 开发 YOLOv5 的同步推理程序
参考链接:基于OpenVINO在C++中部署YOLOv5模型 | 51OpenLab-一站式ICT创新服务平台
先归纳实现流程:
\1. 模型导出为onnx
1.1 onnx文件导出
1.2 yolov5 onnx文件的导出
参考:新版本新教程 | 基于 OpenVINO™ 2022.2 和蝰蛇峡谷优化并部署 YOLOv5 模型
\2. 模型部署框架选择
2.1 onnxruntime 推理引擎
2.1.1 安装onnxruntime
2.1.2 推理实现
2.2 openvino 推理引擎
\3. 图像预处理
\4. 后处理
4.1 获得推理结果
4.2 后处理decode box
4.3 NMS
四、OpenVINO 部署YOLO案例
回顾上述内容:利用openvino进行AI推理计算
主要步骤有:
\1. 初始化Core类
\2. 编译模型
\3. 创建推理请求infer_request
\4. 读取图像数据并做预处理
\5. 将预处理后的blob数据传入模型输入节点
\6. 调用infer()方法执行推理计算
\7. 获得推理结果
// -------- Step 1. Initialize OpenVINO Runtime Core --------

    ov::Core core;

    // -------- Step 2. Compile the Model --------

    auto compiled_model = core.compile_model(model_file, "CPU"); //GPU.1 is dGPU A770

    // -------- Step 3. Create an Inference Request --------

    ov::InferRequest infer_request = compiled_model.create_infer_request();

    // -------- Step 4. Read a picture file and do the preprocess --------

    cv::Mat img = cv::imread(image_file); //Load a picture into memory

    std::vector<float> paddings(3);       //scale, half_h, half_w

    cv::Mat resized_img = letterbox(img, paddings); //resize to (640,640) by letterbox

    // BGR->RGB, u8(0-255)->f32(0.0-1.0), HWC->NCHW

    cv::Mat blob = cv::dnn::blobFromImage(resized_img, 1 / 255.0, cv::Size(640, 640), cv::Scalar(0, 0, 0), true);

    // -------- Step 5. Feed the blob into the input node of YOLOv5 -------

    // Get input port for model with one input

    auto input_port = compiled_model.input();

    // Create tensor from external memory

    ov::Tensor input_tensor(input_port.get_element_type(), input_port.get_shape(), blob.ptr(0));

    // Set input tensor for model with one input

    infer_request.set_input_tensor(input_tensor);

    // -------- Step 6. Start inference --------

    infer_request.infer();

    // -------- Step 7. Get the inference result --------

    auto output = infer_request.get_output_tensor(0);

    auto output_shape = output.get_shape();

    std::cout << "The shape of output tensor:"<<output_shape << std::endl;
为了更宏观地入门及学习流程,提供一份OpenVINO部署yolov5的一体式demo运行代码以供学习,实现视频流检测:
可直接配置好环境后运行:
C++代码:
#include <fstream>                   //C++ 文件操作
#include <iostream>                  //C++ input & output stream
#include <sstream>                   //C++ String stream, 读写内存中的string对象
#include <opencv2\opencv.hpp>        //OpenCV 头文件

#include <openvino\openvino.hpp>     //OpenVINO >=2022.1

using namespace std;
using namespace ov;
using namespace cv;

// COCO数据集的标签,可以根据自己的实际情况修改标签。
vector<string> class_names = { "person", "bicycle", "car", "motorbike", "aeroplane", "bus", "train", "truck", "boat", "traffic light","fire hydrant",
"stop sign", "parking meter", "bench", "bird", "cat", "dog", "horse", "sheep", "cow", "elephant", "bear", "zebra", "giraffe","backpack", "umbrella",
"handbag", "tie", "suitcase", "frisbee", "skis", "snowboard", "sports ball", "kite", "baseball bat", "baseball glove","skateboard", "surfboard",
"tennis racket", "bottle", "wine glass", "cup", "fork", "knife", "spoon", "bowl", "banana", "apple", "sandwich", "orange","broccoli", "carrot",
"hot dog", "pizza", "donut", "cake", "chair", "sofa", "pottedplant", "bed", "diningtable", "toilet", "tvmonitor", "laptop", "mouse","remote",
"keyboard", "cell phone", "microwave", "oven", "toaster", "sink", "refrigerator", "book", "clock", "vase", "scissors", "teddy bear", "hair drier", "toothbrush" };

//OpenVINO IR模型文件路径(修改为自己的yolov5s.xml路径)
string ir_filename = "D:/chenhan/opencv_tutorial_data-master/models/yolov5/yolov5s.xml";

// @brief 对网络的输入为图片数据的节点进行赋值,实现图片数据输入网络
// @param input_tensor 输入节点的tensor
// @param inpt_image 输入图片数据
void fill_tensor_data_image(ov::Tensor& input_tensor, const cv::Mat& input_image) {
	// 获取输入节点要求的输入图片数据的大小
	ov::Shape tensor_shape = input_tensor.get_shape();
	const size_t width = tensor_shape[3]; // 要求输入图片数据的宽度
	const size_t height = tensor_shape[2]; // 要求输入图片数据的高度
	const size_t channels = tensor_shape[1]; // 要求输入图片数据的维度
	// 读取节点数据内存指针
	float* input_tensor_data = input_tensor.data<float>();
	// 将图片数据填充到网络中
	// 原有图片数据为 H、W、C 格式,输入要求的为 C、H、W 格式
	for (size_t c = 0; c < channels; c++) {
		for (size_t h = 0; h < height; h++) {
			for (size_t w = 0; w < width; w++) {
				input_tensor_data[c * width * height + h * width + w] = input_image.at<cv::Vec<float, 3>>(h, w)[c];
			}
		}
	}
}


int main(int argc, char** argv) {

	//1、创建OpenVINO Core
	Core core;
	CompiledModel compiled_model = core.compile_model(ir_filename, "AUTO");
	InferRequest infer_request = compiled_model.create_infer_request();

	//2、 预处理输入数据 - 格式化操作
	VideoCapture cap;
	cap.open(0);
	if (!cap.isOpened()) {
		cout << "Exit!webcam fails to open!" << endl;
		return -1;
	}

	// 3、获取输入节点tensor
	Tensor input_image_tensor = infer_request.get_tensor("images");
	int input_h = input_image_tensor.get_shape()[2]; //获得"images"节点的Height
	int input_w = input_image_tensor.get_shape()[3]; //获得"images"节点的Width
	cout << "input_h:" << input_h << "; input_w:" << input_w << endl;
	cout << "input_image_tensor's element type:" << input_image_tensor.get_element_type() << endl;
	cout << "input_image_tensor's shape:" << input_image_tensor.get_shape() << endl;
	// 4、获取输出节点tensor
	Tensor output_tensor = infer_request.get_tensor("output");
	int out_rows = output_tensor.get_shape()[1]; //获得"output"节点的out_rows
	int out_cols = output_tensor.get_shape()[2]; //获得"output"节点的Width
	cout << "out_cols:" << out_cols << "; out_rows:" << out_rows << endl;

	//连续采集处理循环
	while (true) {

		Mat frame;
		cap >> frame;

		int64 start = cv::getTickCount();
		int w = frame.cols;
		int h = frame.rows;
		int _max = std::max(h, w);
		cv::Mat image = cv::Mat::zeros(cv::Size(_max, _max), CV_8UC3);
		cv::Rect roi(0, 0, w, h);
		frame.copyTo(image(roi));

		float x_factor = image.cols / input_w;
		float y_factor = image.rows / input_h;

		cv::Mat blob_image;
		resize(image, blob_image, cv::Size(input_w, input_h));
		blob_image.convertTo(blob_image, CV_32F);
		blob_image = blob_image / 255.0;

		// 将图片数据填充到tensor数据内存中
		fill_tensor_data_image(input_image_tensor, blob_image);

		// 5、执行推理计算
		infer_request.infer();

		// 获得推理结果
		const ov::Tensor& output_tensor = infer_request.get_tensor("output");

		// 6、解析推理结果,YOLOv5 output format: cx,cy,w,h,score
		cv::Mat det_output(out_rows, out_cols, CV_32F, (float*)output_tensor.data());

		std::vector<cv::Rect> boxes;
		std::vector<int> classIds;
		std::vector<float> confidences;

		for (int i = 0; i < det_output.rows; i++) {
			float confidence = det_output.at<float>(i, 4);
			if (confidence < 0.4) {
				continue;
			}
			cv::Mat classes_scores = det_output.row(i).colRange(5, 85);
			cv::Point classIdPoint;
			double score;
			minMaxLoc(classes_scores, 0, &score, 0, &classIdPoint);

			// 置信度 0~1之间
			if (score > 0.5)
			{
				float cx = det_output.at<float>(i, 0);
				float cy = det_output.at<float>(i, 1);
				float ow = det_output.at<float>(i, 2);
				float oh = det_output.at<float>(i, 3);
				int x = static_cast<int>((cx - 0.5 * ow) * x_factor);
				int y = static_cast<int>((cy - 0.5 * oh) * y_factor);
				int width = static_cast<int>(ow * x_factor);
				int height = static_cast<int>(oh * y_factor);
				cv::Rect box;
				box.x = x;
				box.y = y;
				box.width = width;
				box.height = height;

				boxes.push_back(box);
				classIds.push_back(classIdPoint.x);
				confidences.push_back(score);
			}
		}
		// NMS
		std::vector<int> indexes;
		cv::dnn::NMSBoxes(boxes, confidences, 0.25, 0.45, indexes);
		for (size_t i = 0; i < indexes.size(); i++) {
			int index = indexes[i];
			int idx = classIds[index];
			cv::rectangle(frame, boxes[index], cv::Scalar(0, 0, 255), 2, 8);
			cv::rectangle(frame, cv::Point(boxes[index].tl().x, boxes[index].tl().y - 20),
				cv::Point(boxes[index].br().x, boxes[index].tl().y), cv::Scalar(0, 255, 255), -1);
			cv::putText(frame, class_names[idx], cv::Point(boxes[index].tl().x, boxes[index].tl().y - 10), cv::FONT_HERSHEY_SIMPLEX, .5, cv::Scalar(0, 0, 0));
		}

		// 计算FPS render it
		float t = (cv::getTickCount() - start) / static_cast<float>(cv::getTickFrequency());
		cout << "Infer time(ms): " << t * 1000 << "ms; Detections: " << indexes.size() << endl;
		putText(frame, cv::format("FPS: %.2f", 1.0 / t), cv::Point(20, 40), cv::FONT_HERSHEY_PLAIN, 2.0, cv::Scalar(255, 0, 0), 2, 8);
		cv::imshow("YOLOv5-6.1 + OpenVINO 2022.1 C++ Demo", frame);

		char c = cv::waitKey(1);
		if (c == 27) { // ESC
			break;
		}
	}

	cv::waitKey(0);
	cv::destroyAllWindows();

	return 0;
}
运行界面展示: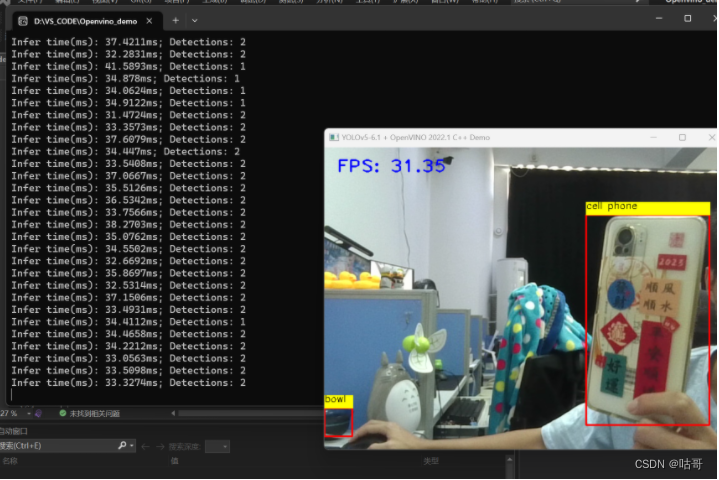
同样地,在Pycharm上下载配置好OpenVINO后,也可用对应的Python代码进行尝试:
import cv2
import numpy as np
from openvino.inference_engine import IECore

# COCO dataset labels
class_names = ["person", "bicycle", "car", "motorbike", "aeroplane", "bus", "train", "truck", "boat", "traffic light","fire hydrant",
"stop sign", "parking meter", "bench", "bird", "cat", "dog", "horse", "sheep", "cow", "elephant", "bear", "zebra", "giraffe","backpack", "umbrella",
"handbag", "tie", "suitcase", "frisbee", "skis", "snowboard", "sports ball", "kite", "baseball bat", "baseball glove","skateboard", "surfboard",
"tennis racket", "bottle", "wine glass", "cup", "fork", "knife", "spoon", "bowl", "banana", "apple", "sandwich", "orange","broccoli", "carrot",
"hot dog", "pizza", "donut", "cake", "chair", "sofa", "pottedplant", "bed", "diningtable", "toilet", "tvmonitor", "laptop", "mouse","remote",
"keyboard", "cell phone", "microwave", "oven", "toaster", "sink", "refrigerator", "book", "clock", "vase", "scissors", "teddy bear", "hair drier", "toothbrush"]

# OpenVINO IR model files
ir_filename = "D:/chenhan/opencv_tutorial_data-master/models/yolov5/yolov5s.xml"

# Function to fill tensor data with image
def fill_tensor_data_image(input_tensor, input_image):
    tensor_shape = input_tensor.shape
    width, height, channels = tensor_shape[3], tensor_shape[2], tensor_shape[1]
    input_tensor_data = input_tensor.data
    for c in range(channels):
        for h in range(height):
            for w in range(width):
                input_tensor_data[c * width * height + h * width + w] = input_image[h, w, c]

# Create OpenVINO Core
ie = IECore()
net = ie.read_network(model=ir_filename, weights=ir_filename.replace(".xml", ".bin"))
exec_net = ie.load_network(network=net, device_name="CPU", num_requests=1)

# Preprocess input data
cap = cv2.VideoCapture(0)
if not cap.isOpened():
    print("Exit! Webcam fails to open!")
    exit()

input_image_tensor = next(iter(net.input_info))
input_h, input_w = net.input_info[input_image_tensor].input_data.shape[2], net.input_info[input_image_tensor].input_data.shape[3]
print(f"input_h: {input_h}; input_w: {input_w}")
print(f"input_image_tensor's element type: {net.input_info[input_image_tensor].precision}")
print(f"input_image_tensor's shape: {net.input_info[input_image_tensor].input_data.shape}")

output_image_tensor = next(iter(net.outputs))
out_rows, out_cols = net.outputs[output_image_tensor].shape[2], net.outputs[output_image_tensor].shape[3]
print(f"out_cols: {out_cols}; out_rows: {out_rows}")

while True:
    ret, frame = cap.read()

    if not ret:
        print("Failed to grab frame")
        break

    start = cv2.getTickCount()
    h, w = frame.shape[:2]
    _max = max(h, w)
    image = np.zeros((_max, _max, 3), dtype=np.uint8)
    image[:h, :w] = frame

    x_factor, y_factor = image.shape[1] / input_w, image.shape[0] / input_h

    blob_image = cv2.resize(image, (input_w, input_h)).astype(np.float32) / 255.0

    # Fill image data into the input tensor
    fill_tensor_data_image(exec_net.requests[0].input_blobs[input_image_tensor], blob_image)

    # Perform inference
    exec_net.requests[0].infer()

    # Get inference results
    output_tensor = exec_net.requests[0].output_blobs[output_image_tensor]
    det_output = output_tensor.buffer

    boxes, classIds, confidences = [], [], []

    for i in range(det_output.shape[0]):
        confidence = det_output[i, 4]
        if confidence < 0.4:
            continue
        classes_scores = det_output[i, 5:85]
        classIdPoint = np.argmax(classes_scores)
        score = classes_scores[classIdPoint]

        if score > 0.5:
            cx, cy, ow, oh = det_output[i, :4]
            x = int((cx - 0.5 * ow) * x_factor)
            y = int((cy - 0.5 * oh) * y_factor)
            width = int(ow * x_factor)
            height = int(oh * y_factor)
            box = (x, y, width, height)
            boxes.append(box)
            classIds.append(classIdPoint)
            confidences.append(score)

    # Non-maximum suppression
    indexes = cv2.dnn.NMSBoxes(boxes, confidences, 0.25, 0.45)

    for i in indexes:
        i = i[0]
        idx = classIds[i]
        x, y, width, height = boxes[i]
        cv2.rectangle(frame, (x, y), (x + width, y + height), (0, 0, 255), 2)
        cv2.rectangle(frame, (x, y - 20), (x + width, y), (0, 255, 255), -1)
        cv2.putText(frame, class_names[idx], (x, y - 10), cv2.FONT_HERSHEY_SIMPLEX, 0.5, (0, 0, 0))

    t = (cv2.getTickCount() - start) / cv2.getTickFrequency()
    print(f"Infer time(ms): {t * 1000:.2f}ms; Detections: {len(indexes)}")
    cv2.putText(frame, f"FPS: {1.0 / t:.2f}", (20, 40), cv2.FONT_HERSHEY_PLAIN, 2.0, (255, 0, 0), 2)
    cv2.imshow("YOLOv5-6.1 + OpenVINO 2022.1 Python Demo", frame)

    key = cv2.waitKey(1)
    if key == 27:  # ESC
        break

cv2.destroyAllWindows()
总结:
OpenVINO旨在加速计算机视觉和深度学习应用的推理。它提供了一系列优化算法和预训练模型,以及用于模型转换和推理的 API。OpenVINO 支持多种类型的 Intel 硬件,包括 CPU、GPU、FPGA 和 VPU,使得它非常适用于边缘计算场景。通过硬件加速和模型优化,OpenVINO 能够大大提高视觉识别、目标检测和其他计算密集型任务的性能,同时降低功耗和延迟。这使得它在工业自动化、安防监控、医疗图像分析等多个领域具有广泛的应用前景。