Android的四种基本布局
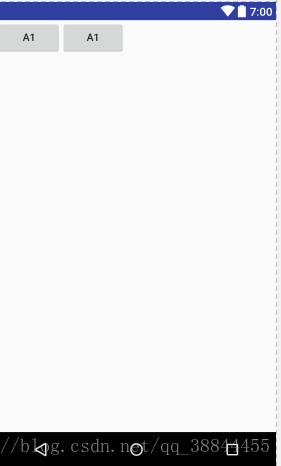
1.LinearLayout线性布局
线性布局具有垂直方向与水平方向的布局方式,通过设置属性“android:orientation”控制方向,
属性值垂直(vertical)和水平(horizontal),默认水平方向。
android:gravity:内部控件对齐方式,常用属性值有center、center_vertical、center_horizontal、top、bottom、left、right等。
这个属性在布局组件RelativeLayout、TableLayout中也有使用,FrameLayout、AbsoluteLayout则没有这个属性。
center:居中显示,这里并不是表示显示在LinearLayout的中心,当LinearLayout线性方向为垂直方向时,
center表示水平居中,但是并不能垂直居中,此时等同于center_horizontal的作用;同样当线性方向为水平方向时,center表示垂直居中,等同于center_vertical。
top、bottom、left、right为内部控件居顶、低、左、右布局。
android:layout_weight:权重,用来分配当前控件在剩余空间的大小。
代码如下:
<LinearLayout xmlns:android="http://schemas.android.com/apk/res/android"
xmlns:app="http://schemas.android.com/apk/res-auto"
xmlns:tools="http://schemas.android.com/tools"
android:layout_width="match_parent"
android:layout_height="match_parent"
tools:context="com.example.asus.myapplication.ListActivity">
<TextView
android:id="@+id/textView4"
android:layout_width="wrap_content"
android:layout_height="wrap_content"
android:layout_weight="1"
android:text="<LinearLayout xmlns:android="http://schemas.android.com/apk/res/android"
 xmlns:app="http://schemas.android.com/apk/res-auto"
 xmlns:tools="http://schemas.android.com/tools"
 android:layout_width="match_parent"
 android:layout_height="match_parent"
 tools:context="com.example.asus.myapplication.ListActivity">

 <Button
 android:layout_width="wrap_content"
 android:layout_height="wrap_content"
 android:id="@+id/list"
 android:text="a1">

 <Button
 android:layout_width="wrap_content"
 android:layout_height="wrap_content"
 android:id="@+id/list1"
 android:text="a1">" />
<Button
android:layout_width="wrap_content"
android:layout_height="wrap_content"
android:id="@+id/list"
android:text="a1">
<Button
android:layout_width="wrap_content"
android:layout_height="wrap_content"
android:id="@+id/list1"
android:text="a1">
</Button>
</LinearLayout >
`
2.RelativeLayout相对布局
相对布局可以让子控件相对于兄弟控件或父控件进行布局,可以设置子控件相对于兄弟控件
或父控件进行上下左右对齐。
RelativeLayout能替换一些嵌套视图,当我们用LinearLayout来实现一个简单的布局但又使用了过多的嵌套时,
就可以考虑使用RelativeLayout重新布局。
RelativeLayout中子控件常用属性:
1、相对于父控件,例如:android:layout_alignParentTop=“true”
android:layout_alignParentTop 控件的顶部与父控件的顶部对齐;
android:layout_alignParentBottom 控件的底部与父控件的底部对齐;
android:layout_alignParentLeft 控件的左部与父控件的左部对齐;
android:layout_alignParentRight 控件的右部与父控件的右部对齐;
2、相对给定Id控件,例如:android:layout_above=“@id/**”
android:layout_above 控件的底部置于给定ID的控件之上;
android:layout_below 控件的底部置于给定ID的控件之下;
android:layout_toLeftOf 控件的右边缘与给定ID的控件左边缘对齐;
android:layout_toRightOf 控件的左边缘与给定ID的控件右边缘对齐;
android:layout_alignBaseline 控件的baseline与给定ID的baseline对齐;
android:layout_alignTop 控件的顶部边缘与给定ID的顶部边缘对齐;
android:layout_alignBottom 控件的底部边缘与给定ID的底部边缘对齐;
android:layout_alignLeft 控件的左边缘与给定ID的左边缘对齐;
android:layout_alignRight 控件的右边缘与给定ID的右边缘对齐;
3、居中,例如:android:layout_centerInParent=“true”
android:layout_centerHorizontal 水平居中;
android:layout_centerVertical 垂直居中;
android:layout_centerInParent 父控件的中央;
<?xml version="1.0" encoding="utf-8"?>
<RelativeLayout xmlns:android="http://schemas.android.com/apk/res/android"
    android:layout_width="match_parent"
    android:layout_height="match_parent"
    android:orientation="vertical">

    <TextView
        style="@style/btn_relative"

        android:text="1" />

    <TextView
        style="@style/btn_relative"

        android:text="2" />

    <TextView
        android:id="@+id/txt_center"
        style="@style/btn_relative"

        android:layout_centerInParent="true"

        android:text="3" />

    <TextView
        style="@style/btn_relative"

        android:layout_alignParentBottom="true"

        android:text="4" />

    <TextView
        style="@style/btn_relative"

        android:layout_below="@id/txt_center"
        android:background="#d0d9ff"

        android:text="5" />

    <TextView
        style="@style/btn_relative"

        android:layout_alignBottom="@+id/txt_center"

        android:text="6" />

    <TextView
        style="@style/btn_relative"

        android:layout_marginLeft="150dp"

        android:text="7" />

    <TextView
        style="@style/btn_relative"

        android:layout_centerVertical="true"
        android:layout_marginLeft="100dp"
        android:layout_toRightOf="@id/txt_center"

        android:text="8" />
</RelativeLayout>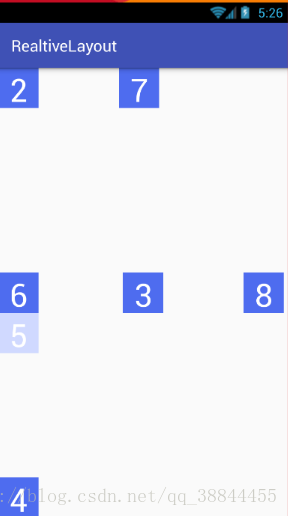
3.FrameLayout帧布局
帧布局或叫层布局,从屏幕左上角按照层次堆叠方式布局,后面的控件覆盖前面的控件。
<?xml version="1.0" encoding="utf-8"?>
<FrameLayout xmlns:android="http://schemas.android.com/apk/res/android"
    android:layout_width="match_parent"
    android:layout_height="match_parent"
    android:orientation="vertical">
    <TextView
        android:layout_width="wrap_content"
        android:layout_height="wrap_content"
        android:textSize="100dp"
        android:textColor="#9c27b0"
        android:text="第一层"/>
    <TextView
        android:layout_width="wrap_content"
        android:layout_height="wrap_content"
        android:textSize="80dp"
        android:textColor="#e91e63"
        android:text="第二层"/>
    <TextView
        android:layout_width="wrap_content"
        android:layout_height="wrap_content"
        android:textSize="60dp"
        android:textColor="#e51c23"
        android:text="第三层"/>
    <TextView
        android:layout_width="wrap_content"
        android:layout_height="wrap_content"
        android:textSize="40dp"
        android:textColor="#5677fc"
        android:text="第四层"/>
</FrameLayout>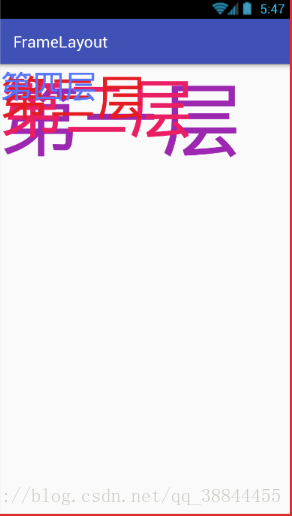
4.TableLayout 表格布局
表格布局,适用于多行多列的布局格式,每个TableLayout是由多个TableRow组成,一个TableRow就表示TableLayout中的每一行,这一行可以由多个子元素组成。实际上TableLayout和TableRow都是LineLayout线性布局的子类。但是TableRow的参数android:orientation属性值固定为horizontal,且android:layout_width=MATCH_PARENT,android:layout_height=WRAP_CONTENT。所以TableRow实际是一个横向的线性布局,且所以子元素宽度和高度一致。
在TableLayout布局中,一列的宽度由该列中最宽的那个单元格指定,而该表格的宽度由父容器指定。可以为每一列设置以下属性:
Shrinkable 表示该列的宽度可以进行收缩,以使表格能够适应父容器的大小
Stretchable 表示该列的宽度可以进行拉伸,以使能够填满表格中的空闲空间
Collapsed 表示该列会被隐藏
?xml version="1.0" encoding="utf-8"?>
<TableLayout xmlns:android="http://schemas.android.com/apk/res/android"
    android:layout_width="match_parent"
    android:layout_height="match_parent"
    android:collapseColumns="2"
    android:shrinkColumns="1"
    android:stretchColumns="0">

    <TableRow
       >
        <TextView android:text="我是伸展的第一列" />

        <TextView android:text="我是收缩的第二列" />

        <TextView android:text="我被隐藏了" />
    </TableRow>

    <TableRow>
        <TextView android:text="我可以伸展的很长很长很长长" />

        <TextView android:text="我可以收缩,我可以变的很深很深很深" />

        <TextView android:text="我被隐藏了T_T" />
    </TableRow>

    <TableRow>
        <TextView
            android:layout_column="1"
            android:text="我要在第2列" />
    </TableRow>

    <TableRow>
        <TextView
            android:layout_width="wrap_content"
            android:layout_height="wrap_content"
            android:layout_column="0"
            android:layout_span="2"
            android:text="我要               跨                  两                列" />
    </TableRow>
</TableLayout>