1、前言
TensorRTx(下文简称为trtx)是一个十分流行的利用API来搭建网络结构实现trt加速的开源库,作者提到为什么不用ONNX parser的方式来进行trt加速,而用最底层的API来搭建trt加速的方式有如下原因:
- Flexible 很容易修改模型的任意一层,删除、增加、替换等操作。
- Debuggable 可以容易获得模型中间某一层的结果
- Chance to learn 可以对模型结构有进一步的了解
尽管onnx2trt的方式目前已经在绝大部分情况下都不会出现问题,但在trtx下,我们能够掌握更底层的原理和代码,有利于我们对模型的部署以及优化。下文将会以yolov5s在trtx框架下的例子,来逐行解析是trtx是如何工作的。
TensorRTx项目链接:https://github.com/wang-xinyu/tensorrtx。
2、步骤解析
在trtx中,对一个模型加速的过程可以分为两个步骤
- 提取pytorch模型参数 wts
- 利用trt底层API搭建网络结构,并将wts中的参数填充到网络中
2.1、get_wts.py
首先需要将pytorch中的模型参数提取出来,pytorch中的模型参数是以caffe中blob的格式存在的,每个操作都有对应的名字、数据长度、数据.
for k, v in model.state_dict().items():
    # k-> blob的名字
    vr = v.reshape(-1).cpu().numpy() # vr -> 数据长度
    f.write('{} {} '.format(k, len(vr)))
    for vv in vr:
        f.write(' ')
        f.write(struct.pack('>f', float(vv)).hex()) # 将数据转化到16进制
        f.write('\n')
通过上get_wts.py,就可以得到包含yolov5s.pth的模型参数,打开yolov5s.wts如下图所示:

其中第一行的351为总的blob数量,第二行的model.0.conv.weight为第一个blob的名字,3456表示为该blob的数据长度,3a198000 3ca58000…为实际参数。
得到了上述的参数之后,就可以以trtx的方式进行加速了。
2.2、构造engine
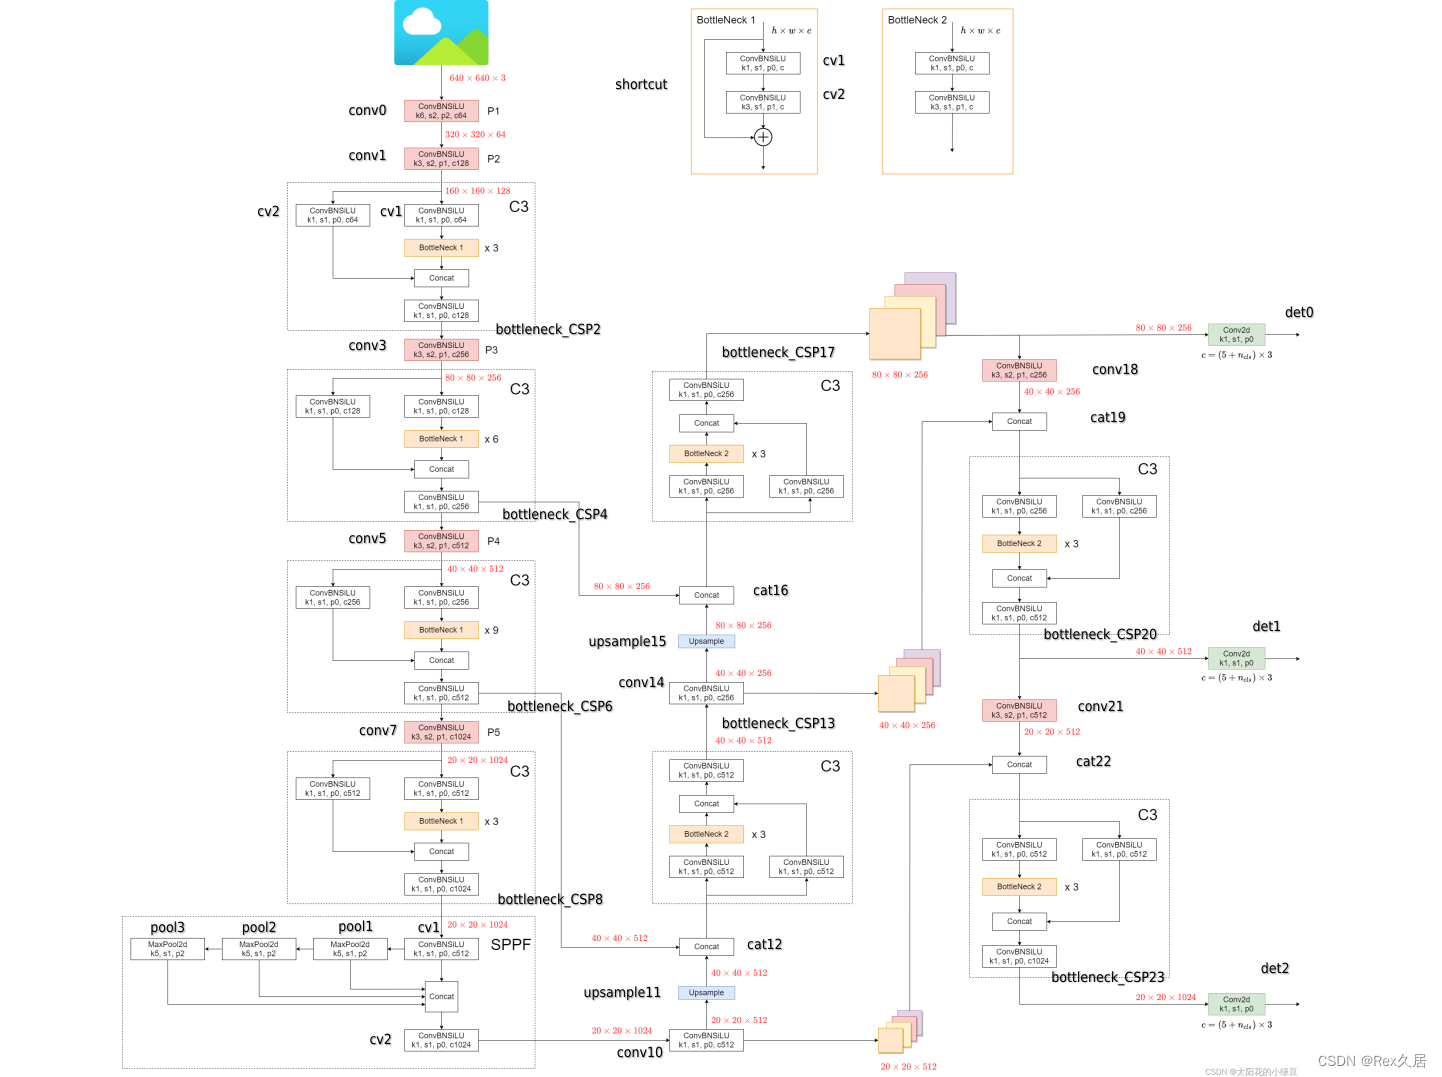
在利用wts转engine的之前,需要十分清楚模型的网络结构,不太清楚的同学可以参考太阳花的小绿豆关于yolov5的网络结构图。了解完yolov5的网络结构后,就可以着手利用trt的api来搭建网络模型了。搭建模型的代码在 model.cpp中的build_det_engine函数,本文将其中的代码过程直接画到yolov5的网络结构图中了,可以直接对照代码和图来进行查看。
//yolov5_det.cpp
viod serialize_engine(...){


	if (is_p6) {


        ...
	} else {


        // 以yolov5s为例
        engine = build_det_engine(max_batchsize, builder, config, DataType::kFLOAT, gd, gw, wts_name);
  	}
    // 序列化
    IHostMemory* serialized_engine = engine->serialize();
    std::ofstream p(engine_name, std::ios::binary);
    // 写到文件中
    p.write(reinterpret_cast<const char*>(serialized_engine->data()), serialized_engine->size());

}
model.cpp

// 解析get_wts.py
static std::map<std::string, Weights> loadWeights(const std::string file) {


    int32_t count;  // wts文件第一行,共有351个blob
  	input >> count;
    //每一行是一个blob,模型名称 + 数据长度 + 参数
    while (count--) {


        // 一个blob的参数
     	Weights wt{

     DataType::kFLOAT, nullptr, 0 };
        uint32_t size;  //blob 数据长度
        std::string name; // blob 数据名字
        for (uint32_t x = 0, y = size; x < y; ++x) {


      		input >> std::hex >> val[x];  // 将数据转化成十进制,并放到val中
    	}
        // 每个blob名字对应一个wt
        weightMap[name] = wt;
    }
}


ICudaEngine* build_det_engine(){


   // 初始化网络结构
   INetworkDefinition* network = builder->createNetworkV2(0U);
   // 定义模型输入
   ITensor* data = network->addInput(kInputTensorName, dt, Dims3{

     3, kInputH, kInputW });
   // 加载pytorch模型中的参数
   std::map<std::string, Weights> weightMap = loadWeights(wts_name);

   // 逐步添加网络结构,已将代码与网络结构一一对应 ,具体过程见上图

   // 增加yolo后处理decode模块,使用了plugin
   auto yolo = addYoLoLayer(network, weightMap, "model.24", std::vector<IConvolutionLayer*>{

    det0, det1, det2});
   network->markOutput(*yolo->getOutput(0));  //将plugin的输出设置为模型的最后输出(decode)

   #if defined(USE_FP16)
  	// FP16
	config->setFlag(BuilderFlag::kFP16);
   #elif defined(USE_INT8)
    // INT8 量化
    std::cout << "Your platform support int8: " << (builder->platformHasFastInt8() ? "true" : "false") << std::endl;
    assert(builder->platformHasFastInt8());
    config->setFlag(BuilderFlag::kINT8);
    Int8EntropyCalibrator2* calibrator = new Int8EntropyCalibrator2(1, kInputW, kInputH, "./coco_calib/", "int8calib.table", kInputTensorName);
      config->setInt8Calibrator(calibrator);
    #endif
    // 根据网络结构来生成engine
    ICudaEngine* engine = builder->buildEngineWithConfig(*network, *config);
	return engine;
}
3、plugin
本人对plugin也在学习当中,下面是我在学习trtx-yolo5代码中对plugin浅显的认知。原作者在模型后面增加了一个模型解码的plugin,用于获得每个特征层上的bbox,调用代码在model.cpp中
auto yolo = addYoLoLayer(network, weightMap, "model.24", std::vector<IConvolutionLayer*>{

    det0, det1, det2});

static IPluginV2Layer* addYoLoLayer(...){


    // 注册一个名为 "YoloLayer_TRT"的插件,如果找不到插件,就会报错
    auto creator = getPluginRegistry()->getPluginCreator("YoloLayer_TRT", "1");

    // plugin的数据
    PluginField plugin_fields[2];
    int netinfo[5] = {

    kNumClass, kInputW, kInputH, kMaxNumOutputBbox, (int)is_segmentation};  //维度数据
  	plugin_fields[0].data = netinfo;
  	plugin_fields[0].length = 5;
  	plugin_fields[0].name = "netinfo";
  	plugin_fields[0].type = PluginFieldType::kFLOAT32;

    // 所有plugin的参数
    PluginFieldCollection plugin_data;
  	plugin_data.nbFields = 2;
  	plugin_data.fields = plugin_fields;
    // 创建plugin的对象
    IPluginV2 *plugin_obj = creator->createPlugin("yololayer", &plugin_data);
}
实现代码在yololayer.h/cu中
class API YoloLayerPlugin : public IPluginV2IOExt {

    // 设置插件名称,在注册插件时会寻找对应的插件
      const char* getPluginType() const TRT_NOEXCEPT override{
          return "YoloLayer_TRT";
      }


    //插件构造函数
	YoloLayerPlugin(int classCount, int netWidth, int netHeight, int maxOut, bool is_segmentation, const std::vector<YoloKernel>& vYoloKernel){
      /*
      	classCount:类别数量
      	netWidth:输入宽
      	netHeight:输入高
      	maxOut:最大检测数量
      	is_segmentation:是否含有实例分割
      	vYoloKernel:anchors参数
      */
    }

}

// 插件运行时调用的代码
void YoloLayerPlugin::forwardGpu(...){
    // 输出结果 1+ 是在第一个位置记录解码的数量
    int outputElem = 1 + mMaxOutObject * sizeof(Detection) / sizeof(float);

    // 将存放结果的内存置为0
    for (int idx = 0; idx < batchSize; ++idx) {
    	CUDA_CHECK(cudaMemsetAsync(output + idx * outputElem, 0, sizeof(float), stream));

    // 遍历三种不同尺度的anchor
    for (unsigned int i = 0; i < mYoloKernel.size(); ++i) {
        // 调用核函数进行解码
     	CalDetection << < (numElem + mThreadCount - 1) / mThreadCount, mThreadCount, 0, stream >> >(...)
    }

}

__global__ void CalDetection(...){
    // input:模型输出结果
    // output:decode存放地址
    // 当前线程的的全局索引ID
    int idx = threadIdx.x + blockDim.x * blockIdx.x;
    // yoloWidth * yoloHeight
    int total_grid = yoloWidth * yoloHeight; // 在当前特征层上要处理的总框数
    int bnIdx = idx / total_grid;    // 第n个batch
    // x,y,w,h,score + 80
    int info_len_i = 5 + classes;
    // 如果带有实例分割分析,需要再加上32个分割系数
    if (is_segmentation) info_len_i += 32;

    // 第n个batch的推理结果开始地址
    const float* curInput = input + bnIdx * (info_len_i * total_grid * kNumAnchor);
    // 遍历三种不同尺寸的anchor
    for (int k = 0; k < kNumAnchor; ++k) {
        //每个框的置信度
    	float box_prob = Logist(curInput[idx + k * info_len_i * total_grid + 4 * total_grid]);
        if (box_prob < kIgnoreThresh) continue;
        for (int i = 5; i < 5 + classes; ++i) {
            // 每个类别的概率
        	float p = Logist(curInput[idx + k * info_len_i * total_grid + i * total_grid]);
            // 提取最大概率以及类别ID
            if (p > max_cls_prob) {
        		max_cls_prob = p;
        		class_id = i - 5;
      		}
        }
        //
        float *res_count = output + bnIdx * outputElem;
        // 统计decode框的数量
        int count = (int)atomicAdd(res_count, 1);
		// 下面是按照论文的公式将预测的宽和高恢复到原图大小
		...
    }
}
4、总结
通过本次对trtx开源代码的深入学习,知道了如何利用trt的api对模型进行加速,同时还了解到plugin的实现,后续还会继续学习trtx里面的知识点。