VCED项目实战2–Jina入门
文章目录
Jina
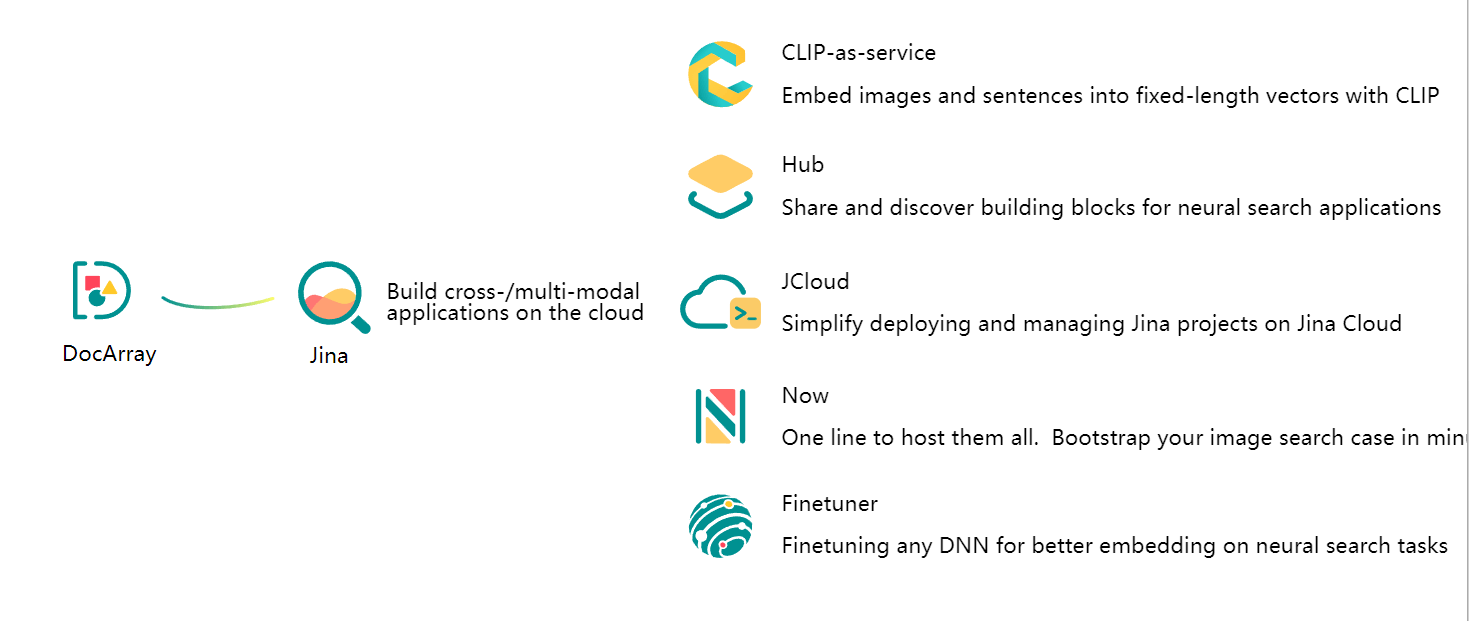
- jina是一个MLOp框架, 可以阻力跨模态/多模态应用在云端构建. 其将Poc原型提升为准产品级的服务. Jina能够处理非结构化数据, 使其成为高级解决方案引擎和每个开发者能接触云原生技术.
基本概念
Document
Document是jina中基本的多模态和跨模态的数据,是Jina中的IO的基本元素- 可以理解为将文本,图像,视频,音频,3D网格等抽象成了统一的数据结构
- 官方文档
属性
id:唯一的document 编号blob:二进制原始数据tensor:视频图片音频的ndarraytext:文本modality:表示这个document对应的模态,在搜索时会用到embedding:这个document的embedding- 更多属性可以参考官方文档
例子
-
不同参数的实例化
-
from docarray import Document
import numpy

d1 = Document(text='hello')
d2 = Document(blob=b'\f1')
d3 = Document(tensor=numpy.array([1, 2, 3]))
d4 = Document(
    uri='https://jina.ai',
    mime_type='text/plain',
    granularity=1,
    adjacency=3,
    tags={

        'foo': 'bar'},
)
-
-
找最近的embedding
-
人脸识别,相似图片搜索,多模态搜索的本质就是对query的压缩的embedding寻找最相似/临近的embedding的过程
-
相较于用循环的方式,
Document.match方法提供了更方便的api- 注意在使用前要通过
.embed方法或者.embeddings设置document的embedding
- 注意在使用前要通过
-
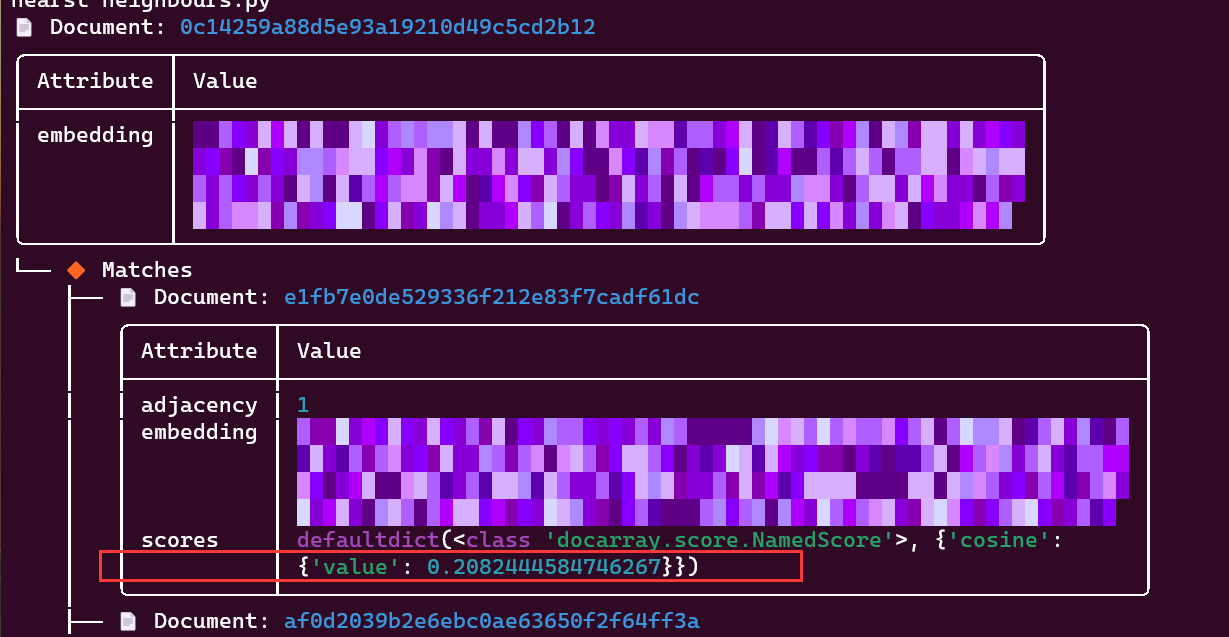
from docarray import DocumentArray, Document import numpy as np da = DocumentArray.empty(10) #创建一个长度为10的DocumentArray,元素为空的Document da.embeddings = np.random.random([10, 256]) #设置每个Document的embedding字段为随机数 q = Document(embedding=np.random.random([256])) # query q.match(da) q.summary() -
结果会返回和候选集DocumentArray中的元素的相似度,并按相似度从大到小排序
- 注意,默认的距离度量是余弦距离,即 1 − a ⋅ b / ( ∣ ∣ a ∣ ∣ ⋅ ∣ ∣ b ∣ ∣ ) 1-a\cdot b /(||a||\cdot||b||) 1−a⋅b/(∣∣a∣∣⋅∣∣b∣∣),即越小越相似
-
DocumentArray
DocumentArray是多个Document的容器,类似一个python中的list
Executor
Executor是一个python的类,他有一系列将DocumentArray当做IO的方法. 可以将Executor看做一个微服务
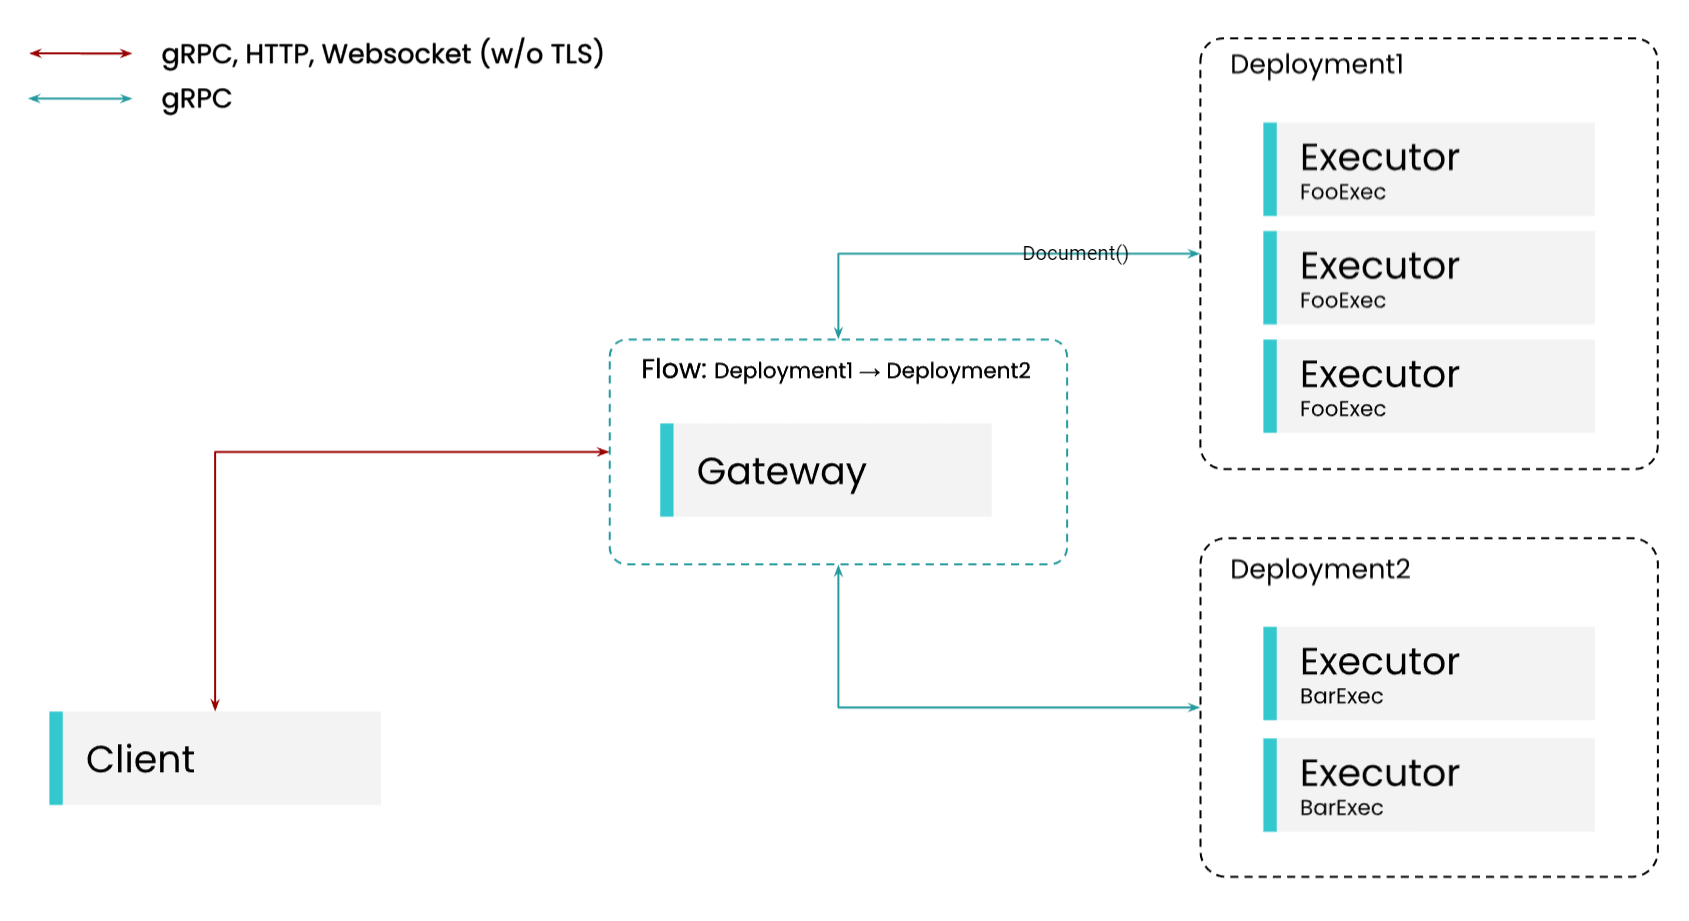
Flow
Flow是多个Executer串联成的逻辑管道,可以看做是一个端到端的服务.
Gateway
Gataway是Flow的入口, 相当于内部通信的一个路由
流程图
代码风格
-
Jina项目支持两种风格的代码
-
pythonic
-
from jina import DocumentArray, Executor, Flow, requests


class FooExec(Executor):
    @requests
    async def add_text(self, docs: DocumentArray, **kwargs):
        for d in docs:
            d.text += 'hello, world!'


class BarExec(Executor):
    @requests
    async def add_text(self, docs: DocumentArray, **kwargs):
        for d in docs:
            d.text += 'goodbye!'


f = Flow(port=12345).add(uses=FooExec, replicas=3).add(uses=BarExec, replicas=2)

with f:
    f.block()
-
-
yamlish
-
# executor.py from jina import DocumentArray, Executor, requests class FooExec(Executor): @requests async def add_text(self, docs: DocumentArray, **kwargs): for d in docs: d.text += 'hello, world!' class BarExec(Executor): @requests async def add_text(self, docs: DocumentArray, **kwargs): for d in docs: d.text += 'goodbye!' -
#flow.yaml jtype: Flow with: port: 12345 executors: - uses: FooExec replicas: 3 py_modules: executor.py - uses: BarExec replicas: 2 py_modules: executor.py -
jina flow --uses flow.yml
-
-
-
pythonic的代码相当于将executor和flow打包在一个python文件
-
而yaml风格代码将executor写在一个python文件,flow的配置成一个单独的yaml.可以分离Flow的逻辑,对于生产环境的复杂项目应该使用这种风格
准备工作
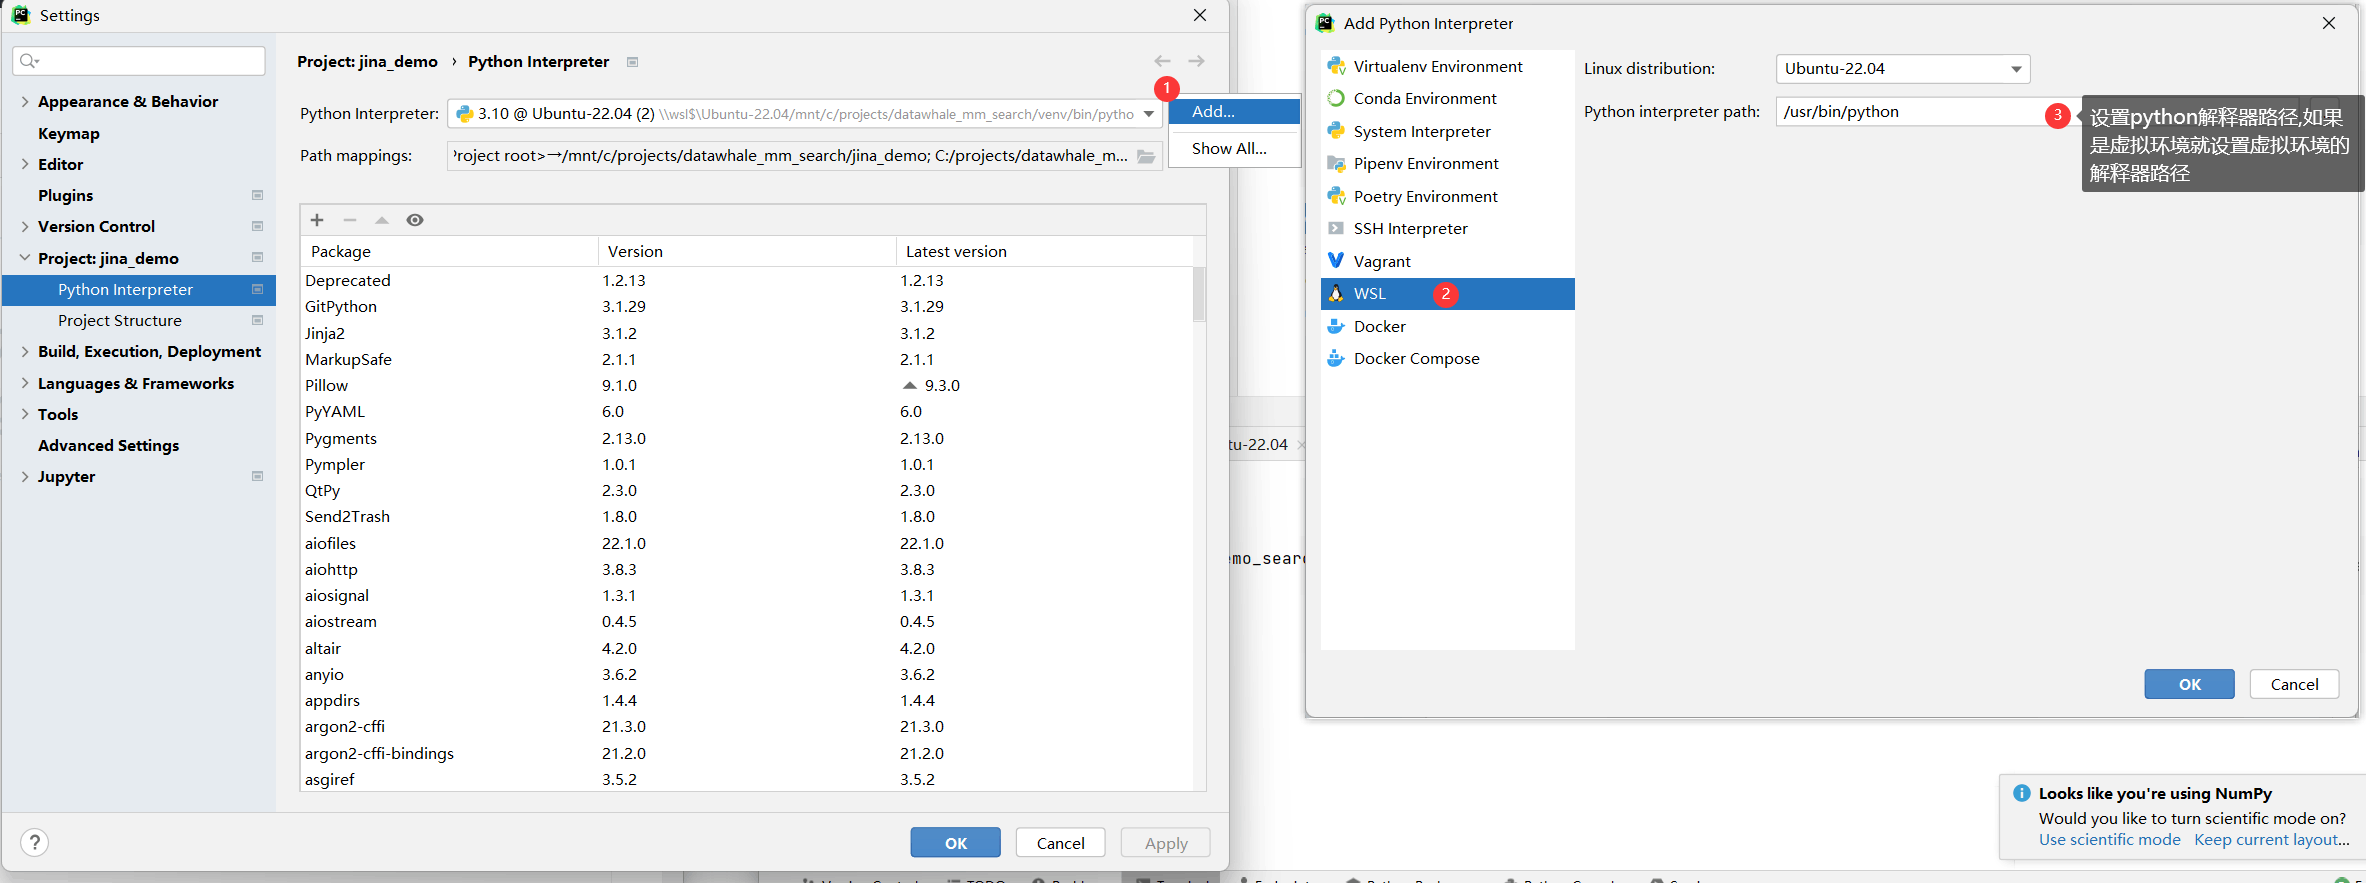
配置pycharm使用wsl的解释器
- file > setting > Project:xxx >Python Interpreter
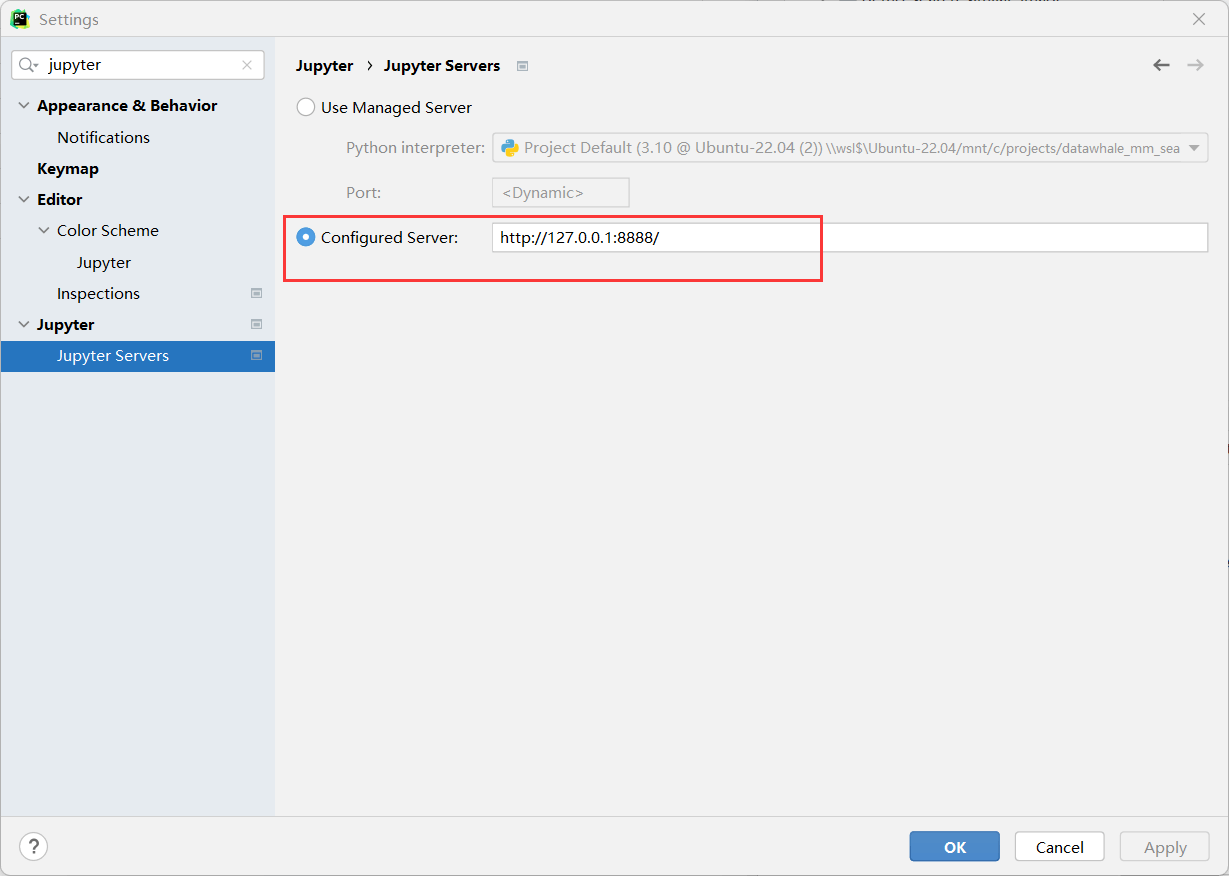
配置jupyter
-
由于pycharm的jupyter启动有问题,得在WLS终端启动jupyter服务
-
jupyter notebook -
复制jupyter的链接,在浏览器打开或者在pycharm中打开

demo: Hello world
-
下面一个例子演示了一个最基本的helloworld demo
- 定义了一个Excutor会往Document的text属性加入’hello, world!’
- 使用
Flow.send方法往流中发送空的DocumentArray
-
# demo_hello_world/main.py from jina import DocumentArray, Executor, Flow, requests class MyExec(Executor): """ 定义了一个executor,包含一个异步方法, 其从网络请求中获取输入一个DocumentArray, 并在其中的每一个Document的text属性加入"hello, world!" """ @requests async def add_text(self, docs: DocumentArray, **kwargs): for d in docs: d.text += "hello, world!" # Flow流中中接着连续两次的MyExec,会在text字段加入两遍 "hello, world!" f = Flow().add(uses=MyExec).add(uses=MyExec) # with控制流的打开与关闭,会在结束时自动关闭 with f: r = f.post('/', DocumentArray.empty(2)) print(r.texts) -
# run python demo_hello_world/main.py -
结果

gRPC服务端
-
注意,flow 写在python文件中的写法当
with f:代码块完成后就结束了,适合调试,如果要部署成一个sever需要用yaml的写法 -
这种写法具有可伸缩性和云原生性
-
将
MyExec类单独放到一个executor.py中,编写对应的yaml-
# executor.py from jina import DocumentArray, Executor, requests class MyExec(Executor): @requests async def add_text(self, docs: DocumentArray, **kwargs): for d in docs: d.text += 'hello, world!' -
# toy.yml jtype: Flow with: port: 51000 protocol: grpc executors: - uses: MyExec name: foo py_modules: - executor.py - uses: MyExec name: bar py_modules: - executor.py -
# 启动项目 jina flow --uses toy.yml -
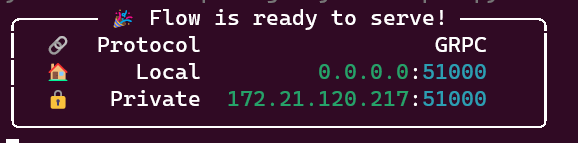
-
此时启动了一个GPRC协议的服务,直接在浏览器访问是不行的,我们需要写一个客户端访问,或者使用Postman进行测试
-
客户端访问
-
client代码
-
from jina import Client, Document c = Client(host='grpc://0.0.0.0:51000') #创建一个客户端 result = c.post('/', Document()) #客户端post一个空的Document print(result.texts) -
结果
-

Postman测试
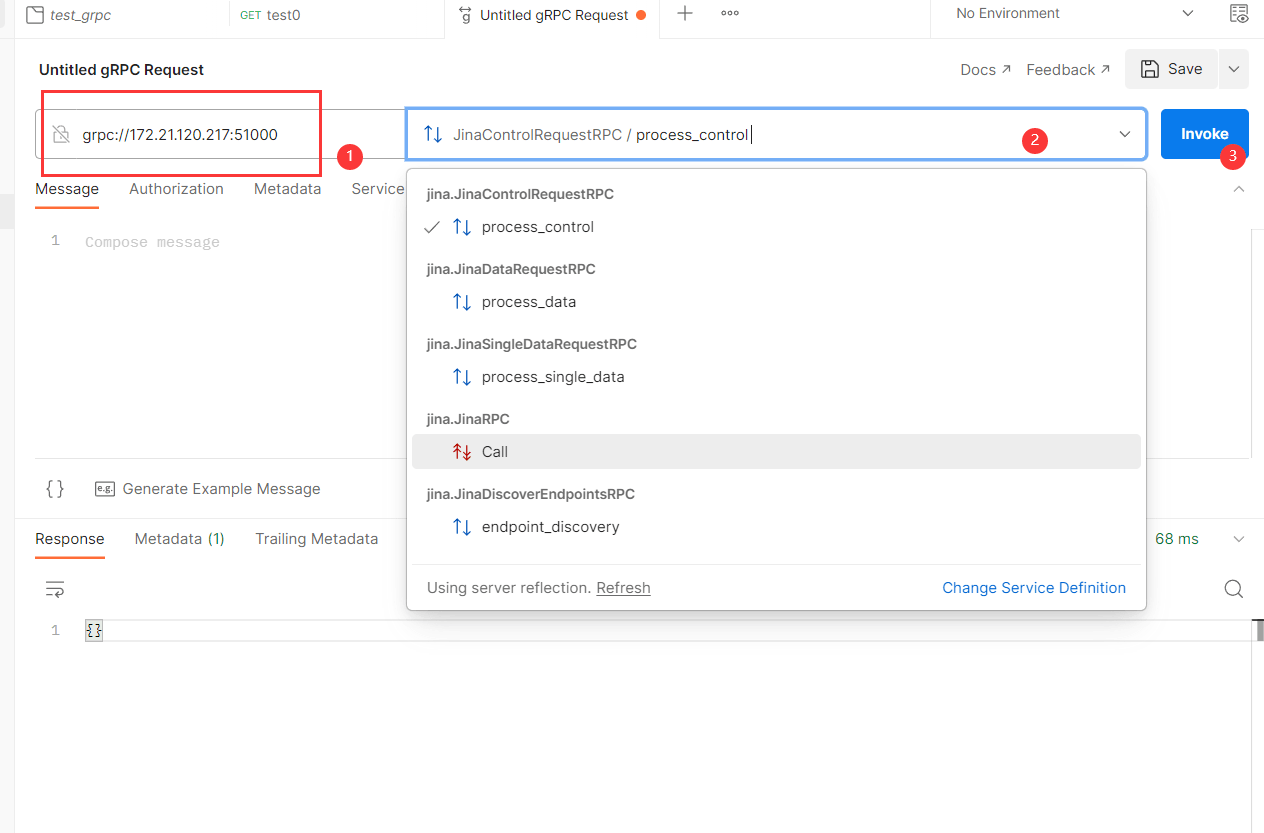
demo: 使用resnet寻找相似图片
import jina
import urllib
from jina import DocumentArray, Executor, requests, Document
from docarray.array.mixins.plot import PlotMixin
from docarray import DocumentArray
import matplotlib.pyplot as plt
import os
plt.rcParams['font.family'] = 'SimHei'
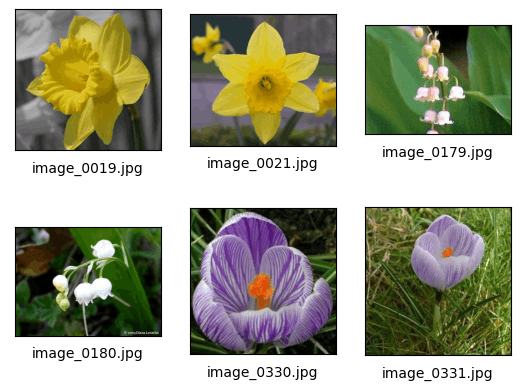
从本地图片构建一个mini检索数据集
img_path_list = [os.path.join('./test_img', i) for i in os.listdir('./test_img')]
img_path_list
for idx, img_path in enumerate(img_path_list):
    # f = urllib.request.urlopen(img_uri)
    plt.subplot(2, 3, idx + 1)
    plt.xticks([])
    plt.yticks([])
    plt.grid(False)
    plt.xlabel(img_path.split('/')[-1])
    img = plt.imread(img_path)
    plt.imshow(img)
预处理
- 从
Document的uri参数传入图片,将图片转为torch.tensor,进行归一化,并且要resize到相同大小,最后将channel放到第一维,相当于torch.permute.
def get_doc_from_img(img_path):
    return Document(uri=img_path).load_uri_to_image_tensor().set_image_tensor_normalization().set_image_tensor_shape(
        (300, 300)).set_image_tensor_channel_axis(-1, 0)
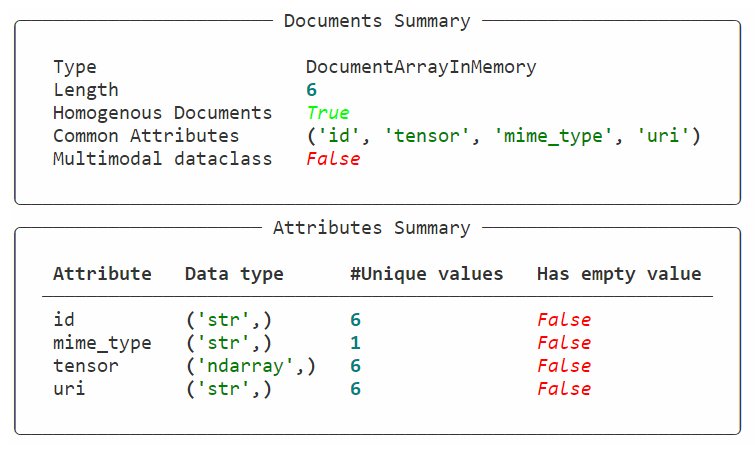
定义检索图片数据库
- 用
DocumentArray保存多个Document
docs = DocumentArray([get_doc_from_img(i) for i in img_path_list])
docs
导入resnet预训练模型,生成embedding
- 如果这一步因为网络原因报错可以先下好预训练权重,按照报错信息放入指定路径
- 使用
DocumentArray.embed方法得到图片的embedding
import torchvision

model = torchvision.models.resnet50(pretrained=True)
docs.embed(model).embeddings
embedding的tensor
tensor([[-1.8643,  1.8063, -2.5505,  ...,  0.3757,  1.5515, -0.1677],
        [-1.0711,  1.8354, -2.3960,  ...,  0.4941,  1.7618, -0.4173],
        [-1.6836,  1.7230, -2.4809,  ...,  0.8211,  5.2785, -0.2270],
        [-0.9699,  1.8454, -2.8017,  ...,  4.9436,  3.8553,  0.9916],
        [ 2.9779,  1.3210, -4.4595,  ...,  3.3578,  1.9920, -1.8143],
        [ 3.9424,  0.8940, -3.4237,  ...,  4.5399,  2.4077, -1.0326]])
可视化
# docs.plot_embeddings() #进行可视化

比较图片相似度
- query图片也要先通过模型得到embedding,然后使用
Document.match方法和数据库的每个embedding计算相似度
# query
d_query = get_doc_from_img(img_path_list[0])
d_query.embed(model) #也要先通过模型得到embedding
d_query.match(docs)
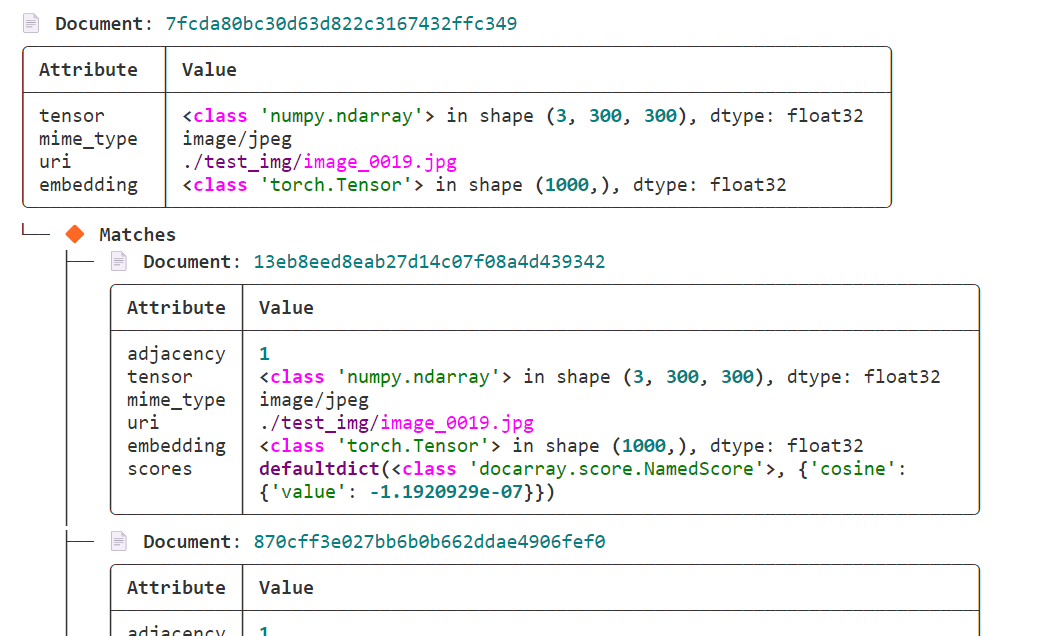
query_result = [(m.scores['cosine'].value, m.uri) for m in d_query.matches]
query_result.sort()# 距离从小到大排序
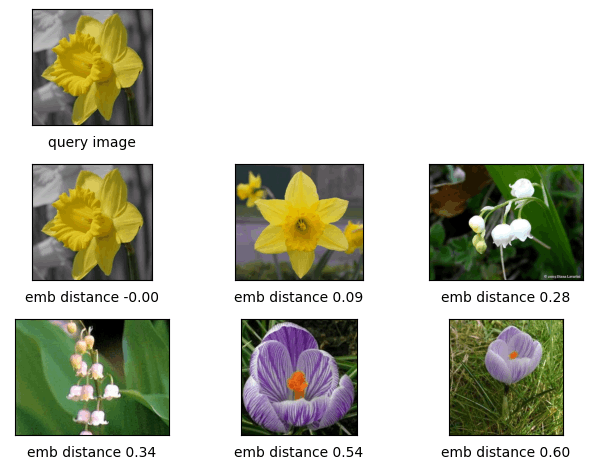
plt.subplot(3, 3, 1)
plt.xticks([])
plt.yticks([])
plt.grid(False)
plt.xlabel(f'query image')
plt.imshow(plt.imread(img_path_list[0]))
for idx, (dis,img_path) in enumerate(query_result):
# f = urllib.request.urlopen(img_uri)
plt.subplot(3, 3, idx + 4)
plt.xticks([])
plt.yticks([])
plt.grid(False)
plt.xlabel(f'emb distance {
dis:.2f}')
img = plt.imread(img_path)
plt.imshow(img)
plt.tight_layout()
plt.show()
使用Flow部署成服务
- 将操作封装成
executor,使用客户端进行查询
# executor.py
from jina import DocumentArray, Executor, requests, Document
import torchvision, os


def get_doc_from_img(img_path):
    return Document(uri=img_path).load_uri_to_image_tensor().set_image_tensor_normalization().set_image_tensor_shape(
        (300, 300)).set_image_tensor_channel_axis(-1, 0)


class MyExec(Executor):
    @requests
    async def get_similar_img(self, docs: DocumentArray, **kwargs):
        docs.embed(model)
        docs.match(img_database)


model = torchvision.models.resnet50(pretrained=True)
img_path_list = [os.path.join('./test_img', i) for i in os.listdir('./test_img')]
img_database = DocumentArray([get_doc_from_img(i) for i in img_path_list])
img_database.embed(model)  #一定要提前将检索图片embed
# toy.yml
jtype: Flow
with:
  port: 51000
  protocol: grpc
executors:
- uses: MyExec
  name: img_query
  py_modules:
    - executor.py
# client 测试
from jina import Client, Document

c = Client(host='grpc://0.0.0.0:51000') #创建一个客户端
d_query=get_doc_from_img(img_path_list[0])
# d_query.embed(model) #改为服务端进行模型embed
result = c.post('/',d_query) #结果是一个DocumentArray
print(result[0])

query_result = [(m.scores['cosine'].value, m.uri) for m in result[0].matches]
query_result.sort()# 距离从小到大排序
plt.subplot(3, 3, 1)
plt.xticks([])
plt.yticks([])
plt.grid(False)
plt.xlabel(f'query image')
plt.imshow(plt.imread(img_path_list[0]))
for idx, (dis,img_path) in enumerate(query_result):
    # f = urllib.request.urlopen(img_uri)
    plt.subplot(3, 3, idx + 4)
    plt.xticks([])
    plt.yticks([])
    plt.grid(False)
    plt.xlabel(f'emb distance {

      dis:.2f}')
    img = plt.imread(img_path)
    plt.imshow(img)
plt.tight_layout()
plt.show()