0. 环境
租用了1台GPU服务器,系统 ubuntu20,Tesla V100-16GB
(GPU服务器已经关机结束租赁了)
SSH地址:*
端口:17520
SSH账户:root
密码:Jaere7pa
内网: 3389 , 外网:17518
VNC地址:*
端口:17519
VNC用户名:root
密码:Jaere7pa
硬件需求,ChatGLM-6B和ChatGLM2-6B相当。
量化等级 最低 GPU 显存
FP16(无量化) 13 GB
INT8 10 GB
INT4 6 GB
1. 基本环境
1.1 测试gpu
nvidia-smi
(base) root@ubuntuserver:~# nvidia-smi
Tue Sep 12 02:06:45 2023
+-----------------------------------------------------------------------------+
| NVIDIA-SMI 510.54       Driver Version: 510.54       CUDA Version: 11.6     |
|-------------------------------+----------------------+----------------------+
| GPU  Name        Persistence-M| Bus-Id        Disp.A | Volatile Uncorr. ECC |
| Fan  Temp  Perf  Pwr:Usage/Cap|         Memory-Usage | GPU-Util  Compute M. |
|                               |                      |               MIG M. |
|===============================+======================+======================|
|   0  Tesla V100-PCIE...  Off  | 00000000:00:07.0 Off |                    0 |
| N/A   42C    P0    38W / 250W |      0MiB / 16384MiB |      0%      Default |
|                               |                      |                  N/A |
+-------------------------------+----------------------+----------------------+

+-----------------------------------------------------------------------------+
| Processes:                                                                  |
|  GPU   GI   CI        PID   Type   Process name                  GPU Memory |
|        ID   ID                                                   Usage      |
|=============================================================================|
|  No running processes found                                                 |
+-----------------------------------------------------------------------------+

(base) root@ubuntuserver:~#
1.2 python
当前LangChain安装说明,需要Python 3.8 - 3.10 版本
执行python3
可以看到python3.9
# 如果低于这个版本,可使用conda安装环境
$ conda create -p /root/work/conda_py310_chatglm2 python=3.10

# 激活环境
$ source activate /root/work/conda_py310_chatglm2

# 更新py库
$ pip3 install --upgrade pip

# 关闭环境
$ source deactivate /root/work/conda_py310_chatglm2

# 删除环境
$ conda env remove -p  /root/work/conda_py310_chatglm2
1.3 pip
pip3 install --upgrade pip -i https://pypi.tuna.tsinghua.edu.cn/simple1.4 准备仓库
git clone https://github.com/chatchat-space/Langchain-Chatchat.git
cd Langchain-Chatchat
1.5 升级cuda
查看显卡驱动版本要求:
https://docs.nvidia.com/cuda/cuda-toolkit-release-notes/index.html
发现cuda 11.8需要 >=450.80.02。已经满足。
执行指令更新cuda
wget https://developer.download.nvidia.com/compute/cuda/11.8.0/local_installers/cuda_11.8.0_520.61.05_linux.run
sh cuda_11.8.0_520.61.05_linux.run
-> 输入 accept
-> 取消勾选 Driver
-> 点击 install
export PATH=$PATH:/usr/local/cuda-11.8/bin
nvcc --version
准备switch-cuda.sh脚本
#!/usr/bin/env bash
# Copyright (c) 2018 Patrick Hohenecker
#
# Permission is hereby granted, free of charge, to any person obtaining a copy
# of this software and associated documentation files (the "Software"), to deal
# in the Software without restriction, including without limitation the rights
# to use, copy, modify, merge, publish, distribute, sublicense, and/or sell
# copies of the Software, and to permit persons to whom the Software is
# furnished to do so, subject to the following conditions:
#
# The above copyright notice and this permission notice shall be included in all
# copies or substantial portions of the Software.
#
# THE SOFTWARE IS PROVIDED "AS IS", WITHOUT WARRANTY OF ANY KIND, EXPRESS OR
# IMPLIED, INCLUDING BUT NOT LIMITED TO THE WARRANTIES OF MERCHANTABILITY,
# FITNESS FOR A PARTICULAR PURPOSE AND NONINFRINGEMENT. IN NO EVENT SHALL THE
# AUTHORS OR COPYRIGHT HOLDERS BE LIABLE FOR ANY CLAIM, DAMAGES OR OTHER
# LIABILITY, WHETHER IN AN ACTION OF CONTRACT, TORT OR OTHERWISE, ARISING FROM,
# OUT OF OR IN CONNECTION WITH THE SOFTWARE OR THE USE OR OTHER DEALINGS IN THE
# SOFTWARE.

# author:   Patrick Hohenecker <[email protected]>
# version:  2018.1
# date:     May 15, 2018


set -e


# ensure that the script has been sourced rather than just executed
if [[ "${BASH_SOURCE[0]}" = "${0}" ]]; then
    echo "Please use 'source' to execute switch-cuda.sh!"
    exit 1
fi

INSTALL_FOLDER="/usr/local"  # the location to look for CUDA installations at
TARGET_VERSION=${1}          # the target CUDA version to switch to (if provided)

# if no version to switch to has been provided, then just print all available CUDA installations
if [[ -z ${TARGET_VERSION} ]]; then
    echo "The following CUDA installations have been found (in '${INSTALL_FOLDER}'):"
    ls -l "${INSTALL_FOLDER}" | egrep -o "cuda-[0-9]+\\.[0-9]+$" | while read -r line; do
        echo "* ${line}"
    done
    set +e
    return
# otherwise, check whether there is an installation of the requested CUDA version
elif [[ ! -d "${INSTALL_FOLDER}/cuda-${TARGET_VERSION}" ]]; then
    echo "No installation of CUDA ${TARGET_VERSION} has been found!"
    set +e
    return
fi

# the path of the installation to use
cuda_path="${INSTALL_FOLDER}/cuda-${TARGET_VERSION}"

# filter out those CUDA entries from the PATH that are not needed anymore
path_elements=(${PATH//:/ })
new_path="${cuda_path}/bin"
for p in "${path_elements[@]}"; do
    if [[ ! ${p} =~ ^${INSTALL_FOLDER}/cuda ]]; then
        new_path="${new_path}:${p}"
    fi
done

# filter out those CUDA entries from the LD_LIBRARY_PATH that are not needed anymore
ld_path_elements=(${LD_LIBRARY_PATH//:/ })
new_ld_path="${cuda_path}/lib64:${cuda_path}/extras/CUPTI/lib64"
for p in "${ld_path_elements[@]}"; do
    if [[ ! ${p} =~ ^${INSTALL_FOLDER}/cuda ]]; then
        new_ld_path="${new_ld_path}:${p}"
    fi
done

# update environment variables
export CUDA_HOME="${cuda_path}"
export CUDA_ROOT="${cuda_path}"
export LD_LIBRARY_PATH="${new_ld_path}"
export PATH="${new_path}"

echo "Switched to CUDA ${TARGET_VERSION}."

set +e
return
用法
source switch-cuda.sh 11.81.6 单独安装torch-gpu版本
$ pip3 install torch torchvision torchaudio --index-url https://download.pytorch.org/whl/cu1181.7 安装全部依赖
$ pip install -r requirements.txt -i https://pypi.tuna.tsinghua.edu.cn/simple验证torch是否带有cuda
import torch
device = torch.device("cuda:0" if torch.cuda.is_available() else "cpu")
print(device)
2. 下载模型
2.1 chatglm2-6b
GIT_LFS_SKIP_SMUDGE=1 git clone https://huggingface.co/THUDM/chatglm2-6b
下载ChatGLM2作者上传到清华网盘的模型文件
https://cloud.tsinghua.edu.cn/d/674208019e314311ab5c/?p=%2Fchatglm2-6b&mode=list
并覆盖到chatglm2-6b
先前以为用wget可以下载,结果下来的文件是一样大的,造成推理失败。
win10 逐一校验文件SHA256,需要和https://huggingface.co/THUDM/chatglm2-6b中Git LFS Details的匹配。
C:\Users\qjfen\Downloads\chatglm2-6b>certutil -hashfile pytorch_model-00001-of-00007.bin SHA256
pytorch_model-00001-of-00007.bin         cdf1bf57d519abe11043e9121314e76bc0934993e649a9e438a4b0894f4e6ee8
pytorch_model-00002-of-00007.bin        1cd596bd15905248b20b755daf12a02a8fa963da09b59da7fdc896e17bfa518c
pytorch_model-00003-of-00007.bin         812edc55c969d2ef82dcda8c275e379ef689761b13860da8ea7c1f3a475975c8
pytorch_model-00004-of-00007.bin         555c17fac2d80e38ba332546dc759b6b7e07aee21e5d0d7826375b998e5aada3
pytorch_model-00005-of-00007.bin         cb85560ccfa77a9e4dd67a838c8d1eeb0071427fd8708e18be9c77224969ef48
pytorch_model-00006-of-00007.bin         09ebd811227d992350b92b2c3491f677ae1f3c586b38abe95784fd2f7d23d5f2
pytorch_model-00007-of-00007.bin         316e007bc727f3cbba432d29e1d3e35ac8ef8eb52df4db9f0609d091a43c69cb
这里需要推到服务器中。并在ubuntu下用sha256sum <filename> 校验下大文件。
2.2 text2vec
GIT_LFS_SKIP_SMUDGE=1 git clone https://huggingface.co/GanymedeNil/text2vec-large-chinese text2vec
下载这两份文件,并放到 text2vec 内:
model.safetensors                        eaf5cb71c0eeab7db3c5171da504e5867b3f67a78e07bdba9b52d334ae35adb3
pytorch_model.bin                        5883cb940ac5509b75e9fe23a9aea62694045849dc8c8c2da2894861a045d7f5
3. 参数配置
cd configs
cp configs/model_config.py.example configs/model_config.py
cp configs/server_config.py.example configs/server_config.py
修改configs/model_config.py·
embedding_model_dict = {
    "text2vec": "/root/work/Langchain-Chatchat/text2vec",
}
# 选用的 Embedding 名称
EMBEDDING_MODEL = "text2vec"

llm_model_dict = {
    "chatglm2-6b": {
        "local_model_path": "/root/work/Langchain-Chatchat/chatglm2-6b",
    },
}
# LLM 名称
LLM_MODEL = "chatglm2-6b"
4. 知识库初始化与迁移
初始化知识库:
$ python init_database.py --recreate-vs5. 一键启动API 服务或 Web UI
5.1 启动命令
一键启动脚本 startup.py,一键启动所有 Fastchat 服务、API 服务、WebUI 服务,示例代码:
$ python startup.py -a5.2 运行测试
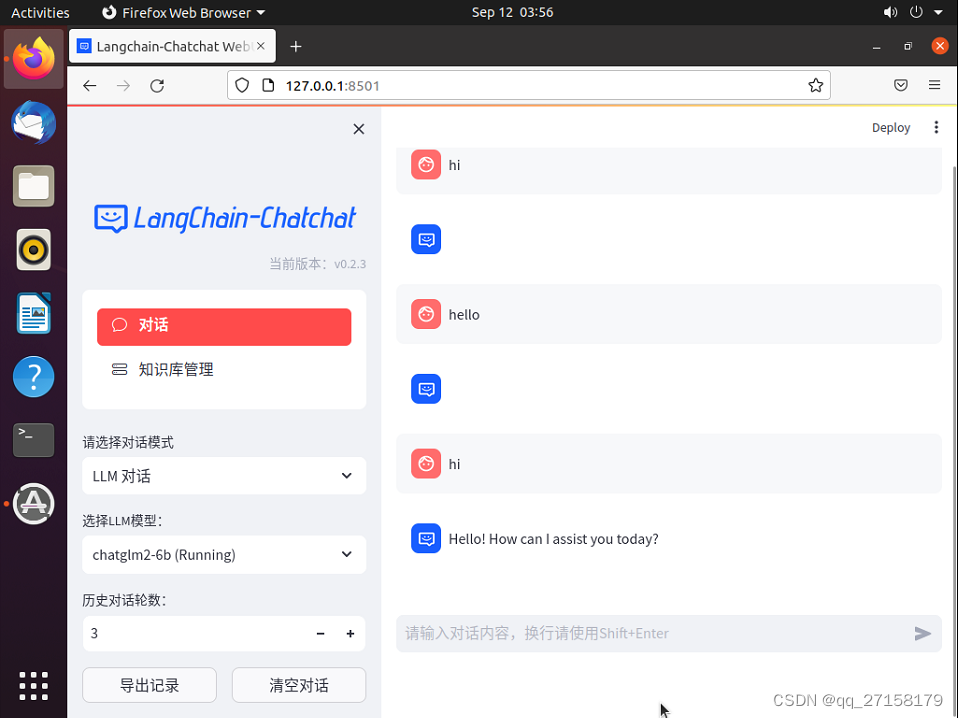
浏览器打开 127.0.0.1:8501。

对话模式支持LLM对话,知识库问答,搜索引擎问答。

知识库问答看起来是本仓库作者制作的,根据分析、数据检索生成的问答结果。

参考:
[1]https://github.com/THUDM/ChatGLM2-6B
[2]ChatGLM-6B (介绍以及本地部署),https://blog.csdn.net/qq128252/article/details/129625046
[3]ChatGLM2-6B|开源本地化语言模型,https://openai.wiki/chatglm2-6b.html
[3]免费部署一个开源大模型 MOSS,https://zhuanlan.zhihu.com/p/624490276
[4]LangChain + ChatGLM2-6B 搭建个人专属知识库,https://zhuanlan.zhihu.com/p/643531454
[5]https://pytorch.org/get-started/locally/