第一步:创建一个springboot的maven项目(pom文件)
<?xml version="1.0" encoding="UTF-8"?>
<project xmlns="http://maven.apache.org/POM/4.0.0" xmlns:xsi="http://www.w3.org/2001/XMLSchema-instance"
         xsi:schemaLocation="http://maven.apache.org/POM/4.0.0 http://maven.apache.org/xsd/maven-4.0.0.xsd">
    <modelVersion>4.0.0</modelVersion>

    <groupId>com.itpengwei.springboot.one</groupId>
    <artifactId>demo</artifactId>
    <version>0.0.1-SNAPSHOT</version>
    <packaging>jar</packaging>
    <name>demo</name>
    <description>Demo project for Spring Boot</description>

    <parent>
        <groupId>org.springframework.boot</groupId>
        <artifactId>spring-boot-starter-parent</artifactId>
        <version>2.0.3.RELEASE</version>
        <relativePath/> <!-- lookup parent from repository -->
    </parent>

    <properties>
        <project.build.sourceEncoding>UTF-8</project.build.sourceEncoding>
        <project.reporting.outputEncoding>UTF-8</project.reporting.outputEncoding>
        <java.version>1.8</java.version>
    </properties>

    <dependencies>
        <dependency>
            <groupId>org.springframework.boot</groupId>
            <artifactId>spring-boot-starter-web</artifactId>
        </dependency>
        <!--整合mybatis依赖-->
        <dependency>
            <groupId>org.mybatis.spring.boot</groupId>
            <artifactId>mybatis-spring-boot-starter</artifactId>
            <version>1.3.2</version>
        </dependency>
        <!--数据库连接驱动-->
        <dependency>
            <groupId>mysql</groupId>
            <artifactId>mysql-connector-java</artifactId>
            <scope>runtime</scope>
        </dependency>

        <dependency>
            <groupId>org.springframework.boot</groupId>
            <artifactId>spring-boot-starter-test</artifactId>
            <scope>test</scope>
        </dependency>
        <!-- 分页插件 -->
        <dependency>
            <groupId>com.github.pagehelper</groupId>
            <artifactId>pagehelper-spring-boot-starter</artifactId>
            <version>1.2.5</version>
        </dependency>
        <!-- alibaba的druid数据库连接池 -->
        <dependency>
            <groupId>com.alibaba</groupId>
            <artifactId>druid-spring-boot-starter</artifactId>
            <version>1.1.9</version>
        </dependency>
        <!-- 导入那个模板依赖 -->
        <dependency>
            <groupId>org.springframework.boot</groupId>
            <artifactId>spring-boot-starter-thymeleaf</artifactId>
        </dependency>
    </dependencies>

    <build>
        <plugins>
            <plugin>
                <groupId>org.springframework.boot</groupId>
                <artifactId>spring-boot-maven-plugin</artifactId>
            </plugin>
        </plugins>
    </build>


</project>
第二步:创建包结构以及编写一个启动类

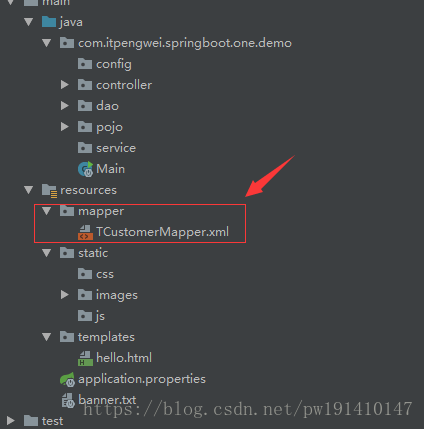
第三步:使用逆向工程生成mapper和实体类(或者自己创建),并将mapper.xml放在resource下面新建一个目录mapper(这个可以自定义放名字以及位置,看后面配置文件怎么配置)存放
第五步:编写application.properties配置文件(相信里面的配置只要会SSM的都能看懂就不多解释了)
#配置端口号以及拦截策略
server.port=8080
server.servlet.path=*.html
#开始配置mysql连接驱动以及数据库连接池参数
spring.datasource.name=mysql_test
spring.datasource.type=com.alibaba.druid.pool.DruidDataSource
spring.datasource.druid.filters=stat
spring.datasource.druid.driver-class-name=com.mysql.jdbc.Driver
spring.datasource.druid.url=jdbc:mysql://localhost:3306/crm-bos?useUnicode=true&characterEncoding=UTF-8&allowMultiQueries=true
spring.datasource.druid.username=root
spring.datasource.druid.password=19980311
#这里可以不用配置,有默认参数,根据自己需求
spring.datasource.druid.initial-size=1
spring.datasource.druid.min-idle=1
spring.datasource.druid.max-active=20
spring.datasource.druid.max-wait=6000
spring.datasource.druid.time-between-eviction-runs-millis=60000
spring.datasource.druid.min-evictable-idle-time-millis=300000
spring.datasource.druid.validation-query=SELECT 'x'
spring.datasource.druid.test-while-idle=true
spring.datasource.druid.test-on-borrow=false
spring.datasource.druid.test-on-return=false
spring.datasource.druid.pool-prepared-statements=false
spring.datasource.druid.max-pool-prepared-statement-per-connection-size=20
#开始配置mybatis
mybatis.mapper-locations=classpath:mapper/*.xml
mybatis.type-aliases-package=com.itpengwei.springboot.one.demo.pojo
#配置thymeleaf缓存开发期间先关闭,否则影响测试
spring.thymeleaf.cache=false
spring.thymeleaf.prefix=classpath:/templates/
spring.thymeleaf.suffix=.html
spring.thymeleaf.mode=HTML5
spring.thymeleaf.encoding=UTF-8
yml版配置
server:
  port: 8080
spring:
  datasource:
    name: mysql_test
    type: com.alibaba.druid.pool.DruidDataSource
    druid:
      filters: stat
      driver-class-name: com.mysql.jdbc.Driver
      url: jdbc:mysql://localhost:3306/crm-bos?useUnicode=true&characterEncoding=UTF-8&allowMultiQueries=true
      username: root
      password: 19980311
      initial-size: 1
      min-idle: 1
      max-active: 20
      max-wait: 60000
      time-between-eviction-runs-millis: 60000
      min-evictable-idle-time-millis: 300000
      validation-query: SELECT 'x'
      test-while-idle: true
      test-on-borrow: false
      test-on-return: false
      pool-prepared-statements: false
      max-pool-prepared-statement-per-connection-size: 20
  thymeleaf:
    cache: false
    prefix: classpath:/templates/
    suffix: .html
    mode: HTML5
    encoding: UTF-8
mybatis:
  mapper-locations: classpath:mapper/*.xml
  type-aliases-package: com.itpengwei.pojo
pagehelper:
  helperDialect: mysql
  reasonable: true
  supportMethodsArguments: true
  params: count=countSql
  returnPageInfo: check
第六步:编写一个Controller进行测试
package com.itpengwei.springboot.one.demo.controller;

import com.itpengwei.springboot.one.demo.dao.TCustomerMapper;
import com.itpengwei.springboot.one.demo.pojo.TCustomer;
import com.itpengwei.springboot.one.demo.pojo.TCustomerExample;
import org.springframework.beans.factory.annotation.Autowired;
import org.springframework.stereotype.Controller;
import org.springframework.ui.Model;
import org.springframework.web.bind.annotation.RequestMapping;
import org.springframework.web.bind.annotation.ResponseBody;

import java.util.List;

@Controller
public class HelloController {
    @Autowired
    private TCustomerMapper customerMapper;

    @RequestMapping(value = "/findAll.html")
    public String findAll(Model model) {
        TCustomerExample example = new TCustomerExample();
        List<TCustomer> list = customerMapper.selectByExample(example);
        model.addAttribute("hello", list);
        return "hello";
    }

    @RequestMapping(value = "/findList.html")
    @ResponseBody
    public List<TCustomer> findList() {
        TCustomerExample example = new TCustomerExample();
        List<TCustomer> list = customerMapper.selectByExample(example);
        return list;
    }
}
第七步:创建一个html5的文件(注意需要导入thymeleaf的约束)
<!DOCTYPE html>
<html xmlns="http://www.w3.org/1999/xhtml"
      xmlns:th="http://www.thymeleaf.org"
      xmlns:sec="http://www.thymeleaf.org/thymeleaf-extras-springsecurity3">
<head>
    <title>Hello World!</title>
</head>
<body>
<h1 th:inline="text">Hello.v.2</h1>
<table>
    <tr>
        <th>id</th>
        <th>name</th>
        <th>station</th>
        <th>telephone</th>
        <th>address</th>
        <th>decidedzoneId</th>
    </tr>
    <!--
        对集合变量hello进行遍历
    -->
    <tr th:each="customer : ${hello}">
        <td th:text="${customer.id}"></td>
        <td th:text="${customer.name}"></td>
        <td th:text="${customer.station}"></td>
        <td th:text="${customer.telephone}"></td>
        <td th:text="${customer.address}"></td>
        <td th:text="${customer.decidedzoneId}"></td>
    </tr>
</table>
<img alt="" th:src="@{/images/a12.png}">
</body>
</html>
第八步:运行main方法

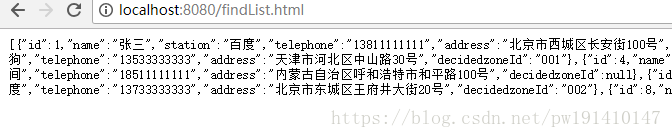
测试成功