概述
ElasticSearch是java开发的,jdk环境是必不可少的,至少有jre环境
1 下载ElasticSearch
最新版本需要访问 ElasticSearch 官网下载:https://www.elastic.co/cn/downloads/elasticsearch,
其他版本见Elastic 中文社区,地址:https://elasticsearch.cn/download
注意版本,不同的版本差异比较大,选择适合自己的版本
2. 安装
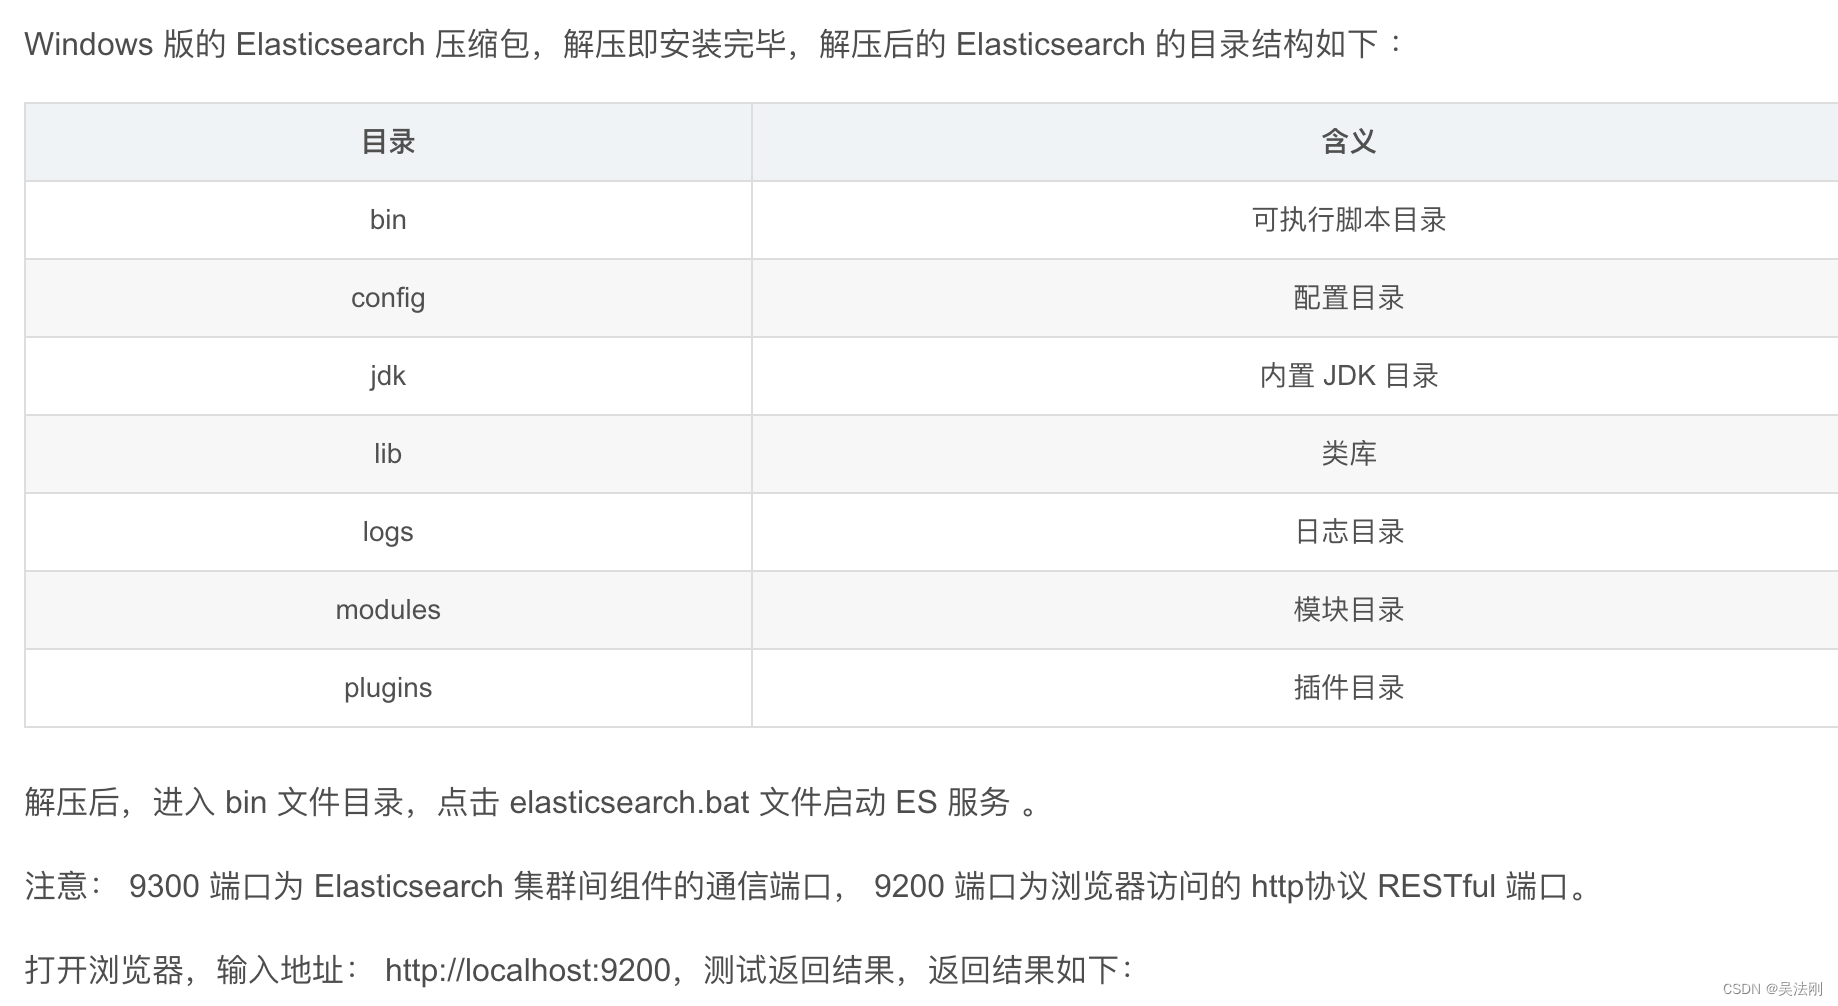
java 程序启动在不同的环境下是不一样的,但是解压后不需要特殊的安装,只需要找到bin目录使用命令启动即可
2.1 配置环境变量, 方便后期使用命令启动,而不是每次都去bin目录
我用的mac本就截图了 其他的自己百度吧 比较简单
vim ~/.bash_profile
增加内容:
自己的解压目录
ES_HOME=/Users/XXX/java/es/elasticsearch-7.17.3
PATH=$PATH:$ES_HOME/bin
export ES_HOME
配置问就可以 在终端 执行
正常 应该是elasticsearch 命令, 我为了简单 修改成 es 命令了
es
在后端启动
es -d
启动后直接访问:
localhost:9200
mac 环境变量 终端关闭后不生效问题
在 ~/.bash_profile 中配置环境变量, 每次重启终端后配置的环境变量不生效。
需要重新执行 : $source ~/.bash_profile才可以。
是因为zsh加载的是 ~/.zshrc文件,而 '.zshrc’文件中并没有定义环境变量。
解决办法:
vi ~/.zshrc
在~/.zshrc文件最后,增加一行:
source ~/.bash_profile
最后
source ~/.zshrc
已经解决了问题,那么我们想问 .bash_profile 和 .zshrc 这两个文件有什么区别呢?
.bash_profile 修改的环境变量只对当前窗口有效,而且需要 source 一下,.zshrc 则相当于 win 开机启动的环境变量,可以在 .zshrc 中加上一个 source 更新 .bash_profile 命令即可解决问题
集群配置
如果刚开始学习,完全没必要配置集群 直接单机学习就可以, 集群反正各种问题,这里我只写一个配置文件,遇到问题自己百度吧/
把自己的解压文件拷贝几分,修改 config下的配置文件
# Use a descriptive name for your cluster:
##集群名称,节点之间要保持一致
cluster.name: my-application
#
# ------------------------------------ Node ------------------------------------
#
# Use a descriptive name for the node:
# #节点名称,集群内要唯一
node.name: node-1
node.master: true
node.data: true
#
# Add custom attributes to the node:
#
#node.attr.rack: r1
#
# ----------------------------------- Paths ------------------------------------
#
# Path to directory where to store the data (separate multiple locations by comma):
#
#path.data: /path/to/data
#
# Path to log files:
#
#path.logs: /path/to/logs
#
# ----------------------------------- Memory -----------------------------------
#
# Lock the memory on startup:
#
#bootstrap.memory_lock: true
#
# Make sure that the heap size is set to about half the memory available
# on the system and that the owner of the process is allowed to use this
# limit.
# node-01
# Elasticsearch performs poorly when the system is swapping the memory.
#
# ---------------------------------- Network -----------------------------------
#
# By default Elasticsearch is only accessible on localhost. Set a different
# address here to expose this node on the network:
# #ip 地址
network.host: 10.0.72.59
#
# By default Elasticsearch listens for HTTP traffic on the first free port it
# finds starting at 9200. Set a specific HTTP port here:
# #http 端口
http.port: 1001
#tcp 监听端口
transport.tcp.port: 9301
#
# For more information, consult the network module documentation.
#
# --------------------------------- Discovery ----------------------------------
#
# Pass an initial list of hosts to perform discovery when this node is started:
# The default list of hosts is ["127.0.0.1", "[::1]"]
#
#discovery.seed_hosts: ["host1", "host2"]
#
# Bootstrap the cluster using an initial set of master-eligible nodes:
#
#cluster.initial_master_nodes: ["node-1", "node-2"]
#
# For more information, consult the discovery and cluster formation module documentation.
#
# ---------------------------------- Various -----------------------------------
#
# Require explicit names when deleting indices:
#
#action.destructive_requires_name: true
#
# ---------------------------------- Security ----------------------------------
#
#                                 *** WARNING ***
#
# Elasticsearch security features are not enabled by default.
# These features are free, but require configuration changes to enable them.
# This means that users don’t have to provide credentials and can get full access
# to the cluster. Network connections are also not encrypted.
#
# To protect your data, we strongly encourage you to enable the Elasticsearch security features.
# Refer to the following documentation for instructions.
#
# https://www.elastic.co/guide/en/elasticsearch/reference/7.16/configuring-stack-security.html


discovery.seed_hosts: ["localhost:9301", "localhost:9302","localhost:9303"]
discovery.zen.fd.ping_timeout: 1m
discovery.zen.fd.ping_retries: 5
#集群内的可以被选为主节点的节点列表
cluster.initial_master_nodes: ["node-1", "node-2","node-3"]
#跨域配置
#action.destructive_requires_name: true
http.cors.enabled: true
http.cors.allow-origin: "*"
访问集群是否正常启动:
GET http://127.0.0.1:1001/_cluster/health
GET http://127.0.0.1:1002/_cluster/health
GET http://127.0.0.1:1003/_cluster/health
返回结果:
{


    "cluster_name": "my-application",
    "status": "green",
    "timed_out": false,
    "number_of_nodes": 3,
    "number_of_data_nodes": 3,
    "active_primary_shards": 0,
    "active_shards": 0,
    "relocating_shards": 0,
    "initializing_shards": 0,
    "unassigned_shards": 0,
    "delayed_unassigned_shards": 0,
    "number_of_pending_tasks": 0,
    "number_of_in_flight_fetch": 0,
    "task_max_waiting_in_queue_millis": 0,
    "active_shards_percent_as_number": 100.0
}
status字段指示着当前集群在总体上是否工作正常。它的三种颜色含义如下:
green:所有的主分片和副本分片都正常运行。
yellow:所有的主分片都正常运行,但不是所有的副本分片都正常运行。
red:有主分片没能正常运行。
配置内存设置文件jvm.options
文件路径:/var/huaxing/elasticsearch-7.4.2/config
内存容量较小时修改默认配置:-Xms1g -Xmx1g为-Xms512m -Xmx512m。