win10+pytorch配置yolov5网络训练数据集
1.软件
Win10+Anaconda3+pytorch2.0.0+python3.9.16+opencv_python4.7
1.1 安装Anaconda3
清华源安装包:https://mirrors.tuna.tsinghua.edu.cn/anaconda/archive/
本文选择: Anaconda3-2022.10-Linux-x86_64.sh
1.1.1 安装
麻瓜安装:“下一步”,但最后一步不要选择“添加环境变量”
***:文件夹不要设中文路径。
1.1.2 环境配置
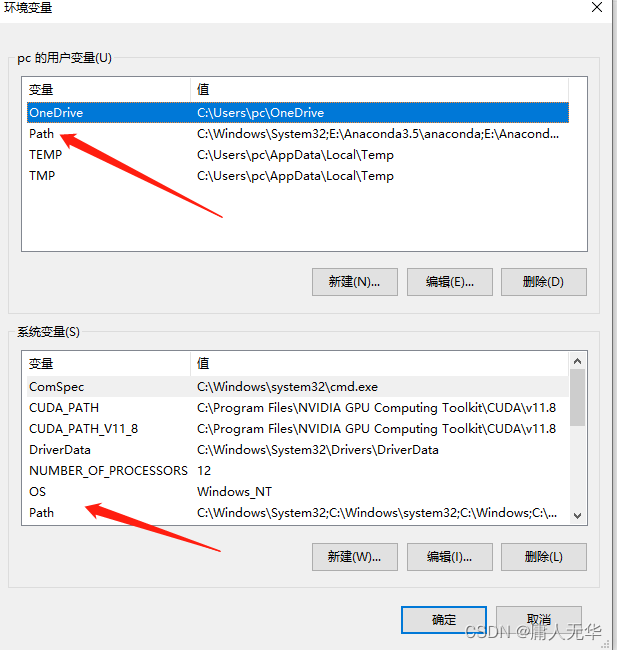
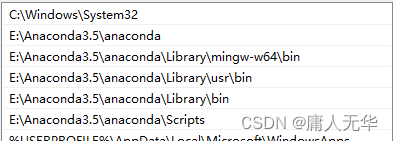
在用户变量和系统变量的“path”中分别添加对应安装路径。
添加下载源:
打开Anaconda Prompot(Anaconda)终端,输入:
conda config --add channels http://mirrors.tuna.tsinghua.edu.cn/anaconda/pkgs/free/
conda config --add channels http://mirrors.tuna.tsinghua.edu.cn/anaconda/pkgs/main/
conda config --add channels http://mirrors.tuna.tsinghua.edu.cn/anaconda/cloud/conda-forge/
查看通道地址:
conda config --show channels
***:也可直接通过修改用户配置实现,也即在C:\Users\xxx.condarc文件中添加上述源。
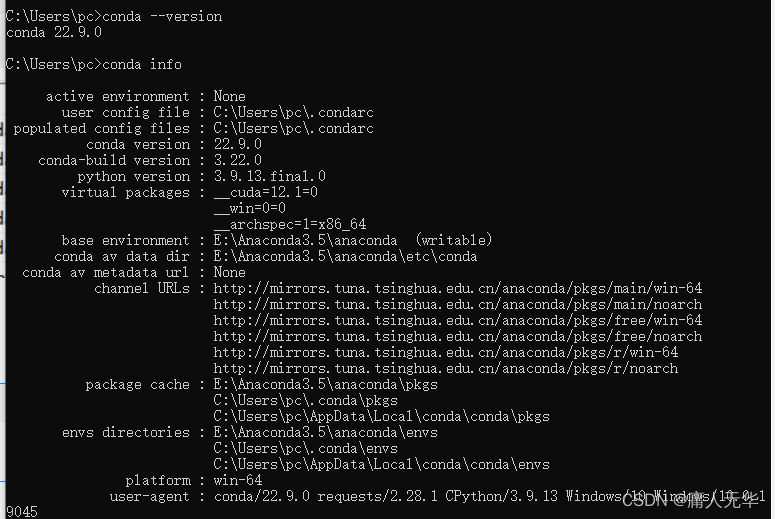
1.1.3 检查安装
打开cmd终端,输入:
conda --version  //conda 22.9.0
conda info
1.2 安装pytorch虚拟环境
该表格给出了pytorch支持的各种系统版本、安装方式、python版本以及CUDA版本(也就是NVIDIA官方的GPU加速工具驱动):https://pytorch.org/get-started/locally/
本机配置:CUDA11.8,python3.9
打开Anaconda Prompt终端
conda create -n pytorch python=3.9
activate pytorch
conda install pytorch torchvision torchaudio pytorch-cuda=11.8 -c pytorch -c nvidia
conda install -c menpo opencv
python
import torch
x = torch.rand(5, 3)
print(x)
#tensor([[0.3380, 0.3845, 0.3217],
#        [0.8337, 0.9050, 0.2650],
#        [0.2979, 0.7141, 0.9069],
#        [0.1449, 0.1132, 0.1375],
#        [0.4675, 0.3947, 0.1426]])
import torch
torch.cuda.is_available()
***若下载速度慢,更新conda国内源
清华源:
conda config --add channels https://mirrors.tuna.tsinghua.edu.cn/anaconda/pkgs/free/
1.3 安装LabelImg
源码下载:https://gitcode.net/mirrors/tzutalin/labelimg?utm_source=csdn_github_accelerator
打开Anaconda Prompt终端
conda create -n labelimg
activate labelimg
conda install lxml
conda install PyQt5
cd E:xxx 			#//安装包路径
Pyrcc5 -o resources.py resources.qrc #会在当前目录下生成一个resource.py