SSM整合的入门案例
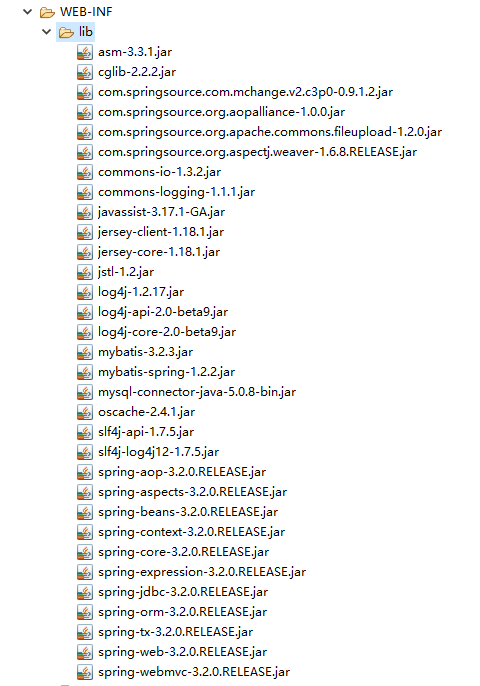
最近学习了springmvc和mybatis,按照学习的视屏总结下SSM的入门案例。第一步:创建一个web工程,并导入所需jar包
jar包包括:spring、springmvc、mybatis、mybatis-spring整合、数据库驱动、jstl、c3p0、log4j...
第二步:编写log4j.properties和jdbc.properties文件
log4j.properties文件
### direct log messages to stdout ###
log4j.appender.stdout=org.apache.log4j.ConsoleAppender
log4j.appender.stdout.Target=System.out
log4j.appender.stdout.layout=org.apache.log4j.PatternLayout
log4j.appender.stdout.layout.ConversionPattern=%d{ABSOLUTE} %5p %c{1}:%L - %m%n

### direct messages to file mylog.log ###
log4j.appender.file=org.apache.log4j.FileAppender
log4j.appender.file.File=c:/mylog.log
log4j.appender.file.layout=org.apache.log4j.PatternLayout
log4j.appender.file.layout.ConversionPattern=%d{ABSOLUTE} %5p %c{1}:%L - %m%n

### set log levels - for more verbose logging change 'info' to 'debug' ###

log4j.rootLogger=info, stdout
jdbc.properties文件
jdbc.url = jdbc\:mysql\:///ssm
jdbc.driver = com.mysql.jdbc.Driver
jdbc.username= root
jdbc.password= root
第三步:配置web.xml文件
<?xml version="1.0" encoding="UTF-8"?>
<web-app xmlns:xsi="http://www.w3.org/2001/XMLSchema-instance" xmlns="http://java.sun.com/xml/ns/javaee" xsi:schemaLocation="http://java.sun.com/xml/ns/javaee http://java.sun.com/xml/ns/javaee/web-app_2_5.xsd" id="WebApp_ID" version="2.5">
	<display-name>ssm</display-name>

	<!-- 配置spring编码过滤器 -->
	<filter>
		<filter-name>characterEncoding</filter-name>
		<filter-class>org.springframework.web.filter.CharacterEncodingFilter</filter-class>
		<init-param>
			<param-name>encoding</param-name>
			<param-value>UTF-8</param-value>
		</init-param>
	</filter>

	<filter-mapping>
		<filter-name>characterEncoding</filter-name>
		<url-pattern>/*</url-pattern>
	</filter-mapping>

	<!-- 加载spring配置文件 -->
	<listener>
		<listener-class>org.springframework.web.context.ContextLoaderListener</listener-class>
	</listener>
	<context-param>
		<param-name>contextConfigLocation</param-name>
		<param-value>classpath:applicationContext.xml</param-value>
	</context-param>

	<!-- 加载springmvc配置文件 -->
	<servlet>
		<servlet-name>springmvc</servlet-name>
		<servlet-class>org.springframework.web.servlet.DispatcherServlet</servlet-class>
		<init-param>
			<param-name>contextConfigLocation</param-name>
			<param-value>classpath:springmvc.xml</param-value>
		</init-param>
	</servlet>

	<servlet-mapping>
		<servlet-name>springmvc</servlet-name>
		<url-pattern>/rest/*</url-pattern>
	</servlet-mapping>

</web-app>
第四步:spring配置文件:applicationContext.xml
一般spring的配置文件包含三个部分:
(1)配置数据源;
(2)创建sqlSessionFactory,生产sqlSesssion;
(3)事务
<?xml version="1.0" encoding="UTF-8"?>
<beans xmlns="http://www.springframework.org/schema/beans"
	xmlns:xsi="http://www.w3.org/2001/XMLSchema-instance"
	xmlns:mvc="http://www.springframework.org/schema/mvc"
	xmlns:context="http://www.springframework.org/schema/context"
	xmlns:aop="http://www.springframework.org/schema/aop"
	xmlns:tx="http://www.springframework.org/schema/tx"
	xsi:schemaLocation="http://www.springframework.org/schema/beans
		http://www.springframework.org/schema/beans/spring-beans-3.2.xsd
		http://www.springframework.org/schema/mvc
		http://www.springframework.org/schema/mvc/spring-mvc-3.2.xsd
		http://www.springframework.org/schema/context
		http://www.springframework.org/schema/context/spring-context-3.2.xsd
		http://www.springframework.org/schema/aop
		http://www.springframework.org/schema/aop/spring-aop-3.2.xsd
		http://www.springframework.org/schema/tx
		http://www.springframework.org/schema/tx/spring-tx-3.2.xsd">

		<!-- 扫描com.zju下的文件 -->
		<context:component-scan base-package="com.zju"></context:component-scan>

		<!-- 第一步:配置数据源 -->
		<!-- 加载jdbc.properties文件 -->
		<context:property-placeholder location="classpath:jdbc.properties" />
		<bean id="dataSource" class="com.mchange.v2.c3p0.ComboPooledDataSource">
			<property name="jdbcUrl" value="${jdbc.Url}"></property>
			<property name="driverClass" value="${jdbc.driver}"></property>
			<property name="user" value="${jdbc.username}"></property>
			<property name="password" value="${jdbc.password}"></property>
		</bean>

		<!-- 第二步:mybatis相关配置:创建sqlSessionFactory,生产sqlSession -->
		<bean id="sqlSessionFactory" class="org.mybatis.spring.SqlSessionFactoryBean">
			<property name="dataSource" ref="dataSource"></property>
			<property name="configLocation" value="classpath:sqlMapConfig.xml"></property>
		</bean>

		<!-- 配置mybatis接口代理开发
		注意事项:1、接口类名和映射文件必须同名
			   2、接口类和映射文件必须在同一目录下
			   3、映射文件的namespace名称必须是接口的全限定路径名
			   4、接口的方法名必须和映射Statement的id一致
		 -->
		<bean class="org.mybatis.spring.mapper.MapperScannerConfigurer">
			<property name="basePackage" value="com.zju.dao"></property>
			<property name="sqlSessionFactoryBeanName" value="sqlSessionFactory"></property>
		</bean>

		<!-- 第三步:配置事务 -->
		<bean id="transactionManager" class="org.springframework.jdbc.datasource.DataSourceTransactionManager">
			<property name="dataSource" ref="dataSource"></property>
		</bean>

		<!-- 配置事务通知 -->
		<tx:advice id="txAdvice" transaction-manager="transactionManager">
			<tx:attributes>
				<!-- save*的意思是以save开头的都拦截 -->
				<tx:method name="save*" propagation="REQUIRED" />
				<tx:method name="update*" propagation="REQUIRED" />
				<tx:method name="delete*" propagation="REQUIRED" />
				<tx:method name="insert*" propagation="REQUIRED" />
				<tx:method name="*" propagation="REQUIRED" />
			</tx:attributes>
		</tx:advice>

		<!-- 配置切面编程,拦截service -->
		<aop:config>
			<aop:advisor advice-ref="txAdvice" pointcut="execution(*com.zju.service.*.*(..))"/>
		</aop:config>

</beans>
第五步:编写springmvc.xml文件
<?xml version="1.0" encoding="UTF-8"?>
<beans xmlns="http://www.springframework.org/schema/beans"
	xmlns:xsi="http://www.w3.org/2001/XMLSchema-instance"
	xmlns:mvc="http://www.springframework.org/schema/mvc"
	xmlns:context="http://www.springframework.org/schema/context"
	xmlns:aop="http://www.springframework.org/schema/aop"
	xmlns:tx="http://www.springframework.org/schema/tx"
	xsi:schemaLocation="http://www.springframework.org/schema/beans
		http://www.springframework.org/schema/beans/spring-beans-3.2.xsd
		http://www.springframework.org/schema/mvc
		http://www.springframework.org/schema/mvc/spring-mvc-3.2.xsd
		http://www.springframework.org/schema/context
		http://www.springframework.org/schema/context/spring-context-3.2.xsd
		http://www.springframework.org/schema/aop
		http://www.springframework.org/schema/aop/spring-aop-3.2.xsd
		http://www.springframework.org/schema/tx
		http://www.springframework.org/schema/tx/spring-tx-3.2.xsd">

	<!-- 配置扫描组件 -->
	<context:component-scan base-package="com.zju"></context:component-scan>

	<!-- 配置处理器映射器和处理器适配器 -->
	<mvc:annotation-driven />

	<!-- 配置springmvc视图解析器 -->
	<bean class="org.springframework.web.servlet.view.InternalResourceViewResolver">
		<property name="prefix" value="/WEB-INF/jsps/"></property>
		<property name="suffix" value=".jsp"></property>
	</bean>

</beans>
第六步:编写SqlMapConfig.xml文件
只用搭个架子就行,约束要有。如果需要使用一级\二级缓存时可以在该文件下配置。
<?xml version="1.0" encoding="UTF-8"?>
<!DOCTYPE configuration
PUBLIC "-//mybatis.org//DTD Config 3.0//EN"
"http://mybatis.org/dtd/mybatis-3-config.dtd">
<configuration>

</configuration>
到这里配置文件都已经配置好了,下面开始编写接口代码
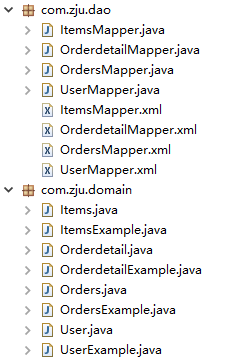
第七步:使用sqlGenerator自动生成domain代码和dao代码
第八步:编写Service层代码
ItemsService接口:
package com.zju.service;

import java.util.List;

import com.zju.domain.Items;

public interface ItemsService {

	List <Items> findAll();
}
ItemsService接口实现类:
package com.zju.service.impl;

import java.util.List;

import javax.annotation.Resource;

import com.zju.dao.ItemsMapper;
import com.zju.domain.Items;
import com.zju.service.ItemsService;

public class ItemsServiceImpl implements ItemsService{

	@Resource
	private ItemsMapper itemsMapper;

	@Override
	public List<Items> findAll() {
		List<Items> list = itemsMapper.findAll();
		return list;
	}
}
第九步:编写Controller层代码
package com.zju.controller;

import java.util.List;

import javax.annotation.Resource;

import org.springframework.stereotype.Controller;
import org.springframework.ui.Model;
import org.springframework.web.bind.annotation.RequestMapping;

import com.zju.domain.Items;
import com.zju.service.ItemsService;

@Controller
@RequestMapping("/items")
public class ItemsController {

	@Resource
	private ItemsService itemsService;

	//查询所有商品
	@RequestMapping("list")
	public String list(Model model) {
		List<Items> list = itemsService.findAll();
		//itemsList要和jsp上的获取名一致
		model.addAttribute("itemsList", list);
		return "itemsList";
	}
}
第十步:编写itemsList.jsp
<%@ page language="java" contentType="text/html; charset=UTF-8"
    pageEncoding="UTF-8"%>
<%@ taglib uri="http://java.sun.com/jsp/jstl/core" prefix="c" %>
<%@ taglib uri="http://java.sun.com/jsp/jstl/fmt"  prefix="fmt"%>
<c:set var="picPath" value="http://127.0.0.1:8003/ssmImage19"></c:set>
<!DOCTYPE html PUBLIC "-//W3C//DTD HTML 4.01 Transitional//EN" "http://www.w3.org/TR/html4/loose.dtd">
<html>
<head>
<meta http-equiv="Content-Type" content="text/html; charset=UTF-8">
<title>查询商品列表</title>
</head>
<body>
<form action="${pageContext.request.contextPath }/items/deleteByIds.do" method="post">
查询条件:
<table width="100%" border=1>
<tr>
<td><input type="submit" value="查询"/></td>
<td><input type="submit" value="批量删除"/></td>
</tr>
</table>
商品列表:
<table width="100%" border=1>
<tr>
	<td>ID</td>
	<td>商品名称</td>
	<td>商品图片</td>
	<td>商品价格</td>
	<td>生产日期</td>
	<td>商品描述</td>
	<td>操作</td>
</tr>
<c:forEach items="${itemsList }" var="item">
<tr>
	<td>
	<input type="checkbox" name="id" value="${item.id }">
	</td>
	<td>${item.name }</td>
	<td>
	<img id='imgSize1ImgSrc' src='${picPath }${item.pic }'  height="100" width="100" />
	</td>
	<td>${item.price }</td>
	<td><fmt:formatDate value="${item.createtime}" pattern="yyyy-MM-dd HH:mm:ss"/></td>
	<td>${item.detail }</td>

	<td><a href="${pageContext.request.contextPath }/items/edit.do?id=${item.id}">修改</a>
	<a href="${pageContext.request.contextPath }/items/deleteByID.do?id=${item.id}">删除</a>
	</td>
</tr>
</c:forEach>
</table>
</form>
</body>

</html>
未完待续......