分布式调度Elastic-job
1. 概述
1.1什么是任务调度
我们可以思考⼀下下⾯业务场景的解决⽅案:
- 某电商平台需要每天上午10点,下午3点,晚上8点发放⼀批优惠券
- 某银⾏系统需要在信⽤卡到期还款⽇的前三天进⾏短信提醒
- 某财务系统需要在每天凌晨0:10分结算前⼀天的财务数据,统计汇总
以上场景就是任务调度所需要解决的问题
任务调度是为了自动完成特定任务,在约定的特定时刻去执行任务的过程
我们经常使用Spring中提供的定时任务注解@Scheduled 在业务类中⽅法中贴上这个注解
@Scheduled(cron = "0/20 * * * * ? ")
public void doWork(){


//doSomething
}
然后在启动类上贴上 @EnableScheduling 注解
1.2 为什么需要分布式调度
感觉Spring给我们提供的这个注解可以完成任务调度的功能,好像已经完美解决问题了,为什么还需要 分布式呢?
主要有如下这⼏点原因:
1.单机处理极限:原本1分钟内需要处理1万个订单,但是现在需要1分钟内处理10万个订单;原来⼀个 统计需要1⼩时,现在业务⽅需要10分钟就统计出来。你也许会说,你也可以多线程、单机多进程处 理。的确,多线程并⾏处理可以提⾼单位时间的处理效率,但是单机能⼒毕竟有限(主要是CPU、内存 和磁盘),始终会有单机处理不过来的情况。
2.高可用:单机版的定式任务调度只能在⼀台机器上运⾏,如果程序或者系统出现异常就会导致功能不 可⽤。虽然可以在单机程序实现的⾜够稳定,但始终有机会遇到⾮程序引起的故障,⽽这个对于⼀个系 统的核⼼功能来说是不可接受的。
3.防止重复执行: 在单机模式下,定时任务是没什么问题的。但当我们部署了多台服务,同时⼜每台服务 ⼜有定时任务时,若不进⾏合理的控制在同⼀时间,只有⼀个定时任务启动执⾏,这时,定时执⾏的结 果就可能存在混乱和错误了
这个时候就需要分布式的任务调度来实现了。
1.3 Elastic-Job介绍
Elastic-Job是⼀个分布式调度的解决⽅案,由当当⽹开源,它由两个相互独⽴的⼦项⽬Elastic-job-Lite和 Elastic-Job-Cloud组成,使⽤Elastic-Job可以快速实现分布式任务调度。
Elastic-Job的地址: https://shardingsphere.apache.org/elasticjob/
功能列表:
-
分布式调度协调
- 在分布式环境中,任务能够按照指定的调度策略执⾏,并且能够避免同⼀任务多实例重复执⾏。
-
丰富的调度策略
- 基于成熟的定时任务作业框架Quartz cron表达式执⾏定时任务。
-
弹性拓容缩容
- 当集群中增加⼀个实例,它应当能够被选举被执⾏任务;当集群减少⼀个实例时,他所执⾏的任务 能被转移到别的示例中执⾏。
-
失效转移
- 某示例在任务执⾏失败后,会被转移到其他实例执⾏。
-
错过执行任务重触发
- 若因某种原因导致作业错过执⾏,⾃动记录错误执⾏的作业,并在下次次作业完成后⾃动触发。
-
⽀持并行调度
- ⽀持任务分⽚,任务分⽚是指将⼀个任务分成多个⼩任务在多个实例同时执⾏。
-
作业分片一致性
- 当任务被分⽚后,保证同⼀分⽚在分布式环境中仅⼀个执⾏实例。
-
支持作业生命周期操作
-
可以动态对任务进⾏开启及停⽌操作。
-
丰富的作业类型
-
⽀持Simple、DataFlow、Script三种作业类型

系统架构图
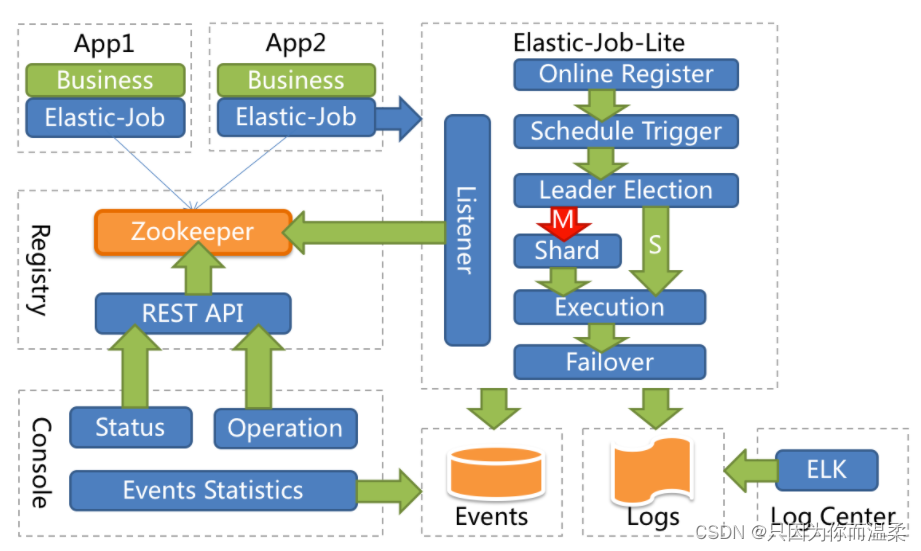
-
2.Elastic-Job快速入门
2.1 环境搭建
2.1.1 版本02.要求
-
JDK 要求1.7以上版本
-
Maven 要求3.0.4及以上版本
-
Zookeeper 要求采取3.4.6以上版本
2.1.2 Zookeeper安装&运行
1. 解压zookeeper-3.4.11.tar.gz, 进入conf目录, 复制zoo_sample.cfg文件, 命名为:zoo.cfg
2. 进入bin目录, 运行zkServer.cmd就可以了.
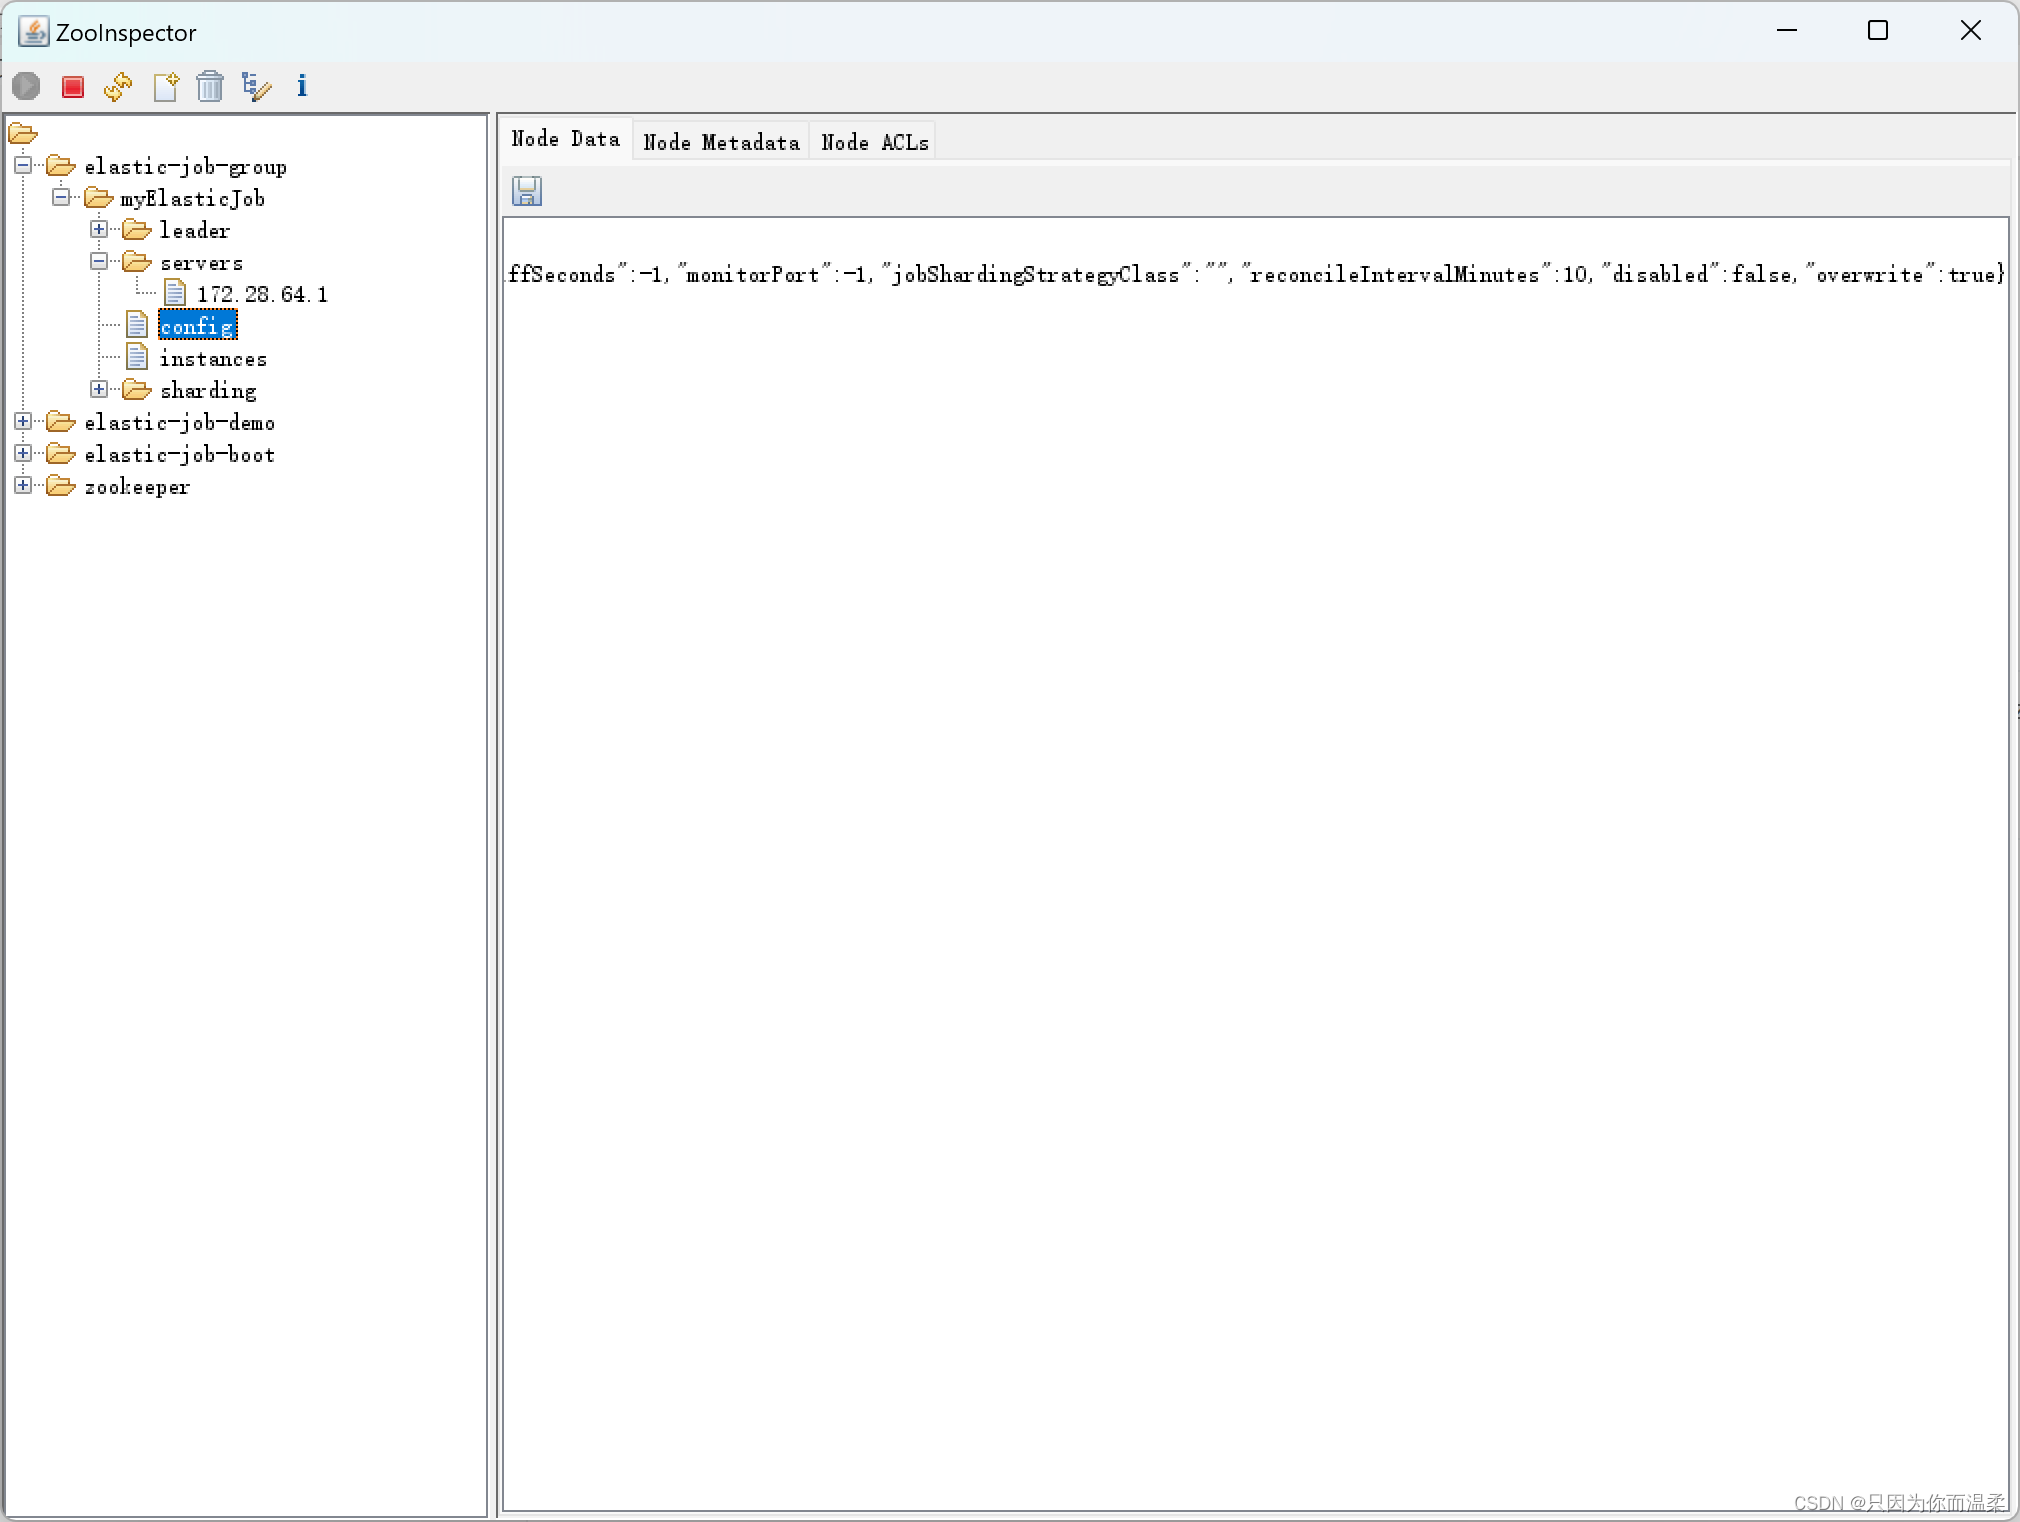
3. 解压ZooInspector.zip, 运行jar文件
zookeeper客户端可视化工具
2.1.3 创建Maven项目
添加如下依赖
<dependency>
	<groupId>com.dangdang</groupId>
 	<artifactId>elastic-job-lite-core</artifactId>
 	<version>2.1.5</version>
</dependency>
2.2 代码实现
2.2.1 任务类
package com.xiaoge;

import com.dangdang.ddframe.job.api.ShardingContext;
import com.dangdang.ddframe.job.api.simple.SimpleJob;

import java.util.Date;

public class MyElasticJob implements SimpleJob {


    public void execute(ShardingContext shardingContext) {


        System.out.println("定时任务开始====>" + new Date());
    }
}
2.2.2 配置类
package com.xiaoge;

import com.dangdang.ddframe.job.config.JobCoreConfiguration;
import com.dangdang.ddframe.job.config.simple.SimpleJobConfiguration;
import com.dangdang.ddframe.job.lite.api.JobScheduler;
import com.dangdang.ddframe.job.lite.config.LiteJobConfiguration;
import com.dangdang.ddframe.job.reg.base.CoordinatorRegistryCenter;
import com.dangdang.ddframe.job.reg.zookeeper.ZookeeperConfiguration;
import com.dangdang.ddframe.job.reg.zookeeper.ZookeeperRegistryCenter;

public class JobDemo {


    public static void main(String[] args) {


        // JobScheduler(注册中心对象, 任务配置对象)
        new JobScheduler(createRegistryCenter(), createJobConfiguration()).init();
    }

    // 注册中心
    private static CoordinatorRegistryCenter createRegistryCenter() {


        // 配置zk地址,调度任务的组名
        ZookeeperConfiguration zookeeperConfiguration = new ZookeeperConfiguration("localhost:2181", "elastic-job-demo");
        // 设置节点超时时间
        zookeeperConfiguration.setSessionTimeoutMilliseconds(100);
        // ZookeeperRegistryCenter("zookeeper地址", "项目名")
        CoordinatorRegistryCenter regCenter = new ZookeeperRegistryCenter(zookeeperConfiguration);
        regCenter.init();
        return regCenter;
    }

    // 定时任务配置
    private static LiteJobConfiguration createJobConfiguration() {


        // 定义作业核⼼配置 newBuilder("任务名称", "cron表达式", "分片数量")
        JobCoreConfiguration simpleCoreConfig =
                JobCoreConfiguration.newBuilder("myElasticJob", "0/10 * * * * ?", 1).build();
        // 定义SIMPLE类型配置 MyElasticJob.class.getCanonicalName()--->获取这个类的权限定类名
        SimpleJobConfiguration simpleJobConfig = new SimpleJobConfiguration(simpleCoreConfig, MyElasticJob.class.getCanonicalName());
        // 定义Lite作业根配置 (overwrite(true) 表示zookeeper里面的配置可以覆盖, 如果为false, 设置了一次cron表达式, 第二次修改表达式是不生效的)
        LiteJobConfiguration simpleJobRootConfig = LiteJobConfiguration.newBuilder(simpleJobConfig).overwrite(true).build();
        return simpleJobRootConfig;
    }
}
2.2.3 测试
-
运行单个程序,查看是否按照cron表达式的内容进⾏任务的调度
-
运行多个程序,查看是否只会有⼀个实例进⾏任务调度
-
运行多个程序后,把正在进行任务调度的进程关掉,查看其它进程是否能继续进⾏任务调度
3.SpringBoot集成Elastic-Job
3.1 添加Maven依赖
<?xml version="1.0" encoding="UTF-8"?>
<project xmlns="http://maven.apache.org/POM/4.0.0"
         xmlns:xsi="http://www.w3.org/2001/XMLSchema-instance"
         xsi:schemaLocation="http://maven.apache.org/POM/4.0.0 http://maven.apache.org/xsd/maven-4.0.0.xsd">
    <modelVersion>4.0.0</modelVersion>

    <groupId>com.xiaoge</groupId>
    <artifactId>elastic-job-boot</artifactId>
    <version>1.0-SNAPSHOT</version>

    <parent>
        <groupId>org.springframework.boot</groupId>
        <artifactId>spring-boot-starter-parent</artifactId>
        <version>2.1.3.RELEASE</version>
    </parent>

    <properties>
        <maven.compiler.source>8</maven.compiler.source>
        <maven.compiler.target>8</maven.compiler.target>
        <project.build.sourceEncoding>UTF-8</project.build.sourceEncoding>
    </properties>

    <dependencies>
        <dependency>
            <groupId>org.springframework.boot</groupId>
            <artifactId>spring-boot-starter-web</artifactId>
        </dependency>

        <dependency>
            <groupId>com.dangdang</groupId>
            <artifactId>elastic-job-lite-spring</artifactId>
            <version>2.1.5</version>
        </dependency>

        <dependency>
            <groupId>org.projectlombok</groupId>
            <artifactId>lombok</artifactId>
        </dependency>
    </dependencies>

</project>
3.2 相关配置
因为配置中心的地址并不是固定的,所以我们应该把这个地址信息配置在配置文件中,所以在配置⽂件 application.yml中添加配置如下:
elasticjob:
  url: localhost:2181
  group-name: elastic-job-boot
zk注册中心配置类:
@Bean
public CoordinatorRegistryCenter registryCenter(@Value("${elasticjob.url}") String zookeeperUrl, @Value("${elasticjob.group-name}") String groupName) {


    // 配置zk地址,调度任务的组名
    ZookeeperConfiguration zookeeperConfiguration = new ZookeeperConfiguration(zookeeperUrl, groupName);
    // 设置节点超时时间
    zookeeperConfiguration.setSessionTimeoutMilliseconds(100);
    // ZookeeperRegistryCenter("zookeeper地址", "项目名")
    CoordinatorRegistryCenter regCenter = new ZookeeperRegistryCenter(zookeeperConfiguration);
    regCenter.init();
    return regCenter;
}
任务调度配置类:
/**
     * todo 注意这个方法不能交给 spring 管理, 你要让它是个公共的方法,
     *      传递不同的jobName(任务名称), cron(cron表达式), shardingTotalCount(分片数量) 生成不同的LiteJobConfiguration, 因为环境不同任务配置不同.
     *      也有可能别的任务需要这个方法创建
     * @return
     */
public LiteJobConfiguration createJobConfiguration(Class<?> clazz, String cron, Integer shardingTotalCount, String shardingParam) {


    // 定义作业核⼼配置 newBuilder("任务名称", "cron表达式", "分片数量")
    JobCoreConfiguration.Builder jobBuilder = JobCoreConfiguration.newBuilder(clazz.getSimpleName(), cron, shardingTotalCount);
    if (!StringUtils.isEmpty(shardingParam)) {


        // 分片参数
        jobBuilder = jobBuilder.shardingItemParameters(shardingParam);
    }
    // SimpleJob配置
    // 定义SIMPLE类型配置 MyElasticJob.class.getCanonicalName()--->获取这个类的权限定类名
    SimpleJobConfiguration simpleJobConfiguration = new SimpleJobConfiguration(jobBuilder.build(), clazz.getCanonicalName());


    // 定义Lite作业根配置 (overwrite(true) 表示zookeeper里面的配置可以覆盖, 如果为false, 设置了一次cron表达式, 第二次修改表达式是不生效的)
    LiteJobConfiguration simpleJobRootConfig = LiteJobConfiguration.newBuilder(simpleJobConfiguration).overwrite(true).build();
    return simpleJobRootConfig;
}
4.案例需求
需求:数据库中有⼀些列的数据,需要对这些数据进行备份操作,备份完之后,修改数据的状态,标记已 经备份了.
4.1 初始化数据
在数据库中导⼊ elastic-job-demo.sql 数据
4.2 集成Druid&MyBatis
4.2.1 添加依赖
<dependency>
    <groupId>com.alibaba</groupId>
    <artifactId>druid</artifactId>
    <version>1.1.10</version>
</dependency>
<dependency>
    <groupId>org.mybatis.spring.boot</groupId>
    <artifactId>mybatis-spring-boot-starter</artifactId>
    <version>1.2.0</version>
</dependency>
<!--mysql驱动-->
<dependency>
    <groupId>mysql</groupId>
    <artifactId>mysql-connector-java</artifactId>
</dependency>
4.2.2 添加配置
spring:
  datasource:
    url: jdbc:mysql://localhost:3306/elastic-job-demo?serverTimezone=GMT%2B8
    driverClassName: com.mysql.jdbc.Driver
    type: com.alibaba.druid.pool.DruidDataSource
    username: root
    password: root
4.2.3 添加实体类
package com.xiaoge.domain;

import lombok.Data;

@Data
public class FileCustom {


    //唯⼀标识
    private Long id;
    //⽂件名
    private String name;
    //⽂件类型
    private String type;
    //⽂件内容
    private String content;
    //是否已备份
    private Boolean backedUp = false;

    public FileCustom() {


    }

    public FileCustom(Long id, String name, String type, String content) {


        this.id = id;
        this.name = name;
        this.type = type;
        this.content = content;
    }
}
4.2.4 添加Mapper处理类
package com.xiaoge.mapper;

import com.xiaoge.domain.FileCustom;
import org.apache.ibatis.annotations.Mapper;
import org.apache.ibatis.annotations.Param;
import org.apache.ibatis.annotations.Select;
import org.apache.ibatis.annotations.Update;

import java.util.List;

@Mapper
public interface FileCustomMapper {


    @Select("select * from t_file_custom where backedUp = 0")
    List<FileCustom> selectAll();

    @Update("update t_file_custom set backedUp = #{state} where id = #{id}")
    int changeState(@Param("id") Long id, @Param("state") int state);
}
4.3 业务功能实现
4.3.1 添加任务类
package com.xiaoge.service;

import com.dangdang.ddframe.job.api.ShardingContext;
import com.dangdang.ddframe.job.api.simple.SimpleJob;
import com.xiaoge.domain.FileCustom;
import com.xiaoge.mapper.FileCustomMapper;
import lombok.extern.slf4j.Slf4j;
import org.springframework.beans.factory.annotation.Autowired;
import org.springframework.stereotype.Component;

import java.util.List;
import java.util.concurrent.TimeUnit;

@Slf4j
@Component
public class FileCustomElasticJob implements SimpleJob {


    @Autowired
    private FileCustomMapper fileCustomMapper;

    @Override
    public void execute(ShardingContext shardingContext) {


        doWork();
    }
    private void doWork(){


        List<FileCustom> fileList = fileCustomMapper.selectAll();
        System.out.println("需要备份⽂件个数:"+fileList.size());
        for(FileCustom fileCustom:fileList){


            backUpFile(fileCustom);
        }
    }
    private void backUpFile(FileCustom fileCustom){


        try {


            //模拟备份动作
            TimeUnit.SECONDS.sleep(1);
        } catch (InterruptedException e) {


            e.printStackTrace();
        }
        System.out.println("执⾏⽂件备份====>"+fileCustom);
        fileCustomMapper.changeState(fileCustom.getId(),1);
    }
}
4.3.2 添加任务调度配置
在配置类中新增这个Bean
/**
     * todo 注意一个ElasticJob里面不管有多少实例, 只会有一个被调度, 那就是zookeeper选出来的leader
     * @param myElasticJob
     * @param regCenter
     * @return
     */
@Bean(initMethod = "init")
public SpringJobScheduler initSpringScheduler(ElasticJob myElasticJob, CoordinatorRegistryCenter regCenter) {


    LiteJobConfiguration simpleJobRootConfig = createJobConfiguration(myElasticJob.getClass(), "0/10 * * * * ?", 1);
    return new SpringJobScheduler(myElasticJob, regCenter, simpleJobRootConfig);
}
4.4 测试&问题
为了高可用,我们会对这个项⽬做集群的操作,可以保证其中⼀台挂了,另外⼀台可以继续⼯作.但是在集 群的情况下,调度任务只在⼀台机器上运行,如果单个任务调度⽐较耗时,耗资源的情况下,对这台机器 的消耗还是比较大的, 但是这个时候,其他机器却是空闲着的.如何合理的利用集群的其他机器且如何让任务执行得更快些呢? 这时候Elastic-Job提供了任务调度分片的功能.
5.分片概念
作业分片是指任务的分布式执行,需要将⼀个任务拆分为多个独立的任务项,然后由分布式的应用实 例分别执行某⼀个或者几个分布项。
例如:Elastic-Job快速入门中文件备份的案例,现有两台服务器,每台服务器分别跑⼀个应用实例。 为了快速执行作业,那么可以讲任务分成4片,每个应⽤实例都执行两片。作业遍历数据逻辑应为:实例 1查找text和image类型⽂件执⾏备份,实例2查找radio和vedio类型⽂件执⾏备份。如果由于服务器拓 容应⽤实例数量增加为4,则作业遍历数据的逻辑应为: 4个实例分别处理text,image,radio,video类型的 ⽂件。
例如:Elastic-Job快速入门中文件备份的案例,现有两台服务器,每台服务器分别跑⼀个应⽤实例。 为了快速执行作业,那么可以讲任务分成4片,每个应⽤实例都执行两片。作业遍历数据逻辑应为:实例 1查找text和image类型文件执行备份,实例2查找radio和vedio类型文件执行备份。如果由于服务器拓 容应⽤实例数量增加为4,则作业遍历数据的逻辑应为: 4个实例分别处理text,image,radio,video类型的 文件。
分片项与业务处理解耦
Elastic-Job并不直接提供数据处理的功能,框架只会将分⽚项分配⾄各个运⾏中的作业服务器,开发者 需要自行处理分⽚项与真实数据的对应关系
最大限度利用资源
将分片项设置大于服务器的数据,最好是⼤于服务器倍数的数量,作业将会合理利⽤分布式资源,动态 的分配分片项.
例如: 3台服务器,分成10片,则分片项结果为服务器A=0,1,2;服务器B=3,4,5;服务器C=6,7,8,9.如果 服务器C奔溃,则分片项分配结果为服务器A=0,1,2,3,4;服务器B=5,6,7,8,9.在不丢失分⽚项的情况下,最大限度利⽤现有的资源提高吞吐量.
6.案例改造成任务分片
6.1 配置类修改
在任务配置类中增加分片个数以及分片参数.
@Bean(initMethod = "init")
public SpringJobScheduler initFileCustomElasticJob(FileCustomElasticJob
                                                   fileCustomElasticJob){


    SpringJobScheduler springJobScheduler = new SpringJobScheduler(
        fileCustomElasticJob,
        registryCenter,
        createJobConfiguration(FileCustomElasticJob.class,"0 0/1 * * *
                               ?",4,"0=text,1=image,2=radio,3=vedio"));
    return springJobScheduler;
}
6.2 新增作业分片逻辑
package com.xiaoge.service;

import com.dangdang.ddframe.job.api.ShardingContext;
import com.dangdang.ddframe.job.api.simple.SimpleJob;
import com.xiaoge.domain.FileCustom;
import com.xiaoge.mapper.FileCustomMapper;
import lombok.extern.slf4j.Slf4j;
import org.springframework.beans.factory.annotation.Autowired;
import org.springframework.stereotype.Component;

import java.util.List;
import java.util.concurrent.TimeUnit;

@Slf4j
@Component
public class FileCustomElasticJob implements SimpleJob {


    @Autowired
    private FileCustomMapper fileCustomMapper;

    @Override
    public void execute(ShardingContext shardingContext) {


        long threadId = Thread.currentThread().getId();
        log.info("线程ID: {}, 任务的名称: {}, 任务参数: {}, 分片个数: {}, 分片索引号: {}, 分片参数: {}",
                threadId,
                shardingContext.getJobName(),
                shardingContext.getJobParameter(),
                shardingContext.getShardingTotalCount(),
                shardingContext.getShardingItem(),
                shardingContext.getShardingParameter()
        );
        doWork(shardingContext.getShardingParameter());
    }

    private void doWork(String shardingParameter) {


        List<FileCustom> fileList = fileCustomMapper.selectFileCustomByType(shardingParameter);
        log.info("需要备份⽂件个数{}: {}", shardingParameter, fileList.size());
        for (FileCustom fileCustom : fileList) {


            backUpFile(fileCustom);
        }
    }

    private void backUpFile(FileCustom fileCustom) {


        try {


            //模拟备份动作
            TimeUnit.SECONDS.sleep(1);
        } catch (InterruptedException e) {


            e.printStackTrace();
        }
        System.out.println("执⾏⽂件备份====>" + fileCustom);
        fileCustomMapper.changeState(fileCustom.getId(), 1);
    }
}
6.3 Mapper类修改
package com.xiaoge.mapper;

import com.xiaoge.domain.FileCustom;
import org.apache.ibatis.annotations.Mapper;
import org.apache.ibatis.annotations.Param;
import org.apache.ibatis.annotations.Select;
import org.apache.ibatis.annotations.Update;

import java.util.List;

@Mapper
public interface FileCustomMapper {


    @Select("select * from t_file_custom where backedUp = 0")
    List<FileCustom> selectAll();

    @Select("select * from t_file_custom where backedUp = 0 and type = #{type}")
    List<FileCustom> selectFileCustomByType(@Param("type") String type);

    @Update("update t_file_custom set backedUp = #{state} where id = #{id}")
    int changeState(@Param("id") Long id, @Param("state") int state);
}
6.4 测试
-
只有⼀台机器的情况下,任务分片是如何执行的
-
有多台机器的情况下,任务分片是如何执行的
7.Dataflow类型调度任务
Dataflow类型的定时任务需要实现Dataflowjob接⼝,该接⼝提供2个⽅法供覆盖,分别⽤于抓取 (fetchData)和处理(processData)数据,我们继续对例⼦进⾏改造。
Dataflow类型的定时任务需要实现Dataflowjob接⼝,该接⼝提供2个⽅法供覆盖,分别⽤于抓取 (fetchData)和处理(processData)数据,我们继续对例子进行改造。
7.1 任务类
package com.xiaoge.service;

import com.dangdang.ddframe.job.api.ShardingContext;
import com.dangdang.ddframe.job.api.dataflow.DataflowJob;
import com.xiaoge.domain.FileCustom;
import com.xiaoge.mapper.FileCustomMapper;
import org.springframework.beans.factory.annotation.Autowired;
import org.springframework.context.annotation.Configuration;
import org.springframework.stereotype.Component;

import java.util.List;
import java.util.concurrent.TimeUnit;

/**
 * TODO 处理大数据量的时候用那个DataFlow这种方式
 *
 * @author <a href="mailto:[email protected]">Zhang Xiao</a>
 * @since
 */
@Component
public class FileDataFlowJob implements DataflowJob<FileCustom> {


    @Autowired
    private FileCustomMapper fileCustomMapper;

    // 抓取数据
    @Override
    public List<FileCustom> fetchData(ShardingContext shardingContext) {


        System.out.println("开始抓取数据...........");
        return fileCustomMapper.selectLimit(shardingContext.getShardingParameter(), 2);
    }

    // 处理数据
    @Override
    public void processData(ShardingContext shardingContext, List<FileCustom> fileCustomList) {


        fileCustomList.forEach(fileCustom -> {


            backUpFile(fileCustom);
        });
    }

    private void backUpFile(FileCustom fileCustom) {


        System.out.println("备份的方法名: " + fileCustom.getName() + "备份的类型: " + fileCustom.getType());
        try {


            //模拟备份动作
            TimeUnit.SECONDS.sleep(1);
        } catch (InterruptedException e) {


            e.printStackTrace();
        }
        System.out.println("执⾏⽂件备份====>" + fileCustom);
        fileCustomMapper.changeState(fileCustom.getId(), 1);
    }
}
7.2 配置类
package com.xiaoge.config;

import com.dangdang.ddframe.job.config.JobCoreConfiguration;
import com.dangdang.ddframe.job.config.JobTypeConfiguration;
import com.dangdang.ddframe.job.config.dataflow.DataflowJobConfiguration;
import com.dangdang.ddframe.job.config.simple.SimpleJobConfiguration;
import com.dangdang.ddframe.job.event.JobEventConfiguration;
import com.dangdang.ddframe.job.event.rdb.JobEventRdbConfiguration;
import com.dangdang.ddframe.job.lite.config.LiteJobConfiguration;
import com.dangdang.ddframe.job.lite.spring.api.SpringJobScheduler;
import com.dangdang.ddframe.job.reg.base.CoordinatorRegistryCenter;
import com.dangdang.ddframe.job.reg.zookeeper.ZookeeperConfiguration;
import com.dangdang.ddframe.job.reg.zookeeper.ZookeeperRegistryCenter;
import com.xiaoge.service.FileCustomElasticJob;
import com.xiaoge.service.FileDataFlowJob;
import org.apache.commons.lang3.StringUtils;
import org.springframework.beans.factory.annotation.Autowired;
import org.springframework.beans.factory.annotation.Value;
import org.springframework.context.annotation.Bean;
import org.springframework.context.annotation.Configuration;

import javax.sql.DataSource;

/**
 * TODO
 *
 * @author <a href="mailto:[email protected]">Zhang Xiao</a>
 * @since
 */
@Configuration
public class ElasticJobConfig {


    /**
     * todo 注意一个ElasticJob里面不管有多少实例, 只会有一个被调度, 那就是zookeeper选出来的leader
     * @param myElasticJob
     * @param regCenter
     * @return
     */
//    @Bean(initMethod = "init")
//    public SpringJobScheduler testScheduler(ElasticJob myElasticJob, CoordinatorRegistryCenter regCenter) {


//        LiteJobConfiguration simpleJobRootConfig = createJobConfiguration(myElasticJob.getClass(), "0/10 * * * * ?", 1);
//        return new SpringJobScheduler(myElasticJob, regCenter, simpleJobRootConfig);
//    }

//    @Bean(initMethod = "init")
//    public SpringJobScheduler fileScheduler(FileCustomElasticJob fileCustomElasticJob, CoordinatorRegistryCenter regCenter){


//        SpringJobScheduler springJobScheduler = new SpringJobScheduler(fileCustomElasticJob,regCenter,createJobConfiguration(fileCustomElasticJob.getClass(),"0 0/1 * * * ?",4, "0=text,1=image,2=radio,3=vedio", false));
//        return springJobScheduler;
//    }

    @Bean(initMethod = "init")
    public SpringJobScheduler fileDataFlowScheduler(FileDataFlowJob fileDataFlowJob, CoordinatorRegistryCenter regCenter){


        SpringJobScheduler springJobScheduler = new SpringJobScheduler(fileDataFlowJob,regCenter,createJobConfiguration(fileDataFlowJob.getClass(),"0 0/1 * * * ?",4, "0=text,1=image,2=radio,3=vedio", true));
        return springJobScheduler;
    }

//    @Bean(initMethod = "init")
//    public SpringJobScheduler test1Scheduler(ElasticJob myElasticJob1, CoordinDataRevisionatorRegistryCenter regCenter) {


//        LiteJobConfiguration simpleJobRootConfig = createJobConfiguration(myElasticJob1.getClass(), "0/3 * * * * ?", 1);
//        return new SpringJobScheduler(myElasticJob1, regCenter, simpleJobRootConfig);
//    }

    @Bean
    public CoordinatorRegistryCenter registryCenter(@Value("${elasticjob.url}") String zookeeperUrl, @Value("${elasticjob.group-name}") String groupName) {


        // 配置zk地址,调度任务的组名
        ZookeeperConfiguration zookeeperConfiguration = new ZookeeperConfiguration(zookeeperUrl, groupName);
        // 设置节点超时时间
        zookeeperConfiguration.setSessionTimeoutMilliseconds(100);
        // ZookeeperRegistryCenter("zookeeper地址", "项目名")
        CoordinatorRegistryCenter regCenter = new ZookeeperRegistryCenter(zookeeperConfiguration);
        regCenter.init();
        return regCenter;
    }

    /**
     * todo 注意这个方法不能交给 spring 管理, 你要让它是个公共的方法,
     *      传递不同的jobName(任务名称), cron(cron表达式), shardingTotalCount(分片数量) 生成不同的LiteJobConfiguration, 因为环境不同任务配置不同.
     *      也有可能别的任务需要这个方法创建
     * @return
     */
    public LiteJobConfiguration createJobConfiguration(Class<?> clazz, String cron, Integer shardingTotalCount, String shardingParam, boolean isDataFlow) {


        // 定义作业核⼼配置 newBuilder("任务名称", "cron表达式", "分片数量")
        JobCoreConfiguration.Builder jobBuilder = JobCoreConfiguration.newBuilder(clazz.getSimpleName(), cron, shardingTotalCount);
        if (!StringUtils.isEmpty(shardingParam)) {


            // 分片参数
            jobBuilder = jobBuilder.shardingItemParameters(shardingParam);
        }
        JobTypeConfiguration jobConfiguration;
        if (isDataFlow) {


            // DataflowJob配置
            jobConfiguration = new DataflowJobConfiguration(jobBuilder.build(), clazz.getCanonicalName(), true);
        } else {


            // SimpleJob配置
            // 定义SIMPLE类型配置 MyElasticJob.class.getCanonicalName()--->获取这个类的权限定类名
            jobConfiguration = new SimpleJobConfiguration(jobBuilder.build(), clazz.getCanonicalName());
        }

        // 定义Lite作业根配置 (overwrite(true) 表示zookeeper里面的配置可以覆盖, 如果为false, 设置了一次cron表达式, 第二次修改表达式是不生效的)
        LiteJobConfiguration simpleJobRootConfig = LiteJobConfiguration.newBuilder(jobConfiguration).overwrite(true).build();
        return simpleJobRootConfig;
    }


}
7.3 测试
8.运维管理
8.1 事件追踪
Elastic-Job-Lite在配置中提供了JobEventConfiguration,⽀持数据库⽅式配置,会在数据库中⾃动创建 JOB_EXECUTION_LOG和JOB_STATUS_TRACE_LOG两张表以及若⼲索引来近路作业的相关信息。
8.1.1 修改Elastic-Job配置类
在ElasticJobConfig配置类中注⼊DataSource
@Configuration
public class ElasticJobConfig {


 @Autowired
 private DataSource dataSource;
 ......
}
在任务配置中增加事件追踪配置
@Bean(initMethod = "init")
    public SpringJobScheduler fileDataFlowScheduler(FileDataFlowJob fileDataFlowJob, CoordinatorRegistryCenter regCenter){


        // 日志监控, 它会自动在数据库生成两张表job_execution_log/job_status_trace_log
        // 配置会在任务执行的时间将任务执行的情况存储到数据源中
        JobEventConfiguration jobEventConfiguration = new JobEventRdbConfiguration(dataSource);
        SpringJobScheduler springJobScheduler = new SpringJobScheduler(fileDataFlowJob,regCenter,createJobConfiguration(fileDataFlowJob.getClass(),"0 0/1 * * * ?",4, "0=text,1=image,2=radio,3=vedio", true), jobEventConfiguration);
        return springJobScheduler;
}
8.1.2 日志信息表
启动后会发现在elastic-job-demo数据库中新增以下两张表
job_execution_log
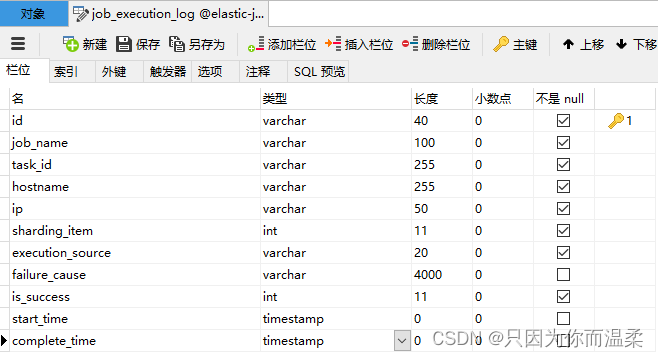
记录每次作业的执行历史,分为两个步骤:
1.作业开始执⾏时间想数据库插⼊数据.
2.作业完成执⾏时向数据库更新数据,更新is_success,complete_time和failure_cause(如果任务执行失败)
job_status_trace_log
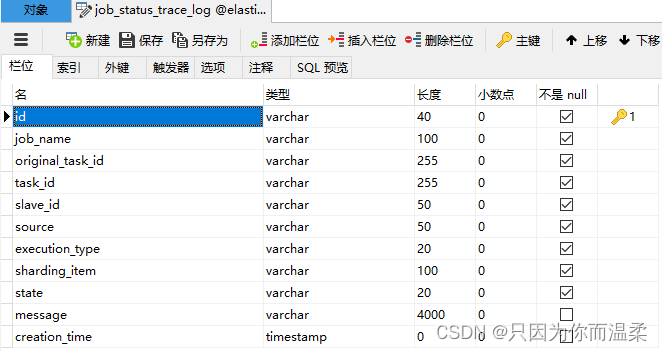
记录作业状态变更痕迹表,可通过每次作业运行的task_id查询作业状态变化的⽣命轨迹和运行轨迹.
8.2 运维控制台
elastic-job中提供了⼀个elastic-job-lite-console控制台
设计理念
1.本 控制台和Elastic-Job并⽆直接关系,是通过读取Elastic-Job的注册中心数据展示作业状态,或更新注 册中心数据修改全局配置。
2.控制台只能控制任务本身是否运行,但不能控制作业进程的启停,因为控制台和作业本身服务器是完 全分布式的,控制台并不能控制作业服务器。
主要功能:
1.查看作业以及服务器状态
2.快捷的修改以及删除作业配置
3.启用和禁用作业
4.跨注册中心查看作业
5.查看作业运行轨迹和运行状态
不支持项
1.添加作业,因为作业都是在首次运行时自动添加,使用控制台添加作业并无必要.直接在作业服务器启 动包含Elasitc-Job的作业进程即可。
8.2.1 搭建步骤
-
解压缩 elastic-job-lite-console-2.1.5.tar
-
进⼊bin⽬录,并执⾏:
bin\start.bat -
打开浏览器访问 http://localhost:8899 ⽤户名: root 密码: root,进⼊之后界⾯如下:
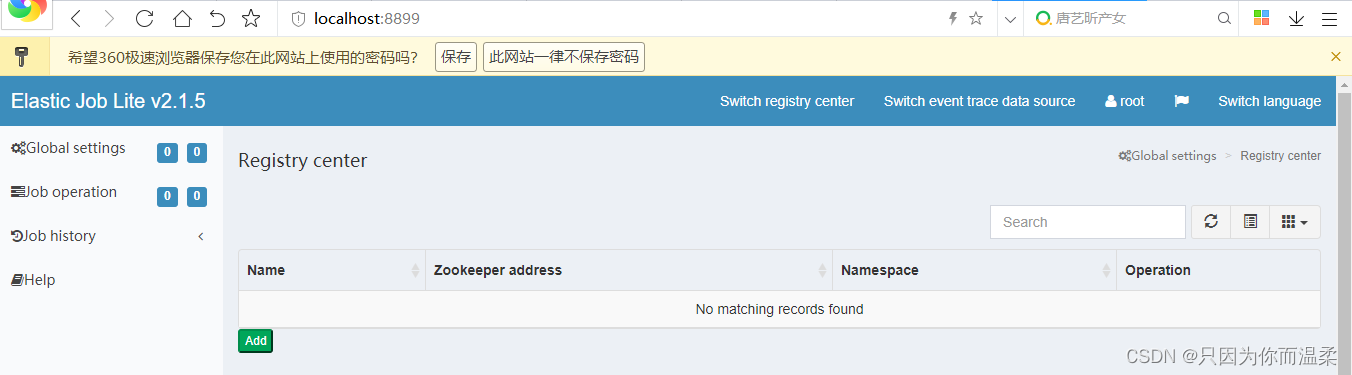
提供两种⽤户:管理员和访客,管理员拥有全部操作权限,访客仅拥有查看权限。默认管理员账号和密码是root/root,访客⽤户名和密码是guest/guest,通过conf\auth.properties可以修改管理员以及访客⽤ 户名及密码
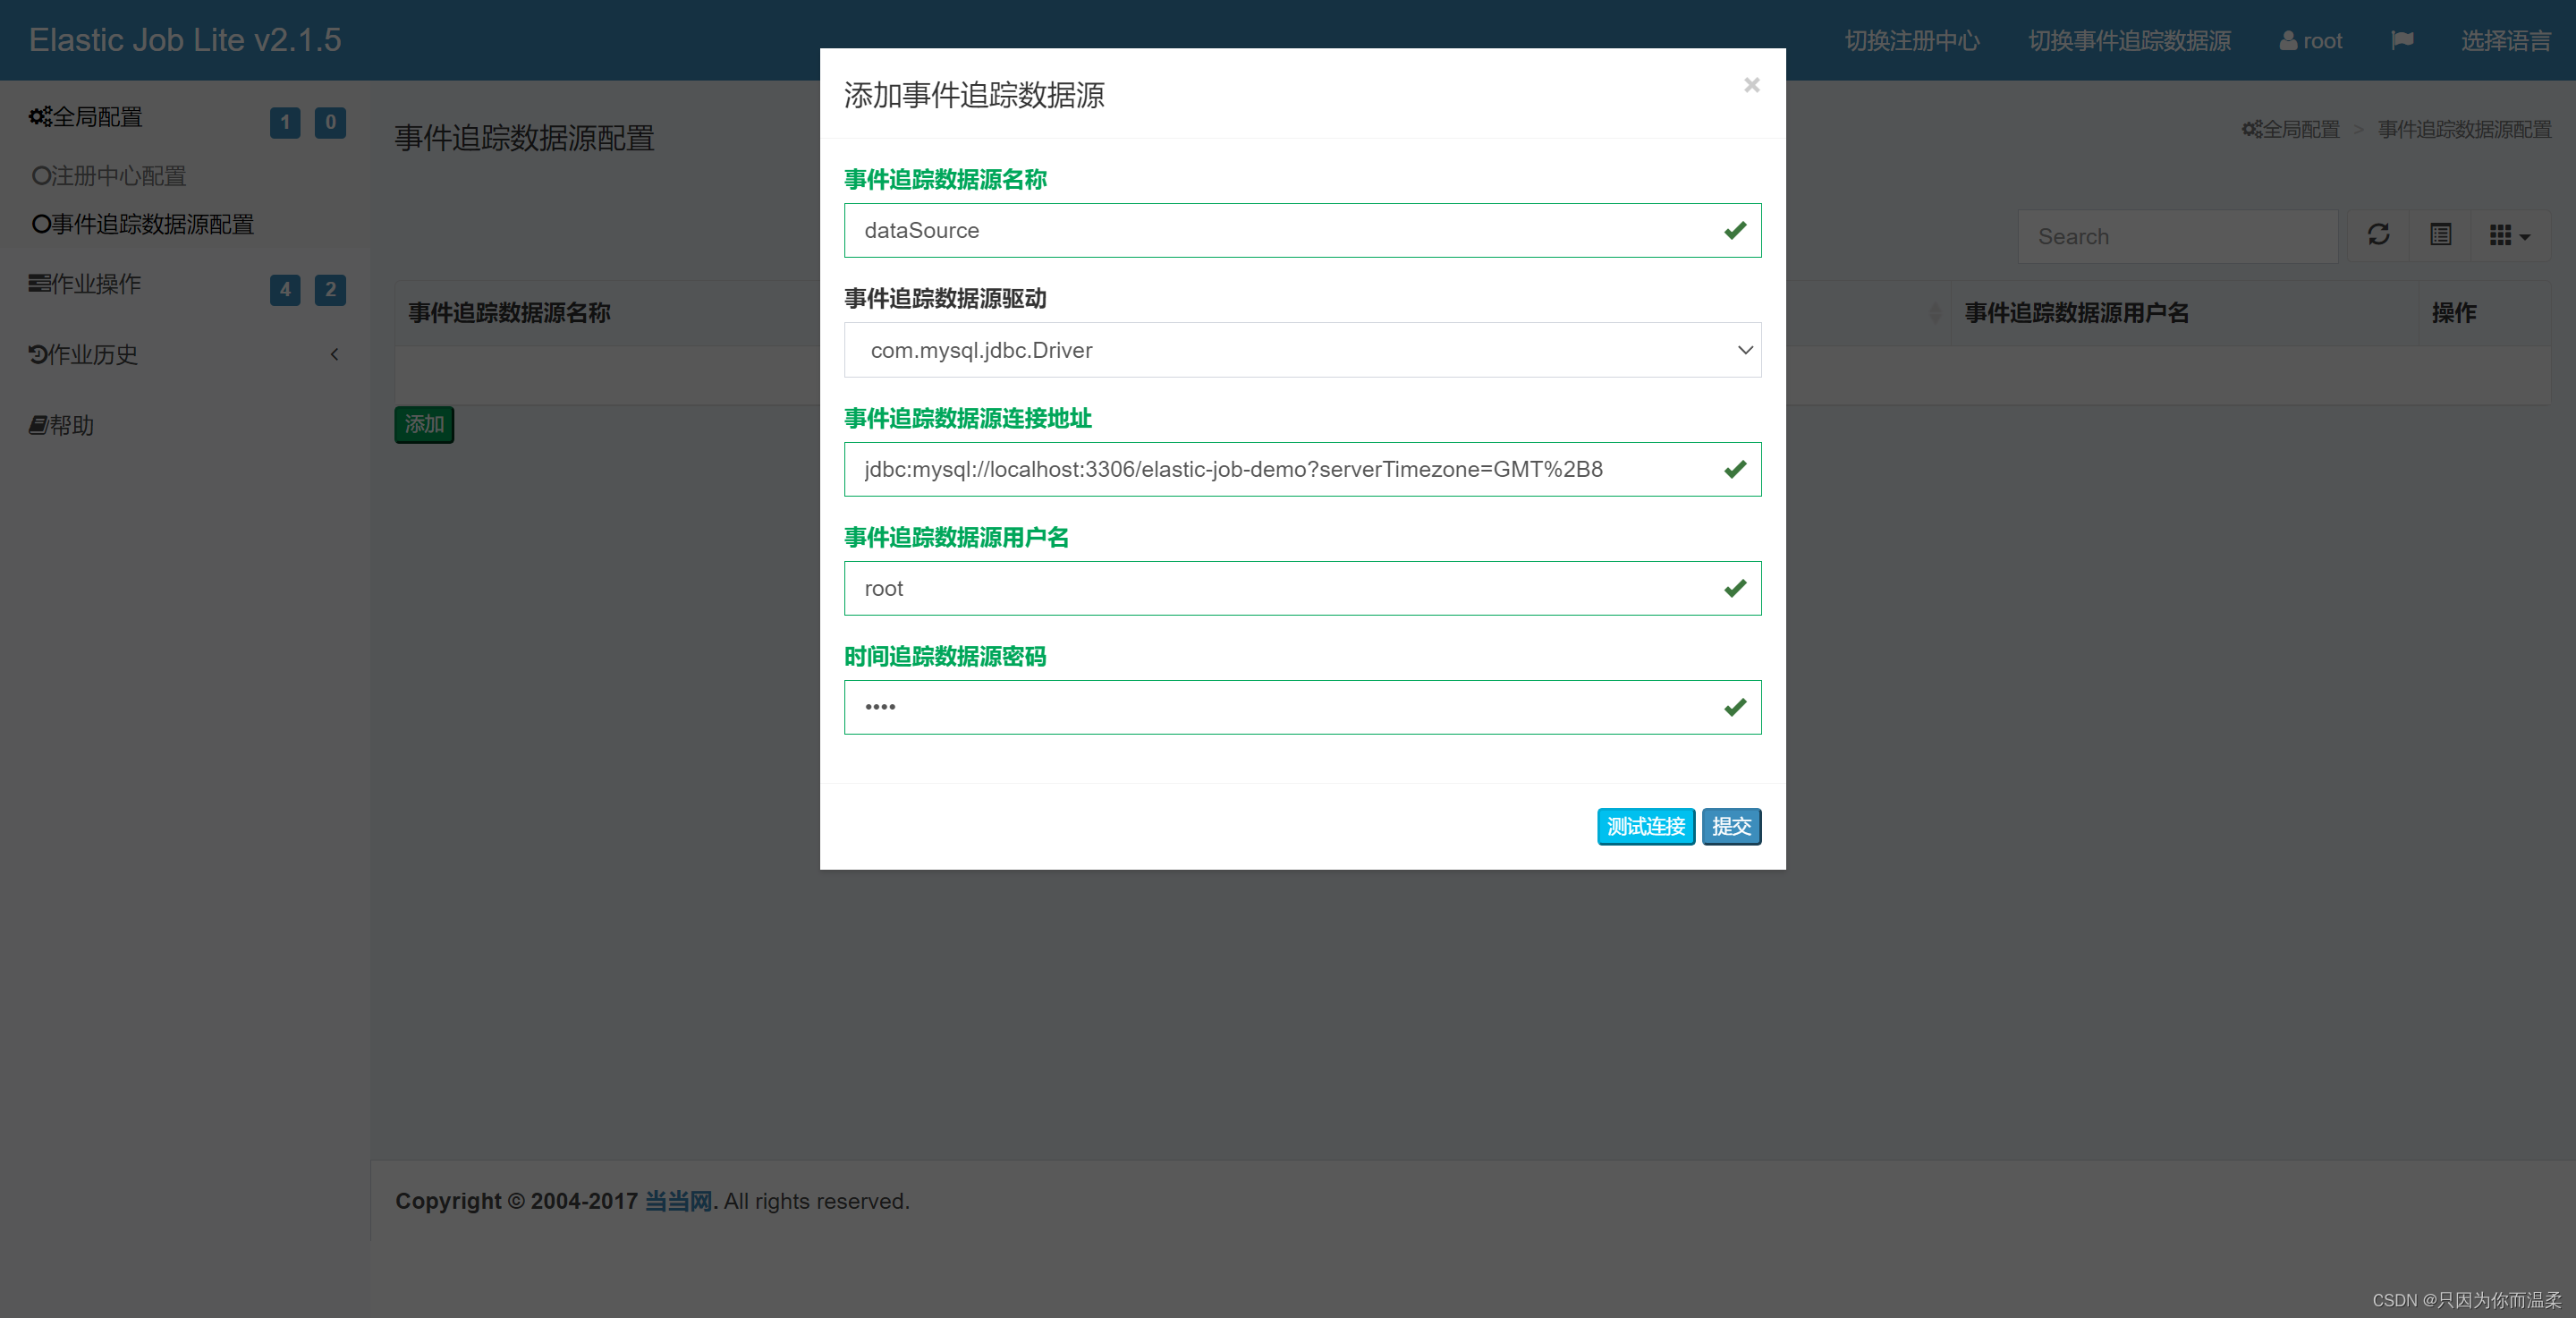
8.2.2 配置及使用
-
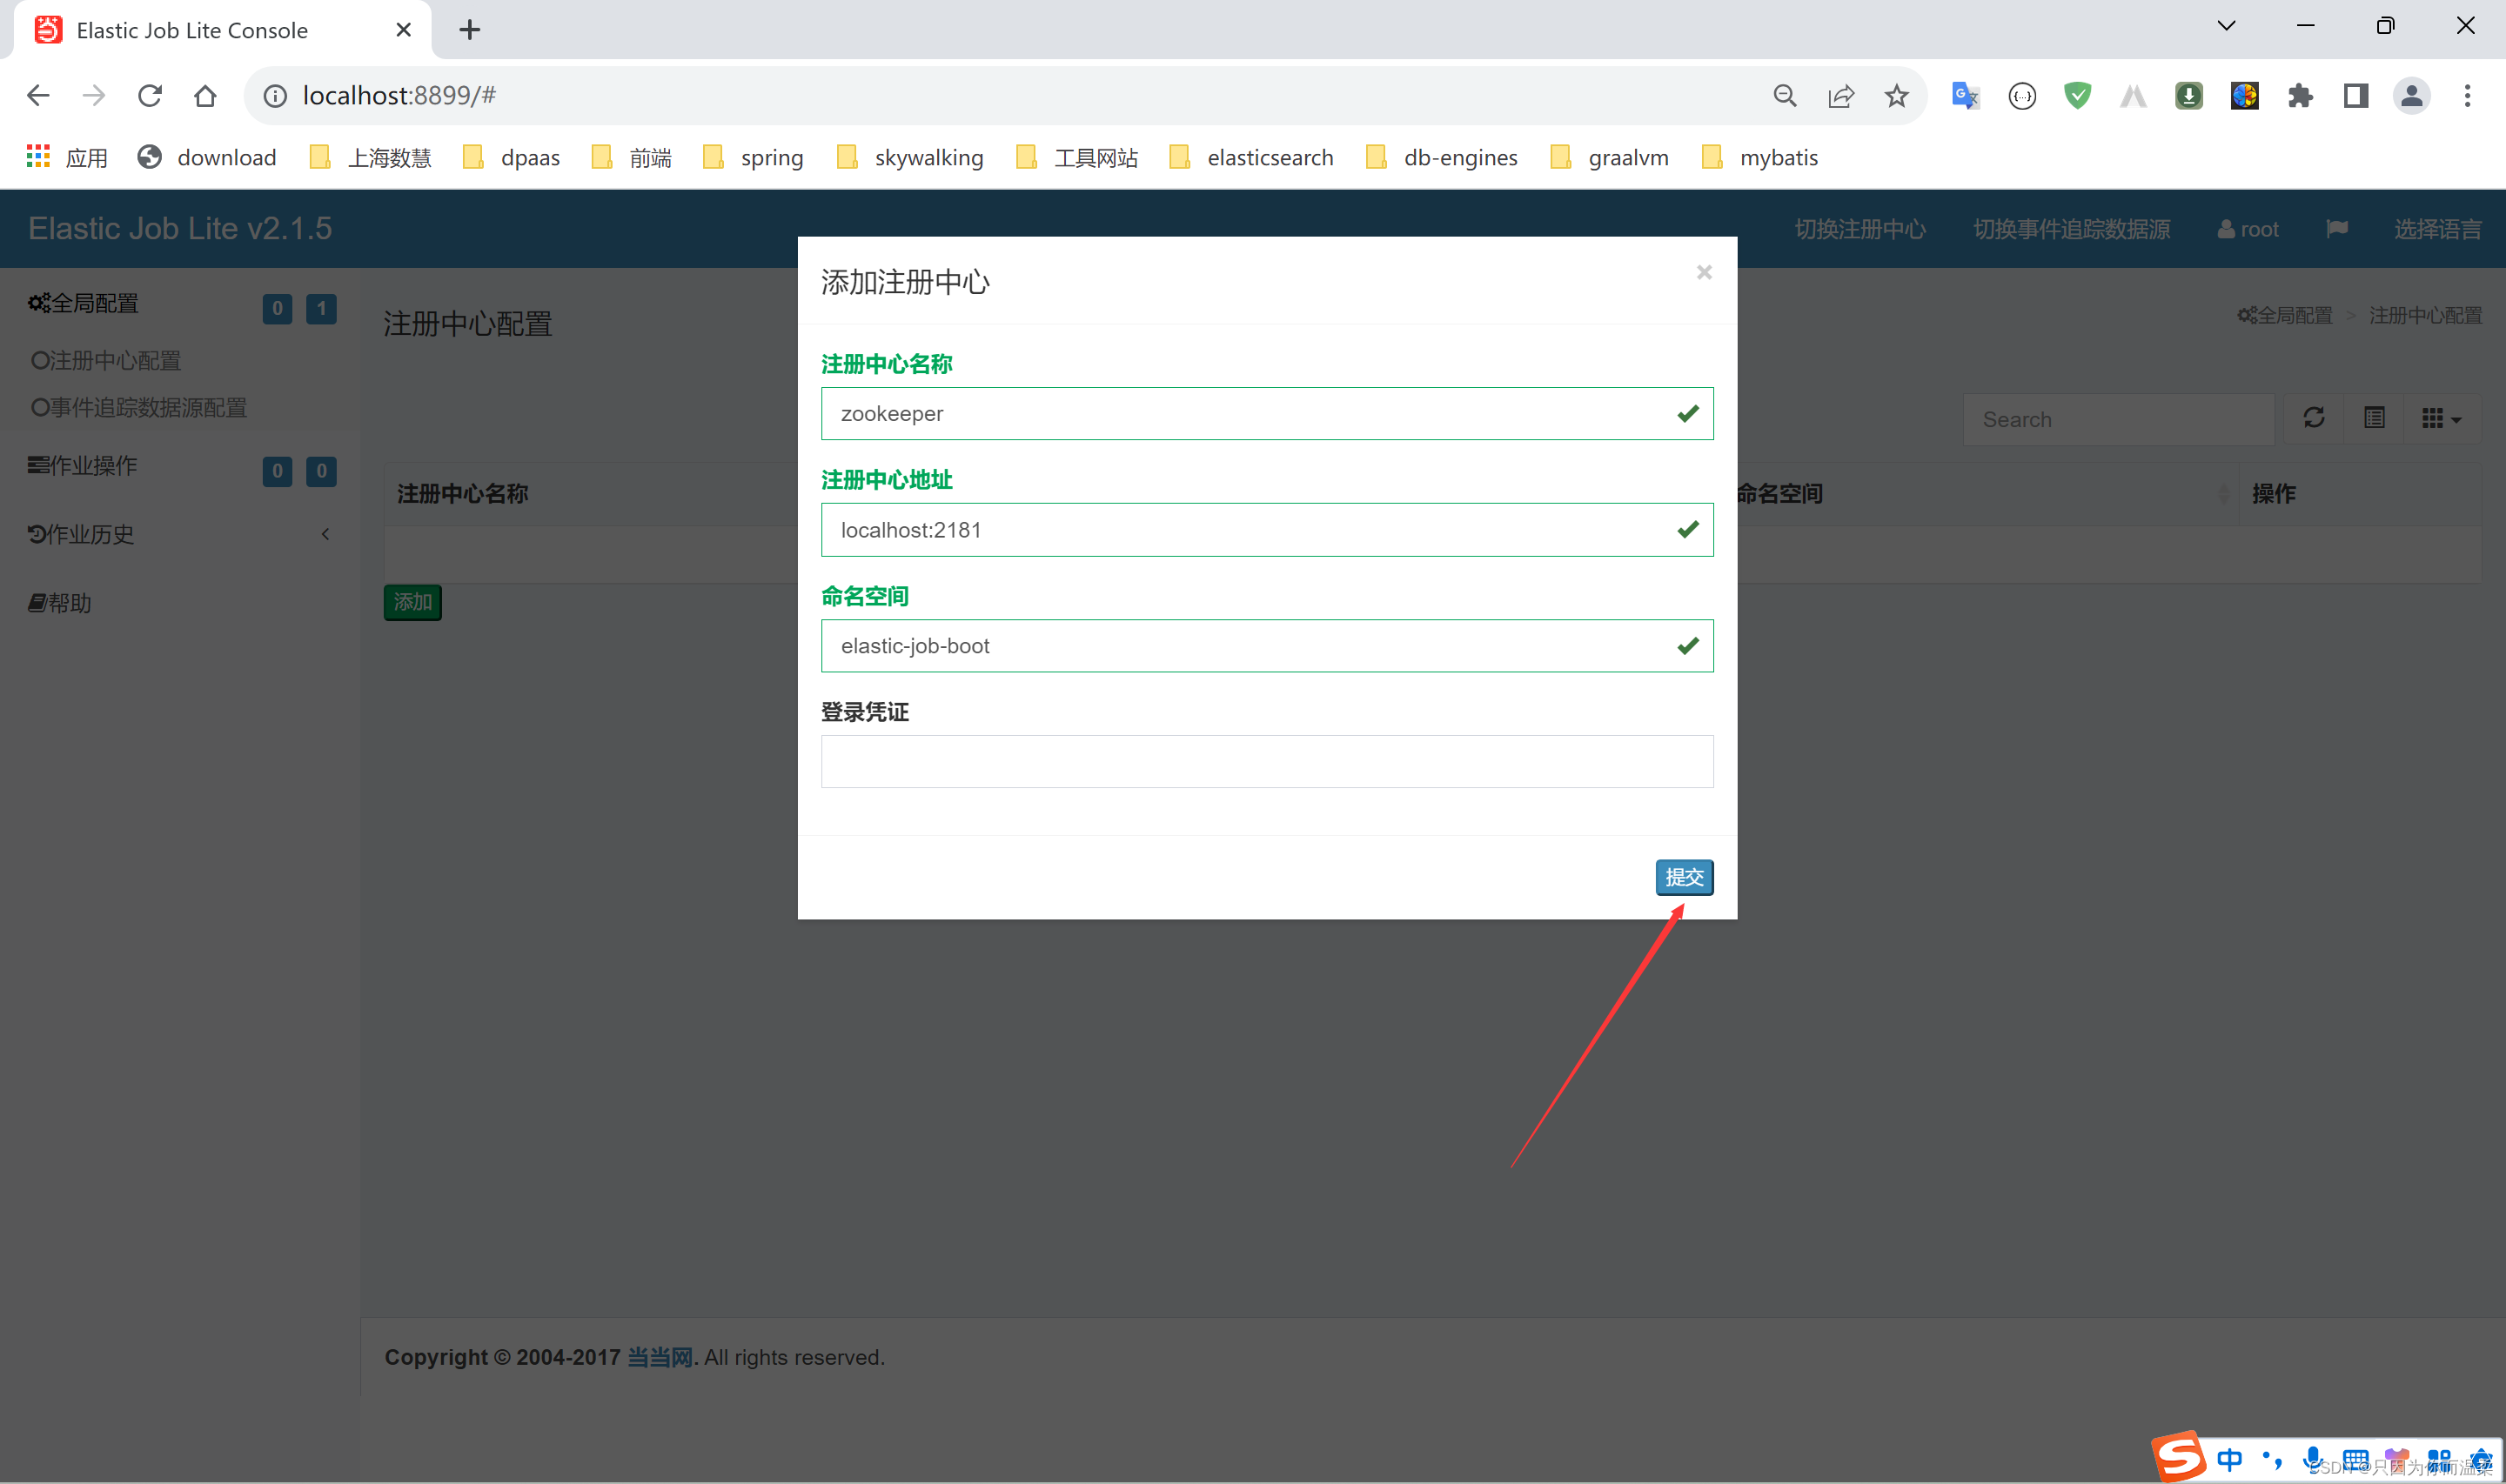
配置注册中心地址 先启动zookeeper然后再注册中心配置界面,点添加
-
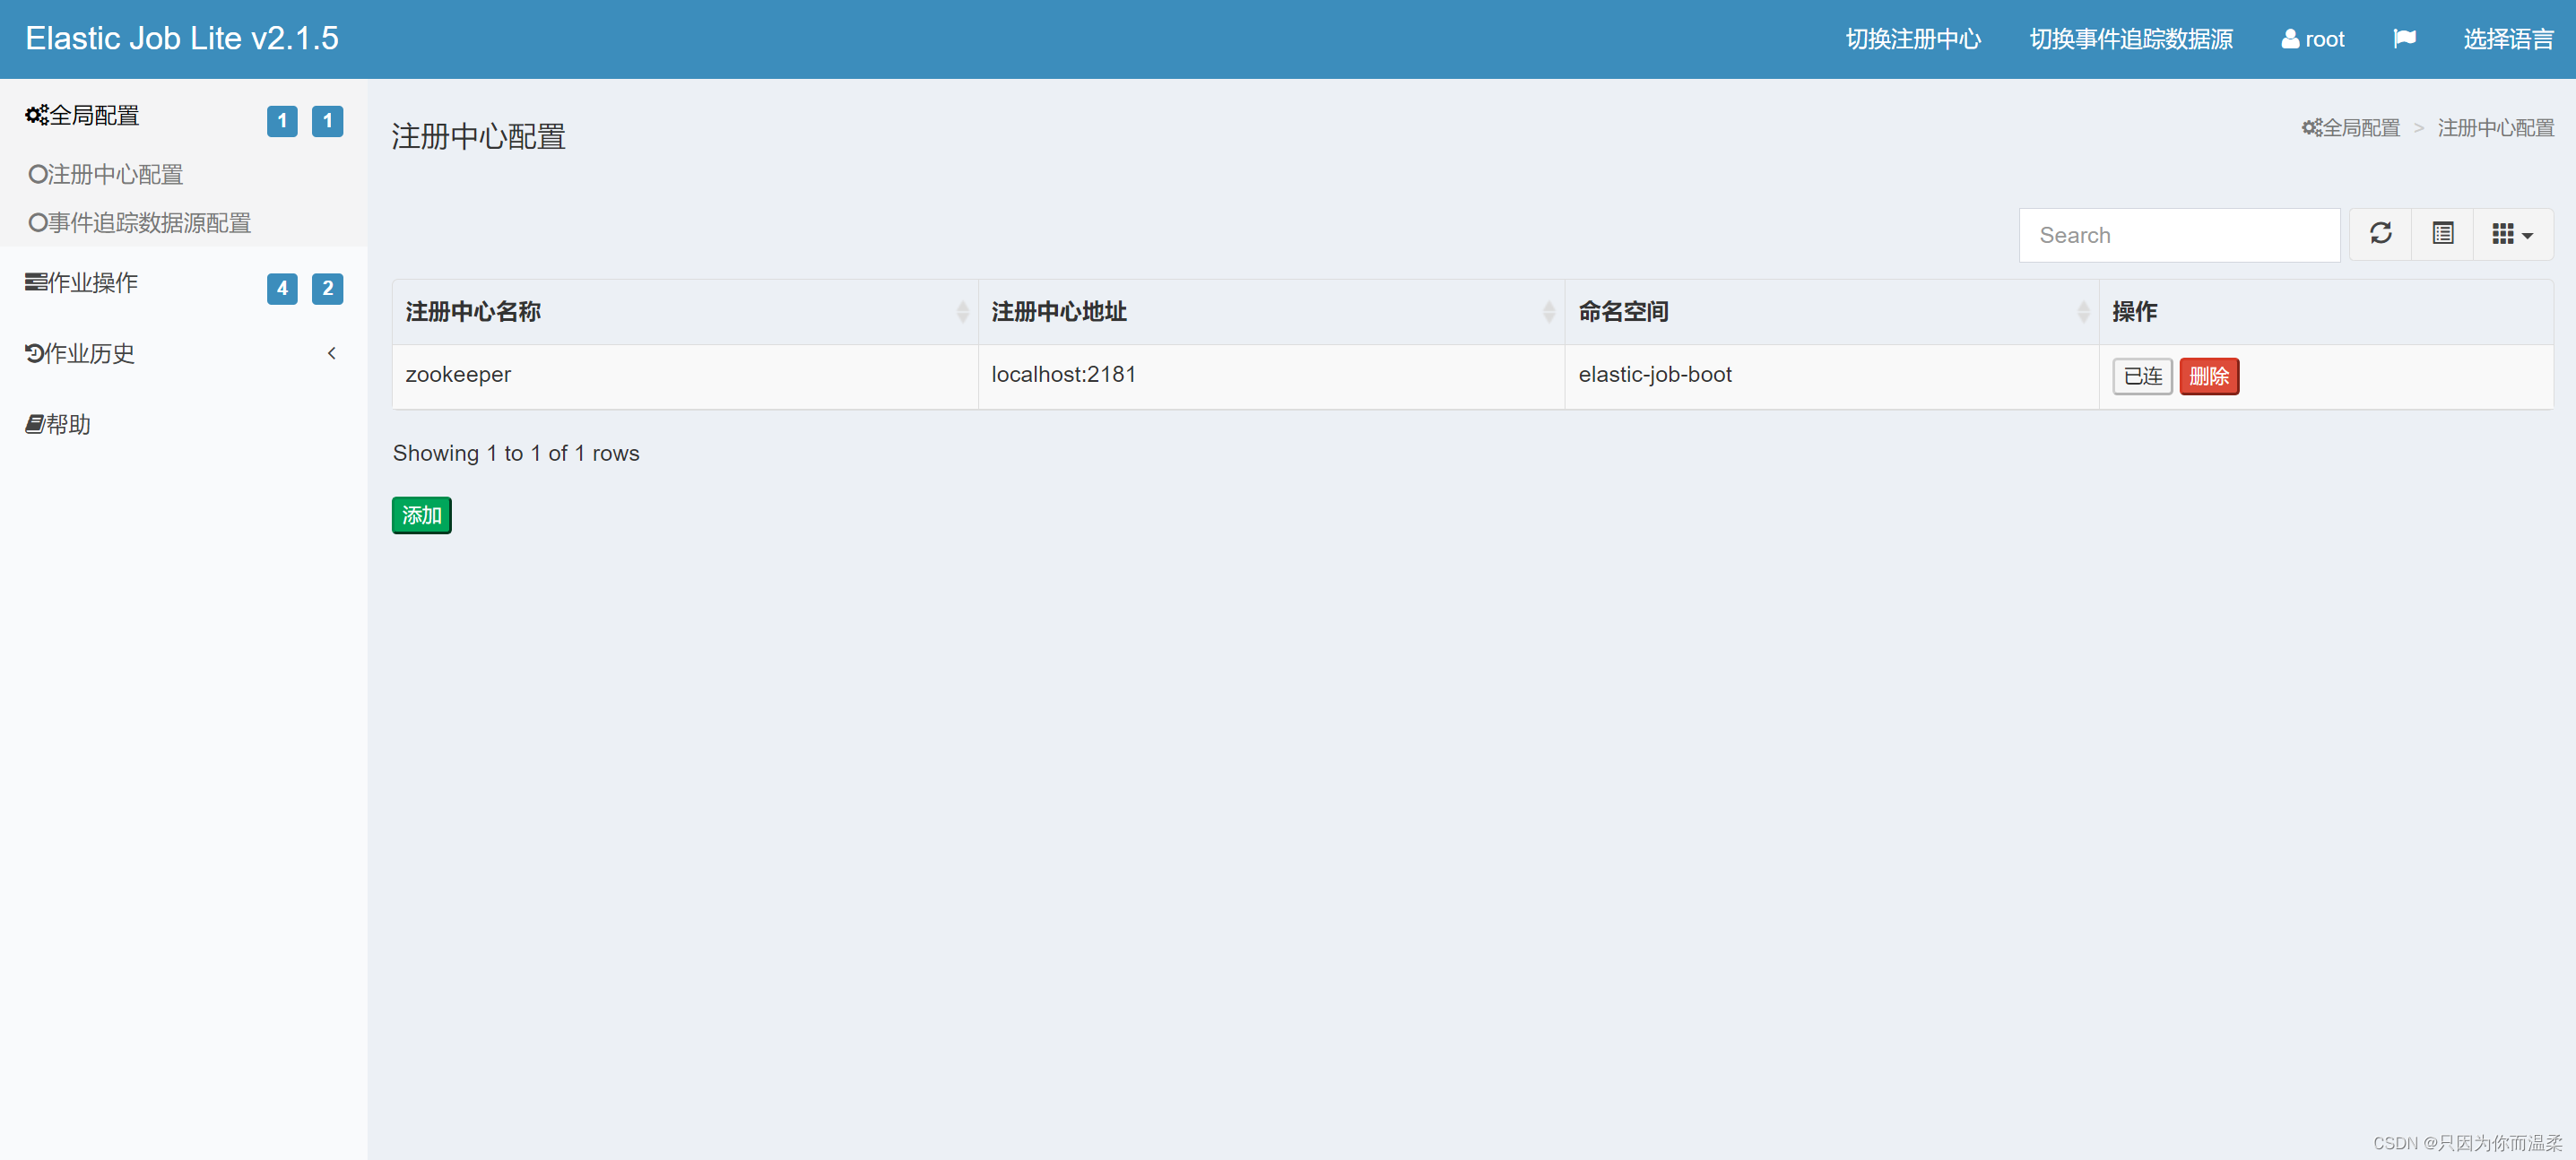
点击提交后,然后点连接(zookeeper必须处于启动状态)
-
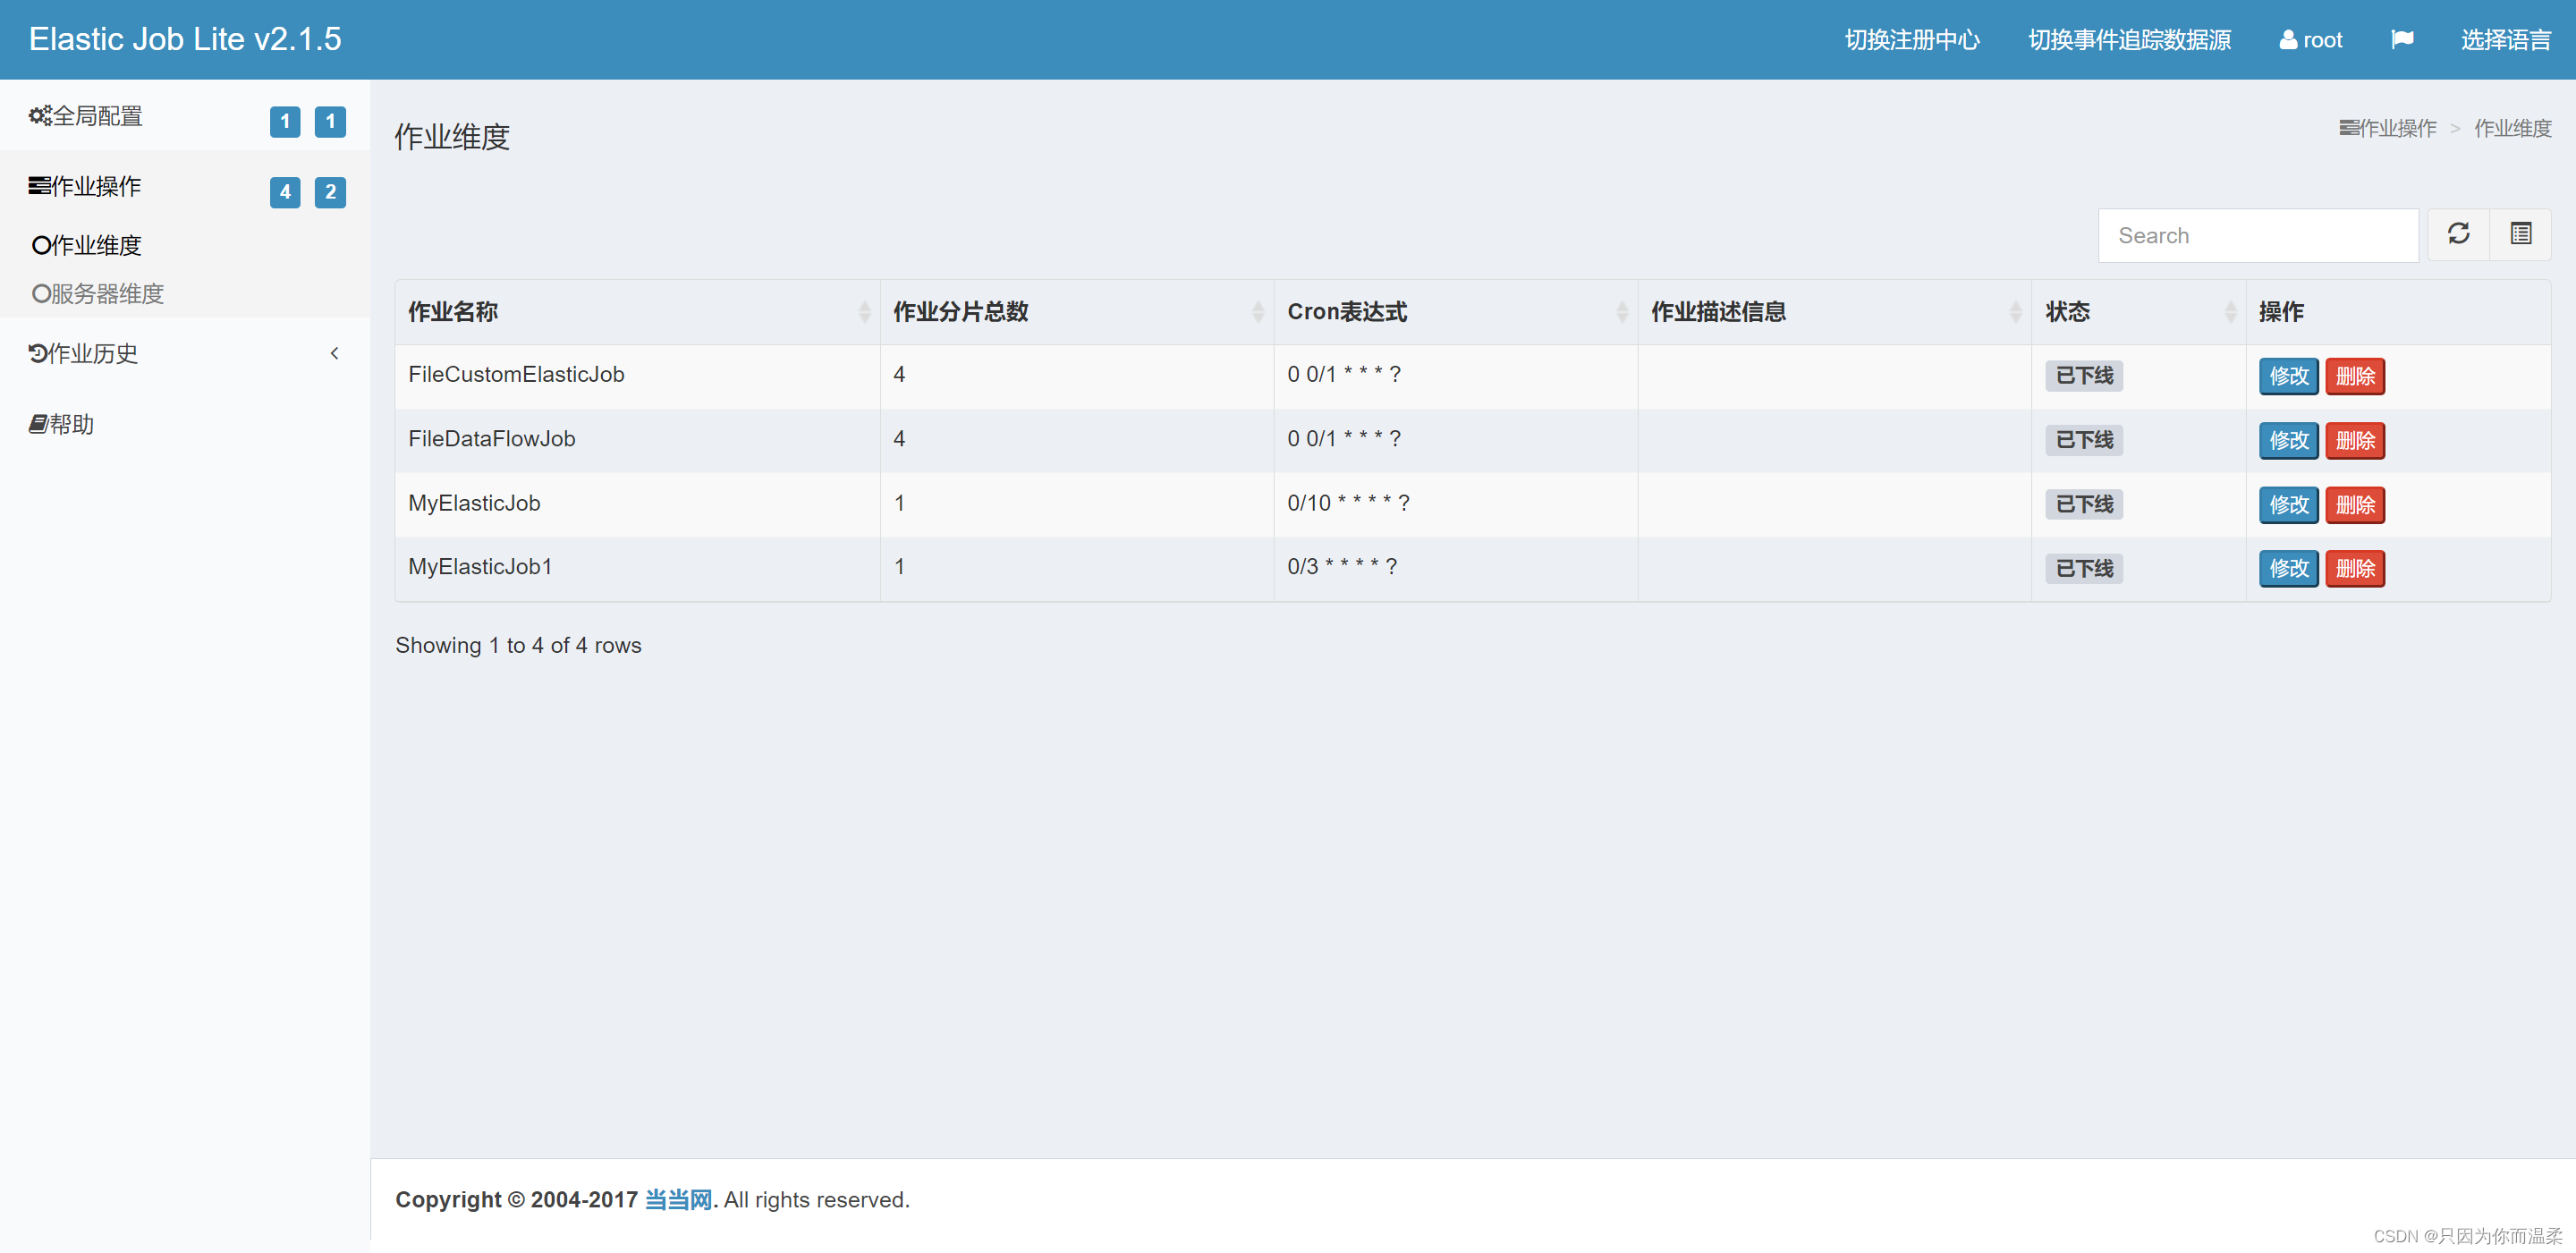
连接成功后,在作业纬度下可以显示该命名空间作业名称,分⽚数量及该作业的cron表达式等信息 在服务器纬度可以查看到服务器ip,当前运⾏的是实例数,作业总数等信息。
-
添加数据库连接之后可以查看任务的执行结果
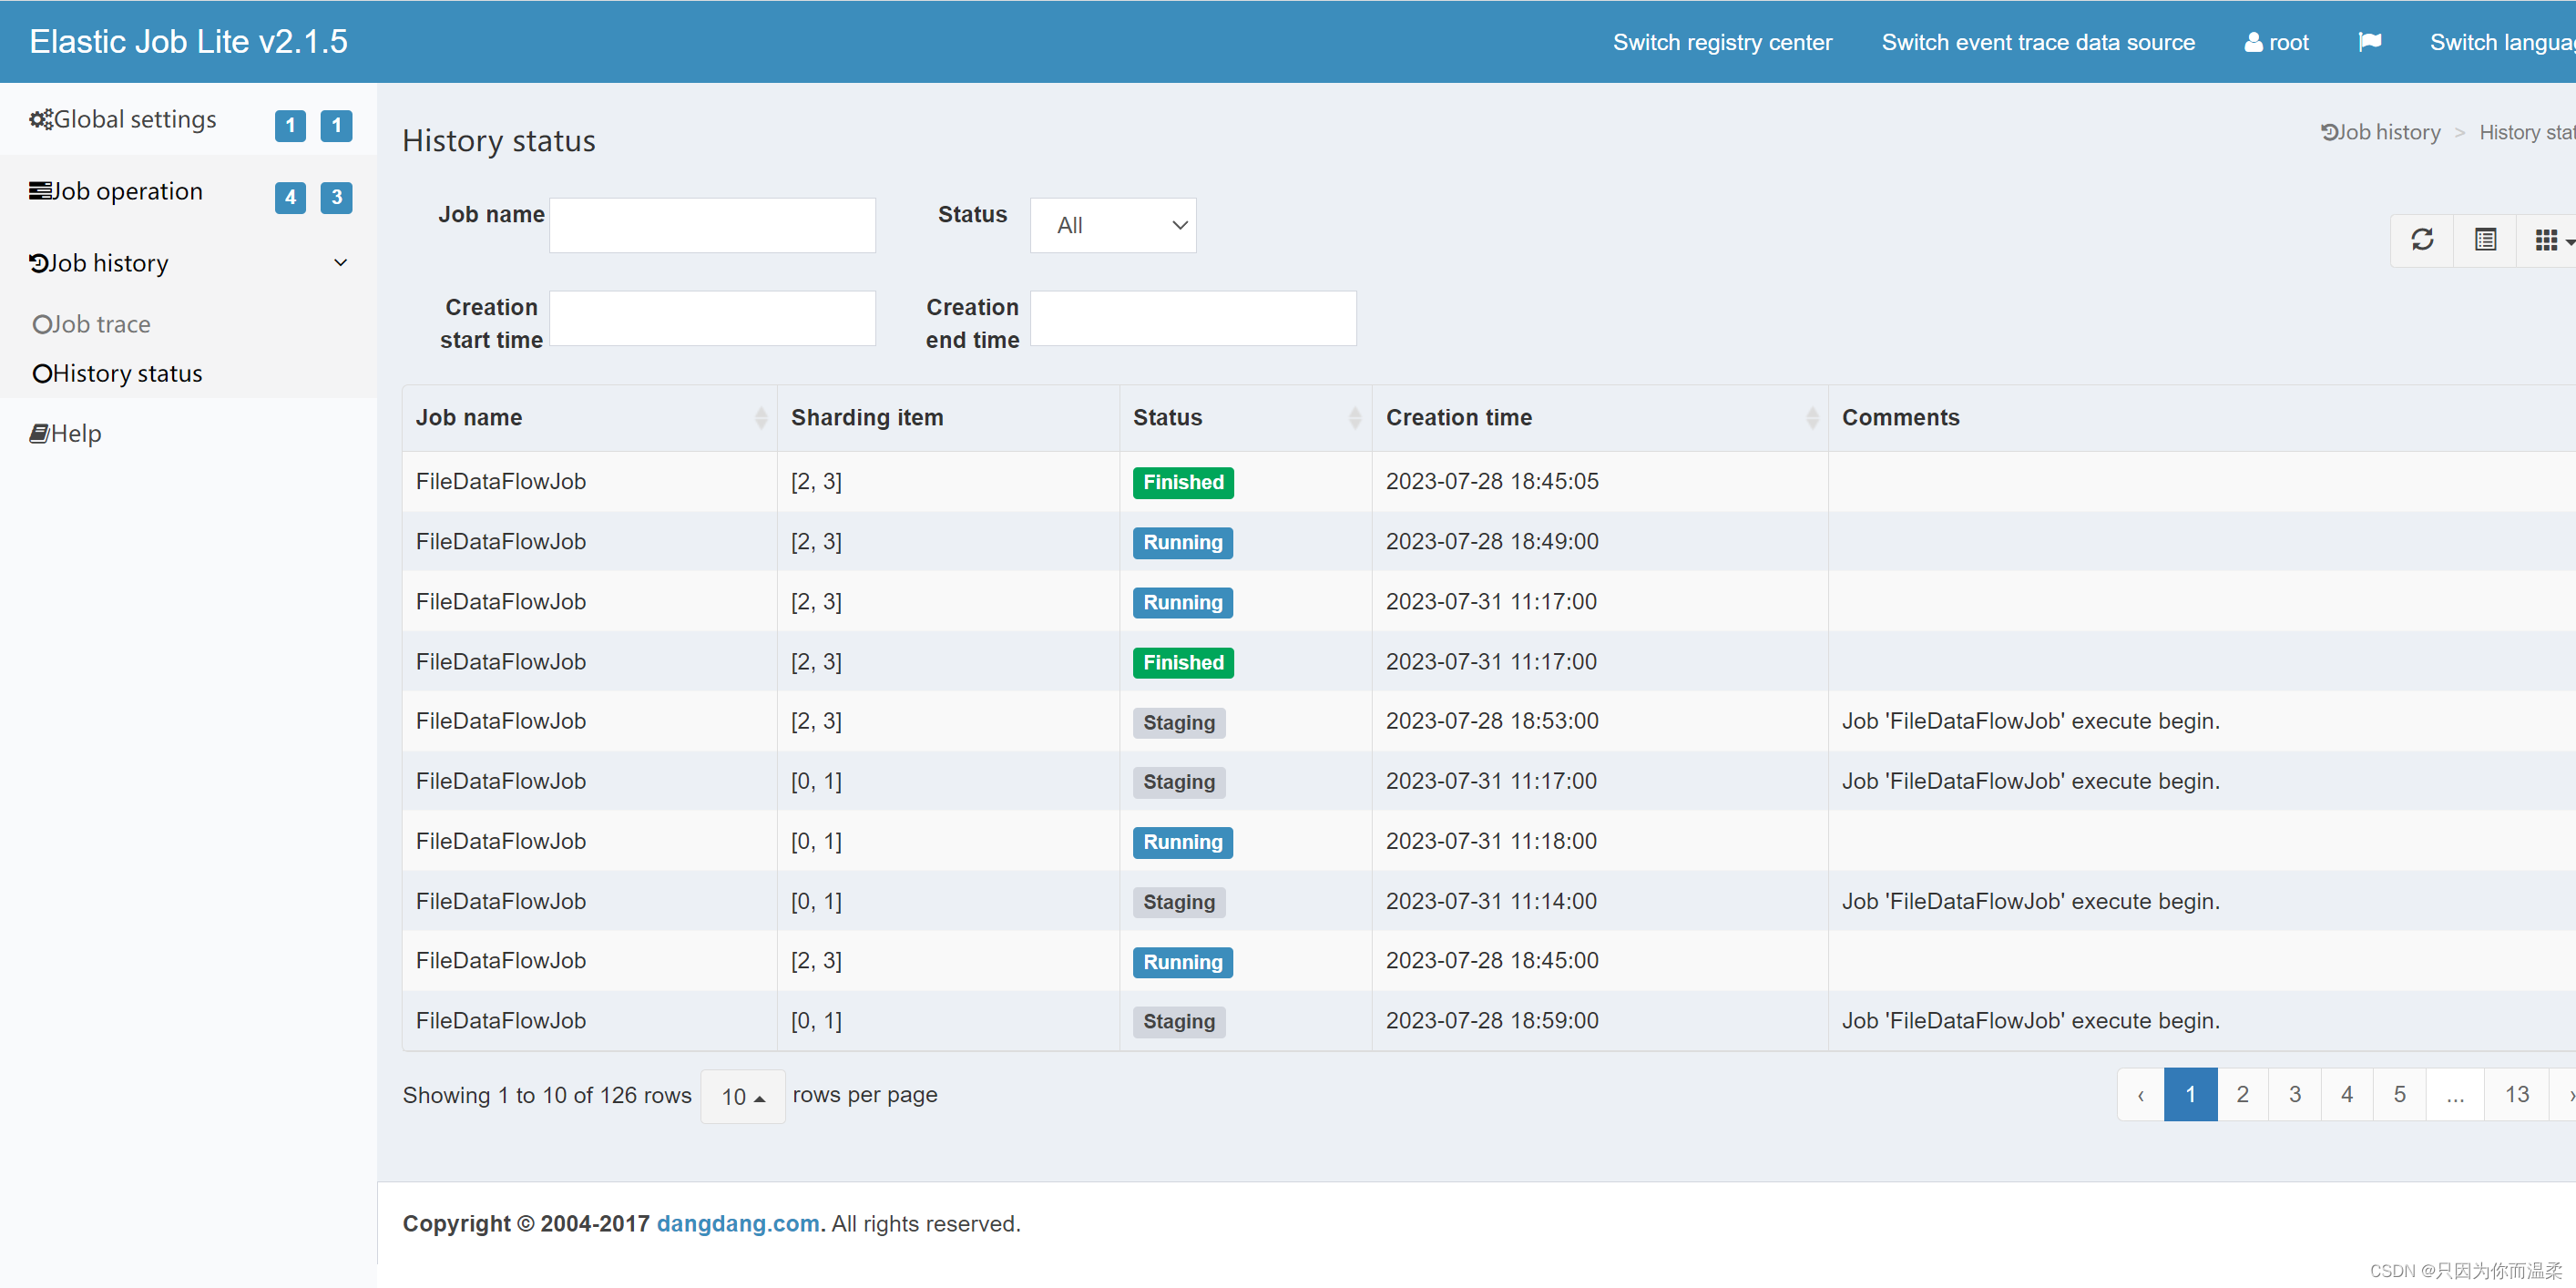
-
然后在作业历史中就可以看到任务执行历史了。
demo下载地址: https://download.csdn.net/download/zsx1314lovezyf/88282573