前端开发过程中经常遇到导出excel的需求。这种情况大多数都是服务端处理数据(QAQ至少我遇到的大多数都是这样),然后返回一个链接,前端不需要管服务端怎么操作直接打开这个链接(window.location.href = url;)就能下载excel了。
但是事情往往没有那么简单,当表格数据不多,且没有分页的时候,服务端往往会把导出excel的操作扔给前端。。。。前端导出excel的情况也不少,经常做了就过了,现在整理出来分享下
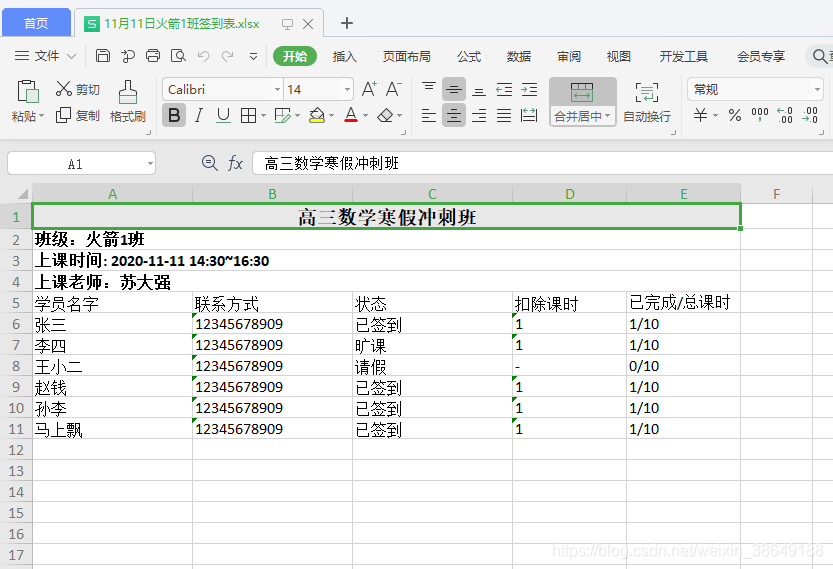
效果图如下:
一开始我用的是js-xlsx插件做的,这个导出基本的表格完全没问题,贼好用,合并单元格也能实现。但是后面产品要求导出的excel需要加上样式,我用js-xlsx试了发现加的样式导出之后并没有生效,网上说xlsx插件开源版不支持修改excel的样式上找了一圈发现了xlsx-style,两者用法上也没什么太大区别,前端导出完全够用了
好了废话不多说,直接上代码
第一步先安装依赖
// 如果使用xlsx-style(支持设置单元格样式)
npm i xlsx-style

// js-xlsx 不支持设置单元格样式
// npm i js-xlsx
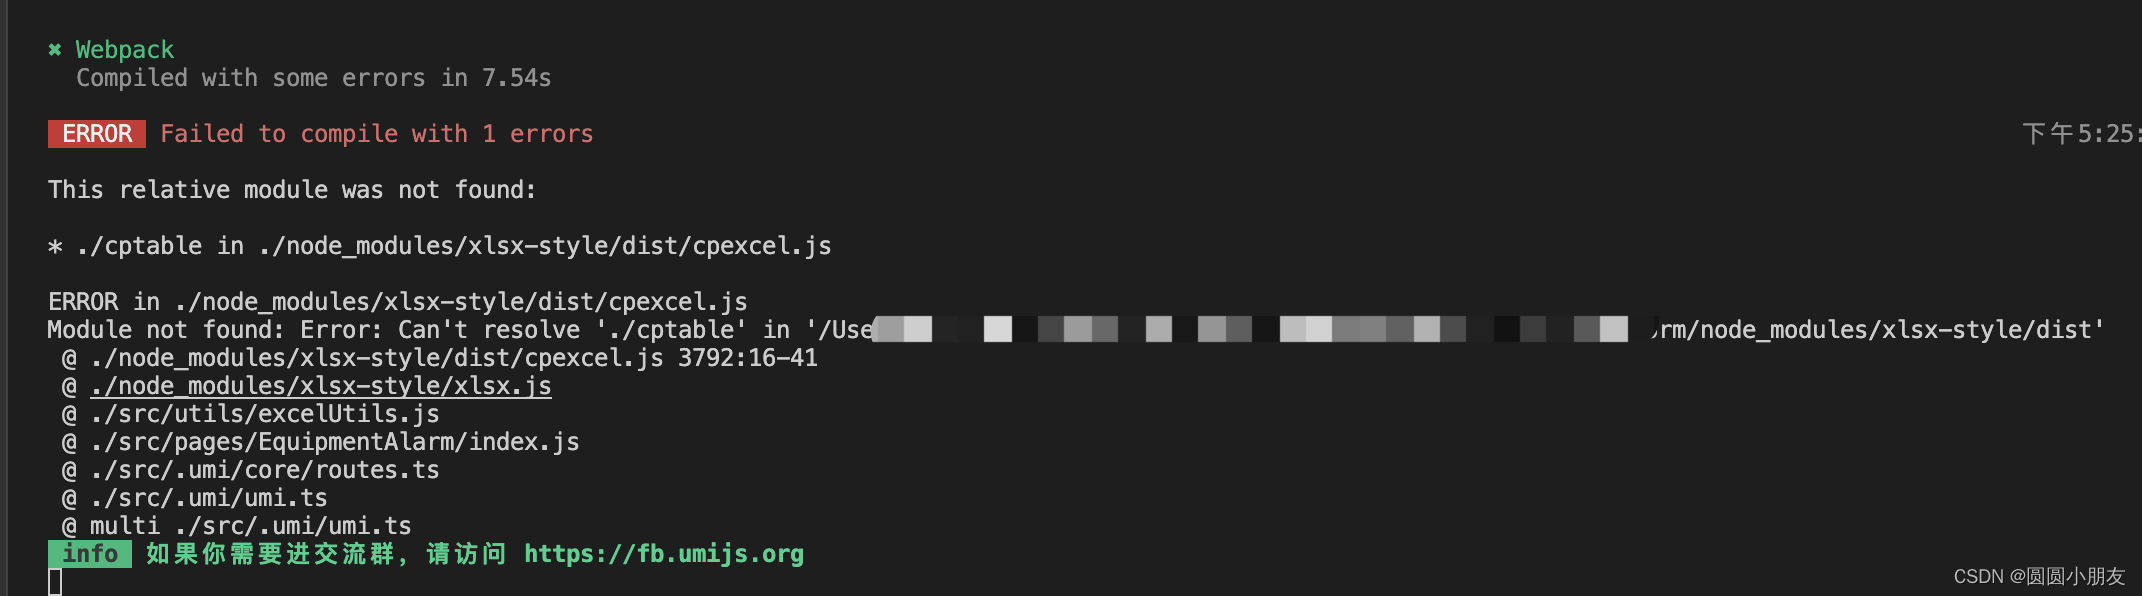
注意:npm i xlsx-style安装完在使用的时候会报错,如下图
解决方法:
方法1:
找到\node_modules\xlsx-style\dist\cpexcel.js
把var cpt = require(‘./cpt’ + ‘able’); 改为 var cpt = cptable;方法2(推荐):
chainWebpack: config => {
config.externals({ ‘./cptable’: ‘var cptable’});
}
第二步封装导出的方法excelUtils.js
// import XLSX from 'xlsx';
import XLSX from 'xlsx-style';

/**
 * 定制化导出excel(定制化:附加标题&&样式)
 * @param { 表头 } headers
 * @param { 数据源  } datasource
 * @param { 表格副标题 } options
 * @param { 配置文件类型 } type
 * @param { 导出的文件名 } fileName
 */
function exportExcel(headers, datasource, options, type, fileName="未命名") {


  // 处理列宽
  const cloWidth = headers.map(item => (
    {

    wpx:item.width || 60}
  ))

  // 处理附加表头
  const _options = options.map((item,i) =>
    Object.assign({

    },{


      title:item.title,
      position:String.fromCharCode(65) + (i+1)
    })
  )
  .reduce((prev, next) =>
    Object.assign({

    }, prev ,{


      [next.position]:{

     v:next.title }
    }),{

    },
  )

  // 处理表头
  const _headers = headers.map((item,i) =>
    Object.assign({

    },{


      key:item.dataIndex,
      title:item.title,
      position:String.fromCharCode(65+i) + (options.length+1)
    })
  )
  .reduce((prev, next) =>
    Object.assign({

    }, prev ,{


      [next.position]:{

     v:next.title, key:next.key }
    }),{

    },
  )

  // 处理数据源
  const _data = datasource.map((item,i) =>
    headers.map((col,j) =>
      Object.assign({

    },{


        content:item[col.dataIndex],position:String.fromCharCode(65+j) + (options.length + i + 2)
      })
    )
  )
  .reduce((prev, next) => prev.concat(next))
  .reduce((prev, next) =>
    Object.assign({

    }, prev ,{


      [next.position]:{

     v:next.content}
    }),{

    }
  )

  const output = Object.assign({

    }, _options, _headers, _data);
  const outputPos = Object.keys(output); // 设置表格渲染区域,如从A1到C8

  // 设置单元格样式!!!!   仅xlsx-style生效,js-xlsx写了也不生效
  // 这里对每个单元格设置样式是写死的,每次改样式改都要改这里有点鸡肋
  output.A1.s = {


    font: {

     sz: 14, bold: true, vertAlign: true },
    alignment: {

     vertical: 'center', horizontal: 'center' },
    fill: {

     bgColor: {

     rgb: 'E8E8E8' }, fgColor: {

     rgb: 'E8E8E8' } },
  };
  output.A2.s = {


    font: {

     sz: 12, bold: true, vertAlign: true },
    alignment: {

     vertical: 'center', horizontal: 'bottom' },
  };
  output.A3.s = {


    font: {

     sz: 12, bold: true, vertAlign: true },
    alignment: {

     vertical: 'center', horizontal: 'bottom' },
  };
  output.A4.s = {


    font: {

     sz: 12, bold: true, vertAlign: true },
    alignment: {

     vertical: 'center', horizontal: 'bottom' },
  };

  // 合并单元格
  const merges = options.map((item,i)=> (
    {


      s: {

     c: 0, r: i },
      e: {

     c: headers.length-1, r: i },
    }
  ))

  const wb = {


    SheetNames: ['mySheet'],                // 保存的表标题
    Sheets: {


      mySheet: Object.assign({

    },
        output,                            // 导出的内容
        {


          '!ref': `${

      outputPos[0]}:${

      outputPos[outputPos.length - 1]}`, // 设置填充区域(表格渲染区域)
          '!cols': [...cloWidth],
          '!merges': [...merges]
        }
      ),
    },
  };

  // 这种导出方法只适用于js-xlsx,且设置的单元格样式不生效,
  // 直接打开下面这两行就行了,后面的可以省略
  // XLSX.writeFile(wb,`${fileName}.xlsx`);
  // return;

  /**
   * 以下这种导出方法对于js-xlsx/xlsx-style都适用
   * 区别在于import XLSX from 'xlsx-style';可以设置单元格样式
   * import XLSX from 'xlsx';不支持设置单元格样式
   *
   * new Blob转换成二进制类型的对象
   */
  const tmpDown  = new Blob(
    [
      s2ab(
        XLSX.write(
          wb,
          {

     bookType: type == undefined ? 'xlsx' : type.bookType, bookSST: false, type: 'binary' } // 这里的数据是用来定义导出的格式类型
        )
      ),
    ],
    {


      type: '',
    }
  );
  // 数据都准备完成,可以开始下载excel了
  downExcel(tmpDown , `${

      fileName + '.'}${

      type.bookType == 'biff2' ? 'xls' : type.bookType}`);
}


/**
 * <a>标签下载excel
 * @param { Blob对象:二进制的数据 } obj
 * @param { 文件名+文件类型后缀 } fileName
 */
function downExcel(obj, fileName) {


  const a_node = document.createElement('a');
  a_node.download = fileName;

  // 兼容ie
  if ('msSaveOrOpenBlob' in navigator) {


    window.navigator.msSaveOrOpenBlob(obj, fileName);
  } else {


    // URL.createObjectURL根据传入的参数创建一个指向该参数对象的URL. 这个URL的生命仅存在于它被创建的这个文档里.
    // 新的对象URL指向执行的File对象或者是Blob对象.
    a_node.href = URL.createObjectURL(obj);
  }
  a_node.click();

  // 每次调用createObjectURL的时候,一个新的URL对象就被创建了.即使你已经为同一个文件创建过一个URL.
  // 如果你不再需要这个对象,要释放它,需要使用URL.revokeObjectURL()方法.
  //  当页面被关闭,浏览器会自动释放它,但是为了最佳性能和内存使用,当确保不再用得到它的时候,就应该释放它.
  setTimeout(() => {


    URL.revokeObjectURL(obj);
  }, 100);
}

// 字符串转字符流---转化为二进制的数据流
function s2ab(s) {


  if (typeof ArrayBuffer !== 'undefined') {


    const buf = new ArrayBuffer(s.length);
    const view = new Uint8Array(buf);
    for (let i = 0; i != s.length; ++i) view[i] = s.charCodeAt(i) & 0xff;
    return buf;
  } else {


    const buf = new Array(s.length);
    for (let i = 0; i != s.length; ++i) buf[i] = s.charCodeAt(i) & 0xff;
    return buf;
  }
}

export default exportExcel;
第三步页面上响应导出
const handleExcel = () => {


  // 这里用的是模拟数据
  const headers = [
    {

    title:"学员名字",dataIndex:'name',width:140},
    {

    title:"联系方式",dataIndex:'phone',width:140},
    {

    title:"状态",dataIndex:'status',width:140},
    {

    title:"扣除课时",dataIndex:'deduct',width:100},
    {

    title:"已完成/总课时",dataIndex:'number',width:100},
  ]
  const datasource = [
    {

     name:"张三", phone:"12345678909", status:"已签到", deduct:1 ,number:"1/10" },
    {

     name:"李四", phone:"12345678909", status:"旷课",deduct:1 ,number:"1/10"  },
    {

     name:"王小二", phone:"12345678909", status:"请假", deduct:'-' ,number:"0/10"  },
    {

     name:"赵钱", phone:"12345678909", status:"已签到", deduct:1 ,number:"1/10" },
    {

     name:"孙李", phone:"12345678909", status:"已签到", deduct:1 ,number:"1/10" },
    {

     name:"马上飘", phone:"12345678909", status:"已签到", deduct:1 ,number:"1/10" },
  ]
  const options = [
    {

     title: "高三数学寒假冲刺班" },
    {

     title: "班级:火箭1班" },
    {

     title: "上课时间: 2020-11-11 14:30~16:30" },
    {

     title: "上课老师:苏大强" },
  ]
  const type = {

     bookType: 'xlsx', bookSST: true, type: 'binary', cellStyles: true };

  exportExcel(headers,datasource, options, type, "11月11日火箭1班签到表" );
}
补充:
数据量大的话不太建议使用。数据量越大导出越慢,导出1000条数据就几秒钟,但是导出1w条数据就要好几分钟,一度以为程序崩溃了。。。处理数据那部操作的就是疯狂循环,数据量过大建议把数据分开处理,如分几个Sheet导出,或者分个excel导出
以上就是全部内容,项目中可根据实际情况进行修改,有什么不足的地方也可以指出来~~