一 SVG介绍
1.1 SVG(Scalable Vector Graphics)是可缩放矢量图形的缩写,它是一种图形格式,其中形状在XML中指定, 而XML又由SVG查看器呈现。
1.2 SVG可以区别于位图,放大可以做到不模糊,可以做一些图标,按钮等绘制,但太复杂的话会导致渲染速度慢,占用内存大。适合简单的图形绘制。
1.3 SVG坐标系也是笛卡尔坐标系,和android绘制坐标系一眼,x=0,y=0点在左上角,与正常的图坐标系相比,y轴被反转。随着SVG中y的增加,点、形状等向下移动,而不是向上。坐标系单位默认是像素px,还可以选择其它单位:
em The default font size - usually the height of a character.
ex The height of the character x
px Pixels
pt Points (1 / 72 of an inch)
pc Picas (1 / 6 of an inch)
cm Centimeters
mm Millimeters
in Inches
1.4 SVG元素也非常多,如rect,circle,line,path,text等。但android只支持path,由坐标数据描述点和线的位置
<svg xmlns="http://www.w3.org/2000/svg"
  xmlns:xlink="http://www.w3.org/1999/xlink">

  <svg x="10">
    <rect x="10" y="10" height="100" width="100"
        style="stroke:#ff0000; fill: #0000ff"/>
  </svg>
  <svg x="200">
    <rect x="10" y="10" height="100" width="100"
        style="stroke:#009900; fill: #00cc00"/>
  </svg>

</svg>
二 android种svg的使用
2.1 上面说了android支持path元素的绘制,而path里面包含以下元素:
m|M = moveto 移动到某点。
l|L = lineto 画一条直线到某点。
h|H = horizontal lineto 画一条水平线到某点。
v|V = vertical lineto 画一条垂直线到某点。
q|Q = quadratic Bézier curveto 二次贝塞尔曲线
t|T = smooth quadratic Bézier curveto 平滑二次贝塞尔曲线
c|C = curveto 三次贝塞尔曲线
s|S = smooth curveto 平滑三次贝塞尔曲线
a|A = elliptical Arc 弧形
z|Z = closepath 从结束点到开始点画一条直线,形成一个闭合的区域。
注意:大写表示绝对位置(窗口x=0,y=0的位置),小写表示相对位置(自身的位置)
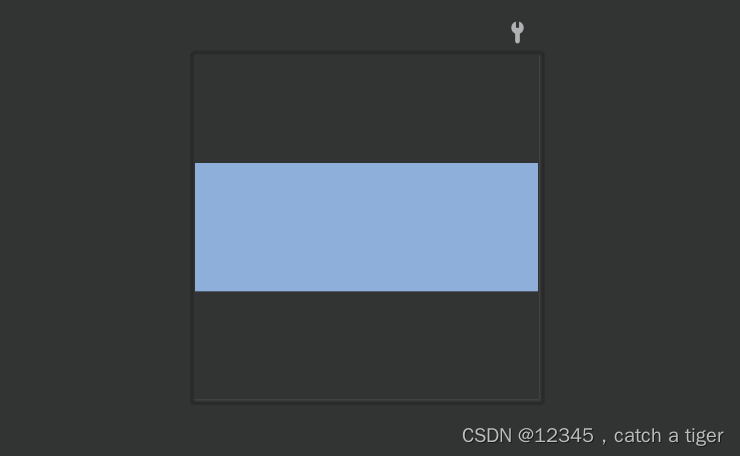
2.2 Android种SVG的使用,绘制矩形示例
<vector xmlns:android="http://schemas.android.com/apk/res/android"
    android:width="160dp"
    android:height="60dp"
    android:viewportWidth="160"
    android:viewportHeight="60">
    <path
        android:pathData="M0,0
        L160,0
        L160,60
        L0,60
        L0,0Z"
        android:fillColor="#8fafdb"/>
</vector>
<!--
M0,0 移到(0,0)点开始绘制 左上角
L160,0 画线(0,0)坐标到(160,0)坐标 右上角
L160,60 画线(160,0)坐标到160,60)坐标 右下角
L0,60 画线(160,60)坐标到(0,60)坐标 右下角
L0,0Z 画线(0,60)坐标到(00)坐标 左上角闭合
-->
2.3 绘制尖头矩形
<vector xmlns:android="http://schemas.android.com/apk/res/android"
    android:width="160dp"
    android:height="60dp"
    android:viewportWidth="160"
    android:viewportHeight="60">
    <path
        android:fillColor="#8fafdb"
        android:pathData="M0,30
        L20,0
        L140,0
        L160,30
        L140,60
        L20,60
        L0,30Z" />
</vector>
<!--
M0,30 移到(0,30)点开始绘制 左上角
L20,0 画线(0,30)坐标到(20,0)坐标 右上角
L140,0 画线(20,0)坐标到(140,0)坐标 右中间
L160,30 画线(140,0)坐标到(160,30)坐标 右下角
L140,60 画线(60,30)坐标到(L140,60)坐标 左下角
L20,60 画线(140,60)坐标到(20,60)坐标 左中间
L0,30Z 画线(0,60)坐标到(0,30)坐标 右上角闭合
-->
2.3 绘制圆角矩形
<vector xmlns:android="http://schemas.android.com/apk/res/android"
    android:width="160dp"
    android:height="60dp"
    android:viewportWidth="160"
    android:viewportHeight="60">
    <path
        android:pathData="M10,0
        L150,0
        A10,10 0 0 1 160,10
        L160,10
        L160,50
        A10,10 0 0 1 150,60
        L150,60
        L10,60
        A10,10 0 0 1 0,50
        L0,50
        L0,10
        A10,10 0 0 1 10,0
        L10,0Z"
        android:fillColor="#8fafdb"/>
</vector>
<!--
M0,0 移到(0,0)点开始绘制 左上角
L150,0 画线(0,0)坐标到(150,0)坐标 右上角
A10,10 0 0 1 160,10 绘制一个起点(150,0),半径10,角度0,大弧1,顺时针1,终点(160,10)的圆角
L160,10
L160,50 画线(160,10)坐标到(160,60)坐标 右下角
A10,10 0 0 1 150,60 绘制一个起点(160,60),半径10,角度0,大弧1,顺时针1,终点(150,60)的圆角
L150,60
L10,60 画线(150,60)坐标到(10,60)坐标 左下角
A10,10 0 0 1 0,50 绘制一个起点(10,60),半径10,角度0,大弧1,顺时针1,终点(0,50)的圆角
L0,50
L0,10 画线(0,50)坐标到(0,10)坐标 左下角
A10,10 0 0 1 10,0 绘制一个起点(0,10),半径10,角度0,大弧1,顺时针1,终点(10,0)的圆角
L10,0Z 画线(10,0)坐标到(10,0)坐标 左上角闭合
-->2.4 绘制圆形。注意:开始坐标和结束坐标一样会绘制不上,所以结束坐标要错开点坐标
<vector xmlns:android="http://schemas.android.com/apk/res/android"
    android:width="160dp"
    android:height="160dp"
    android:viewportWidth="160"
    android:viewportHeight="160">
    <path
        android:pathData="M0,80
        A80,80
        0
        1
        1
        0,80.00001Z"
        android:fillColor="#8fafdb"/>
</vector>
<!--
pathData="
M x y
A rx ry
x-axis-rotation
large-arc-flag
sweep-flag
x y"
M0,80 移到(0,80)点开始绘制,顶部中间位置,rx ry 分别是是椭圆的x轴半径和y轴半径
A80,80 画弧度(80,80) X方向半径,和Y方向半径
0 x-axis-rotation 是椭圆相对于坐标系的旋转角度
1 large-arc-flag 是标记绘制大弧(1)还是小弧(0)部分。
1 sweep-flag 是标记向顺时针(1)还是逆时针(0)方向绘制。
0.00001,80.00001Z x y是圆弧终点的坐标,由于坐标重合不能绘制,所以要偏移一点坐标
-->
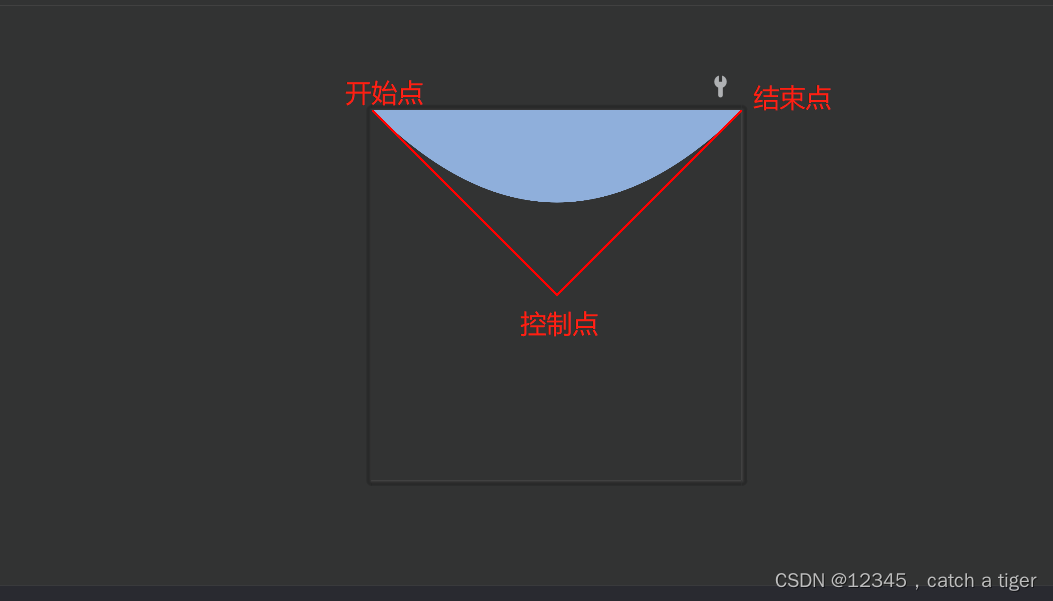
2.5 绘制一次贝塞尔曲线
<vector xmlns:android="http://schemas.android.com/apk/res/android"
    android:width="160dp"
    android:height="160dp"
    android:viewportWidth="160"
    android:viewportHeight="160">
    <path
        android:pathData="M0,0
        Q 80,80 160,0
        "
        android:fillColor="#8fafdb"/>

    <!-- 辅助查看的线(斜率) -->
    <path
        android:pathData="M0,0
        L80,80 160,0"
        android:strokeColor="#ff0000" android:strokeWidth="1"/>

</vector>
<!--
pathData="="Q x1 y1, x y" // 控制点 (x1,y1),终点 (x,y) 大写Q绝对位置 小写q相对位置
-->红色是辅助线
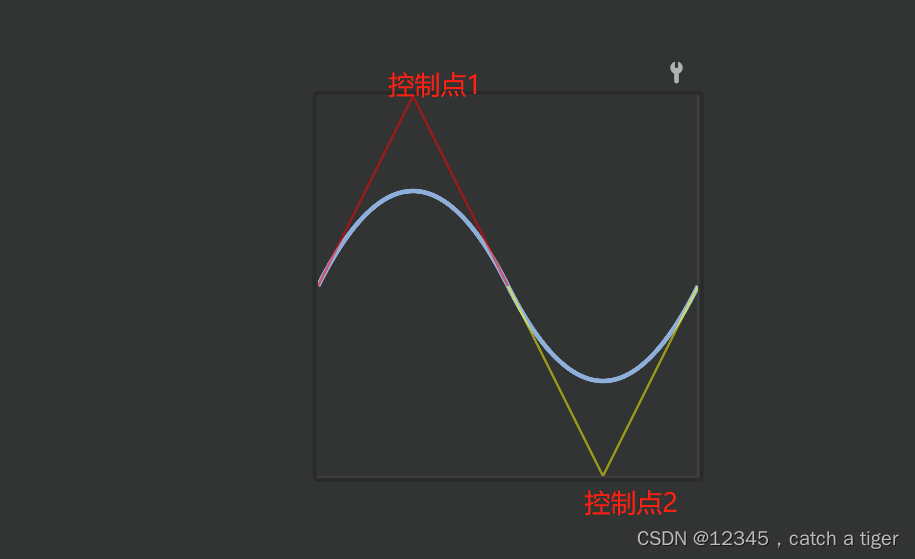
2.5 绘制二次贝塞尔曲线
<vector xmlns:android="http://schemas.android.com/apk/res/android"
    android:width="160dp"
    android:height="160dp"
    android:viewportWidth="160"
    android:viewportHeight="160">
    <path
        android:pathData="M0,80
        Q 40,0 80,80
        T160,80"
        android:strokeColor="#8fafdb" android:strokeWidth="2"/>

    <!-- 辅助查看的线(斜率)1 -->
    <path
        android:pathData="M0,80
        L40,0 80,80"
        android:strokeColor="#ff0000" android:strokeWidth="1" android:strokeAlpha="0.5"/>

    <!-- 辅助查看的线(斜率)2 -->
    <path
        android:pathData="M80,80
        L120,160 160,80"
        android:strokeColor="#ffff00"  android:strokeWidth="1" android:strokeAlpha="0.5"/>
</vector>
<!--
pathData="="Q x1 y1, x y" // 控制点 (x1,y1),终点 (x,y) 大写Q绝对位置 小写q相对位置
pathData="Q x1 y1, x y T x y" // 终点 T(x y),控制点通过前面的Q命令计算得出
-->